| Report Type | Full |
| Peak(s) |
Little Bear Peak - 14,041 feet |
| Date Posted | 07/20/2024 |
| Modified | 08/11/2024 |
| Date Climbed | 07/13/2024 |
| Author | daway8 |
| Additional Members | mindfolded, Joey_parm |
| West Ridge Indirect |
|---|
|
This report is intended to help flesh out and evaluate the Hourglass bypass route first proposed by CaptainSuburbia. As such, the vast majority of this report will focus on the tiny bit near the end where this West Ridge Indirect route diverges from the standard "West Ridge and Hourglass" route. Ten cent overview: this route should be considered class 4 (if only for a move or two) and trades the hair raising rockfall risk of the Hourglass for some brief but eye-popping exposure on a ridge plus some slightly more tricky route-finding. If you're ok with that kind of trade-off then this could be a very viable alternative to the Hourglass for you. If you're terrified of heights, you're better off trying to do the Hourglass early on a weekday to hopefully avoid people knocking rocks on you. UPDATE: After writing this TR I had some discussions with CaptainSuburbia who provided some useful insight. I’m adding a tidbit here plus a combo photo and more feedback below in the middle of the Gaining the Ridge section. Feedback from CaptainSuburbia: “Just a heads up. You crossed over to standard well below where I did. There should've just been an easy ledge that dumps you out onto standard with no orange rock or chockstone to climb. Your path seemed to work fine albeit a little more difficult and possibly harder to find on descent.” Included in this report will be:
Trailhead: Lake Como (Blanca Peak) Trailhead (I started from 9,500ft, the other two started from camp at Lake Como) Route: West Ridge Indirect (as pioneered by CaptainSuburbia) Difficulty: Class 4* Exposure: Extreme (Think of a really short version of the Knife Edge on Capitol but tilted up, though with large, chunky, very solid holds, albeit with a potential move or two of class 4 to get up (some may consider it class 3 - see *note below). Fatal exposure on both sides. Easy climbing but potentially intimidating for those bothered by exposure. Rockfall: Moderate (The number one advantage of this route vs the Hourglass - the rock funnel above the Hourglass is perhaps the single most treacherous feature on any 14er** - anyone knocking a large enough rock into it can take you out in the blink of an eye) Route-Finding: High(er) (it seems overkill to rank the route-finding as extreme, but the Hourglass route is ranked as "high" and it's harder to navigate this route than the Hourglass, plus you risk wandering into highly exposed class 5 terrain if you get too far off) Commitment: High (basically comparable to the Hourglass route in this category except perhaps that it might be slightly more challenging to quickly bail near the top due to route-finding with the above mentioned risk of nearby class 5 terrain) (*In regards to class 4 ranking: this has been a point of discussion/debate on this route. Even CaptainSuburbia at different times has called it class 3 and elsewhere said there were "occasional (maybe 2 or 3) class 4 moves." Likewise, I have in other reports referred to some of the sections here as class 3 but based on re-evaluating and consulting with my partners this time have instead settled on class 4. All this is to say that ranking difficulty is slightly subjective and the actual difficulty encountered can vary if you take a slightly different line and certain moves can seem harder based on how tall/short you are. But there have now been multiple voices chiming in on various trip reports, condition reports, etc and the general consensus seems to be settling in on there being at least a move or two of class 4 you will need to do on this route. Since routes are ranked by their hardest move, that makes this a class 4 route) ** I am endeavoring to strike that delicate balance between neither overly dramatizing nor downplaying the possible dangers - some people have died on this mountain. So my descriptions will be blunt where danger is possible. At the time of this writing I have done 373 summits (counting repeats) on Colorado's 13ers/14ers, including doing most of the 14ers at least twice. Among that is included several class 5 peaks/routes (including CoffeePot and Teakettle) along with the ridge direct variation of the El Diente - Wilson Traverse (including PinPoint), mostly ridge direct Bells Traverse - and immediately after this summit, the Little Bear - Blanca Traverse (more to come on that in another TR...). Out of all of those climbs, the Hourglass on Little Bear remains the single most freaky portion of any mountain I've been on for the one solitary reason of the huge funnel of loose rocks lurking over the Hourglass which funnel down into it. Anybody who did not experience rockfall in the Hourglass will likely think that route is pretty tame and easy. Anyone who had large rocks rip past their heads near that small funnel point will remember it for the rest of their life. The climbing in the Hourglass is overhyped, in my opinion. The rockfall danger will be considered overhyped... by anyone who has not experienced it). Our Team: Joey_parm (Joe) who organized this expedition with a post on the forum; mindfolded (Jay) who provided some excellent supplemental documentation and gave me permission to add his photos and comments to this trip report (I'll call out whenever I'm using photos or quotes from them) and daway8 (David) - that's me! I had been saying for years that I was going to check this route out, and when I saw Joe's post at the last minute just before the weekend and saw how perfect the forecast was, I texted him last minute to alert him that I might come join them if I could get there fast enough. 
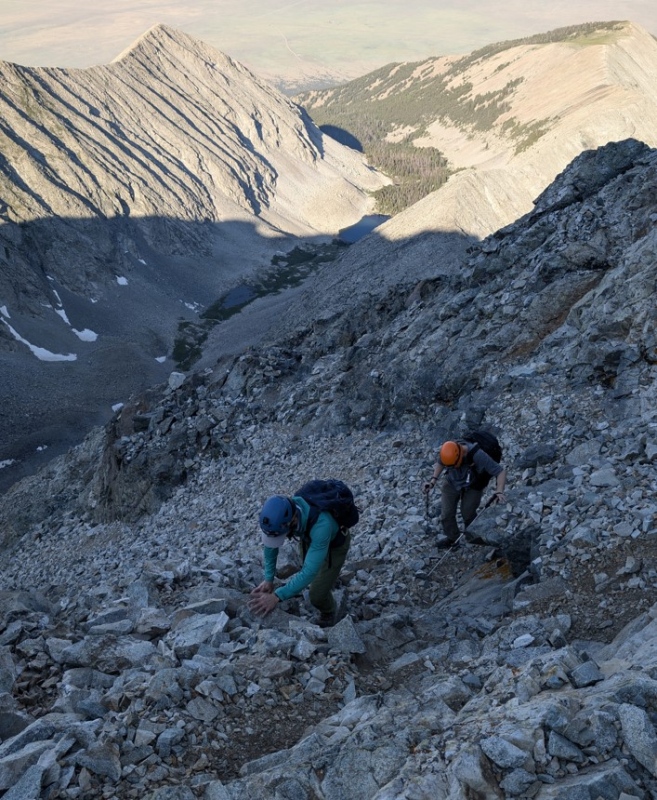
Links I would be remiss to not give proper credit to CaptainSuburbia for scoping out this route and writing up a couple trip reports about it. I'll give brief blurbs about his reports and a couple other Little Bear reports worth mentioning. So CaptainSuburbia first detailed this route in his TR Little Bear West Ridge to Blanca and Hamilton where he gave just enough tantalizing detail to float the idea but didn't really flesh out the details in great depth. Later he wrote another TR called Little Bear - Circumnavigating The Hourglass This TR has a lot of good photos with some useful landmarks to navigate by and offers a bit more in the way of specifics but still wasn't quite up to the neurotic level of detail I like to provide, lol. A ways after that, I did the West Ridge Direct route and took a couple notes on where the two routes meet. I put up a high level of detail on the West Ridge Direct route here: Wrestling with Bears: West Ridge Direct plus South Little Bear Though not directly pertinent to the routes discussed here, ellenmseb did a great write-up with links to other write-ups about the NW Face route which I only allude to since I've yet to do that route or the SW Ridge route. That TR is Finishing the Great Traverses with much love for Cottonwood approach. Route Comparisons West Ridge and Hourglass (standard route) - This is the easiest route to follow. It is the least exposed route. It's also much easier to get decapitated by rockfall since there is a huge funnel of loose rocks above the Hourglass and anything knocked loose will inevitably funnel down through the one tiny spot you have to climb up through (that shape is why it's called the Hourglass). The climbing is class 4. Experienced climbers find it pretty easy. Many folks without climbing experience find it intimidating. Some use a rope to rappel down. West Ridge Direct - This is the most fun route of the 3 (I haven't done the NW Face yet, to compare to...). It is wickedly exposed on both sides much of the way. Largely class 2 and 3 but some class 4 and probably at least a sprinkling of class 5 depending on your exact line. Almost no rockfall danger (well not for you at least - but be careful about people below you on the standard trail - the rock is mostly solid but there are always loose ones lurking here and there). This is a great warm-up for the Little Bear - Blanca Traverse (I'll be making a separate report for that...) West Ridge Indirect - This follows the standard route 90% of the way and veers off just before the Hourglass. Trades the rockfall hazard of the Hourglass for brief but epic exposure on the ridge. Mostly steep loose class 2 to the ridge with some occasional class 3 but will likely hit a move or two of class 4 on the ridge, depending on your exact line. Crux is a bit awkward to downclimb, but could easily go down the Hourglass if you decide not to backtrack. Shorter than the SW Ridge which is the other main option to the Hourglass route for those wanting to avoid rockfall and serious climbing. Who Should Do Which Route? Can't quite decide which route to take? Here are some of my slightly tongue-in-cheek recommendations: Experienced climbers: take the West Ridge Direct - it's much more fun than the other two! Those wanting a warm-up for the LB-B Traverse: take West Ridge Direct - if you can't handle the exposure and moves on this section, then turn around at the summit! See LB-B Traverse via West Ridge Indirect for my Traverse write-up. Those wanting to conserve energy (physical and mental) for the LB-B Traverse: take West Ridge Indirect - it bypasses some of the hardest scrambling and shortens the exposure time, giving a foretaste of the Traverse without expending too much energy. Those who don't want class 5 or significant rockfall risk: take West Ridge Indirect - there's only a move or two of class 4 and comparatively minimal rockfall danger (but still bring a helmet just in case!). Those who want the full 14er experience: take the standard Hourglass route - the rockfall potential is horrifying on a crowded weekend but it's such an iconic part of 14er lore that my 14er journey wouldn't have felt complete without tasting it... Those who want an opportunity for instant decapitation: take the standard Hourglass route on a busy holiday weekend - you'll think I'm way overdoing the rockfall hype, but check out my earlier TR, Little Bear, Big Finish, for the backstory on why Hourglass rockfall has left such a permanent impression on my mind (but thankfully not my skull...). Look for the large bold section about halfway down titled "Rockfall in the Hourglass." If you were lucky enough to have done the Hourglass without experiencing rockfall then you're likely rolling your eyes by now, if you're even still reading at this point. But if you too have heard the sound rocks make in mid-air - yes, they make sound in mid-air when they're going fast enough - then you'll be nodding your head. Starting the Route So this route begins and ends - and follows for most of the journey, exactly where the Hourglass route goes. You still have to deal with that incredibly heavy duty 4WD Lake Como road - either by driving to 8,800ft with decent clearance or possibly making it to 10k with good clearance 4WD, maybe a bit higher if you're really adventurous or taking on the Jaws obstacles if you're crazy and have an amazing rig! Otherwise, you walk from wherever you stop driving. If you didn't camp at Lake Como you'll have to hike on past there, up that annoying first gully (stay to the edges of the cliffs on the right for a little more stable rock) and then follow the standard route until the Hourglass is almost in sight. The turnoff for West Ridge Indirect is so close to the point where you turn to go up the Hourglass that we had to call off several folks to warn them that we were not taking the standard route up the Hourglass. 
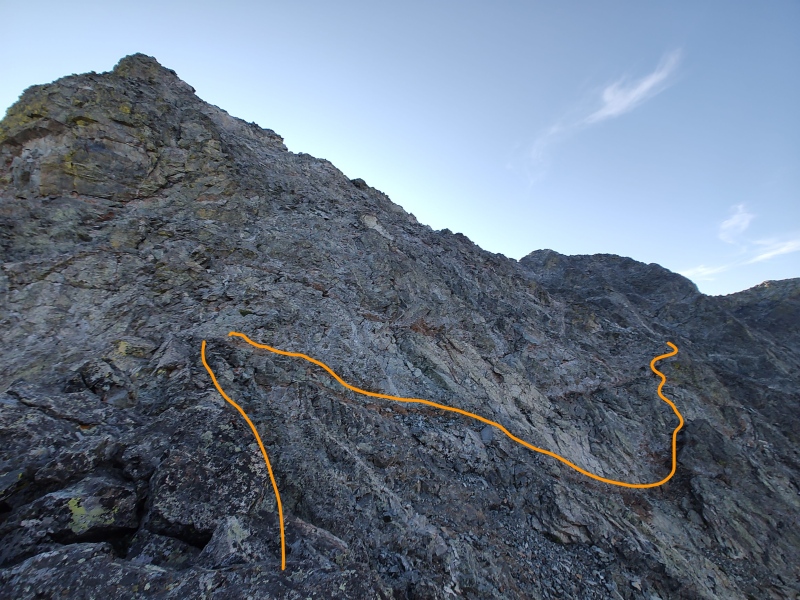
West Ridge Indirect Turnoff To help visualize how close these routes are to each other, check out the photo below where I sketch in the approximate path for the West Ridge Indirect vs the Hourglass route. Note some useful landmarks - the Hourglass has the Black Claw above where you turn to go up, while West Ridge Indirect has the Black Wall at somewhere around 13,100ft where you turn to go up (kicking myself for not dropping a waypoint with the exact elevation). There are also a pair of rock humps on the ridge that will provide a general directional marker, even though you won't be aiming to gain the ridge right at those features. 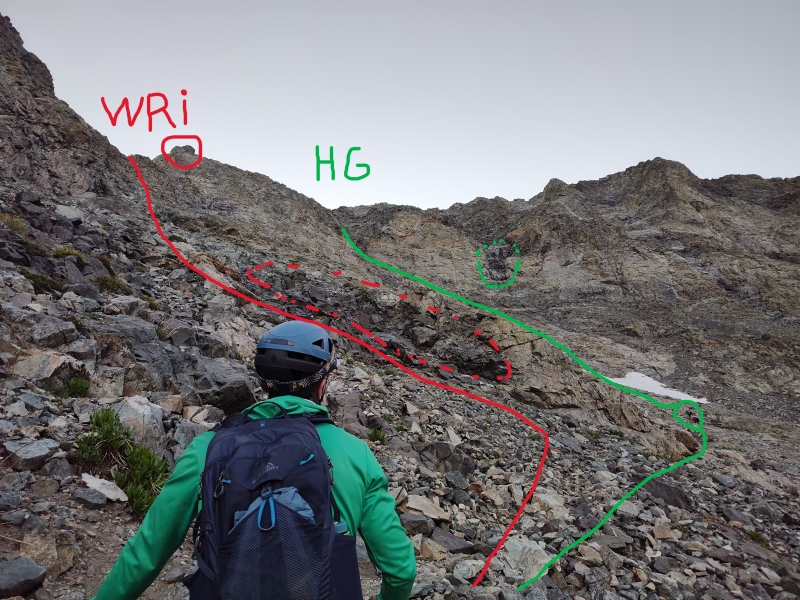
After turning at the Black Wall a little above 13,100ft, we then spotted a rock formation from CaptainSuburbia's writeups that I couldn't resist calling "Bird Poop Rock." Despite the juvenile name, this rock feature is not something that will wear away - at least probably not for many decades, barring being covered by rockslides. It's an actual band of different colored rock embedded in the rock around it. Additionally, the two rock humps above are still visible as a general directional guide. 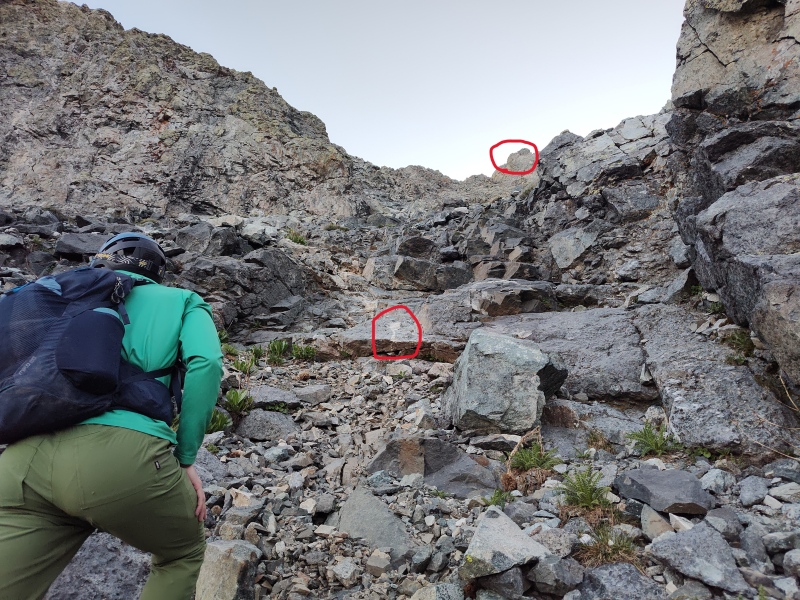
Next we came to what someone on the team called the Rusty Staircase (or Iron Staircase). This is perhaps a more fleeting landmark as it relies on the color of the lichen on the rocks - which in this section is red instead of the yellow color seen in other regions not far off. Again the two rock humps continue to provide a general direction to target. 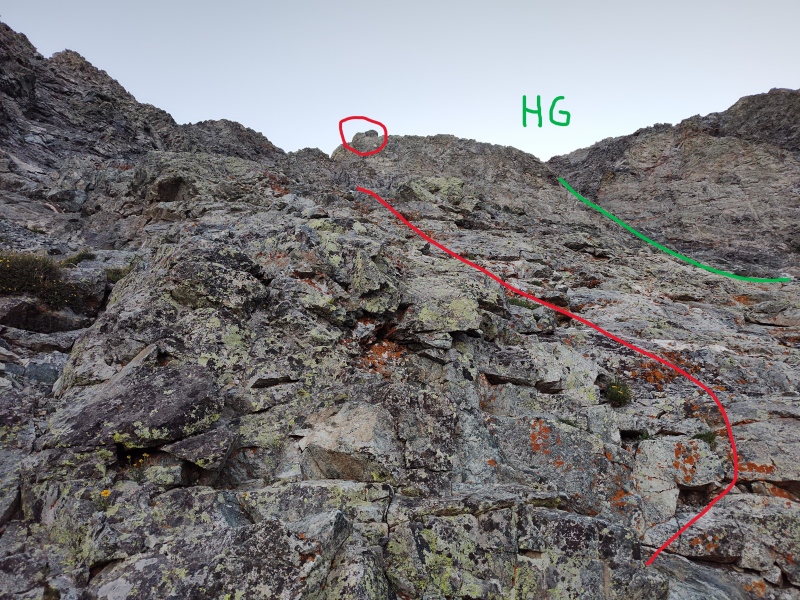
I think we swung a little more to the right than what CaptainSuburbia's route showed - we were heading pretty much right for the two rock humps but then had to cut left to realign with his tracks. 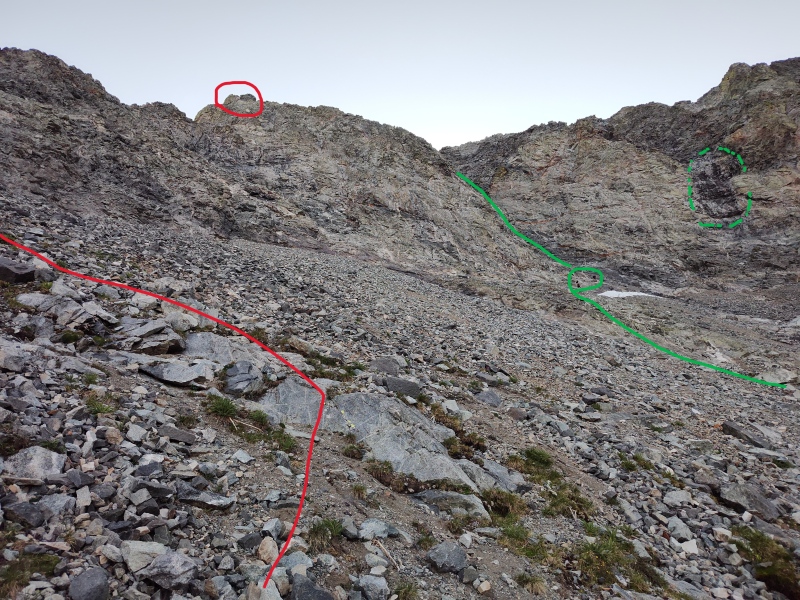
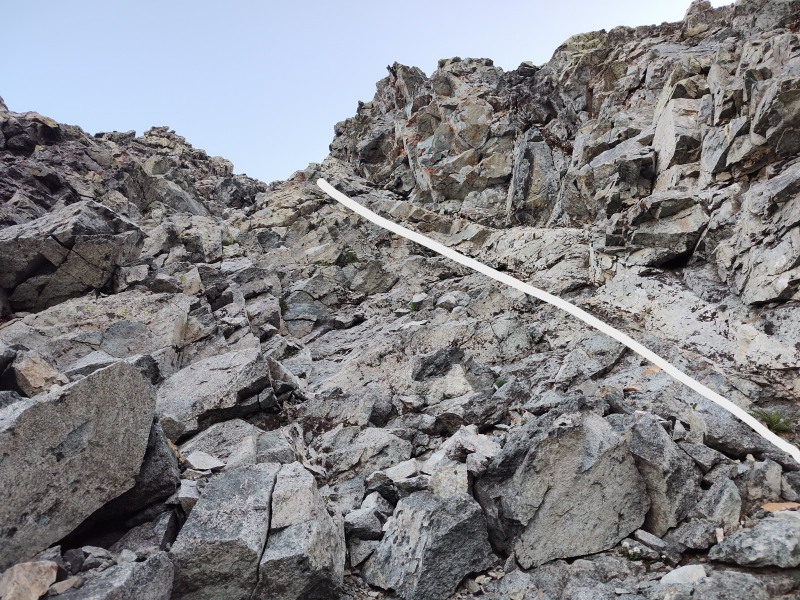
After turning left, we spotted a band of white rock that I ended up calling the Nike Swoosh because of the shape (albeit upside-down) that was soon to come into view (with perhaps a little imagination). 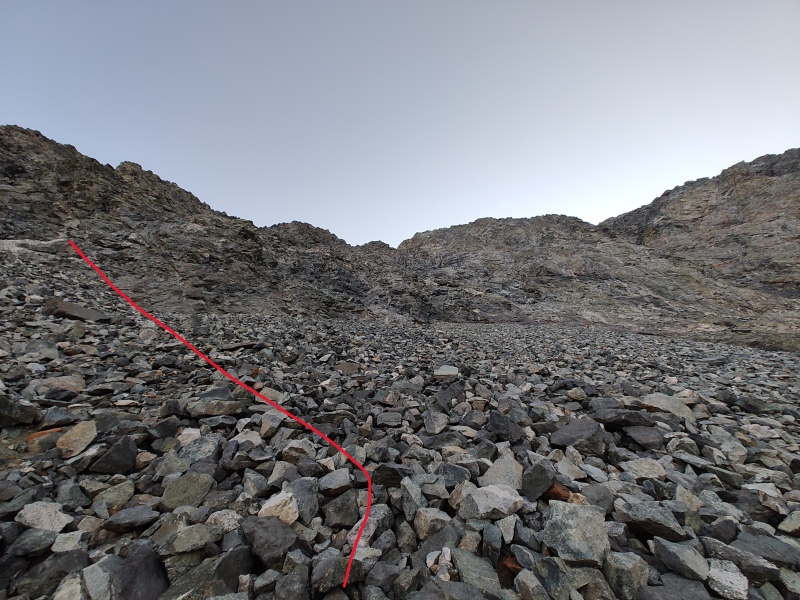
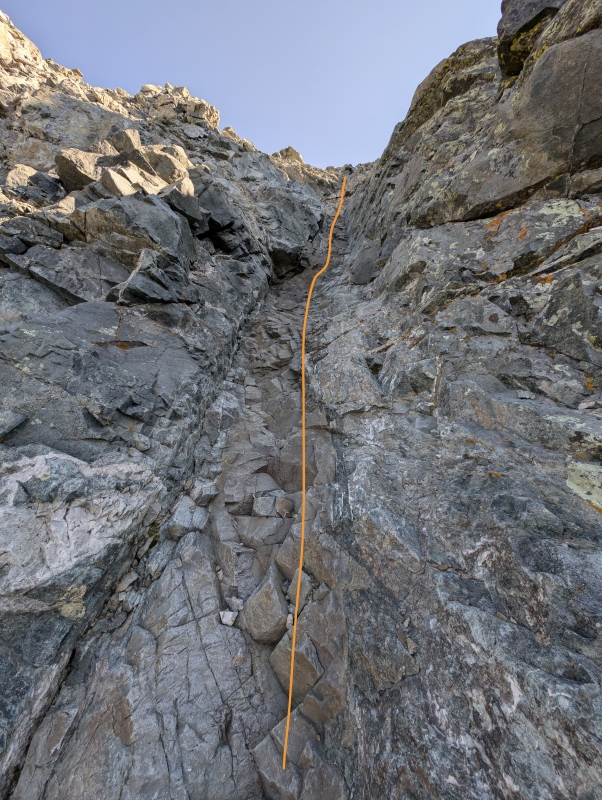
If you're not at the right angle (or lack sufficient imagination) you might have trouble seeing the Swoosh. But it shows up in CaptainSuburbia's images too and between the white rock bands and the features above on the ridge, you can hopefully match something, so I'll give a series of photos here as this is where the trail starts to have a few bits of class 3 sprinkled in (and you could probably ramp up the difficulty if you veered to the side). 
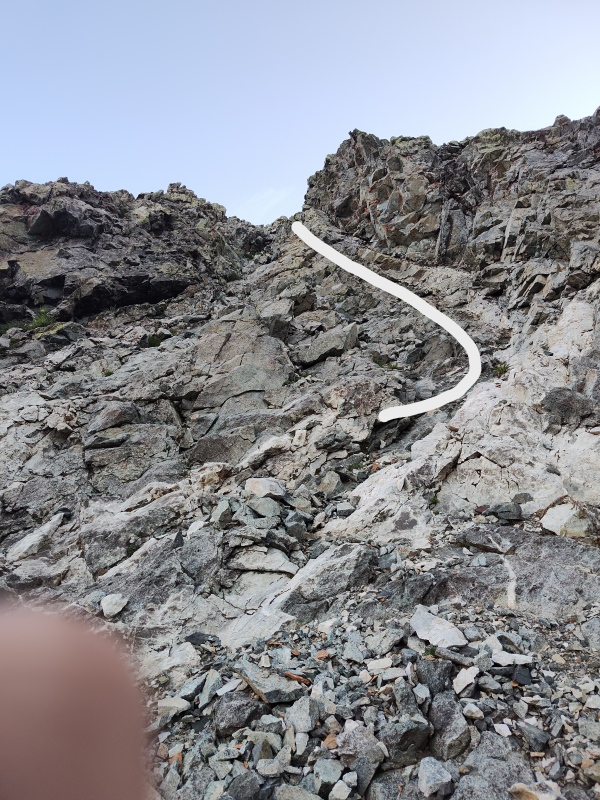
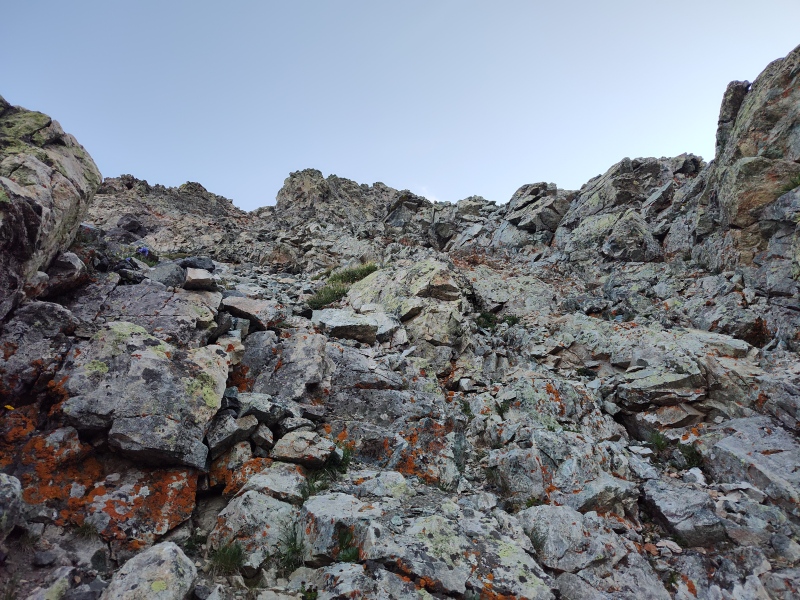
Comment from Jy: “This is looking up the "Nike Swoosh" on our ascent. There's a very distinct rock at the top to help you find the right gulley on the way down.” 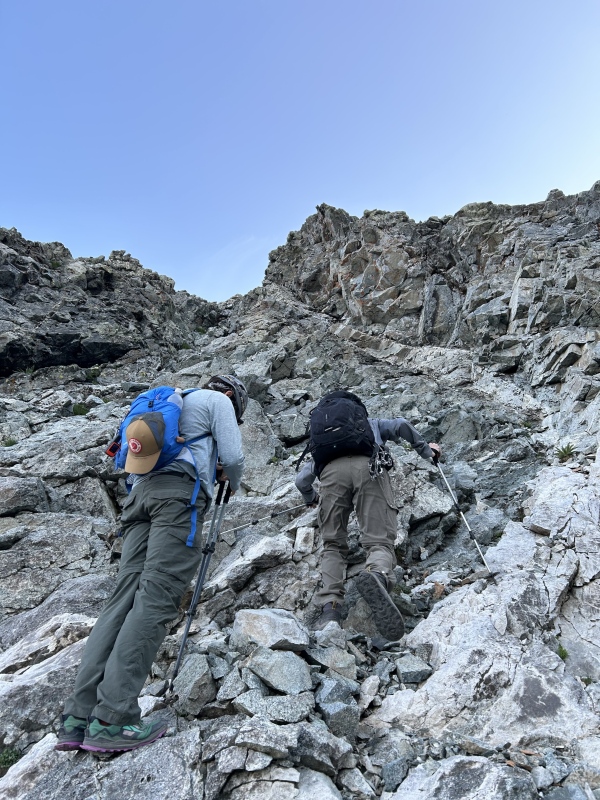
Comment from Jay: “This is the distinct rock used to find the Nike Swoosh gulley on the way down.” 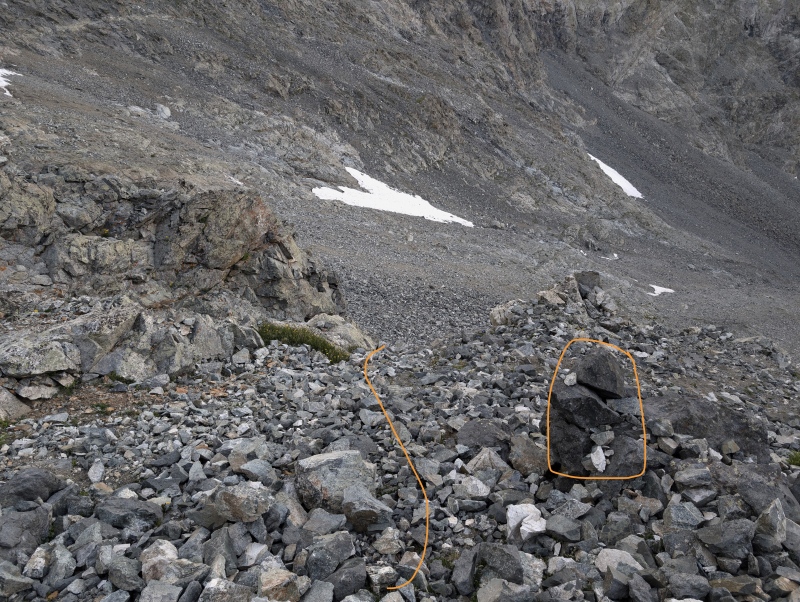


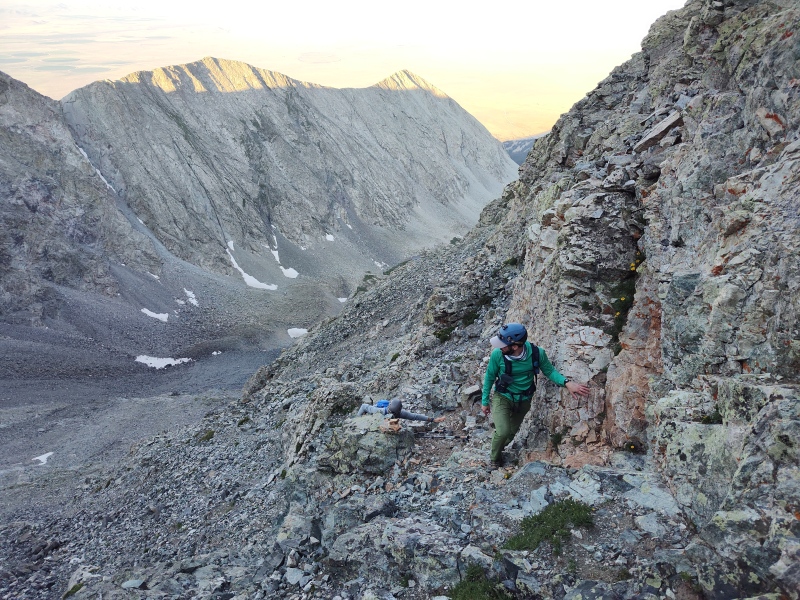
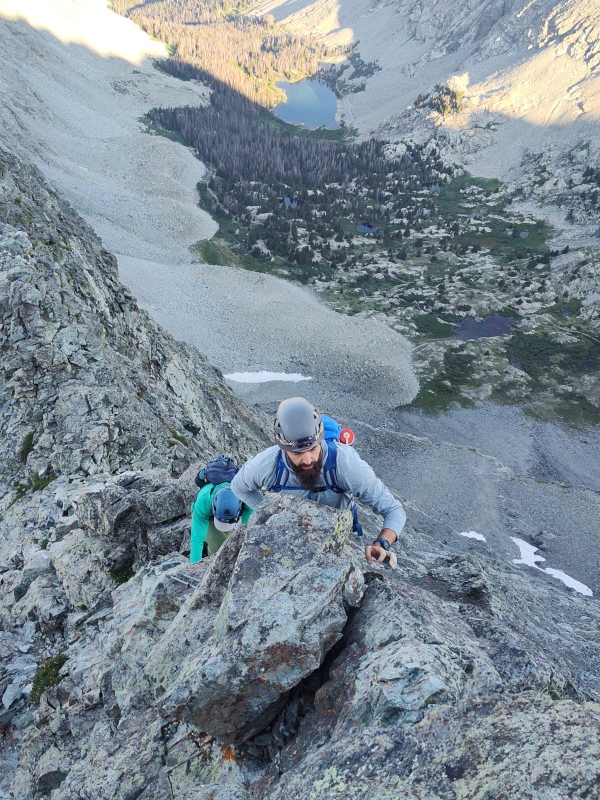
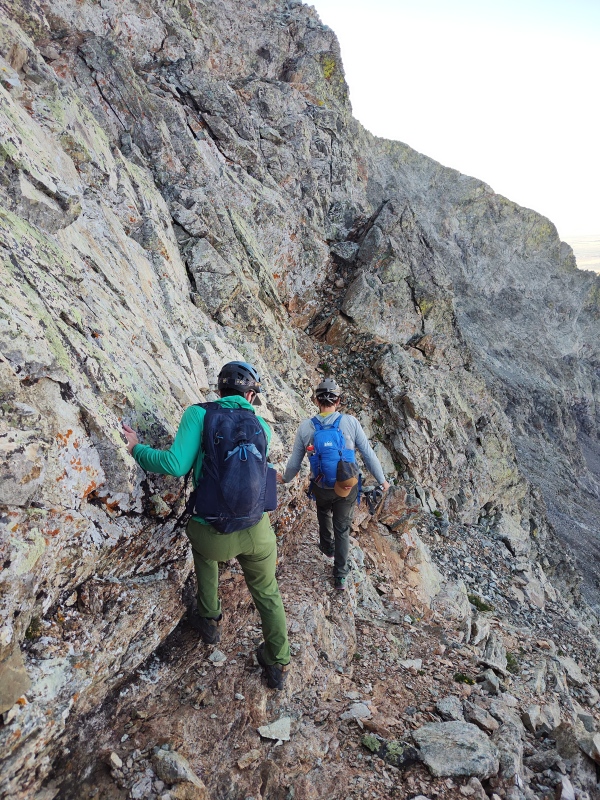
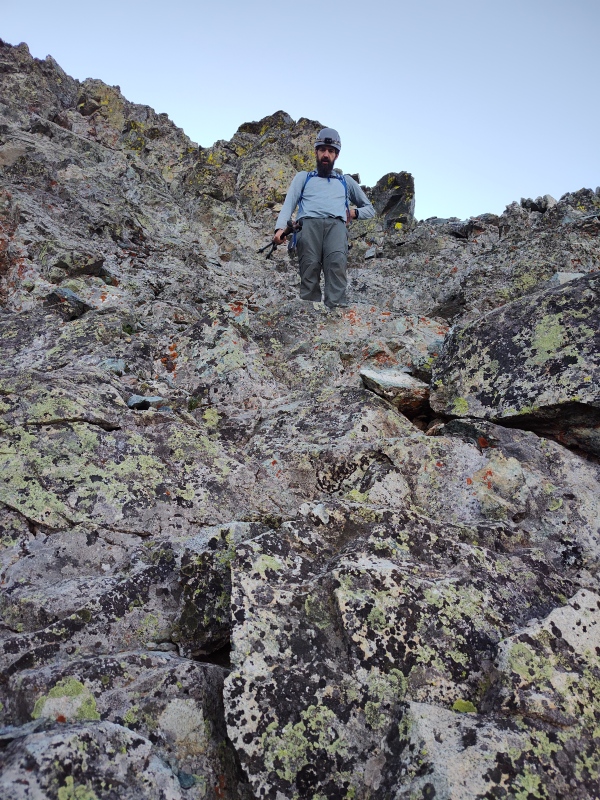
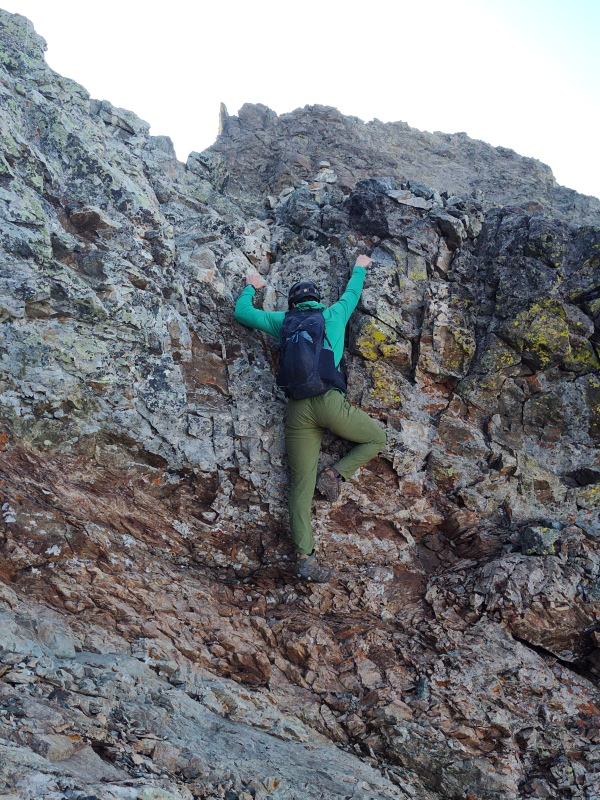
Gaining the Ridge Up to here the route is a little steep at times but not really what I would consider all that exposed. That's about to change tremendously as you top out at or near the Catwalk and exposure instantly goes to 100% on both sides - even having done the West Ridge Direct route before it was a little bit of a shocking transition to pop up onto the ridge and have such instant, dramatic exposure! Anyone who is afraid of heights will NOT like this route and is probably better off taking their chances with rockfall in the Hourglass. 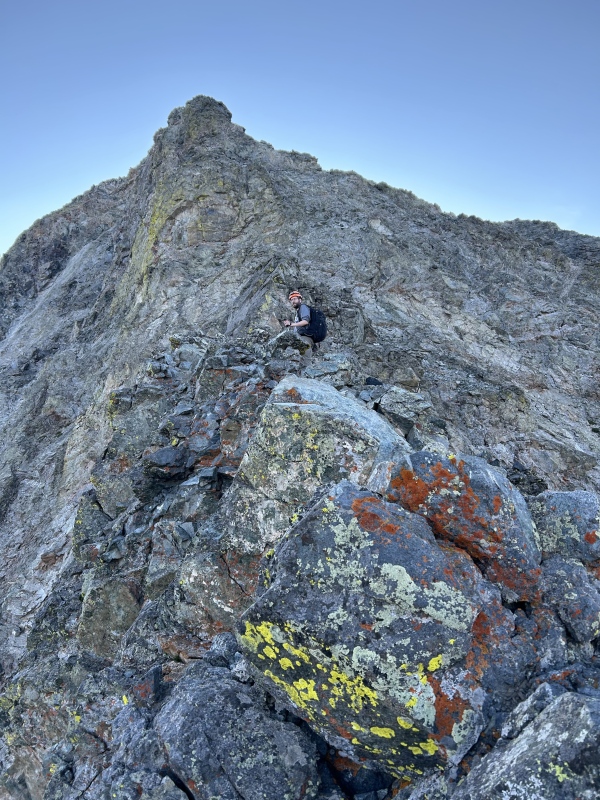

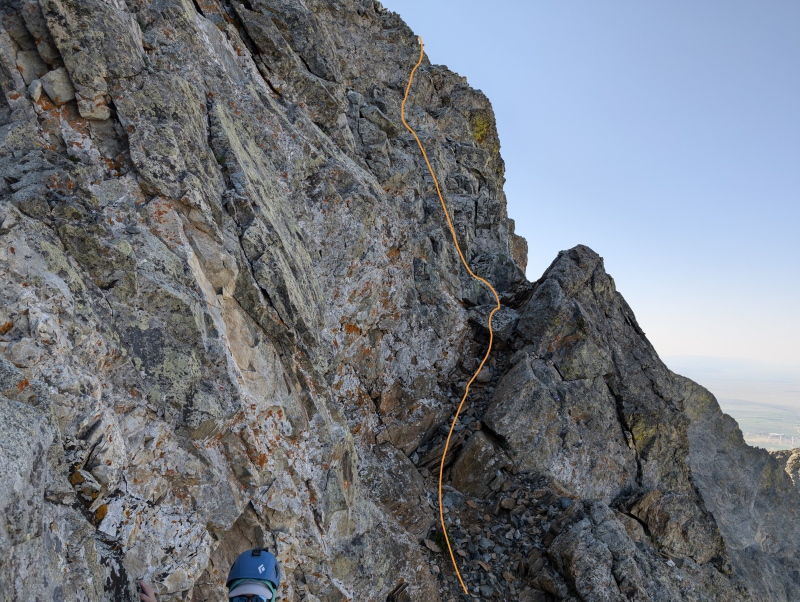
The biggest challenge, other than the highly exposed crux move on a very solid section that in Sept 2022 I dubbed the "Chunky Fin" because of it's fin like shape but large, chunky holds - your main challenge then becomes route-finding. If you continue ridge proper you will encounter class 5 climbing including a very intimidating headwall! So you need to swing to the right if you want to keep things mostly class 3 to the summit. If you swing too far right you'll end up on exposed, loose cliffs. If you don't go far enough to the right then you'll be going up class 4 or even class 5 walls. A decent middle ground is a band of orange rock guiding you to a chockstone squeezed in between the rock face and a jutting rock feature. Jay's comment here is: “The chockstone is the key to starting the traverse around the headwall. Take the loose orange ramp down to the chockstone. Climb over the chockstone and up to hiker's left.” UPDATE: per the comments by CaptainSuburbia in the update at the start of the TR, there is reportedly an easier way to get to the summit without following this orange rock band to the chockstone. I’ll include another quote from him and a conglomerate photo illustrating the area - see the Links section near the start of this report to get to the original photos. Unfortunately, I’ve not yet been able to conclusively pinpoint this spot in a zoomed out image – maybe on some future trip… From CaptainSuburbia: “Yes, there is a landmark where I turned. It's the gash at 13737 as mentioned in your west ridge direct report. My route goes right to the base of that and turns. On the descent part of my second trip report there is a pic of it as I pass by. Also, my first report has a pic of it with my buddy looking up it. We had fully intended to climb it that day until I found the escape ledge to the Southwest face. Also, on my second report there is a pic entitled "ledges" showing my group at the base of the gash and the pic before is a pic of the ledges that I took while standing at the base of the gash. It's a pretty easy stroll from the gash to the southwest face. In both my reports I call it a headwall/chimney.” 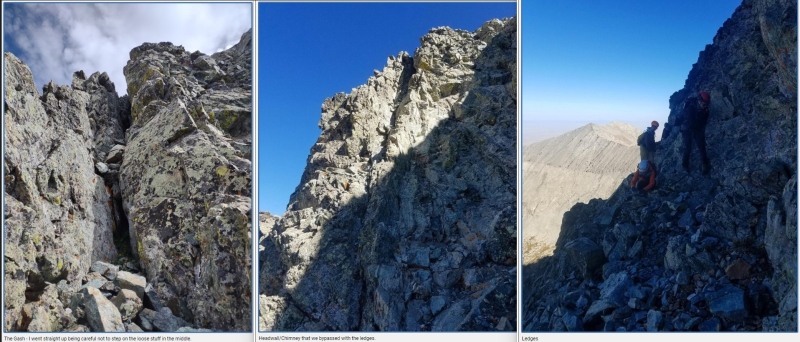
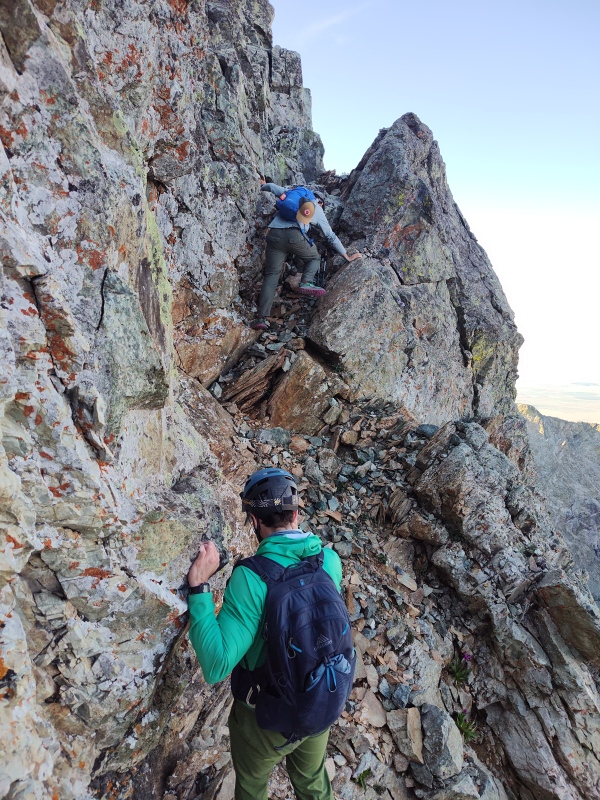
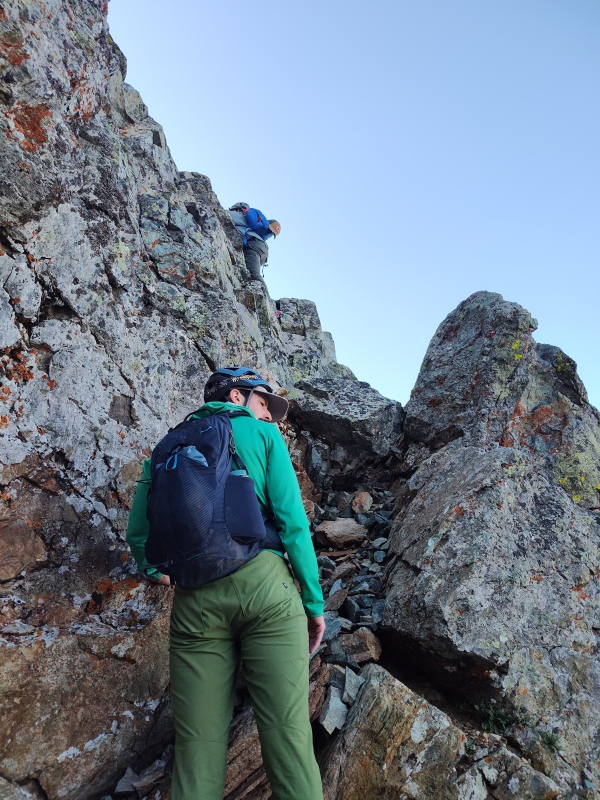
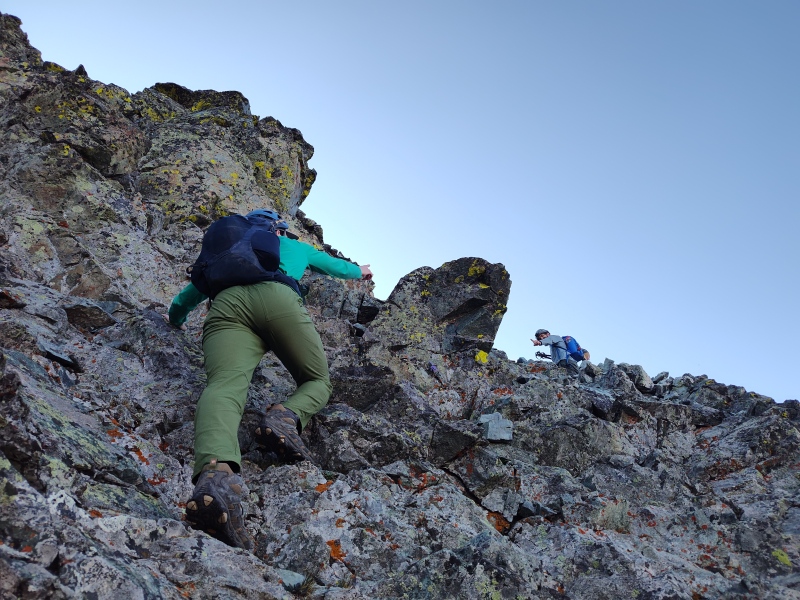
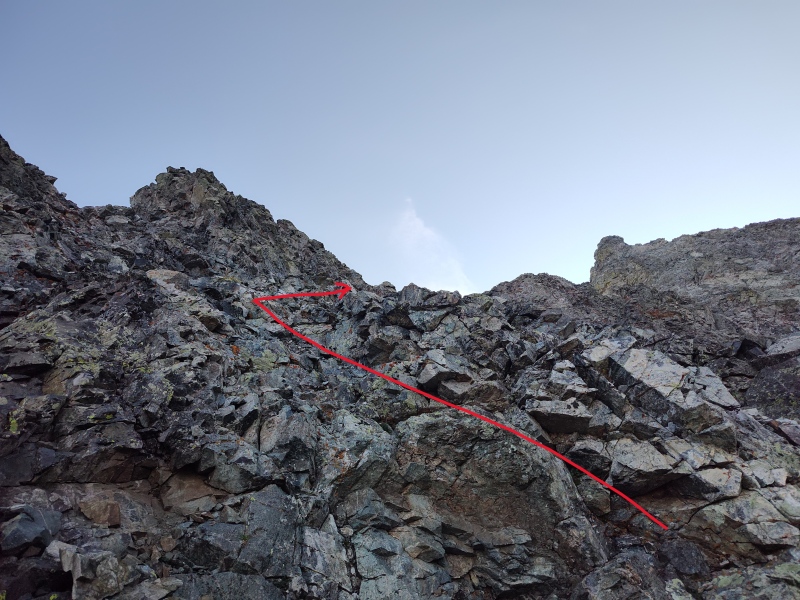
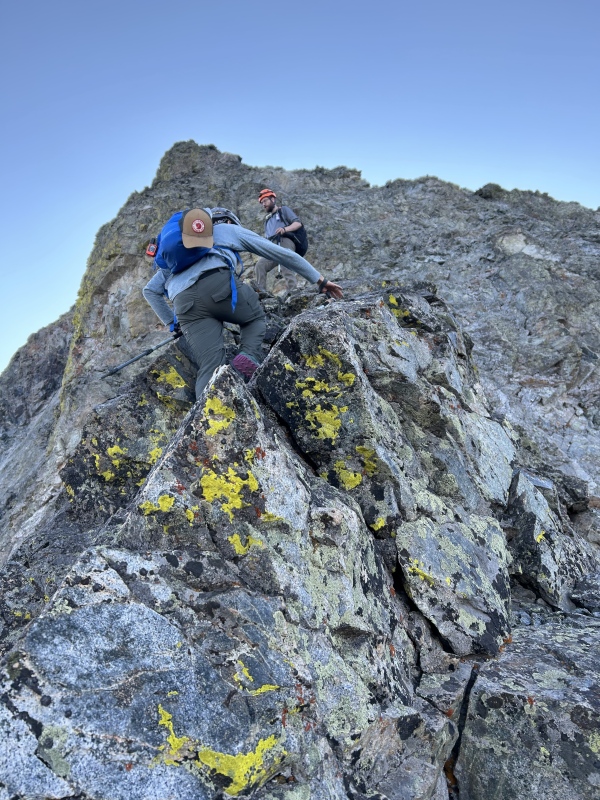
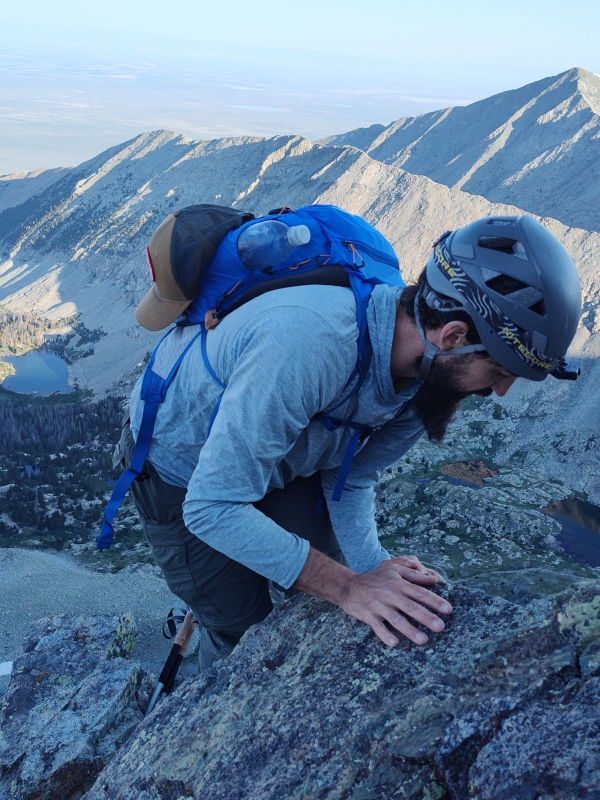
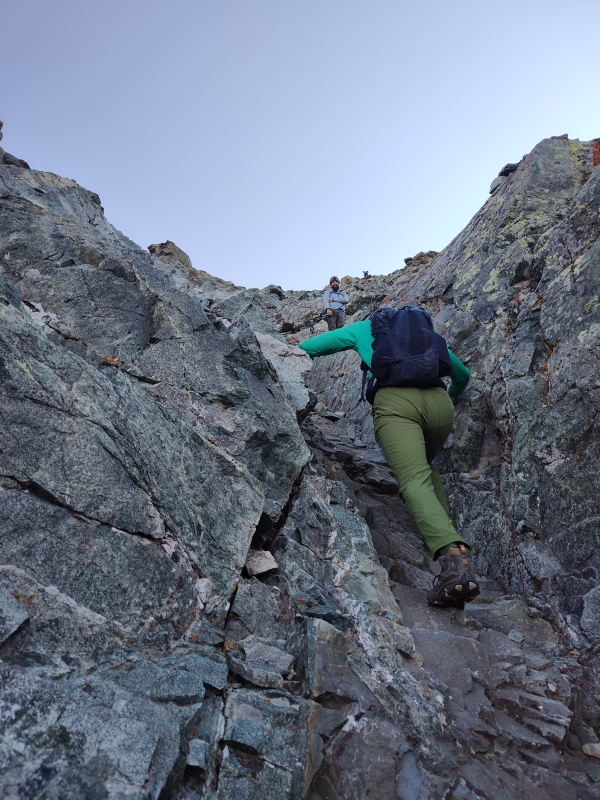
Once you do a short scramble above the chockstone towards the rock pictured above, you'll need to start cutting left towards the summit. The further left you cut the harder, but more solid the climbing will be. The further right you swing, the looser it gets and the closer you'll be to being right over the Hourglass and sending loose rocks down onto any unlucky souls trying to come up it. Jay picked a somewhat middle ground that split the difference between these options. 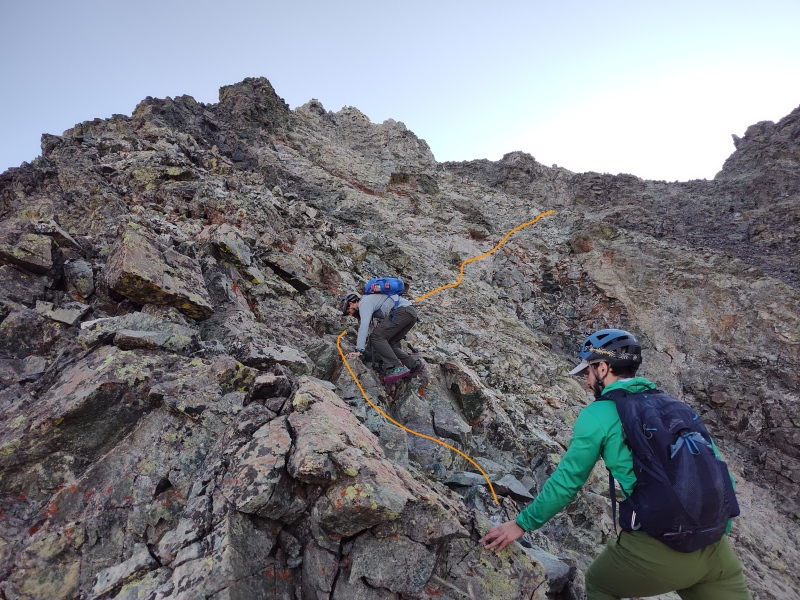
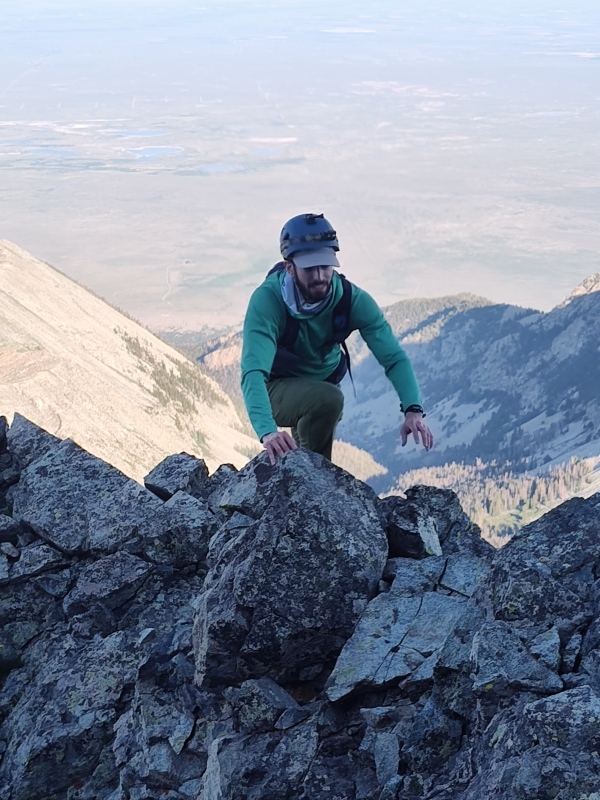
Depending on the line you pick you'll have greater or lesser degrees of scrambling to the summit. 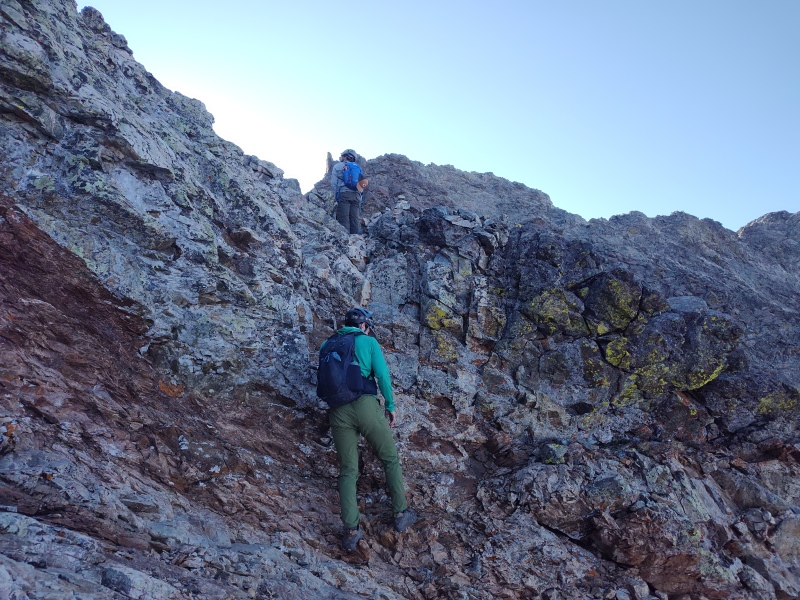
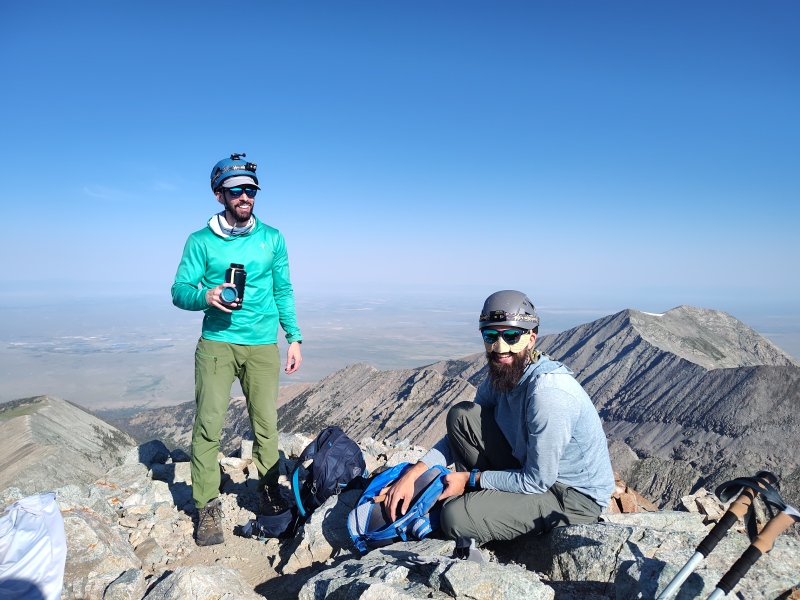
The Summit and Departure for the Traverse So at last we topped out on the summit. We exchanged congratulations, got some food/water and then the other two guys snapped some shots of me heading off for the Traverse as they prepared to return down the West Ridge Indirect route. 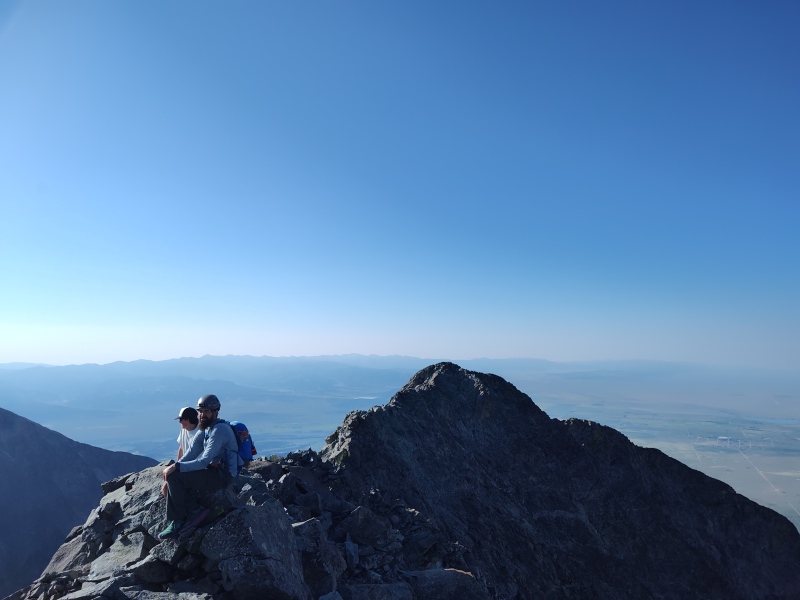
The Traverse was quite a sweet adventure in its own right and since TR's are limited to just 50 photos, I'll be breaking out that adventure into a report all its own to follow shortly. But meanwhile, I'll add in photos and notes from Jay about the return down the West Ridge Indirect route. 
The Return (for Joe and Jay) So while I took off solo for the adventure of the the Traverse, Joe and Jay went back down the same way they came up, or at least tried to - this route still needs a little more work to make it easier to identify landmarks for smooth navigation by the masses, but hopefully this trip report adds just enough extra detail to CaptainSuburbia's excellent reports to inspire a few more folks to check it out and maybe refine the details a little more. Most of the rest of this section will be photos and comments that Jay very graciously provided along with his annotations and comments. He was happy to let me do the work of compiling them into the larger TR... 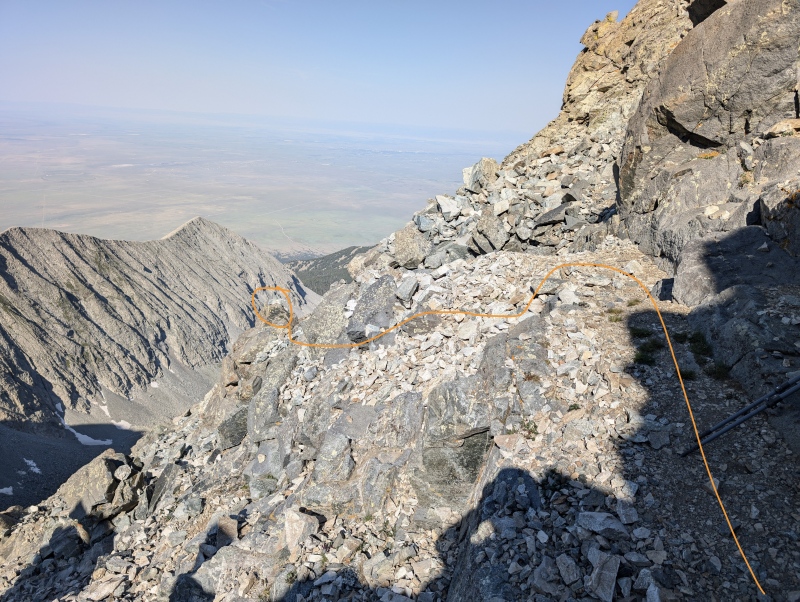

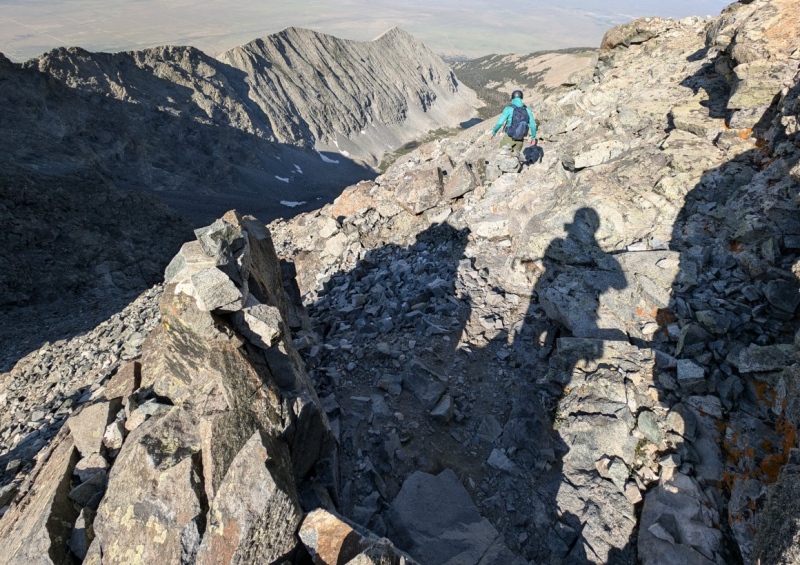
Jay: “Coming down off the summit. Staying high to the right and keeping an eye for cairns.” 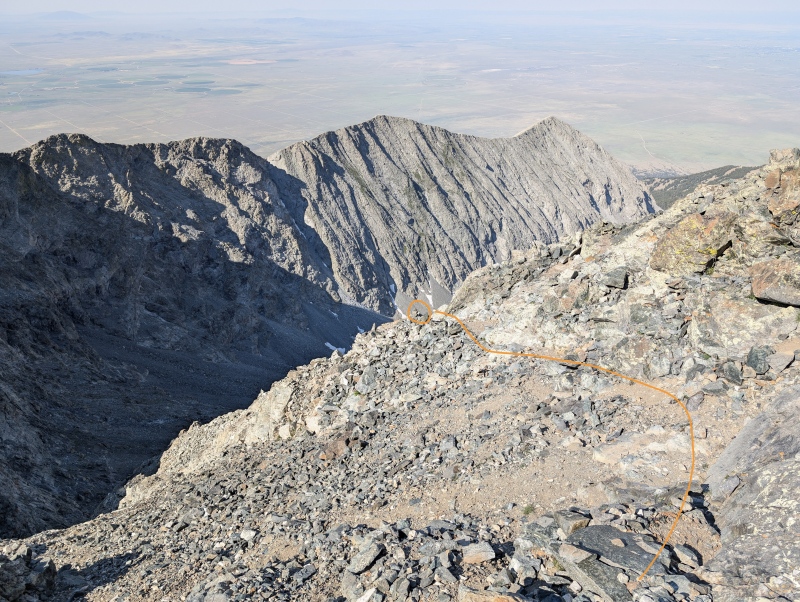
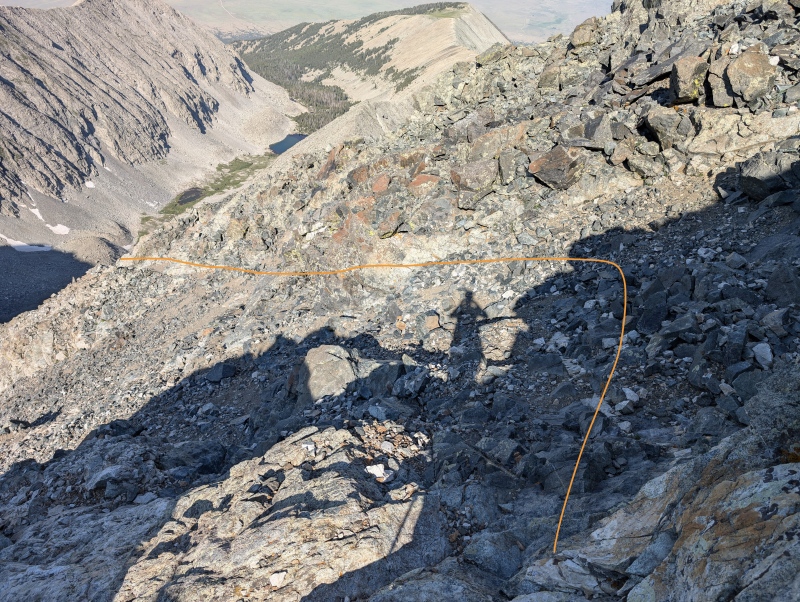
Comment by Jay: "At some point when you're above the Hourglass, there's a trail down into the Hourglass or you can stay to the right and keep an eye out for the chockstone difficulties.” 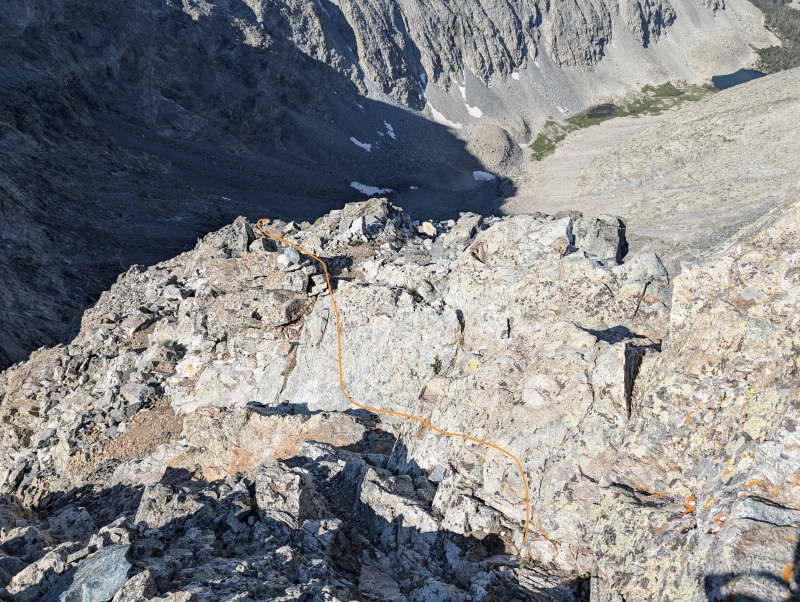
Comment from Jay: "Make sure you can see the chockstone is close and not 50 feet below you when you try to descend the chockstone difficulties." 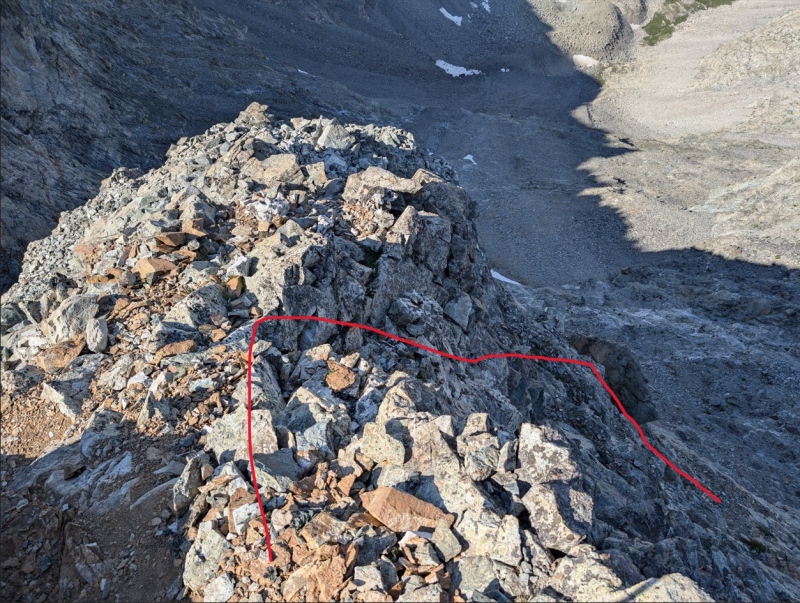
Jay: “Another shot of the chockstone and the difficulties above it.” 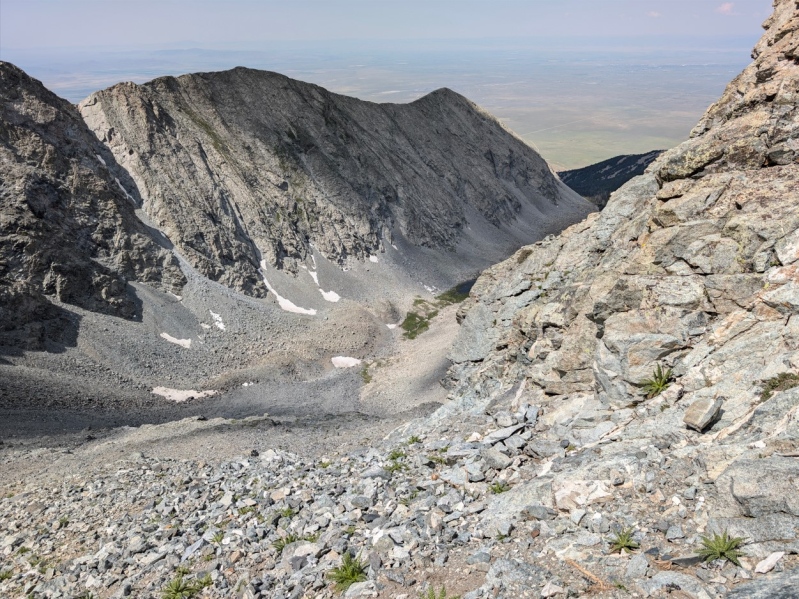
Comments from Jay: “We weren't able to find Bird Poop Rock or the Iron Staircase on the descent, but we were able to use the picture of the unique rock above the Nike Swoosh to properly descend. Once we were down the Swoosh, it was easy to see the standard trail and get back down to it.” 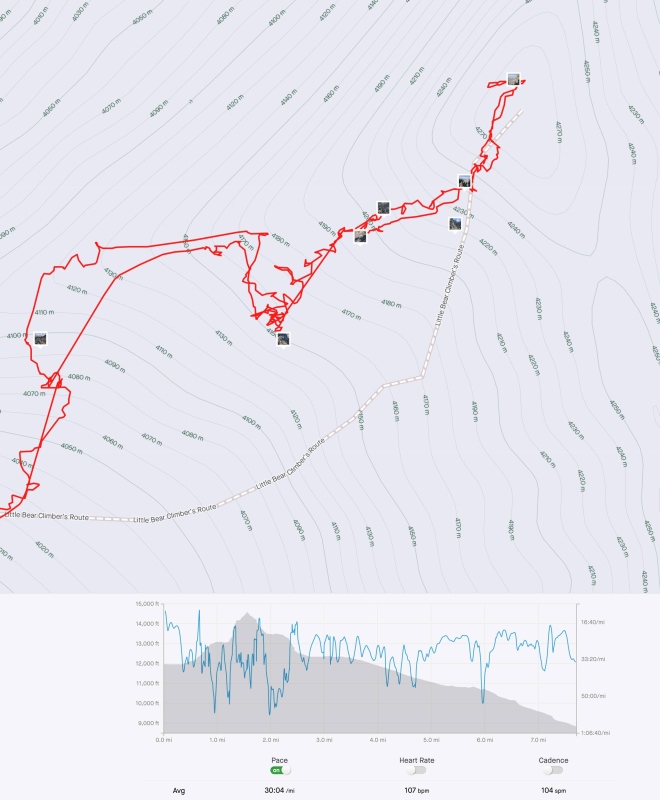
Comments from Jay after looking at his Strava tracks from the descent: “It definitely looks like we bailed off the ridge a little too early and I don't feel there were many consequences from this. The terrain was fine, but the ridge probably would have been more fun. It also seemed like we traversed above the hourglass a bit higher on the return and found a bunch of cairns as a result.” Concluding Thoughts I'm a little disappointed in some respects that I didn't return down this route, because then I could have maybe scouted out the different options a little more completely and snagged a few key photos and waypoints I didn't get on the way up. But the above section of beta provided by Jay gives a lot of really good beta. Between this report and the ones linked near the start from CaptainSuburbia, people ought to have a pretty good level of detail to help them try out this route if they want to avoid the Hourglass. Key advantage of West Ridge Indirect vs Hourglass: You avoid the infamous rockfall danger. This could also be mitigated by going when there are not a lot of people on the route. Just be warned that it is very common for people to start from Lake Como at like 2am to try to avoid the crowds, only to find that there is a crowd of people all trying to avoid the crowds. Even weekdays are no guarantee since again - all the crowds are trying to avoid the crowds... Key disadvantages of West Ridge Indirect vs Hourglass: The tradeoff for avoiding the rockfall is you have to briefly deal with some pretty epic exposure on both sides of the ridge, but you're on mostly really solid rock during these sections. There's also a bit more route-finding involved with the possibility of straying into class 5 terrain if you're not careful. This report will hopefully alleviate some of the route-finding woes but I think a little more work needs to be done to really refine this to the level of a very clear and easy to follow alternative to the standard Hourglass. I would be very interested to see if a little more exploration within this vicinity might eventually uncover a truly class 3 line up through this region. Maybe someday I'll try the SW Ridge route and do a lot of picture taking from across the valley to see if I can spot any promising lines (and/or maybe just take some time to review photos from various TR's of that route to see if any good views of that area are already posted). I do like the idea of finding a viable alternative to the Hourglass just due to how sketchy it is if/when any rocks get dislodged and funneled into that tiny passage just as you're hitting the class 4 scramble with little to no maneuvering room, but the tradeoffs in exposure and route-finding on this route may be too much for some people. 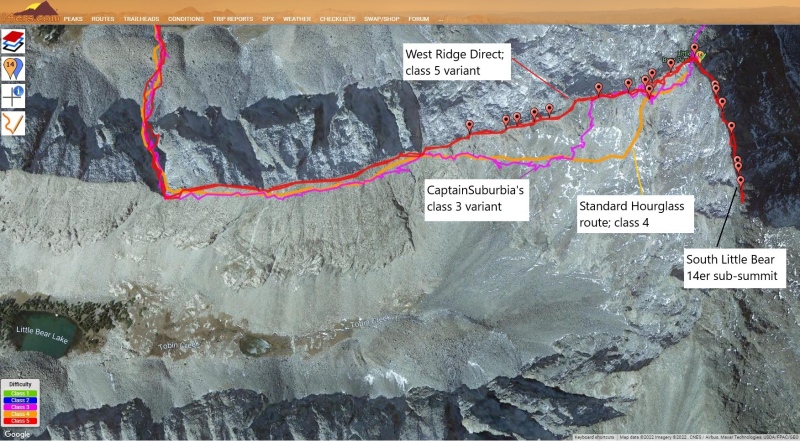
Rough Times I didn't record as many time splits as typical but here are a few markers for reference: 1:40am I started from 9,500ft pull-off where I tossed and turned in the back of my 4Runner for a few hours in surprisingly miserable heat for that elevation ~3:40am I arrive at Lake Como and hang out for a while as Joe and Jay get ready. Forgot to mark our departure time - I think we started off a little after 4am 4:30am at turnoff for gully 1 5:21am top of gully 6:50am at ~13,400ft trying to gain the ridge 8:16am Little Bear Summit Thumbnails for uploaded photos (click to open slideshow): ")
")
")
")
")
")
")
")
")
")
")
")
")
")
")
")
")
")
")
")
")
")
")
")
")
")
")
")
")
")
")
")
")
")
")
")
")
")
")
")
")
")
")
")
")
")
")
")
")
")
|
| Comments or Questions | |||
|---|---|---|---|
|
Caution: The information contained in this report may not be accurate and should not be the only resource used in preparation for your climb. Failure to have the necessary experience, physical conditioning, supplies or equipment can result in injury or death. 14ers.com and the author(s) of this report provide no warranties, either express or implied, that the information provided is accurate or reliable. By using the information provided, you agree to indemnify and hold harmless 14ers.com and the report author(s) with respect to any claims and demands against them, including any attorney fees and expenses. Please read the 14ers.com Safety and Disclaimer pages for more information.
Please respect private property: 14ers.com supports the rights of private landowners to determine how and by whom their land will be used. In Colorado, it is your responsibility to determine if land is private and to obtain the appropriate permission before entering the property.


