| Report Type | Full |
| Peak(s) |
Little Bear Peak - 14,041 feet "South Little Bear" - 14,028 feet |
| Date Posted | 09/05/2022 |
| Date Climbed | 09/02/2022 |
| Author | daway8 |
| Wrestling with Bears: West Ridge Direct plus South Little Bear |
|---|
|
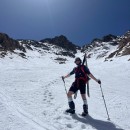
The playful title was chosen to match the playful mood I was in tackling this fun class 5 variant of Little Bear that avoids that dreadful bowling alley known as the Hourglass (where some rockfall threatened to finish me off for my Finisher back in 2019) and to which I added on South Little Bear (a 14er sub-summit that's part of the list of 73) and then backtracked with slight modifications on the way day. Some people search for the PLR (Path of Least Resistance) while I was searching instead for the MSF (Maximum Survivable Fun). Sometimes writing about class 5 routes can come across as dramatized or boastful or whatever but the tone for this trip report is more that of a kid in a candy store as I've been coming to really enjoy these more involved routes. Trailhead: Lake Como Trailhead - parked at 8,700ft (~3mi in from the 2WD lot) Route: West Ridge Direct (class 5 variant that avoids the Hourglass) then ridge direct to SLB Mileage/gain: 12.2mi RT, 6,300ft gain Total Time: exactly 13 hours round trip Difficulty: Much of this route is no more than class 3 but if you stay ridge proper the entire way you'll hit a few class 4 and class 5 sections. I'll attempt to highlight where. I was able to do this all comfortably in regular hiking boots but some may prefer different footwear options based on your own comfort level when climbing exposed class 5. Included in this report will be:
Look for large, bolded section headers if you want to scroll quickly to a certain portion of the report. 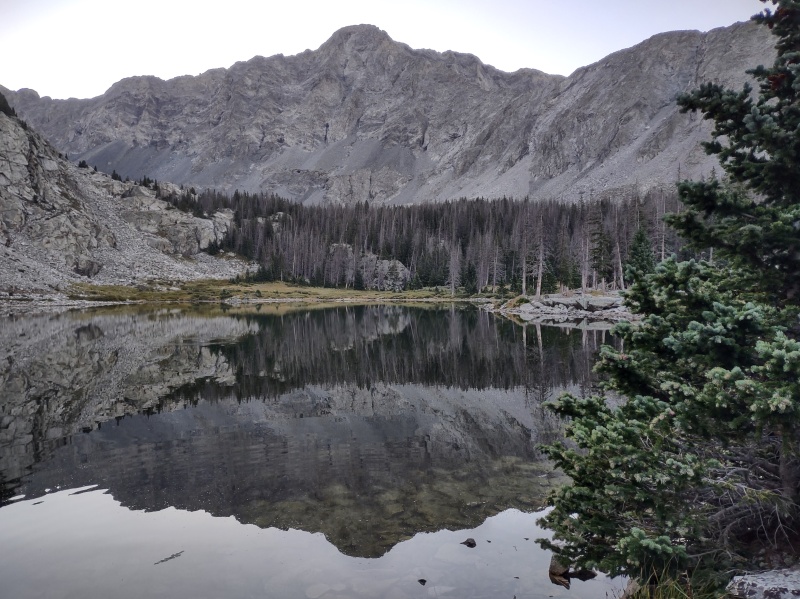
Little Bear Route Overviews and Key Trip Reports Little Bear currently only has one officially defined route on this site - it's listed as "West Ridge and Southwest Face" but known more commonly as "The Hourglass Route" after the infamous defining feature which adds the only class 4 on that route and which stirs up great angst over rockfall and great debate over leaving often frayed ropes hanging in it. If you want the gory details of that route you can read my Finisher report here: Little Bear, Big Finish There are a handful of reports giving details on the West Ridge Direct route which starts off following the Hourglass route but as soon as you reach the top of the gully above Lake Como you get on and stay on the top of the ridge all the way to the summit. One nice report I referenced for some early beta was the one Wentzl wrote called West Ridge Direct on Little Bear A variation of the West Ridge Direct (which I'll nickname West Ridge Indirect) that reportedly keeps the entire route no more than class 3 (which in my opinion spoils all the fun but I mention since this may appeal to some people) is the excellent report written by CaptainSuburbia called Little Bear West Ridge to Blanca and Hamilton which mostly follows the Hourglass Route but hops up on the ridge direct just long enough to bypass the Hourglass while avoiding the class 5 segments on the West Ridge Direct route (I partly used the upper portion of this route for my descent). Another report which provided some good insight on the traverse between Little Bear and South Little Bear was one that used the Southwest Ridge route (not pictured in the map snapshot below but it comes up from the bottom of the screen to South Little Bear then on to Little Bear). It's written by FCSquid and called Little Bear - Southwest Ridge There are tons of other trip reports out there and I've no doubt missed some really good ones (and left out mention of some other routes) but these were some of the ones that caught my eye when I was researching and which had some good beta. Hopefully this report will now also add to the useful beta on this route including a gpx track with lots of waypoints to mark where key features are so you can decide which variation to do or maybe create your own variant based on this data. 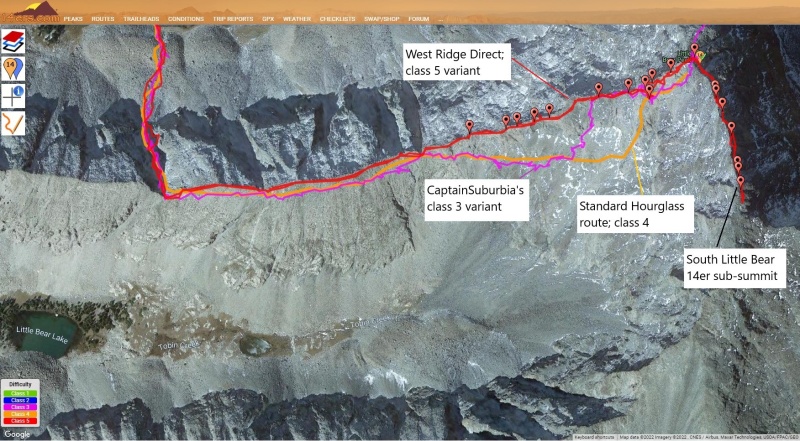
The Backstory So I mentioned in a recent trip report that with Sunlight Spire now officially demoted thanks to LiDAR, I realized I was getting attainably close to finishing the list of 73 (which includes the 58 14ers plus 15 14er sub-summits). Having done the delightful Northeast Crestone a couple months back I had South Little Bear on my radar to put me at number 70. But I really, really, really was not fond of the rockfall I had experienced going up the Hourglass for my finisher and I saw that the other options seemed to look either painfully long and/or involve potentially serious class 5 climbing. I've actually been slowly getting enamored with class 5 routes but I've also been super cautious about pushing myself too far too fast. It seems every time I get ready to do some class 5 route there's another story that comes out about some rescue, recovery or near miss and that always gets me second guessing if I'm really ready to tackle the given route. Sure enough, this time was no exception. Right as I was seriously starting to look at doing this route ClimbingFool puts up the thread McHenrys Rescue 8/11/22 in which he described a harrowing ordeal of getting stuck on a ledge for an insanely long period of time waiting on search and rescue to arrive and extract him. Not wanting to have my own such thread posted (or have my own memorial thread) I went back and forth asking myself "am I actually ready for this route?" I finally concluded that if I stuck strictly to the rule of never go up what you can't come back down, and never go down what you can't come back up then I would be ok. I had a couple potential reroute options scouted out (see the previous section) and had already summitted Little Bear before and was in no real hurry to get South Little Bear so I knew there wasn't going to be any great artificial pressure to push myself and I had the very recent and very vivid description of the McHenrys Rescue to help compel me to stick diligently to the above bolded climbing adage. Getting Started - Gaining the Ridge As mentioned earlier, this route starts along the standard Hourglass route coming up the infamous Lake Como/Blanca Peak road. Last time I took my Jeep to a large parking/camping area at 10,200ft. This time, due to what I'll call some last minute vehicular contingencies which were thrust upon me, I only drove to 8,700ft and day hiked it from there (yes, there is more than one backstory to this tale but I don't want to digress too far...). Since this part is covered extensively in the route description and tons of reports I'll just add the note that on the way down I concluded staying skiers left (or climbers right if you're coming up) keeps you off of some of the worst of the loose junk and partly shields you from potential rockfall from above if you're hugging up against the side of the gully. The stuff in the middle of the gully is at times horridly loose. 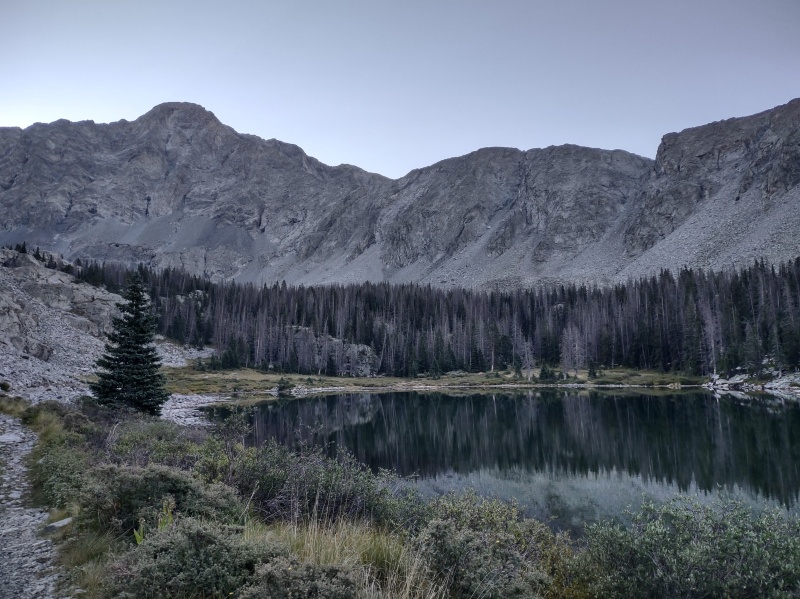
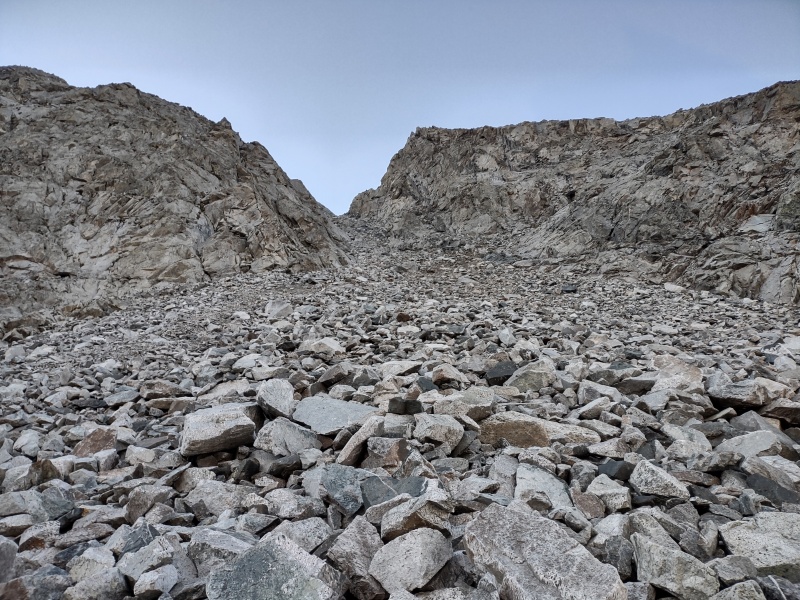
Once you're on the ridge proper, the first section is a casual class 2 stroll only a little ways above the standard Hourglass route and it actually meets up with that standard route briefly at a large notch around 12,900ft as you can see right at the location of the last main shadow in the route overview image above, before the waypoints start. In my opinion, the standard Hourglass route might as well hop up on top and follow the ridgetop along until that notch for an easier and more scenic route that doesn't increase the difficulty. 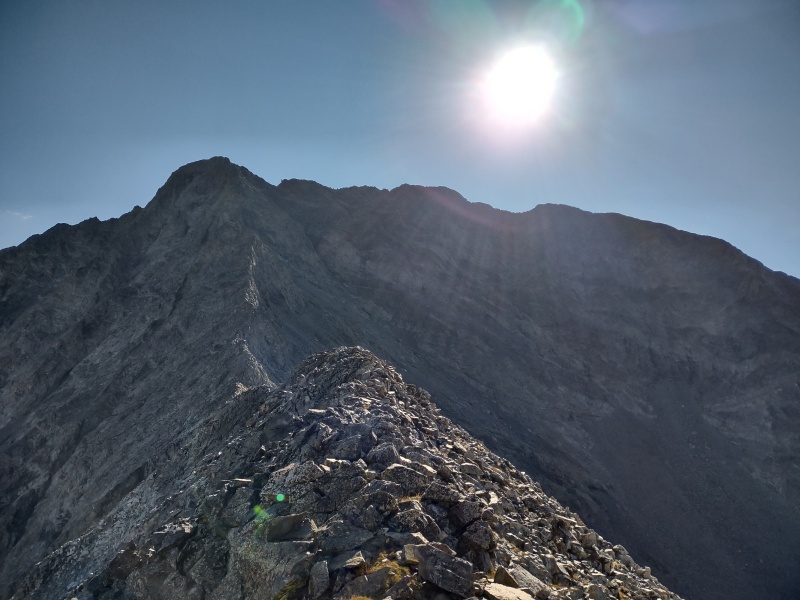
Spicing It Up - Just Past the Middle Portion of the Ridge A little ways after the notch where the standard Hourglass route briefly touches the ridgetop, the West Ridge Direct route starts to show a very clear deviation from the standard and soon starts to add a little bit of spice to make things more fun. The spice level starts low and then slowly builds. The first waypoint in my GPX tracks is the aptly named Narrow Ridge at 13,034ft. How narrow is it? Well, let's just say that if you have any problem with exposure you'll probably want to just backup to the notch, switch to the standard route and take your chances with possible rockfall in the Hourglass. 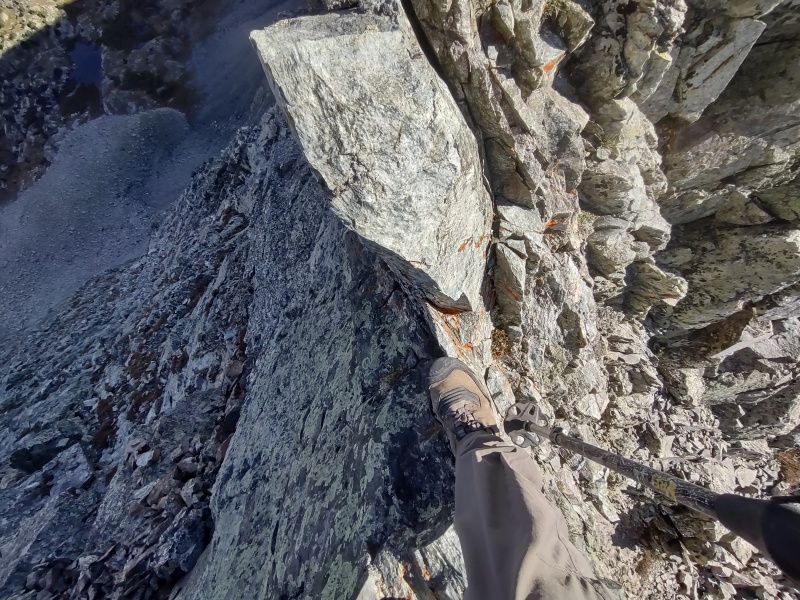
The next waypoint marking a feature of interest is The Slab at 13,166ft. At first glance it may look like possible trouble but - at least to me - it seemed to have plentiful holds. If you're not used to being on slabby rock with exposure (did I mention this route is pretty exposed?) then you might find this more intimidating. 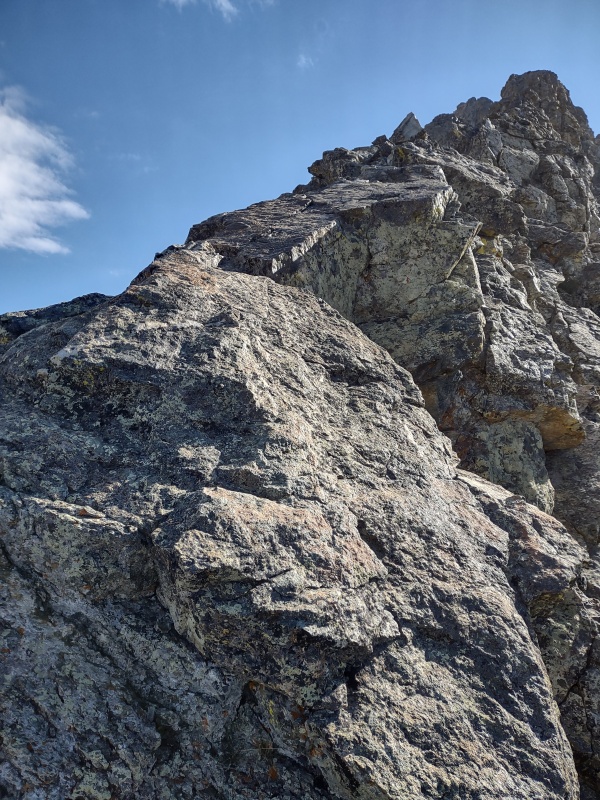
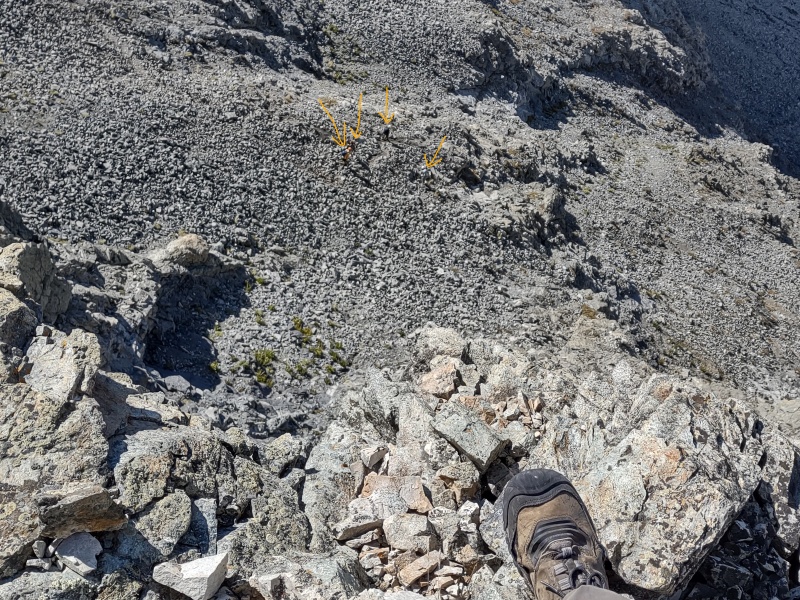
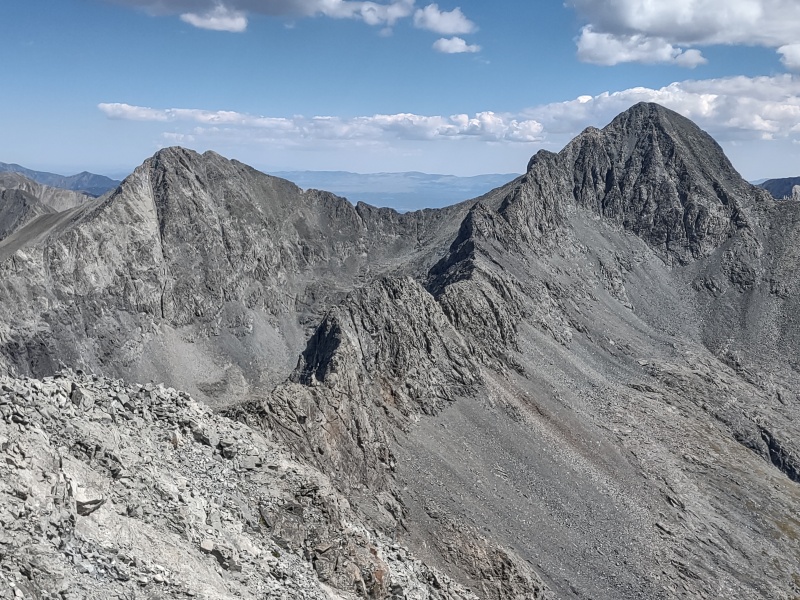
Following that comes The Fin at 13,204ft. This was were I started to really enjoy the ridge. Because of the lighting at that time of day and how the rock blends into the background, I didn't get the greatest of photos of this neat feature but it really does look like a narrow fin sticking up when you're standing in front of it. If my altitude readings from the waypoints between this and the next feature are accurate, this sucker is apparently on the order of 100ft tall! That might be an inflated number due to imprecision of the altitude readings but this is one of the larger features on the ridge. And the exposure? I got an epically sweet photo of 4 hikers on the standard route looking no bigger than my pinky toe since they were so far below. But it was still close enough that they spotted me and called out to ask if I was ok (thinking that dude must surely be radically lost). I called back that I was just having some fun on the class 5 West Ridge Direct route and heard them saying they never knew there was such a route. It's always fun being the one to inspire the "what's that guy doing up there?" comments, lol. 
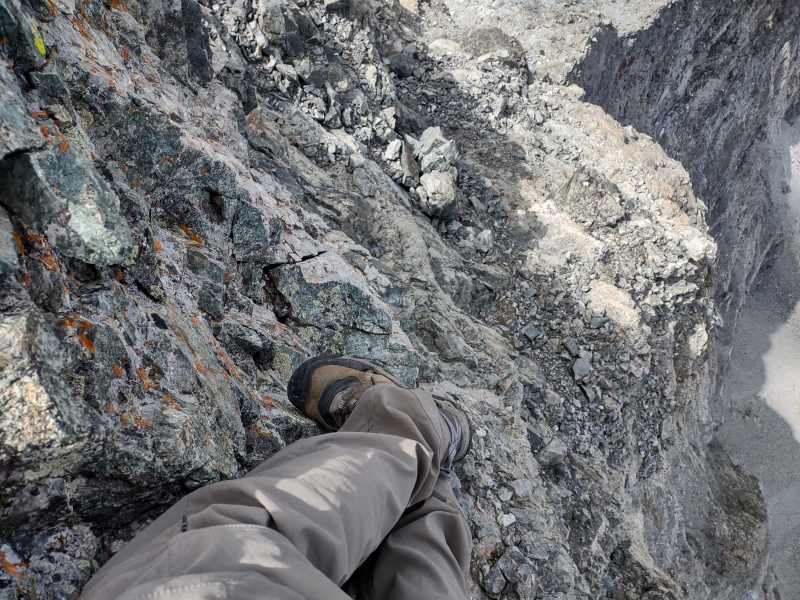
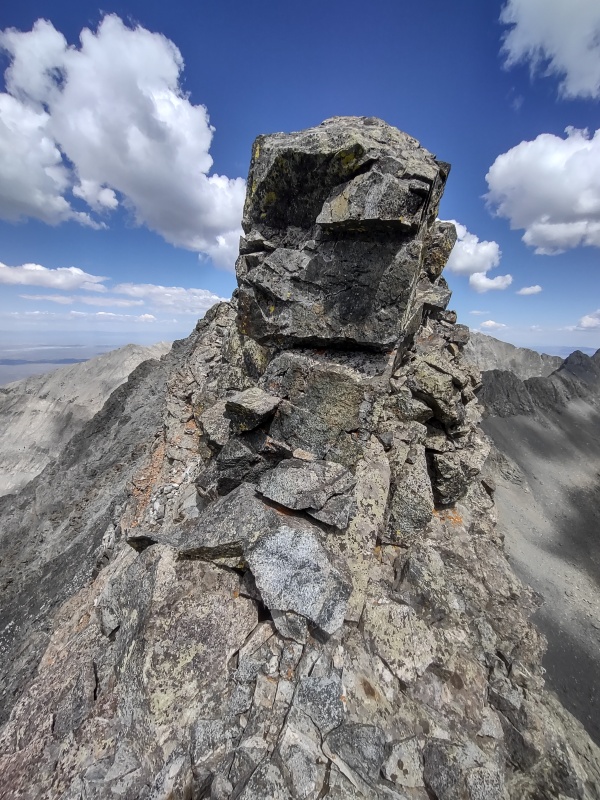
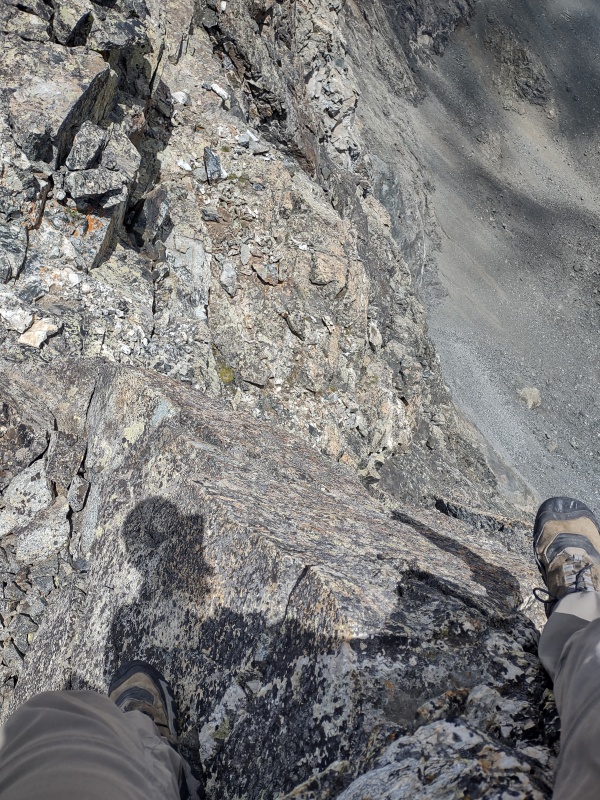
Moving along the ridge, almost immediately after The Fin comes The Chimney at 13,215ft. I had seen this feature in other trip reports where it is often described as a class 5.4 chimney but the photos didn't really give much of a sense of scale for it. Since I had previously done the class 5.4 chimney going from Pettingell to The Citadel I was rather concerned about this feature since I had enjoyed climbing up that 5.4 chimney on The Citadel but it was rather intimidating to climb down it (see Citadel Chimney from Hassell & Pettingell). When I topped out on the Fin and saw this chimney here I actually laughed. It was a Crocodile Dundee type moment where I wanted to pull out my Citadel report and declare: "that's not a chimney; this is a chimney!" But despite it's very petite stature (the entire chimney was only maybe 10-15ft tall) it does have much more wicked exposure than the significantly taller chimney over on the Citadel. One morbidly convenient thing about this chimney is that given its positioning, if you were to fall here your body would most likely land very close to the standard trail about 300 feet below, making the recovery operation a lot easier on the SAR folks. But dark humor aside - seriously, you don't want to fall on this one. Which overall is not really that much to worry about since I agree with the estimation that Wentzl gave that this is practically a ladder (so much so that I felt 100% comfortable pausing within the chimney to snap the photo below showing the exposure). The only real difficulty is the chockstone at the top that blocks an easy exit and forces you to climb on the side or the front edges to top out. 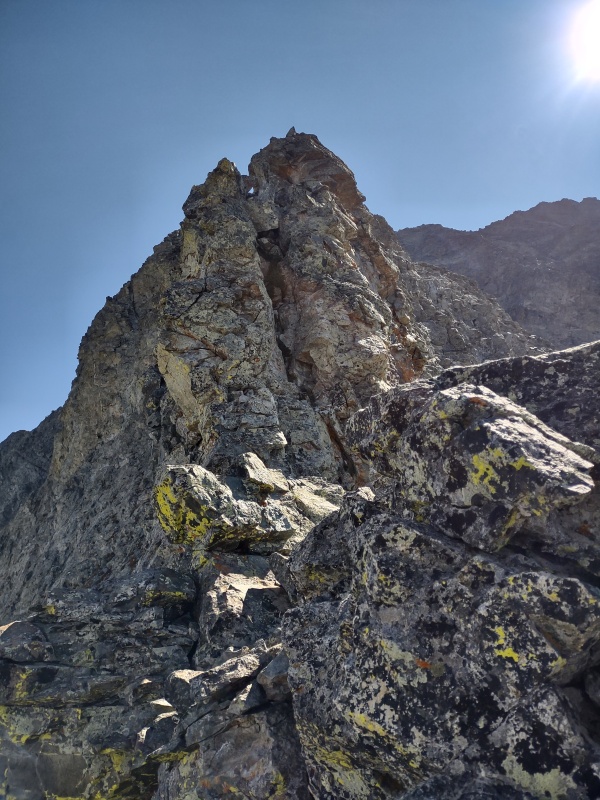
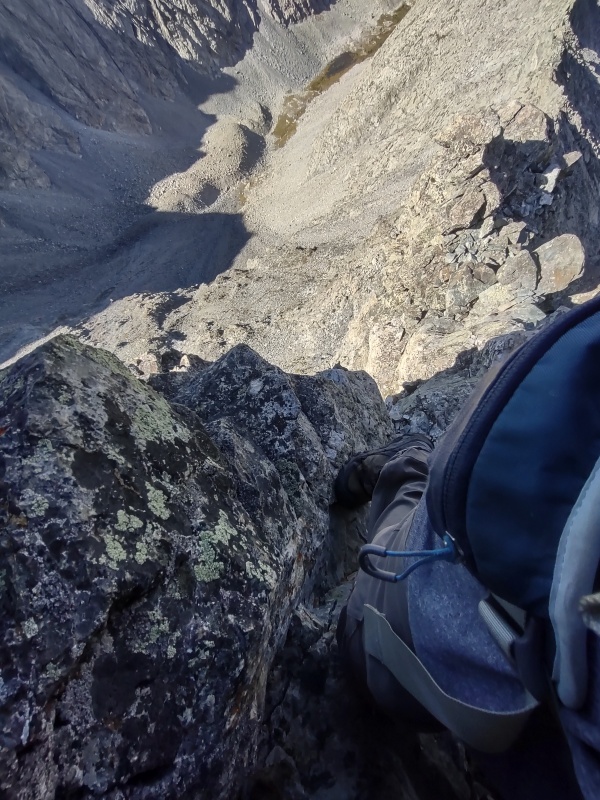
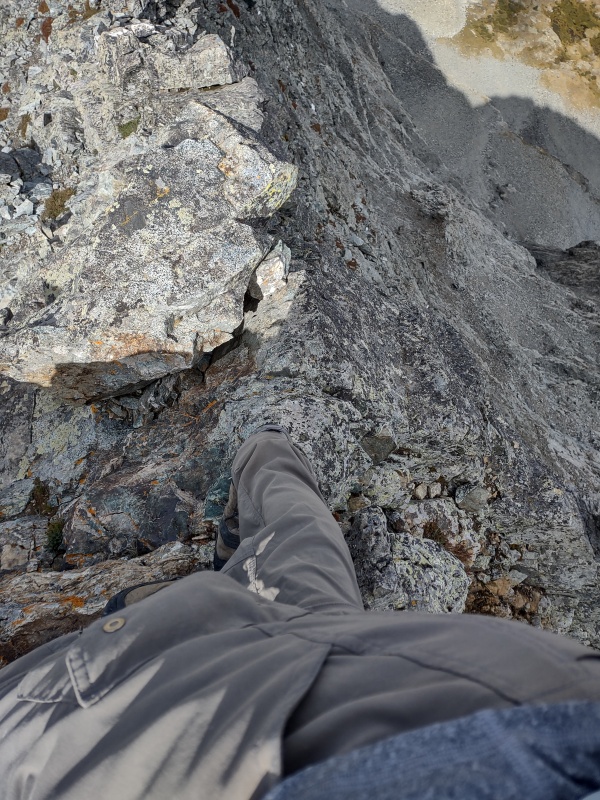
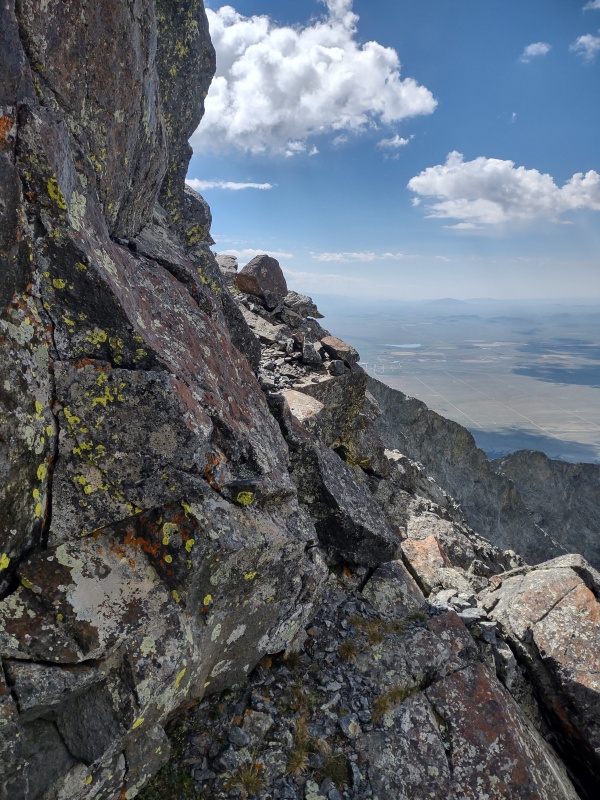
After this, the next key feature I marked with a waypoint with the descriptive name of the Chunky Slab at 13,332ft. This is a much bigger feature than The Slab down at 13,166ft and at first glance it looks like this might pose some real trouble. But after a quick inspection I noticed how "chunky" the right side was - with huge, solid holds along that edge. Par for the course, the exposure along that edge was in the "if you fall, you die" category but it was so solid that I wasn't bothered at all (note however that I'm generally not too bothered by exposure as long as I have solid footholds - I'm throwing in yet another exposure shot down below to help emphasize for anyone less comfortable with exposure that this route really is one big long "no fall" zone for a significant portion of the way). 

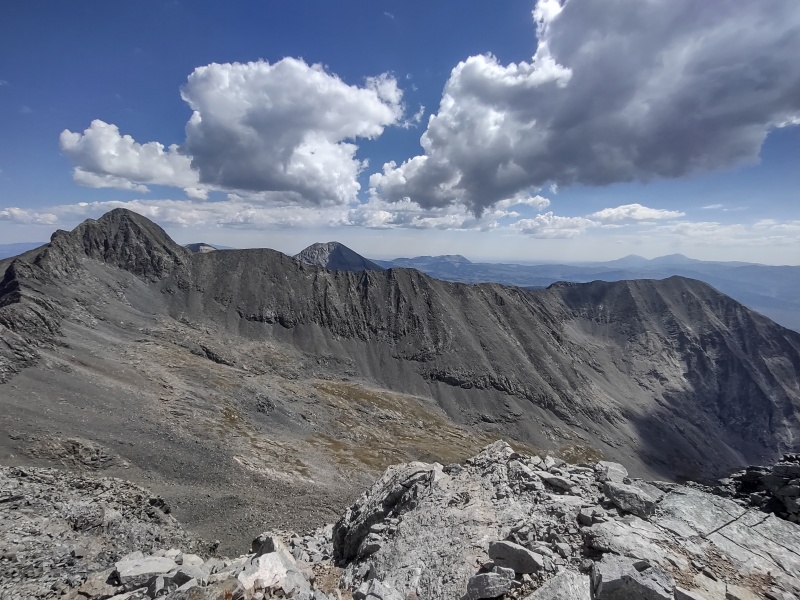
The Intermission - Mellow Terrain Where the Class 3 Option Merges In After this Chunky Slab, things mellow out for a bit in the region where CaptainSuburbia's class 3 variation joins the ridge. Around that general region is another narrow spot that I labeled as Catwalk/Class 3 descent option at 13,538ft. Please not that I did not try to actually verify CaptainSuburbia's variation but might try that when I hopefully return some day for the Little Bear - Blanca traverse. If you've had your share of scrambling and prefer his PLR (Path of Least Resistance) as opposed to my MSF (Maximum Survivable Fun) then switch to his trip report linked in the "Little Bear Route Overviews and Key Trip Reports" sections near the start of this report. 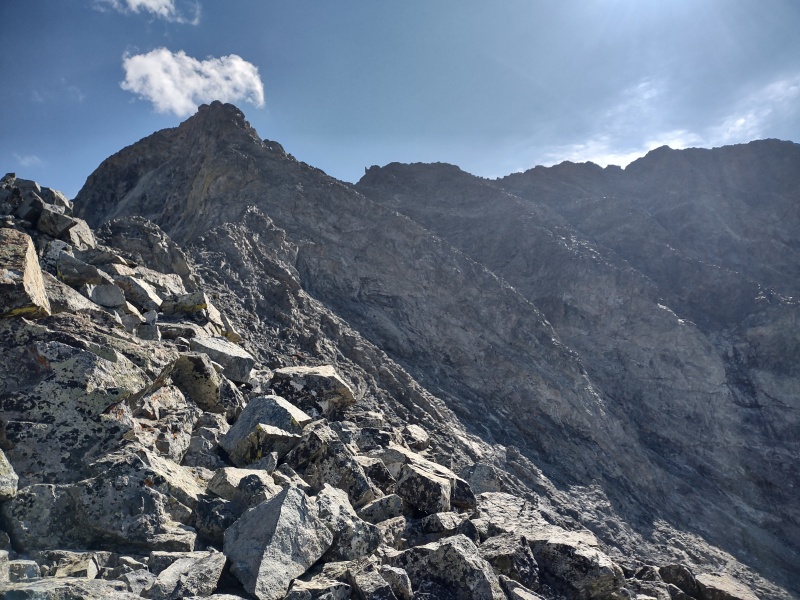
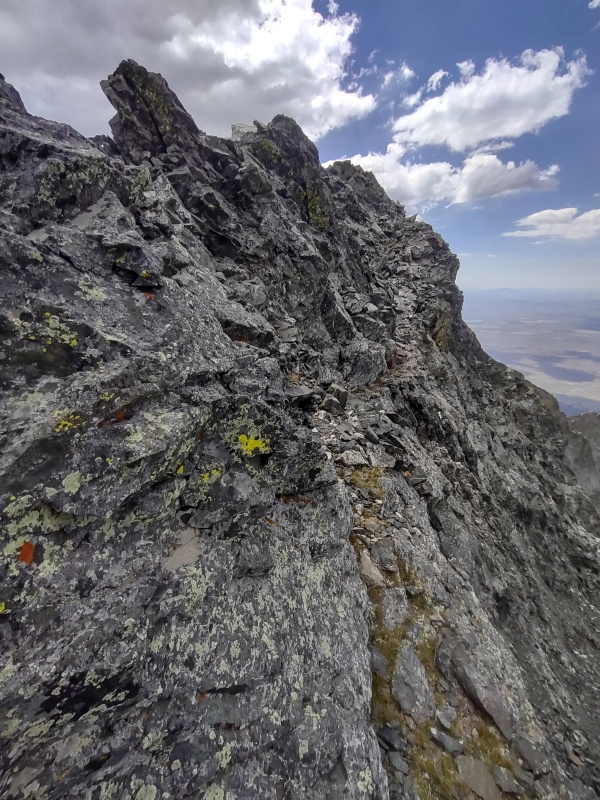
Continuing along the ridge the next waypoint I labeled as the Chunky Fin at 13,637ft. As the name implies, this is kind of like The Fin seen back down at 13,204ft except this one is, well, a lot more chunky (i.e. nice big, solid holds all over). Thus it fits with being part of CaptainSuburbia's class 3 variation. 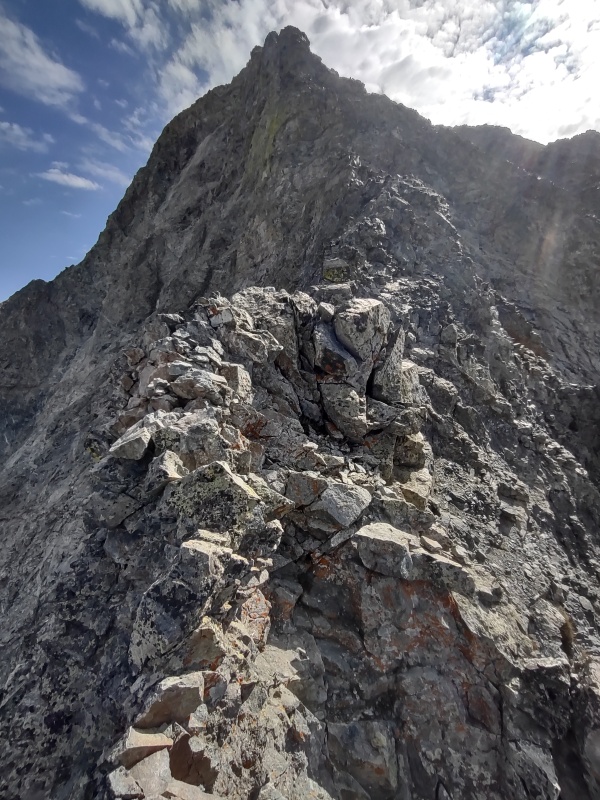
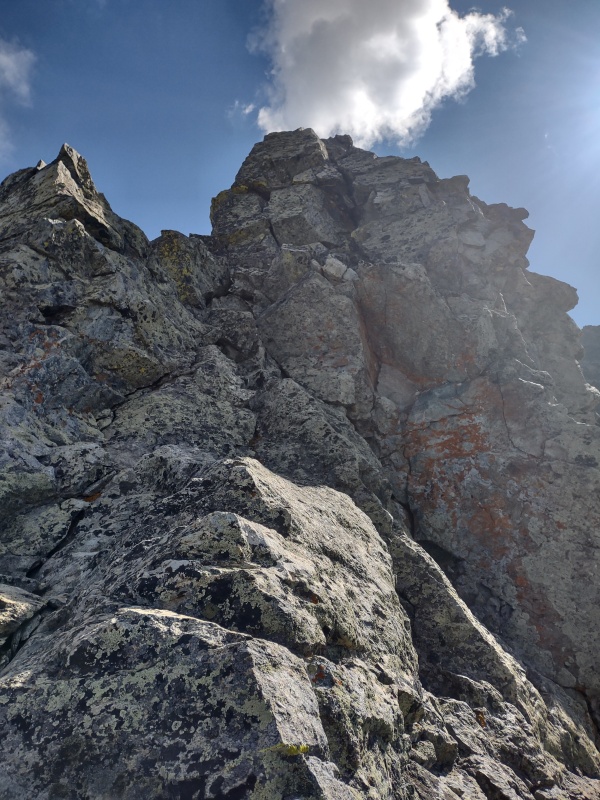
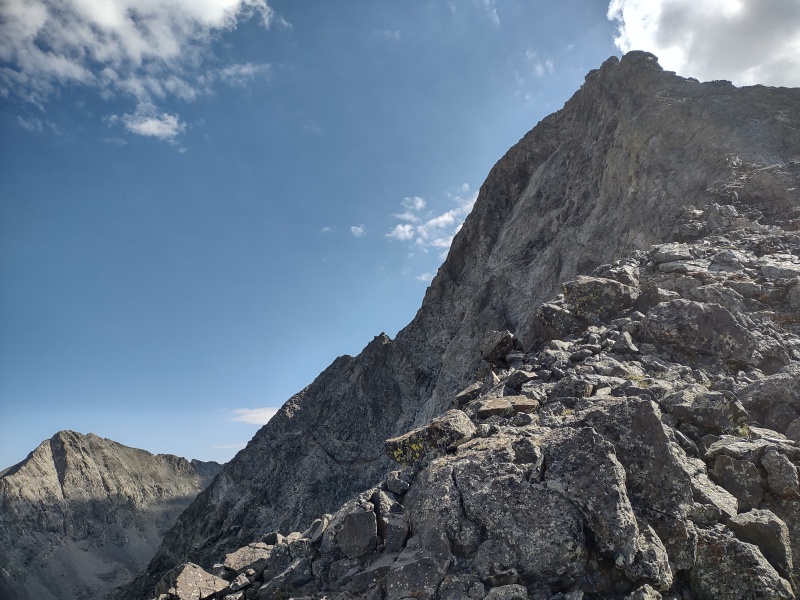
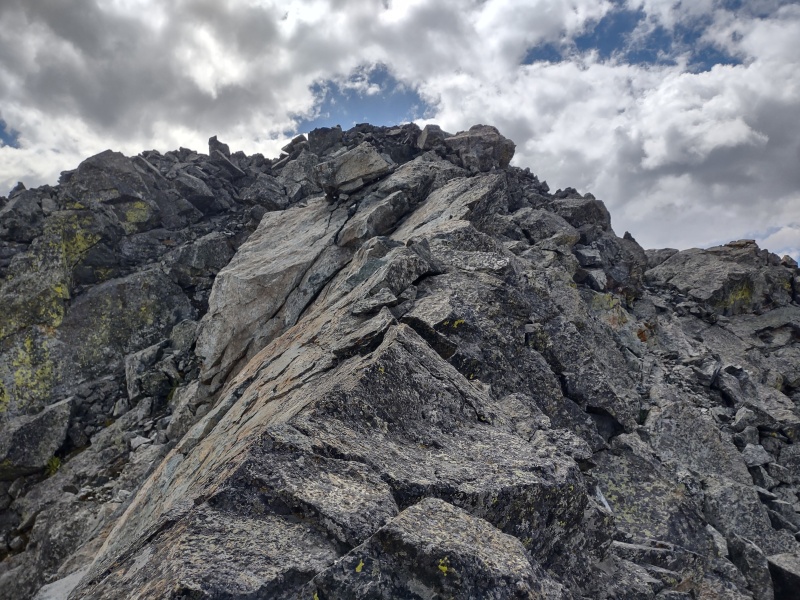
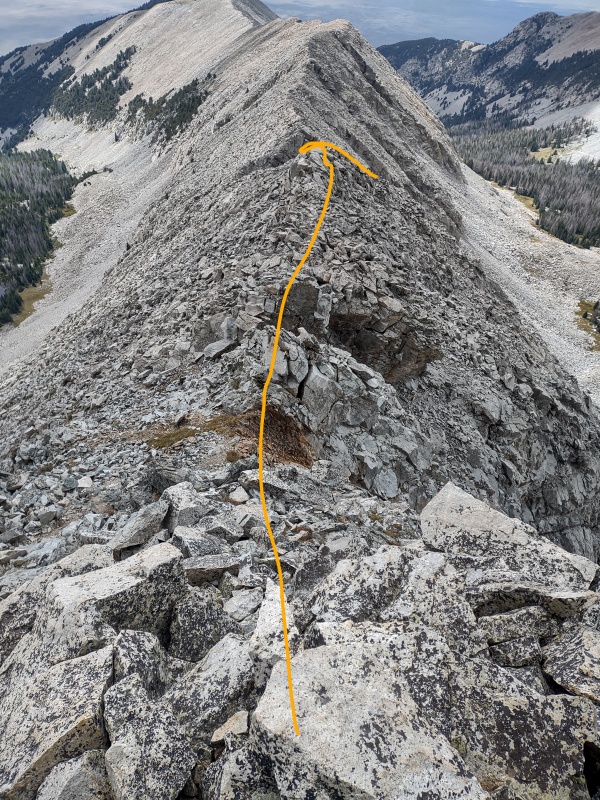
The Finale - Extra Spicy Final Push to the Summit Shortly after the waypoint I named the Chunky Fin, the ridge turns into a choose your own adventure jungle gym with chaotic scrambling of all different types to choose from. I followed the line that seemed most agreeable at the moment until I reached what I named The Gash at 13,737ft. It appears to be somewhere right around here that CaptainSuburbia swung to climbers right to avoid the spicy finale and connect via class 3 terrain to the broad bowl that makes up the upper half of the Hourglass. But with my MSF philosophy I continued ridge direct. 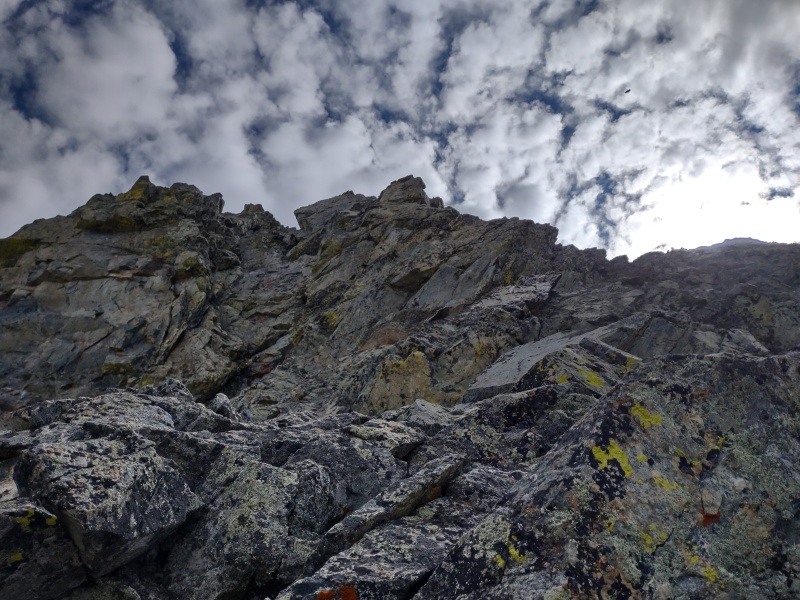
Having handled the Gash easily and after carefully stepping over all the loose rock at the top of that feature, I then came to The Wall at 13,833ft. This had sections vertical enough that I literally felt like I was on a wall at the climbing gym. Here I was on full alert, knowing that this is the type of terrain where things can get real ugly real fast, but I strictly adhered to the "don't go up what you can't come down" philosophy and made sure I was climbing well below the grade I'm comfortable at in the gym. It was just challenging enough to be a vigorous climb that put me on alert but provided the Maximum Fun without jeopardizing the Survivable part of my MSF approach to this climb. 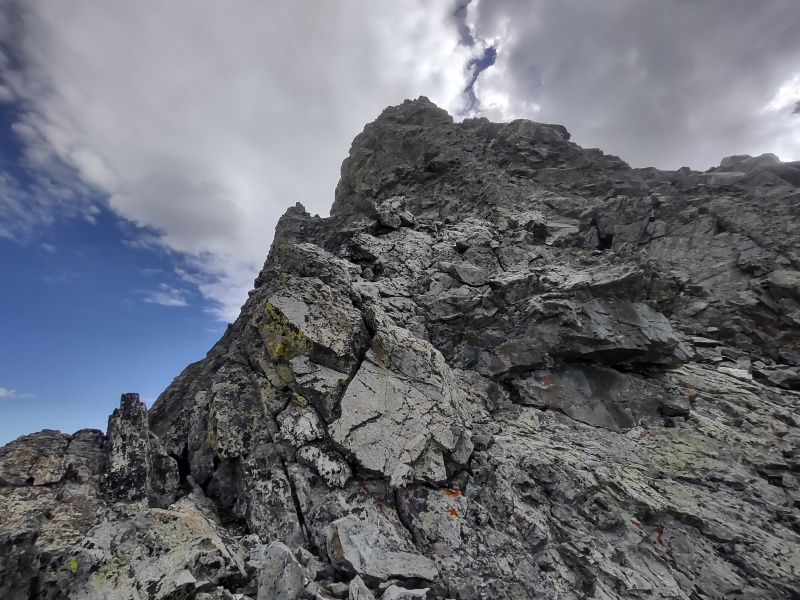
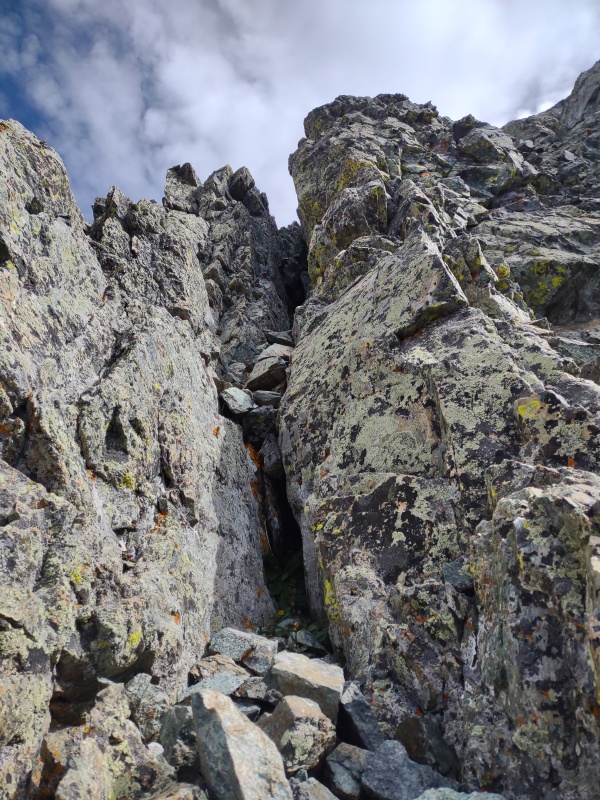
Then somewhere in the jumbled maze of rock features above I suddenly hit a narrow spot of the ridge with no way up except up and over a dangerous looking overhang. I might possibly have attempted something like that on a rope in a gym but I finally decided that the S was potentially about to drop out of my MSF so I looked for other options. 
Unfortunately, to divert around the right side of the feature looked to sketchy. The left side didn't look much better. But that left side did have one tiny ledge over top of an epic drop and I could lean around and see better terrain beyond. This is the specific section I was alluding to in some of my comments on the Testing Rocks while Climbing thread in the forum where I first gently wiggled all the rocks of that ledge, then gave a more vigorous wiggle and then put half my body weight on before finally risking my full body weight on the most secure hand and footholds available. This was far and above the most sketchy couple of moves of the entire day - enough so that I decided to scout of the upper portion of CaptainSuburbia's class 3 variant on the way down to avoid coming down this portion and instead reconnected just below The Gash after briefly swinging down into the upper section of the Hourglass route. 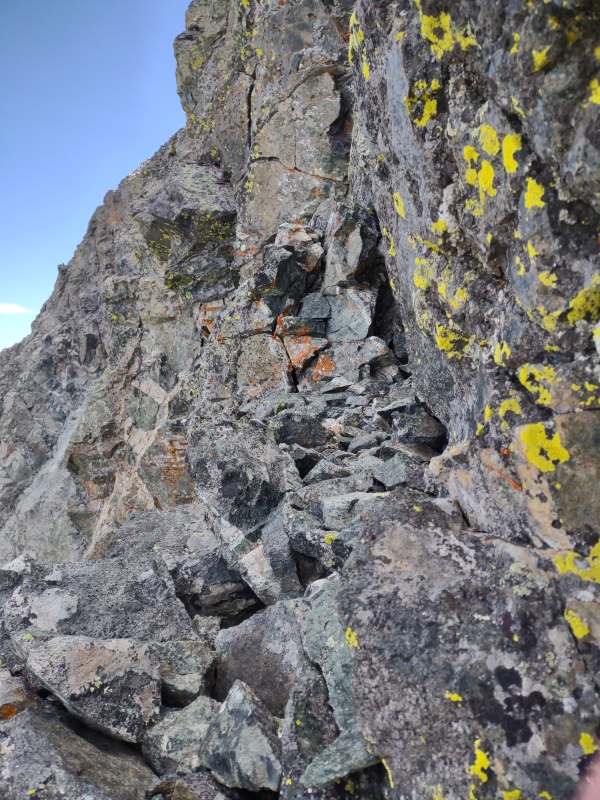

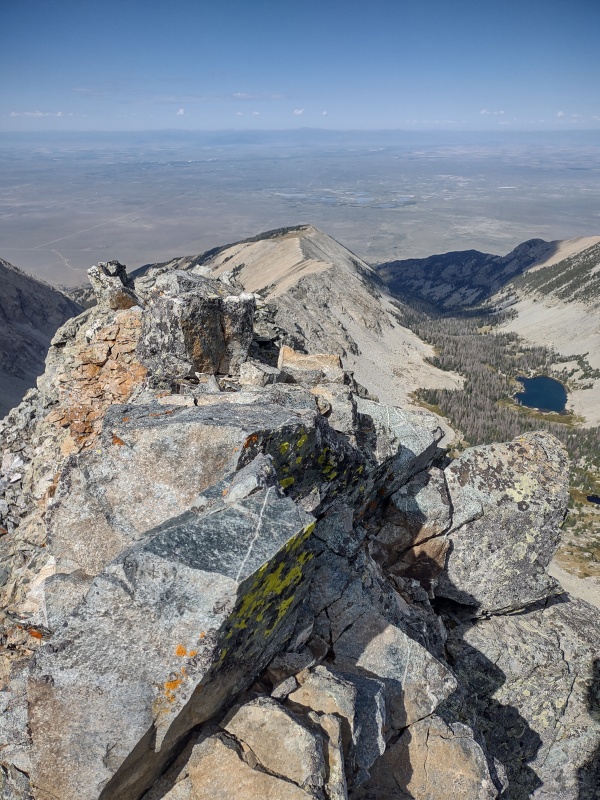
After that uneasy maneuver things mellowed into a selection of class 3 or 4 type options leading up to Overlook Point at 13,962ft where I could look back down on the ridge I was now most of the way up. 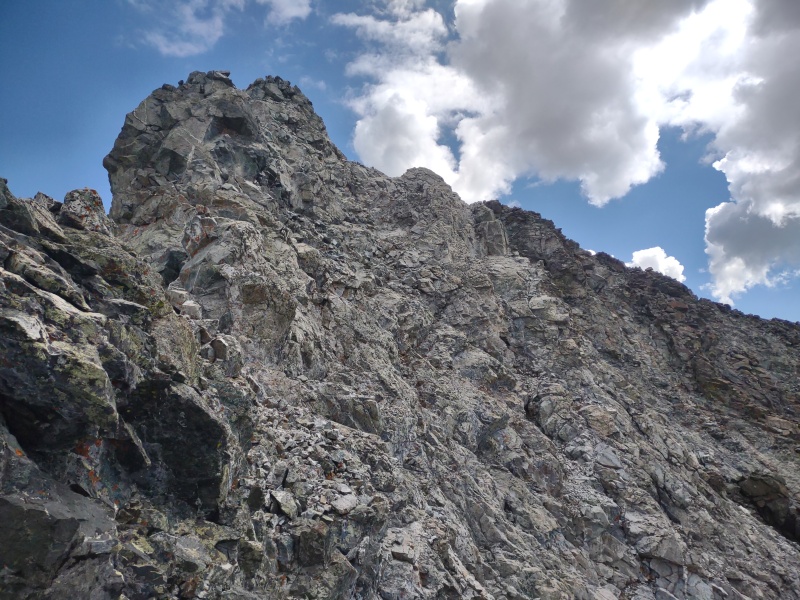
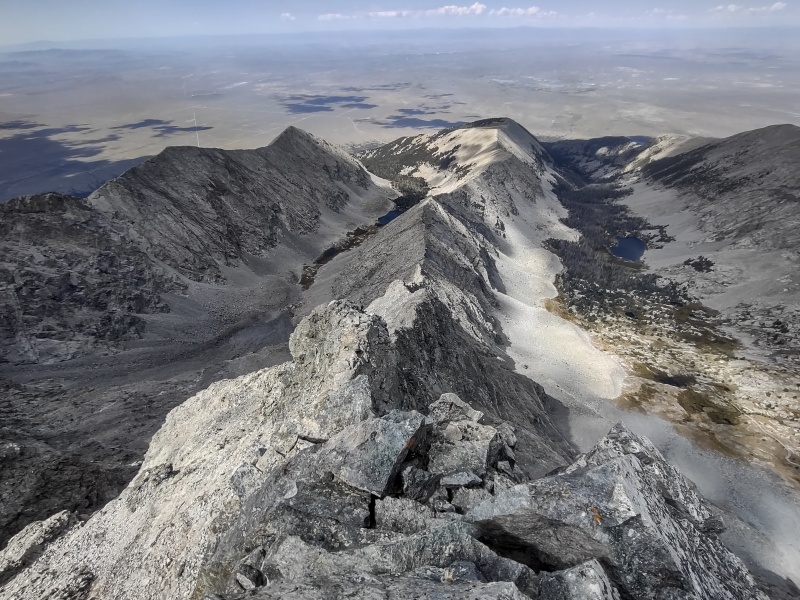
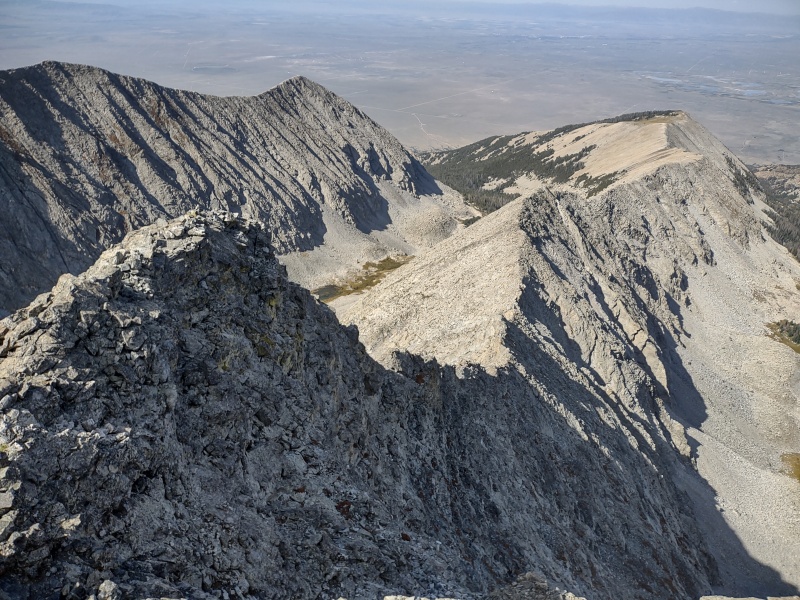
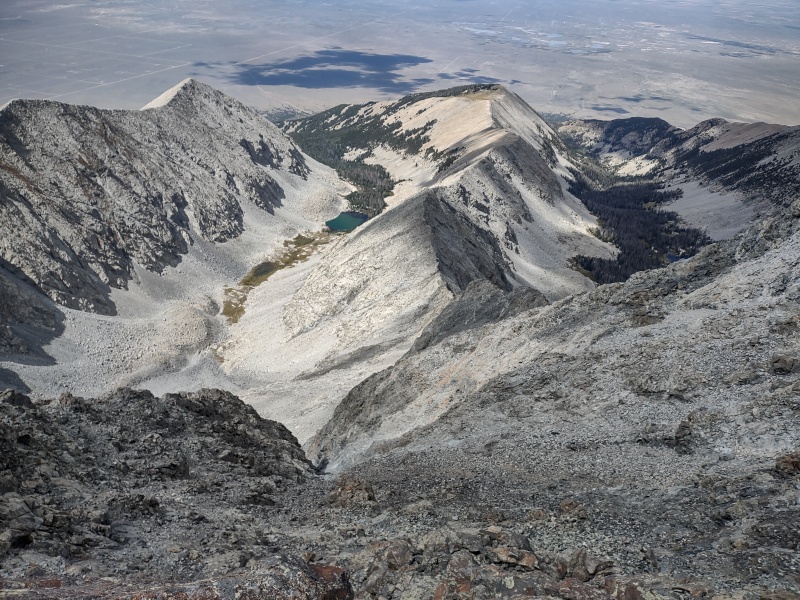
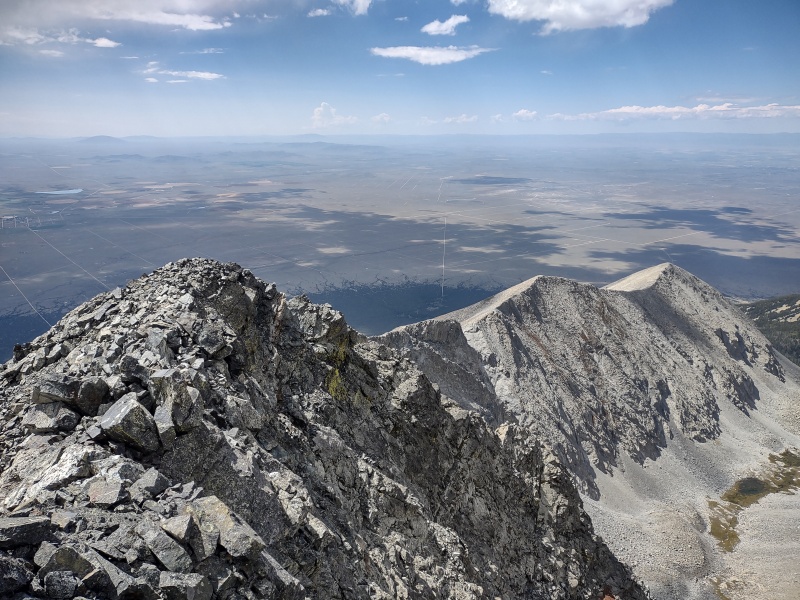
There's just a little more climbing to the summit and you can choose to fight harder terrain on the very top of the ridge or mellow it a bit by swinging climber's right into the area just above the top of the Hourglass. Little Bear Summit Views Just for fun, here are a few informative views from the summit of Little Bear. 
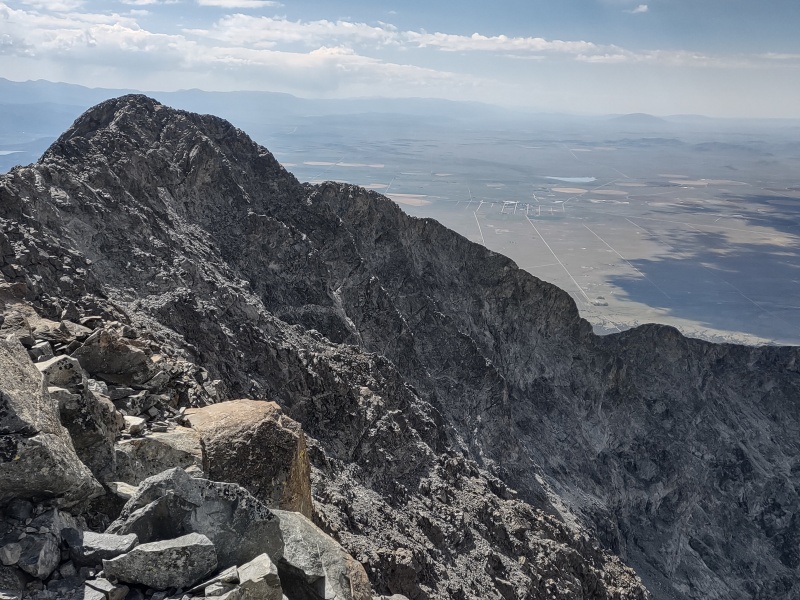
South Little Bear - 14er Sub-Summit Now on to what was my primary initial motivation for heading out this way - the 14er sub-summit South Little Bear that was to make peak #70 for me on the list of 73 (the only list that I'm paying more than mild attention to at the moment). It was a bit harder to find beta on this route since the sub-summits haven't really caught on yet and at least one trip report I found made it sound pretty atrocious. But people's perceptions vary wildly once you start getting into class 4 and 5 terrain. Overall I'd say the traverse to South Little Bear, by sticking mainly to the ridgetop, didn't usually go above class 3 but you could hit some class 4 and maybe even a touch of class 5 depending on the exact lines you pick. It is however important to note that, as with Little Bear WRD (West Ridge Direct), this ridgetop is HIGHLY exposed and even more important, a good section of this short traverse (only about a quarter mile) is DIRECTLY OVER THE HOURGLASS meaning that any rocks knocked down on that side will become like a shooting gallery for anyone coming up the Hourglass. So I used great caution the whole way along here since I had once been on the receiving end of rocks flying down the Hourglass. As with WRD, the rock is 90% solid but you have to be careful of that 10%... 
The short traverse starts with a small dip and easy stroll towards the sub-summit but then very soon a pair of towers jut up off the ridge. They looked doable but I was seeing the first hints of clouds building in the distance so I opted to take the trivial bypass ledge on the right side rather than do a frontal assault on the towers. 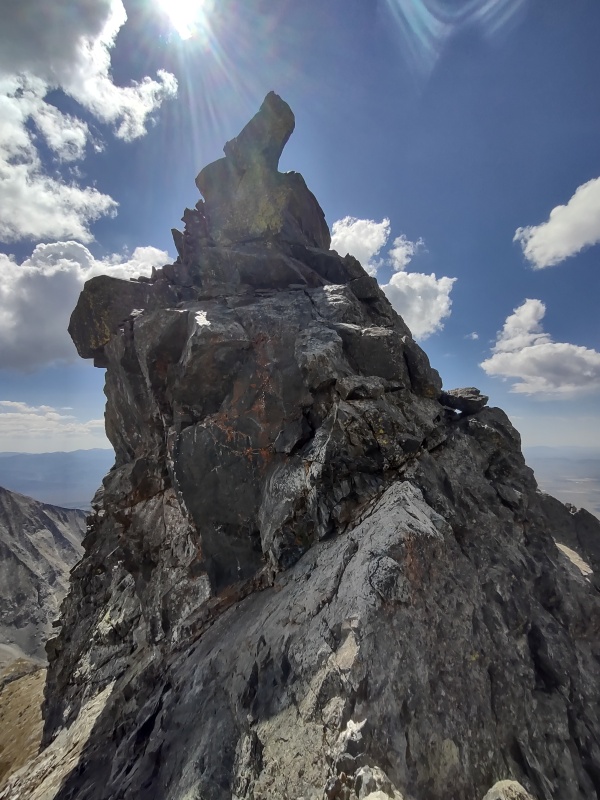
Upon getting close to South Little Bear there's what I deemed "The Pocket Knife" at 14,004ft - basically a tiny little version of a Knife Edge. Again, you can go over or take the bypass ledge on the right (a little before this was a bypass ledge on the left that keeps you away from the Hourglass side when you're most directly above it). 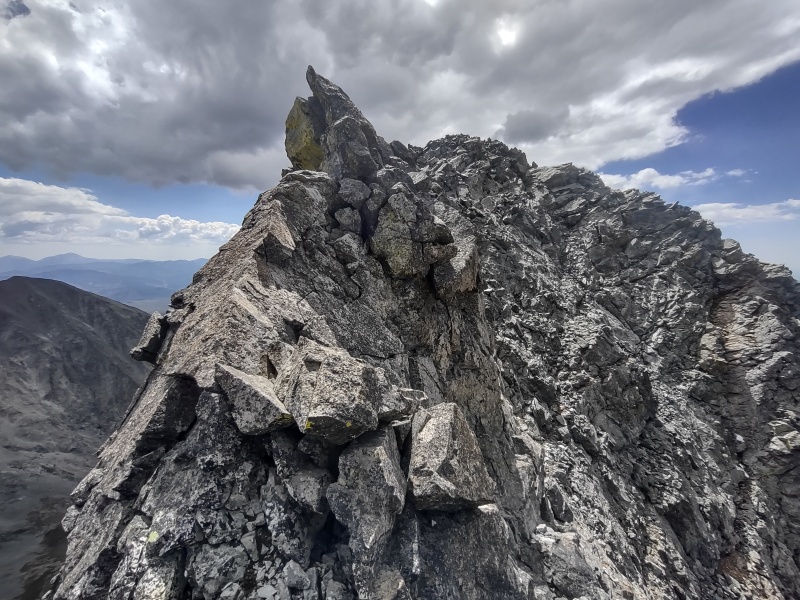
Then, just when it looks like you're going to have an easy stroll over to the sub-summit all of a sudden there is a drop of maybe 10 feet that halts progress. However, upon looking around, leaning over, etc I eventually found a set of really good handholds on top and very good footholds spaced out along the side. It was just a few moves that were at most low 5th class with just a little overhang to it. I saw off to the right (west) a possible route that was easier than that but went for the overhang instead since I didn't want to skip all the fun. 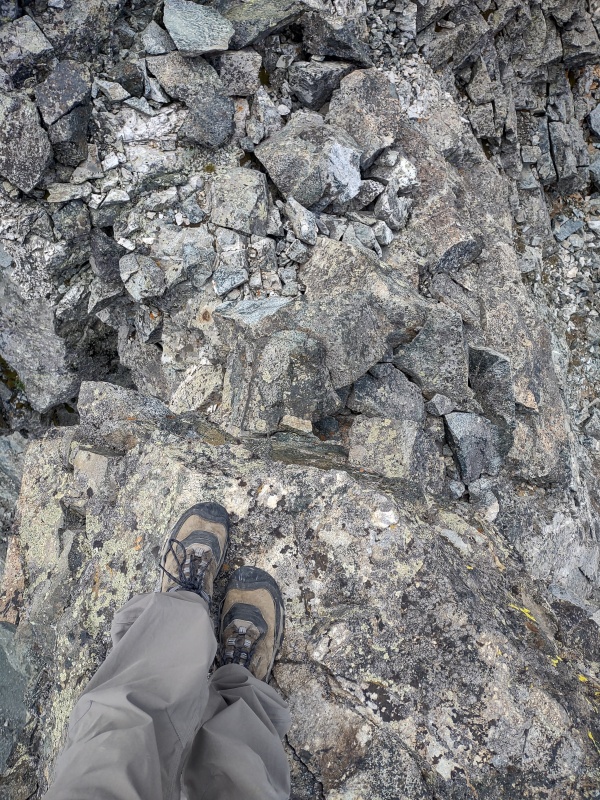
On the way back I stayed a little more strictly to the ridgetop in part because it generally looked easier from that direction. In fact, that was so much the case that before I knew it I was suddenly looking down a big drop and wondering 'where did this come from?' when I realized I was standing on top of the big tower I had bypassed on the way over. So I shrugged, scoped it out and found a way with just a little stretching to get down off the tower. 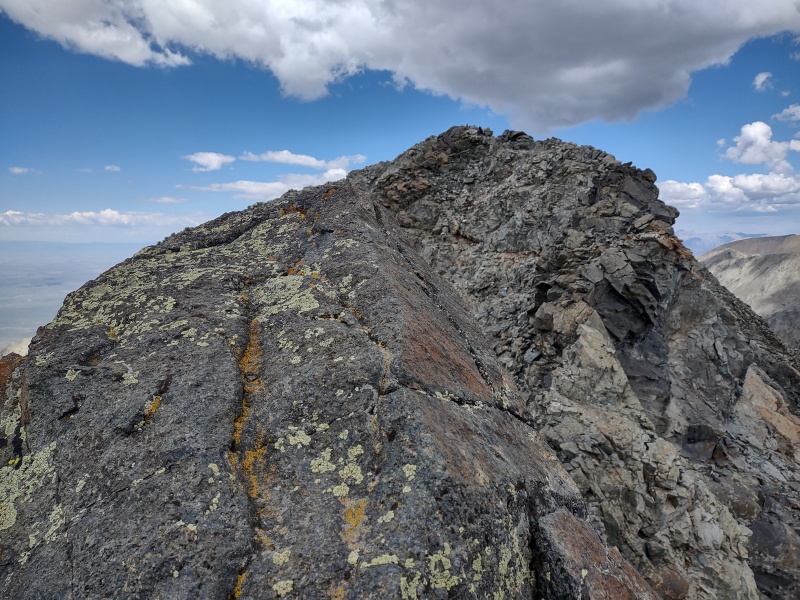
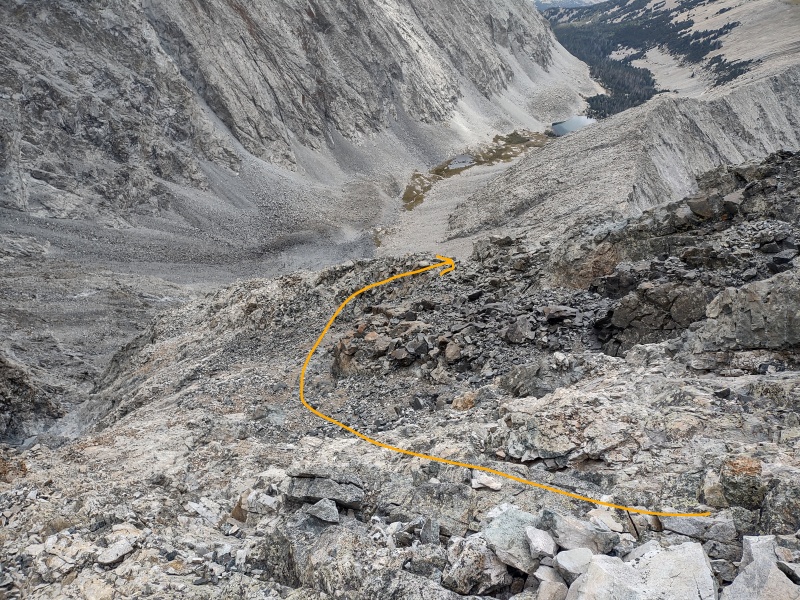
Descending Little Bear West Ridge Direct I went ahead back up to the summit of Little Bear even though that wasn't strictly necessary. There were several isolated showers coming down on surrounding peaks at this point so I didn't want to delay too long getting down, nor rush and get myself into trouble. Considering that, I decided to see if I could bypass the sketchy wall and overhang that had provided the biggest challenge coming up and instead flesh out a route similar to what CaptainSuburbia did for his class 3 bypass. My route finding skills have been improving over the years but I still made the descending bypass about as gracefully as a beached whale navigating a forest path - I got the job done and kept it easier than what I had coming up but when I reviewed the photos I took my thought was it was better to not even put in too much detail since my blundered route wasn't worth following that closely. But still I'll offer a photo or two to give the basic gist of the idea. Basically I went back to Overlook Point at 13,962ft and then swung down to the left into the uppermost section of the Hourglass fanout to drop below the steeper sections then swung right to reconnect to the ridge proper. 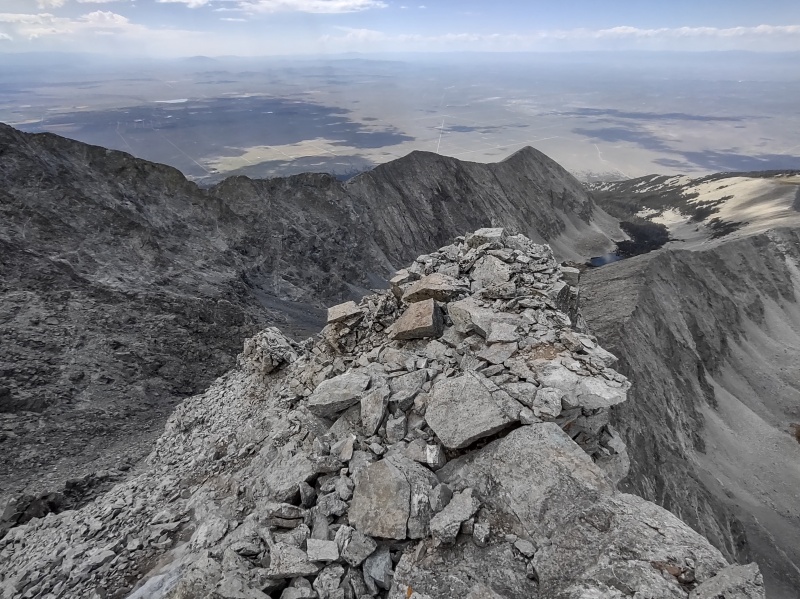
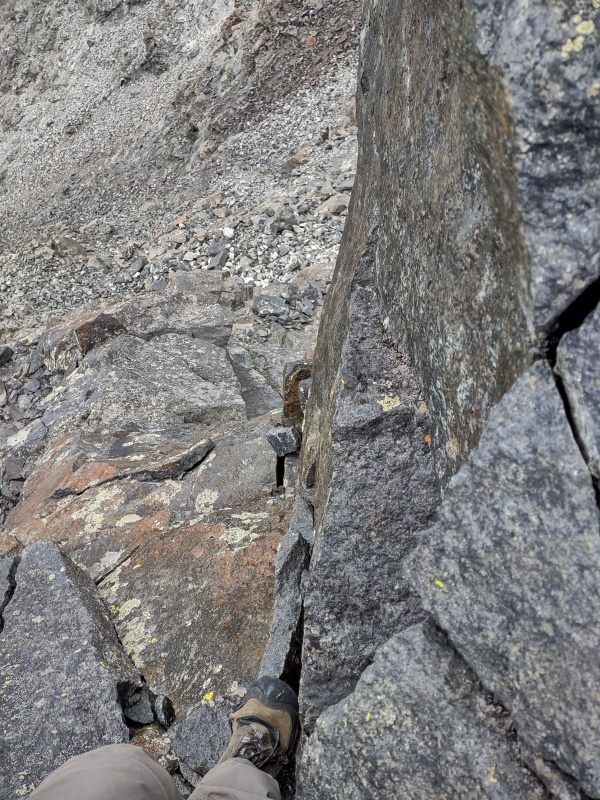
After fumbling my way back around to the ridge proper it was just a simple matter of staying on the ridge proper and reversing what I did that morning. I was concerned that going down the chimney might be worse but it's so short that it never really felt like an issue. Probably the most awkward downclimb of the day was going back down The Fin at 13,204ft which felt MUCH more exposed when going down it than it did going up. I snagged one photo through my legs while leaning forward onto the Fin to try to capture the feel but it doesn't really do justice to how airy that one feels going down. The last note is that along the ridge proper I briefly almost got lured down a rust colored gully before noting it didn't look right and I double checked with my GPX tracks to confirm I needed to continue to the next gully. 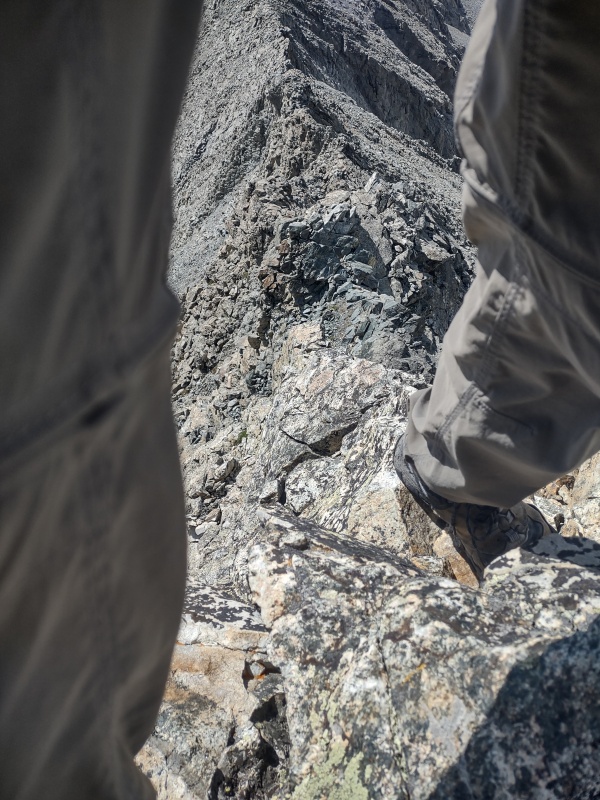
My Times 4:52am start from ~8,700ft (having driven ~3 miles in from the 2WD trailhead but not able to take those dang baby head rocks shaking me to death anymore - not to mention the previously alluded to alterations in transportation) 6:02am made it to the 10,200ft parking I had driven to the last time I did Little Bear 6:53am at Jaws 2 7:34am at Lake Como 8am start up the gully above Lake Como 8:37am at the top of the gully where a guy named Andrew passed me taking the standard Hourglass route 9:13am bottom of the notch where the trail briefly intersects the Hourglass route again 9:36am at The Slab 10am made it past the Chimney 10:36am came up through the jungle gym below the Gash 11:03am Overlook Point 11:09am Little Bear summit 11:21am continue on to South Little Bear High noon - on South Little Bear summit 12:45pm back on Little Bear summit 1:30pm finished my blundering bypass of the upper difficulties of the ridge and first a little rain then a little snow hits 2:23pm below the chimney 2:33pm bottom of the Fin 3:15pm another quick, light rain as I reach the top of the gully going down to Lake Como 4:08pm start along 4WD road after a quick stop to soak my feet in the stream below the base of the gully 5:09pm back at the 10,200ft parking area 5:52pm back at my vehicle at 8,700ft Thumbnails for uploaded photos (click to open slideshow): ")
")
")
")
")
")
")
")
")
")
")
")
")
")
")
")
")
")
")
")
")
")
")
")
")
")
")
")
")
")
")
")
")
")
")
")
")
")
")
")
")
")
")
")
")
")
")
")
")
")
|
| Comments or Questions | |||||||||
|---|---|---|---|---|---|---|---|---|---|
|
Caution: The information contained in this report may not be accurate and should not be the only resource used in preparation for your climb. Failure to have the necessary experience, physical conditioning, supplies or equipment can result in injury or death. 14ers.com and the author(s) of this report provide no warranties, either express or implied, that the information provided is accurate or reliable. By using the information provided, you agree to indemnify and hold harmless 14ers.com and the report author(s) with respect to any claims and demands against them, including any attorney fees and expenses. Please read the 14ers.com Safety and Disclaimer pages for more information.
Please respect private property: 14ers.com supports the rights of private landowners to determine how and by whom their land will be used. In Colorado, it is your responsibility to determine if land is private and to obtain the appropriate permission before entering the property.