| Report Type | Full |
| Peak(s) |
Crestone Peak - 14,299 feet Crestone Needle - 14,196 feet "East Crestone" - 14,298 feet "Northeast Crestone" - 14,251 feet |
| Date Posted | 08/26/2024 |
| Modified | 09/22/2024 |
| Date Climbed | 08/17/2024 |
| Author | daway8 |
| North Buttress to Crestone Traverse |
|---|
|
So why do we need yet another trip report for these peaks, when several people have already written nice ones that cover this route and I myself have no less than 3 other Crestones reports already? Well here are some of my main motivations for piling on: 1) There's been a lot of confusion and even some misinformation regarding the North Buttress route - especially in regards to the difficulty of the crux on Northeast Crestone and how that's rated for different lines. 2) Many of the reports that include this route tend to pile on the entire Kit Carson group with it - which is too much for me. So I wanted to highlight this sweet route without the distraction of the other peaks. 3) I'm fond of both comparisons and cool photos, so I want to share some of those to help people more fully understand the nature of this route. To elaborate, included in this report will be:
Trailhead: South Colony Lakes 4WD Campsite: A little before South Colony Lakes Route: Start up trail towards Humboldt but turn left towards Bear's Playground, then up North Buttress over NE Crestone, East Crestone (bonus points) then Crestone Peak into the Crestone Traverse. Mileage/gain: From 4WD trailhead to camp just before South Colony Lakes: 3.5mi, 1,750ft gain (one way) Loop from lakes to North Buttress to Crestone Traverse and down Broken Hand Pass back to lakes: 6.5 miles, 5,650ft gain Approximate total stats for the weekend: 13.5 miles, 7,400ft Difficulty: Class 5 - optional on initial section up the North Buttress then mandatory to top out on NE Crestone. Reportedly on optional descending traverse said to be rated Class 4 but, if so, it's the sketchiest looking most insanely exposed class 4 I've ever seen. So I would recommend not attempting this route unless you're comfortable doing a little class 5 with extreme exposure. Following that you have the 5.2 bulge move on the Crestone Traverse (which I found rather awkward but not exposed) and the headwall which can go class 4 or 5 depending on your line (I swung left for radically exposed class 5 and it was a delight!) 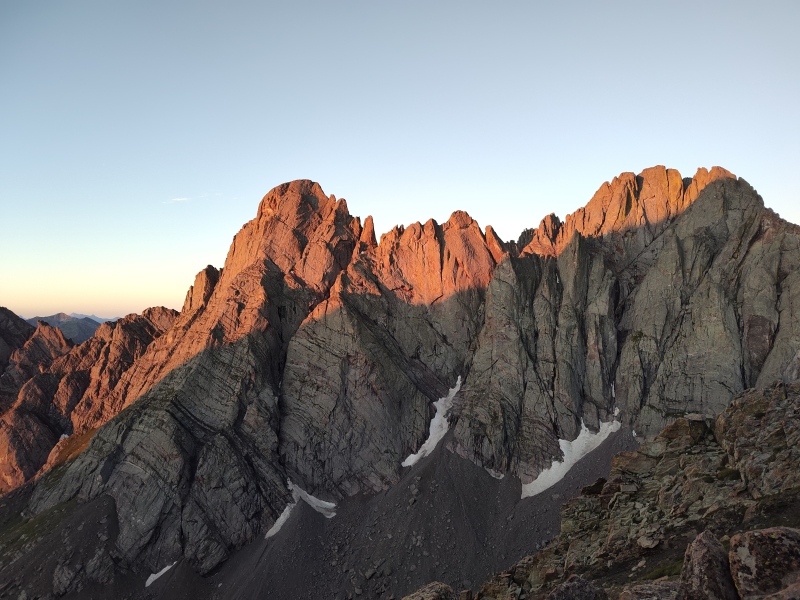
Comparisons So one thing that others have pointed out about the exposure for the crux of this route is that for many of the 14er features that are famous (infamous) for their exposure, you're essentially on top of the exposure - with solid rock under your feet. But for the final crux of the North Buttress - which involves either climbing up onto NE Crestone, or doing a descending traverse across it - you're essentially hanging on the side of a wall with nothing underneath you other than the knubs sticking off of the wall. So if you've done the Knife Edge on Capitol or the Little Bear - Blanca Traverse (which has some of the most eye-popping exposure I've encountered yet) imagine doing those features but down along the side of the cliff wall that you're normally standing on top of - that might not affect the difficulty rating that's listed (class 4, etc) but it sure does give at least a little extra pause to most people. But the thing that makes this work is that fabulous Crestone Conglomerate rock with its huge, juggy super solid holds. I remember thinking while crossing the Knife Edge that one might - with extreme amounts of care and finesse - be able to delicately cross along the steep slabs a ways underneath - since there are potential holds. But that would be the kind of extreme sports extravaganza one might do if ever stuck in a Groundhog's Day loop. The Crestones, on the other hand, have lots of places where you can safely cling to the side of a wall where a fall would mean certain death. Maybe it takes a certain kind of weirdo to enjoy that but I find it really cool! 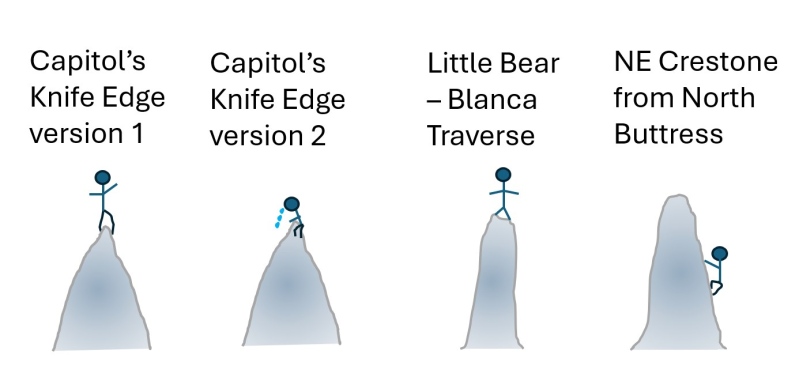
At some future point, having now completed all 4 of Colorado's Great Traverses, I may undertake to write my own summation of these classic routes, as well as some of the variations (such as ridge direct El Diente to Wilson via PinPoint). But, as this is already going to be a long trip report as is, for now suffice to say that the Crestone Traverse had, by an overwhelming margin, the most confusing and non-intuitive route finding of any of the traverses - in large part because the other traverses tend to stay much closer to the ridgetop whereas this one drops much further down and rollercoasters up and down along the side for a very long time before coming up to the ridge. But there were abundant rock cairns that, for once, weren't misleading. Also, I'll not that - if you combine it with North Buttress, I felt the crux there was a bit more challenging - if only for a few moves - than anything I encountered on any of the 4 Great Traverses. This includes the Ridge Direct version of El Diente to Wilson via PinPoint which consensus so far is that it rates as class 5 but its big blocky spires so probably only low class 5. But the crux for the North Buttress route to top out on NE Crestone requires using holds on a vertical face over fatal exposure that are small enough to not even be visible until you get up next to them. This makes it sound rather dramatic, but my intent is not to dramatize, just to paint a clear picture that this crux is set apart from the crux moves on other 14er routes. With that said however, it looks much worse at first glance than how it actually feels when you get on it - or at least that was the case for me. Please note I've been slowly leveling up exposed class 5 climbing over the years and keep going to the climbing gym from time to time. Here's a slightly snarky breakdown of likely reactions to the crux move based on your climbing experience: Likely Reactions to the Crux move on North Buttress if you're:
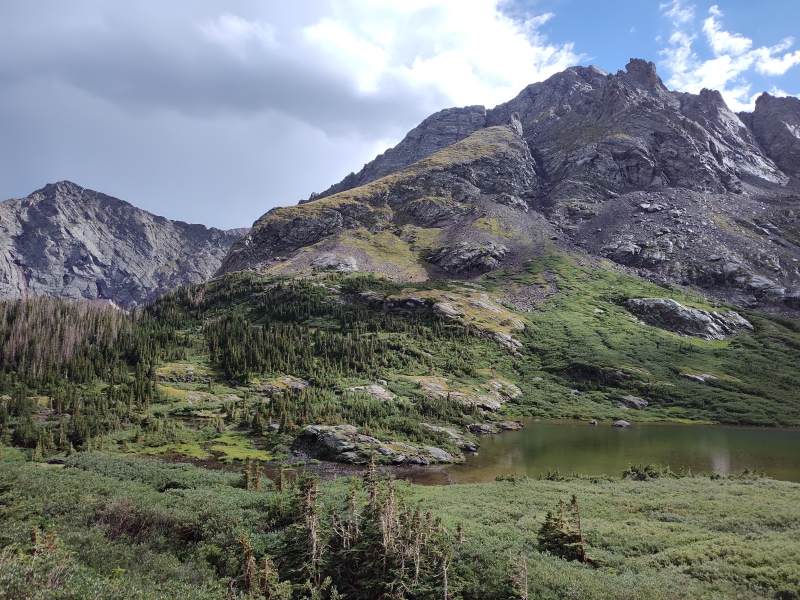
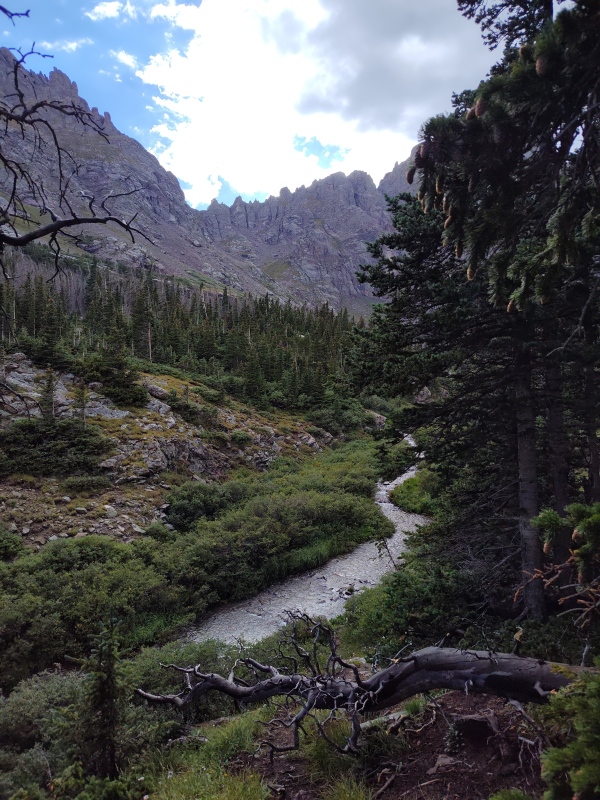
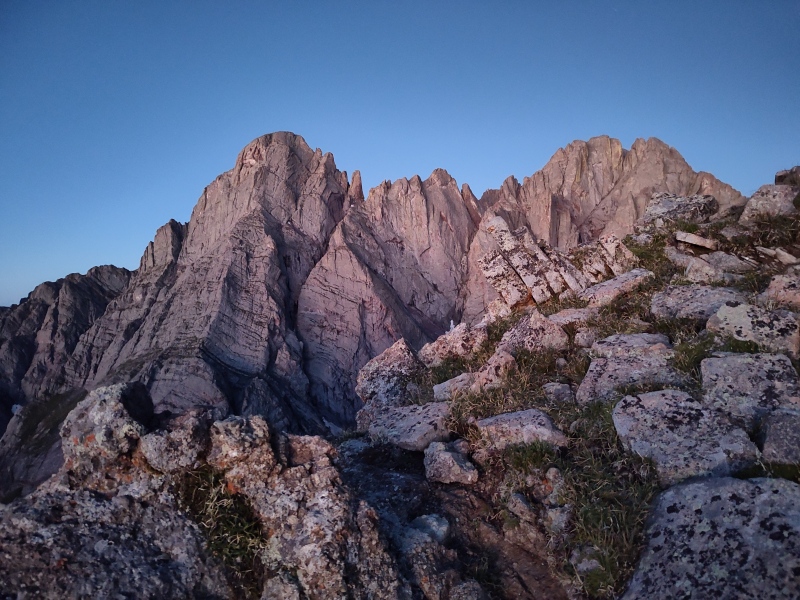
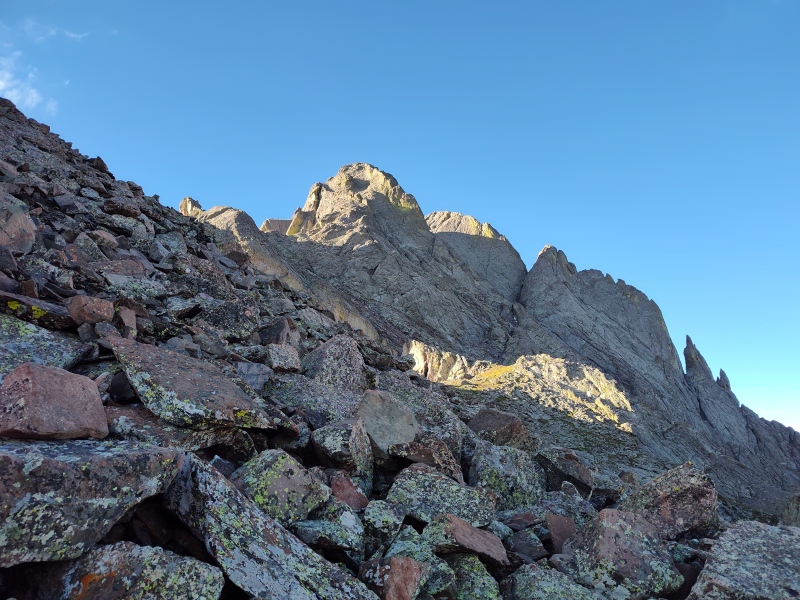
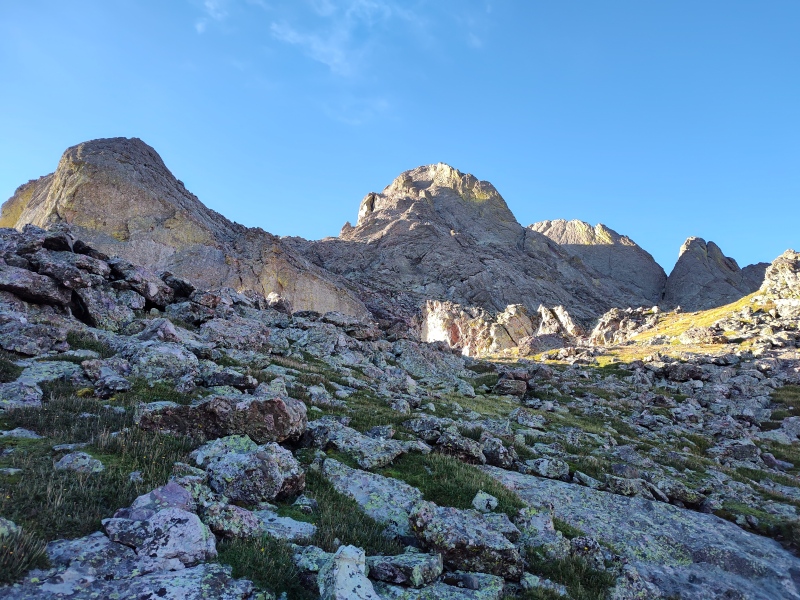
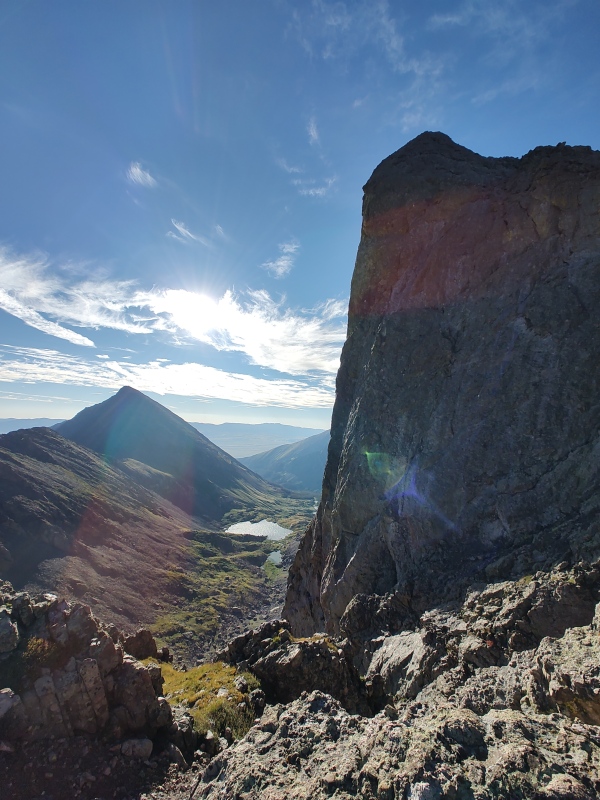
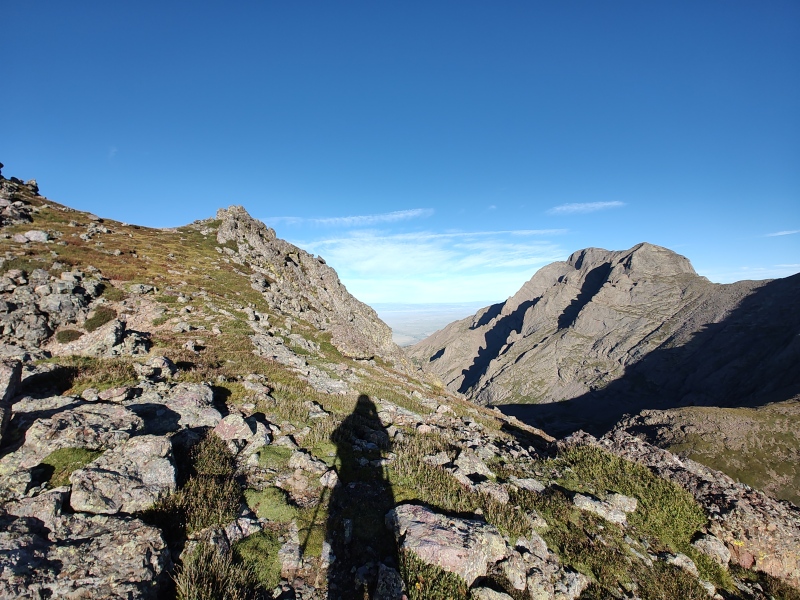
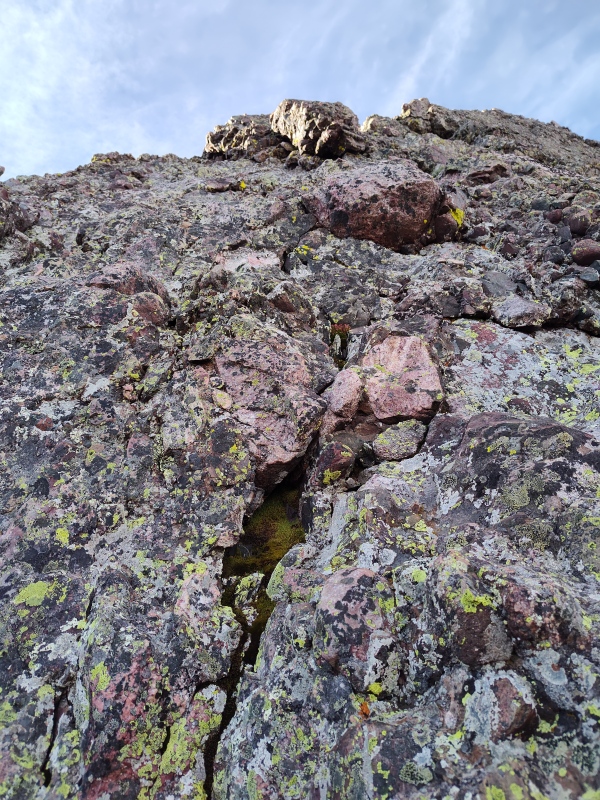
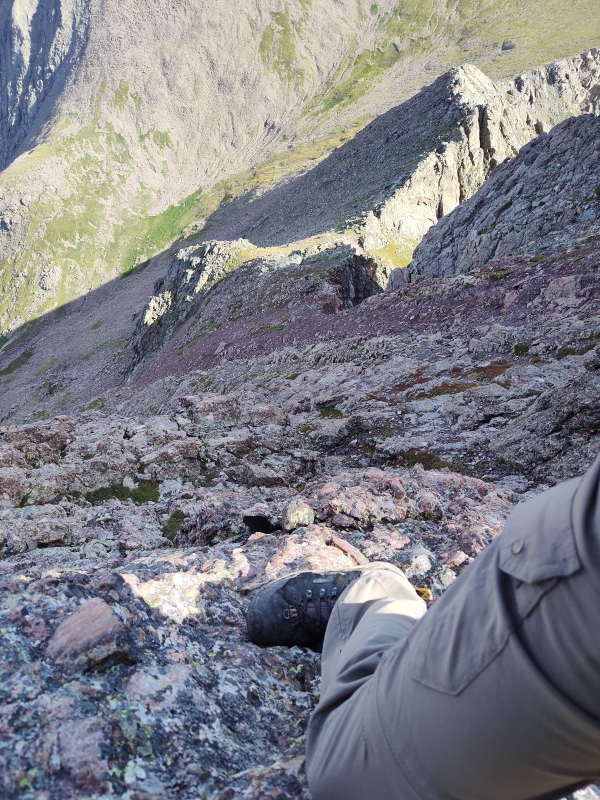
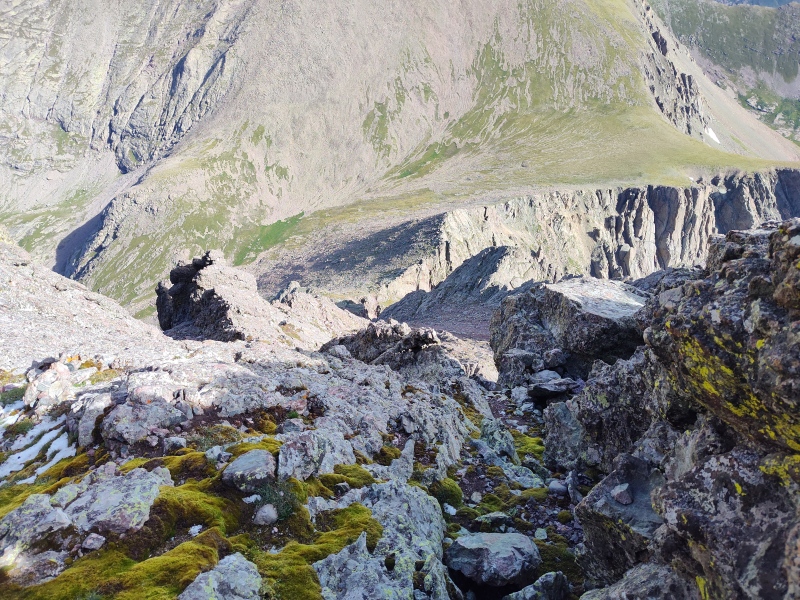
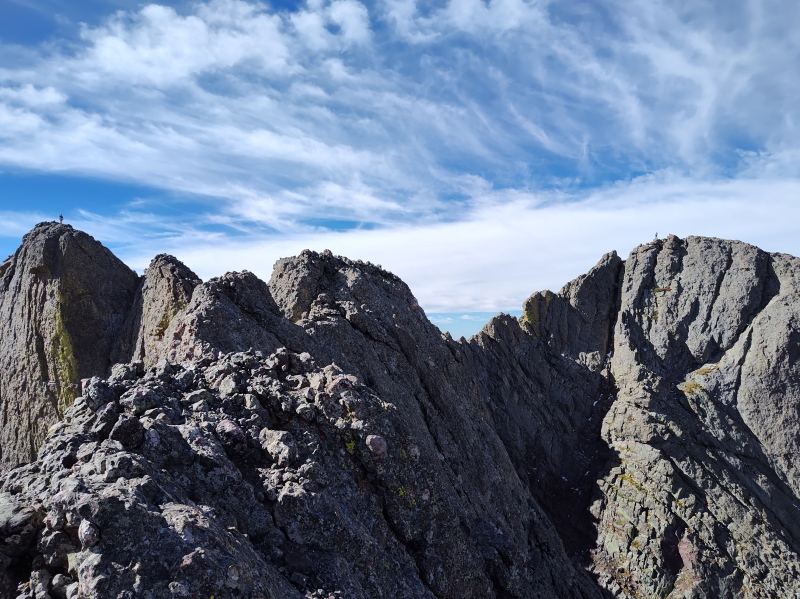
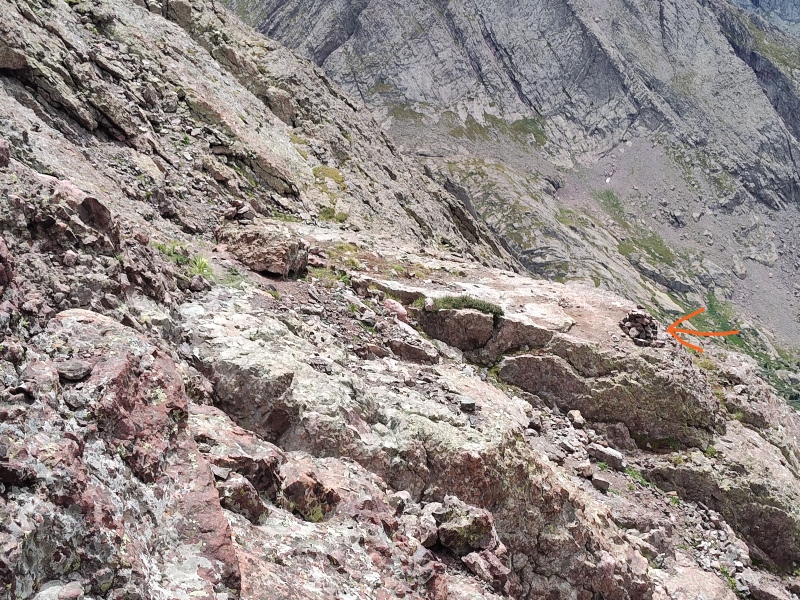
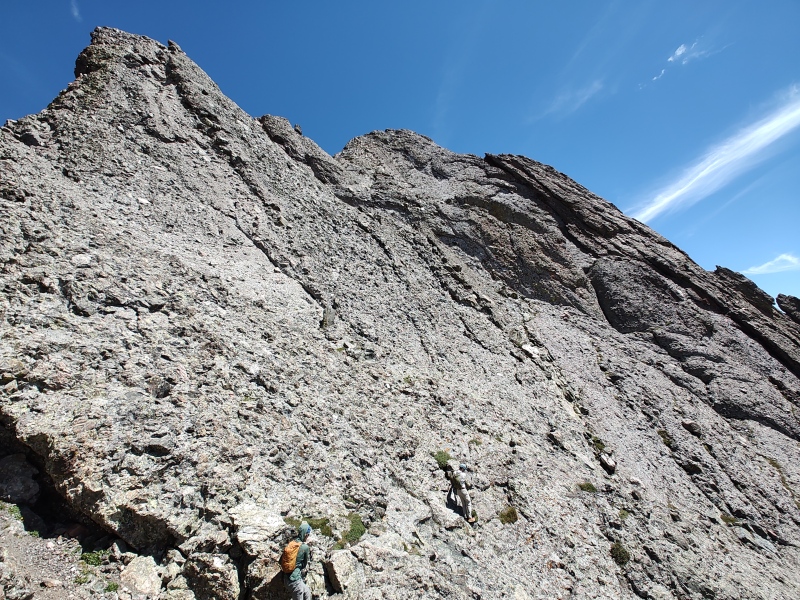
The Approach A few quick observations: South Colony Lakes is a beautiful place to camp. Over half of the distance of this particular trip is incurred on getting to/from South Colony Lakes (but only about 30% of the elevation gain!). That's one thing that makes it attractive to camp for those of us who aren't into stringing 300 peaks into a single day hike. Also you can get incredible views of the stars. Just be aware the trees more or less stop by the time you reach the lakes so if you want any kind of cover, stop before then (besides camping is prohibited within 300ft of the lakes). Route tip: If you follow the standard route for Humboldt it trims out a big switchback that the standard Crestone route takes saving about 1 mile of walking. Not as broad of a trail but it's very well defined. Note the ridge from the Humboldt saddle over to Bear's Playground is really, really chunky. Still pretty much class 2 but if you stay on top there was a class 3 crux to deal with. The ridge isn't difficult per se, but the chunkiness will make it slower going than you might expect. Below are some teaser photos to hook you on this area. 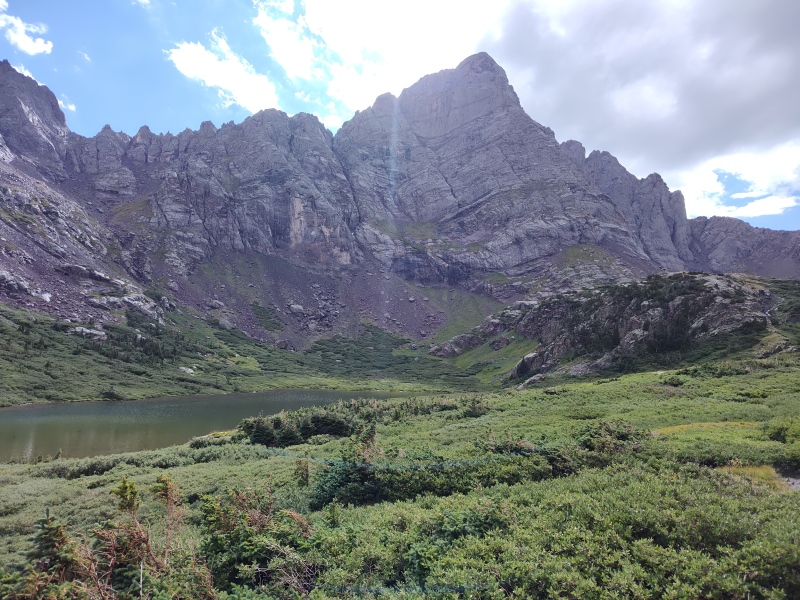


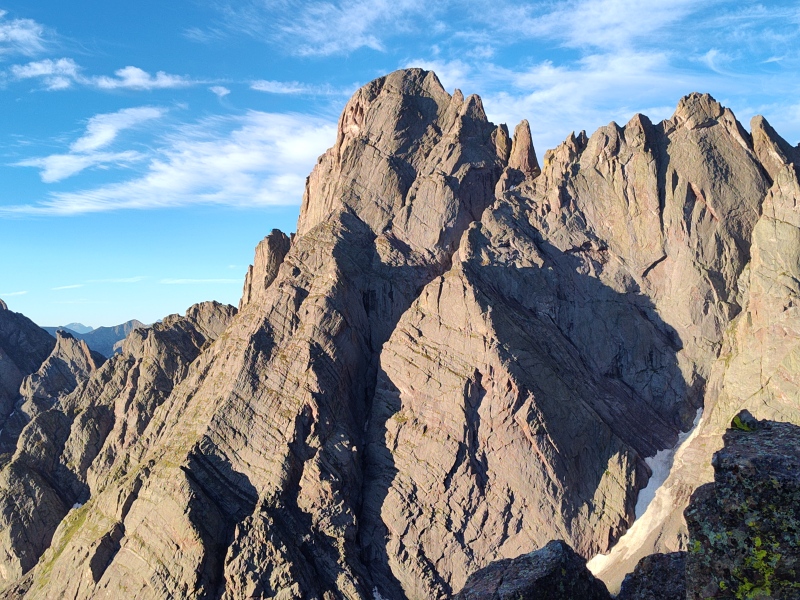
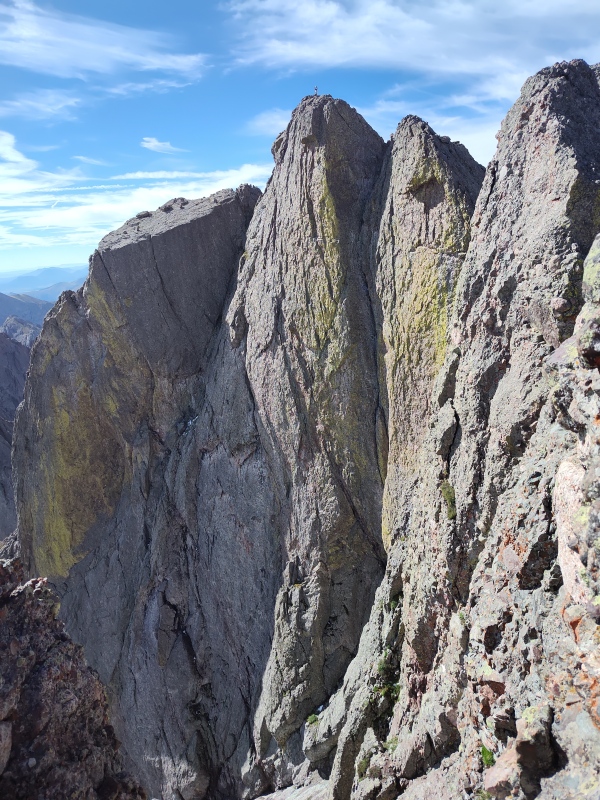
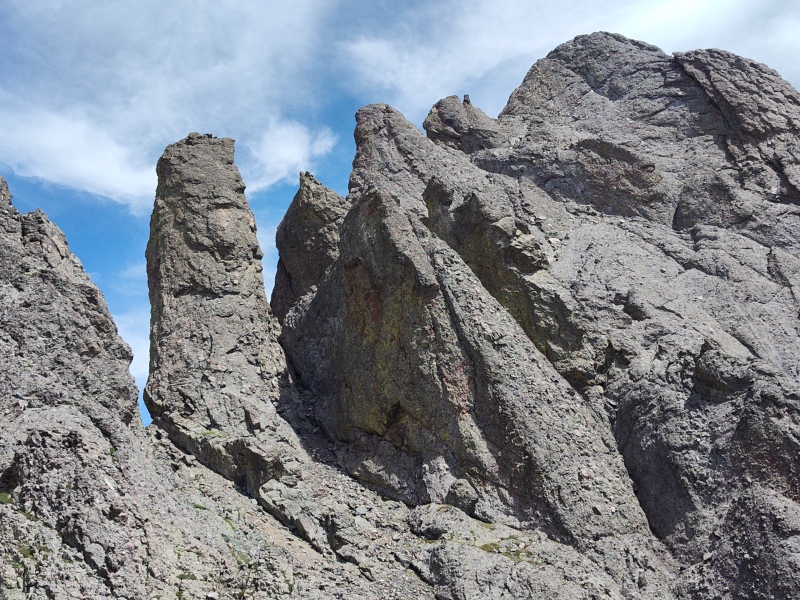
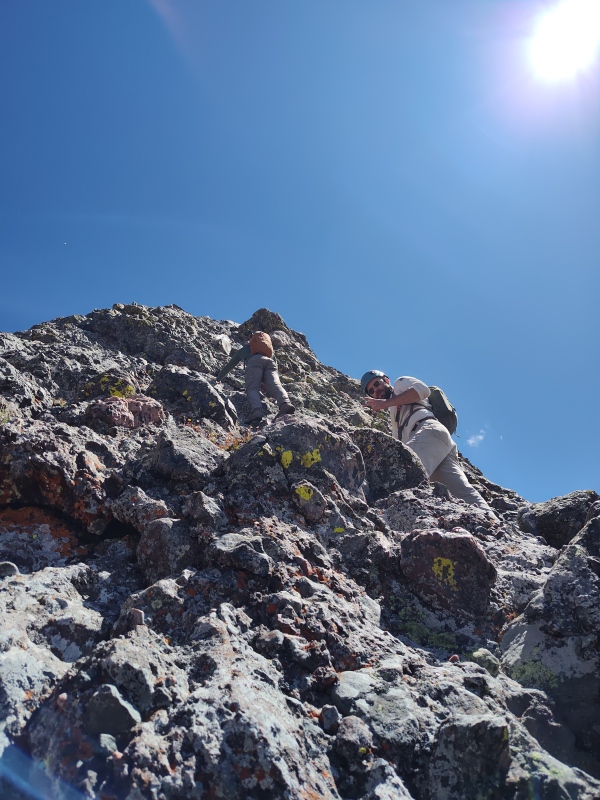
The North Buttress Others have described this area as a choose your own adventure route and that is absolutely the case - there's a little bit a everything here, from a few loose looking gullies which might get you at least partway up at as low as class 2 (but definitely not all the way to the summit) to plenty of class 3 scrambling that you might possibly string together for all but the crux (I didn't try...) or plenty of class 4 and class 5 walls/towers that you can weave up, around, over or whatever suits your fancy. Oftentimes I give very detailed step by step guidance for routes, with route lines, etc. But for this one I'm going to be more vague. If you can handle low 5th class you can wander around freely. If you can't handle low 5th class - um, you might make it to the top but then have a panic attack when you see the crux. Because even though there's a bypass that many of those who have taken it call class 4 - to me it sure had the look and feel of class 5 from where I was. Even if the actual moves really are class 4, it's not going to feel like any other class 4 you've likely done simply because of the nature of the exposure as shown in the cartoon near the start of the report. So if you can't handle low 5th class in an absolute no-fall zone, maybe go for NE Crestone from the south side (from the Crestone Peak saddle). From that side you can easily keep it class 4 and don't have to hang on the side of any walls. But if you're ok with a little high stakes class 5 then have fun sending it up whatever line looks the most fun. I brought climbing shoes but felt no need for them until the final exposed crux pitch. Some might be ok without them at all. 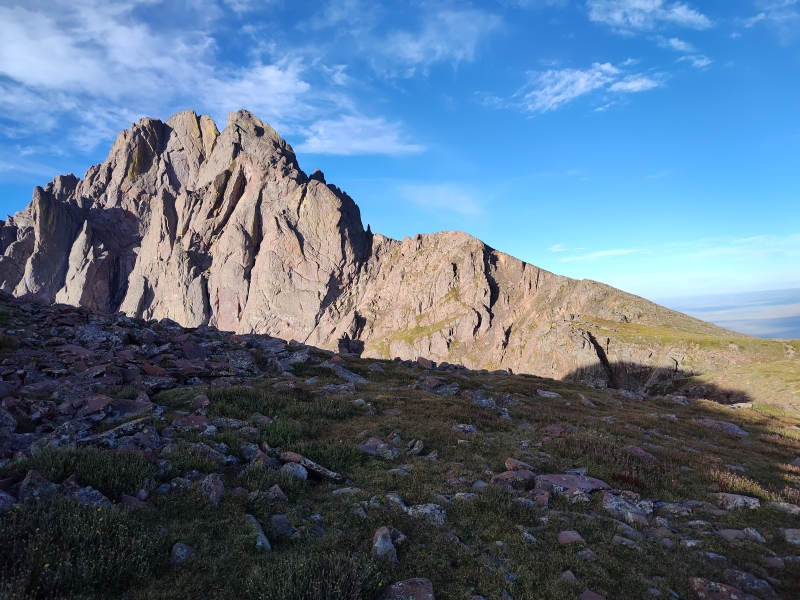
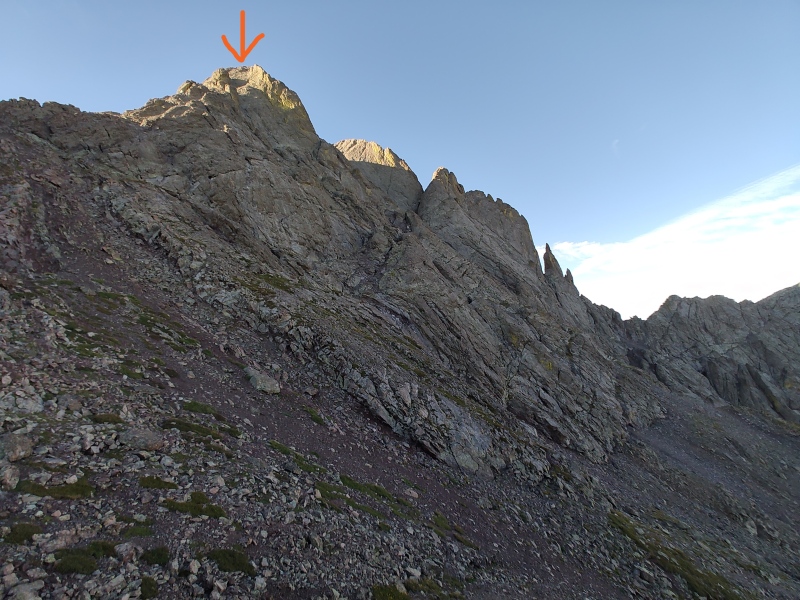
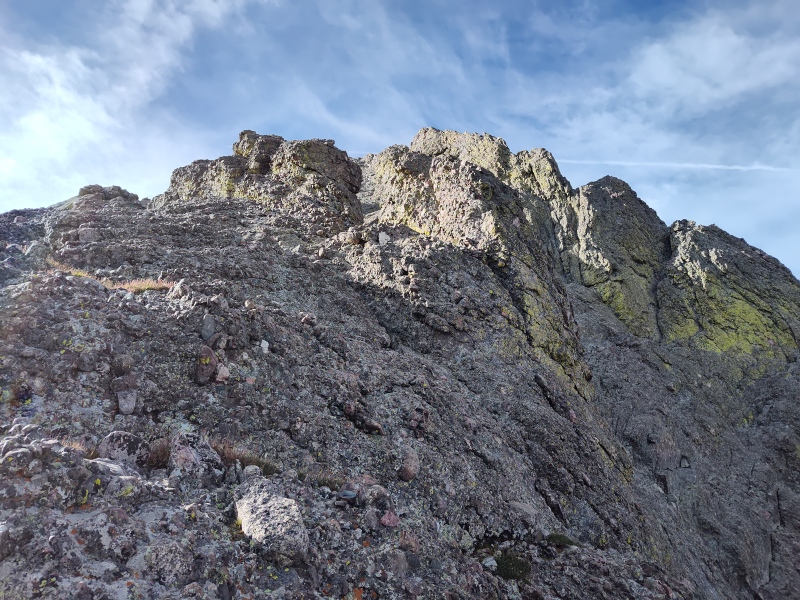
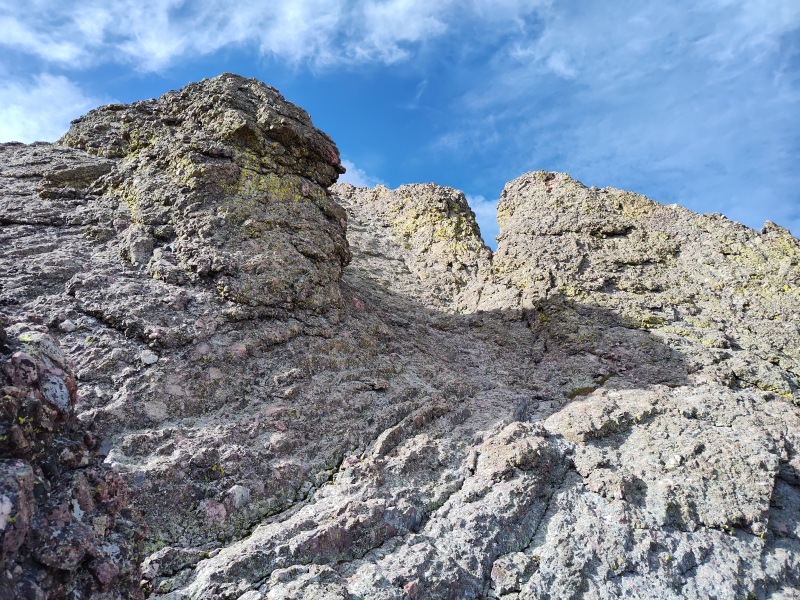
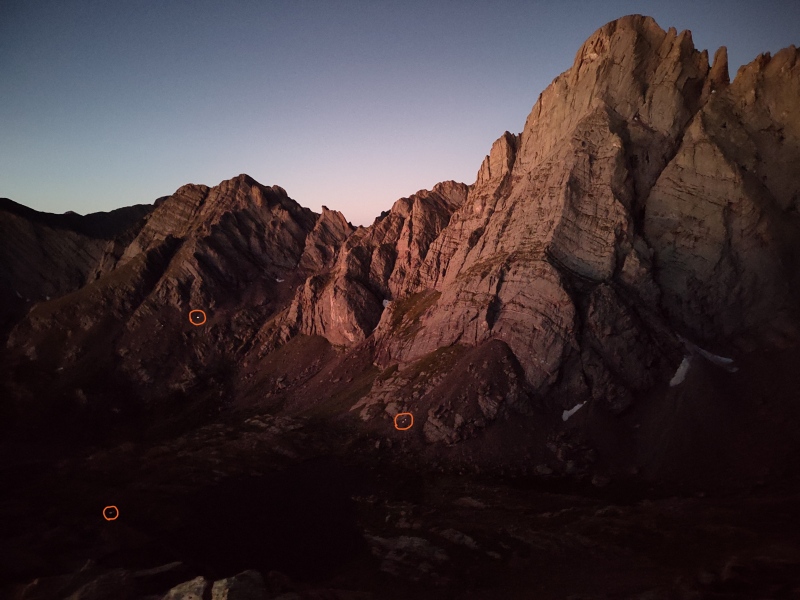
Crux Summary Variants of the below picture have been floating around for a while with different lines and different numbers and sometimes confusing/conflicting data. The image below is my attempt to solidify/clarify the data out there. See also the clarification below about a small error in Gerry Roach's book that has been the source of some of the confusion about this route. Note the North Buttress route has you come up the far side of the false summit on the left, do a 5.0 downclimb into the saddle then a low to mid 5th ascent to the summit of NE Crestone, a 4th class descent then Class 3 or 4 ascent (depending on your line) to get to the Crestone Peak saddle. 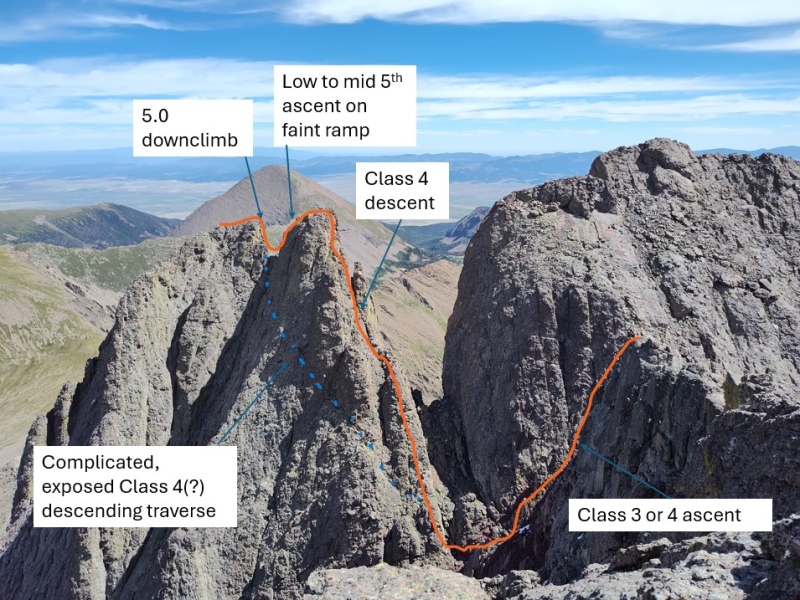
Clarification of Gerry Roach's description: Gerry Roach has some fantastic guidebooks that give insight into lots of little extras like this route. All in all, his Colorado's Fourteeners book (and also Colorado Thirteeners) are excellent resources for beta on obscure routes. But every once in a while he has a little error here or there. This route is one of those small errors. After extensive study and checking this peak out on 3 different occasions from 2 different directions I think I've clarified what's going on. Gerry describes "a tricky Class 5.0 downclimb on the tower's west side" followed by an "exposed Class 4 traverse across unprotected slabs." The gotcha is that Gerry was describing the descent from the false summit of NE Crestone (on the left in the image above). Both visual inspection from Crestone Peak (which is where the above image is taken from) and from on the peak itself, as well as Lidar results confirm that the bump on the right (south) is the true summit of NE Crestone. I can confirm after doing that downclimb off the false summit that it felt like a 5.0 to drop down into the saddle - I stepped down a little bit on the west side then did an awkward little barn door swing from one huge jug to another. From there is what Gerry and others call the "exposed Class 4 traverse" - though a few people argue it's more like low 5th class. This has you pass underneath the true summit of NE Crestone. One key reason I'm sure Gerry's 5.0 is the move coming off of the false summit into the saddle and not the downclimb on the right (south) side of NE Crestone is that - having done that descent off of the south of NE Crestone three times now and having done the class 5 ascent to the top from the North Buttress side, there is absolutely no way that anyone who calls the dashed blue line traverse a mere class 4 could conceivably rank the downclimb on the right (south) side of NEC as 5.0 - but it does fit very nicely to call the drop from the false summit to the saddle a 5.0 move (meaning extremely easy class 5 move). It's also clear that anyone dropping into that saddle between the false and true summit of NEC would at first glance probably not be inclined to try to go straight up that summit. It's primarily because I had already scoped this out from above on my previous trip and saw that little hint of a ramp (that for some reason is mostly invisible in photographs) that I felt comfortable taking it on. Consequences of a Fall Near the Crux This is another slightly tongue in check look at a rather serious issue, intended to communicate useful data in a mildly humorous manner so as to (ironically) capture the seriousness of the situation without excessively dramatizing it.
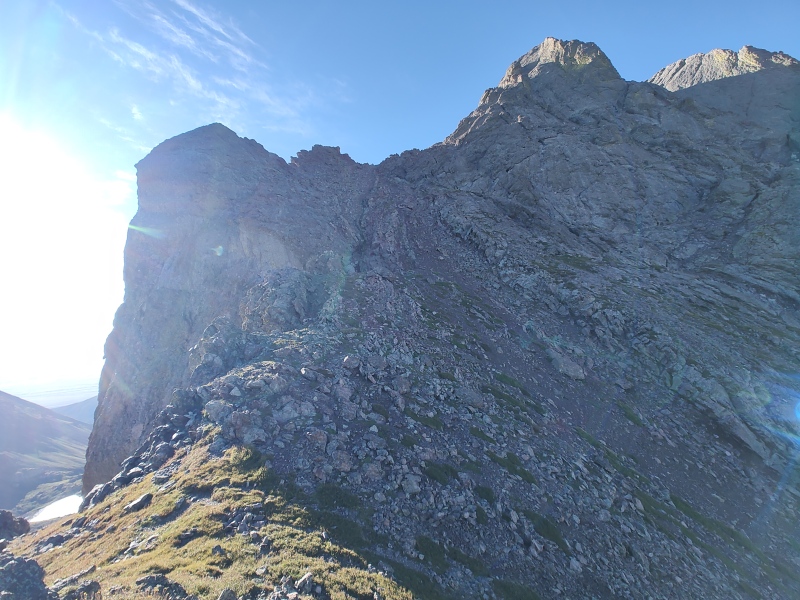
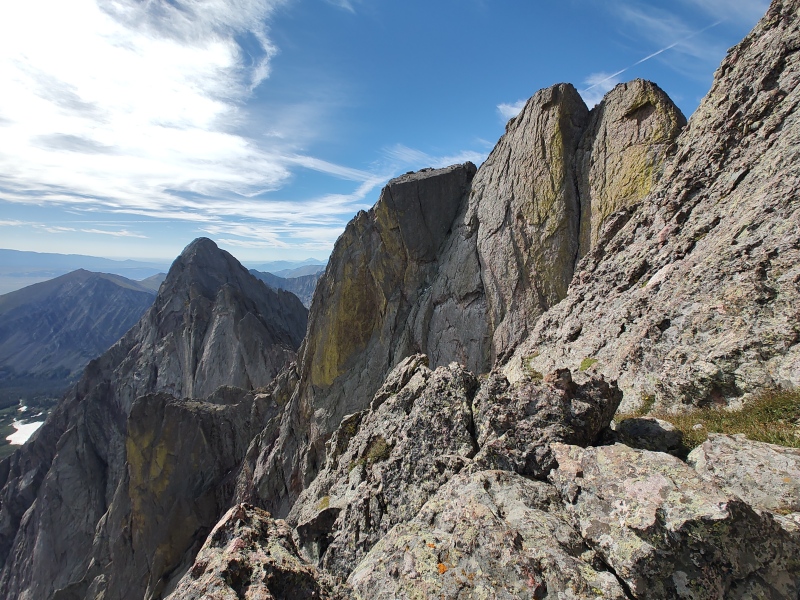
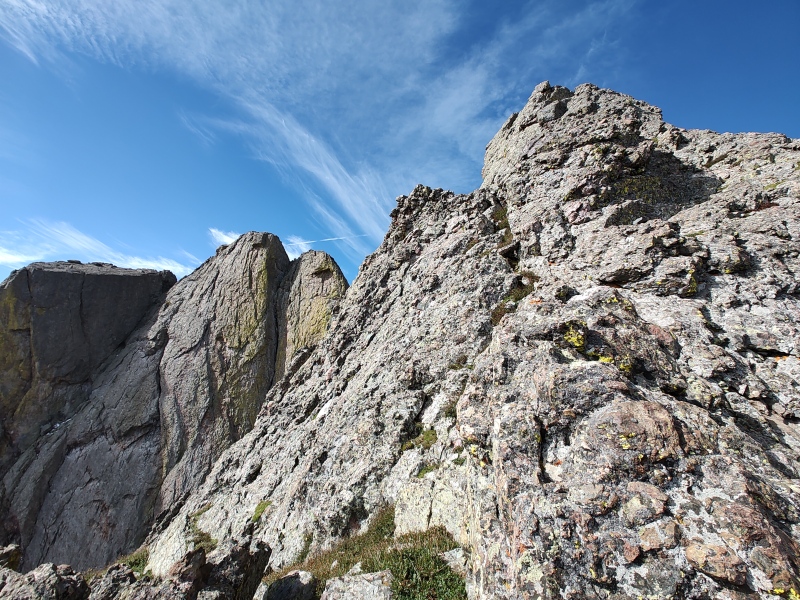
The Crux Details: Northeast Crestone The crux on this route is pretty cruxy. Eli Watson apparently managed to shoot right by it based on his report but apparently only because he was fixated on the massive, insanely imposing face of East Crestone, as it appears from the north - mistakenly thinking that was going to be the crux climb. That is an absolutely jaw dropping face so I can absolutely see how the stuff in between would pale in comparison to that. But barring a very unusual distraction like that, I'd say 99.9% of people are going to be VERY aware of when they reach the crux of this route. The exposure is intense and at first glance it looks like end of game - nobody's getting across this sucker! But as you move forward and inspect things closer you start to see a lot of little weaknesses in this fortress that allow for access. Unlike the main climb up the North Buttress, I'm going into full beta mode for the crux since this is the make it or break it point that comes after a whole lot of effort to get this far. Please refer to the summary photo in the previous section for clarity on which section is which. 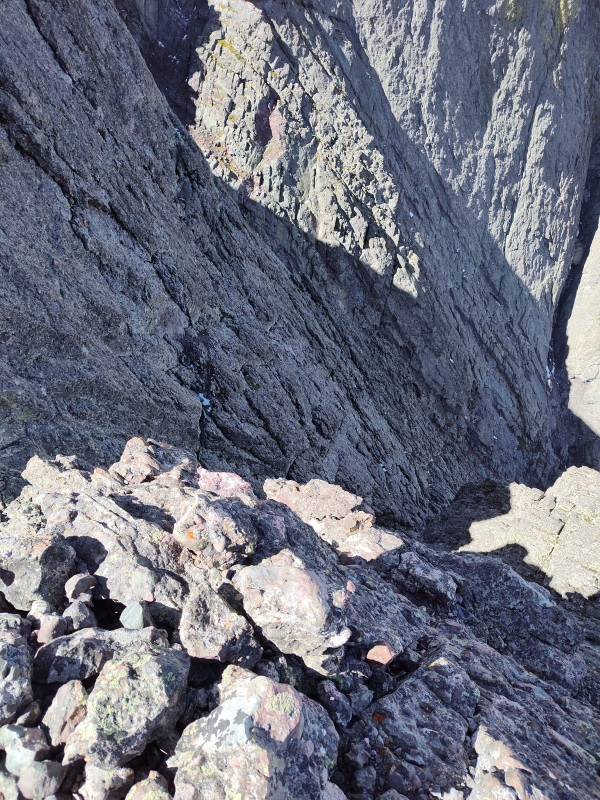
The exposure surrounding the crux is on par with what you'll encounter on the Little Bear - Blanca Traverse. Your options are to hang on the side of this tower for an extended stretch trying to do a descending traverse that might be Class 4 or might be harder, depending on how good you are at finding the route that others have described, or you can hang off the side of that wall for a much shorter length of time while popping up to the true summit of NE Crestone. Polar did a very good write-up about this crux section in his trip report about a larger loop and also links to some discussion in the forum about this. 
The real key to this ascent from the small saddle between NE Crestone and it's adjacent false summit is this very small, subtle little hint of a ramp that's on the west side of NEC. This ramp doesn't go all the way up to the summit - it just gives you something to step out onto and gain just enough elevation that you can clear the overhangs that are facing the saddle and then cut left to get on the ridgetop and easily reach the summit. The really bizarre thing about this little ramp is that it's pretty much invisible in my photos both from my previous trip taken from above and this trip taken from the side. But stepping out onto this "invisible ramp" was the key to the crux for me. 
Below is another view of the crux climb to the summit. Again, the line drawn in is just the basic gist - step out onto the "invisible ramp" for a few steps then cut back left to grab the ridgetop. 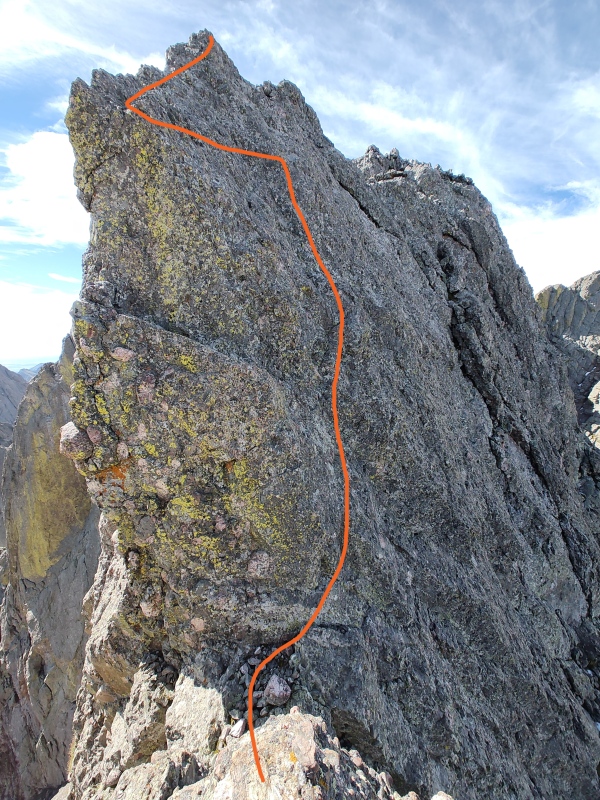
A few moves into the crux I reached a position where I had really solid footing and a bomber handhold that allowed me to free a hand to take this photo. I was perfectly comfortable perched here despite the fatal exposure. But the odd thing is that when I look at this photo my reaction is: "what the heck am I even standing on?!?!?!" This does not look like a place where I would have been comfortable stopping to pull my camera out of my pocket for a photo, and yet, despite how it appears even to me, this position felt totally secure. I think my right foot might still be on the "invisible ramp" or possibly one step above it - I don't recall the exact position for sure. My left foot appears primed for the cut to the left that I described already. 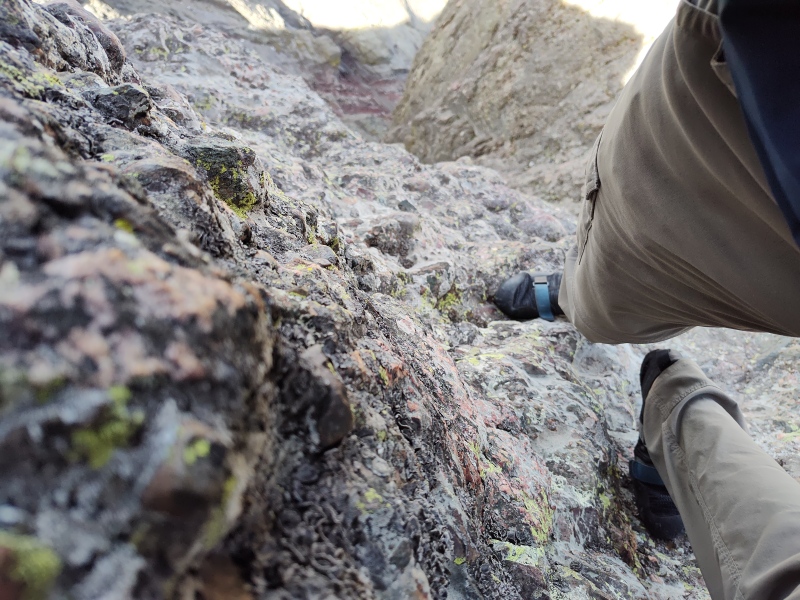
The photo above looks up to the left at what I was convinced at the time was an easy move or two to gain the ridge to the top. But once again, when I look at the photo I can't see in it what I saw in person that gave me the confidence to pause and take these photos. Apparently the lighting plays weird tricks with this Crestone conglomerate rock. But do note one fact from this photo and the previous. That awesome Crestone conglomerate is not so big and chunky on this little section as, for instance, the headwall on the Crestone Traverse. But there are just enough holds that are just big enough for a pretty good solid grip to make it work (I'm not a hang on my fingertips kind of guy...). 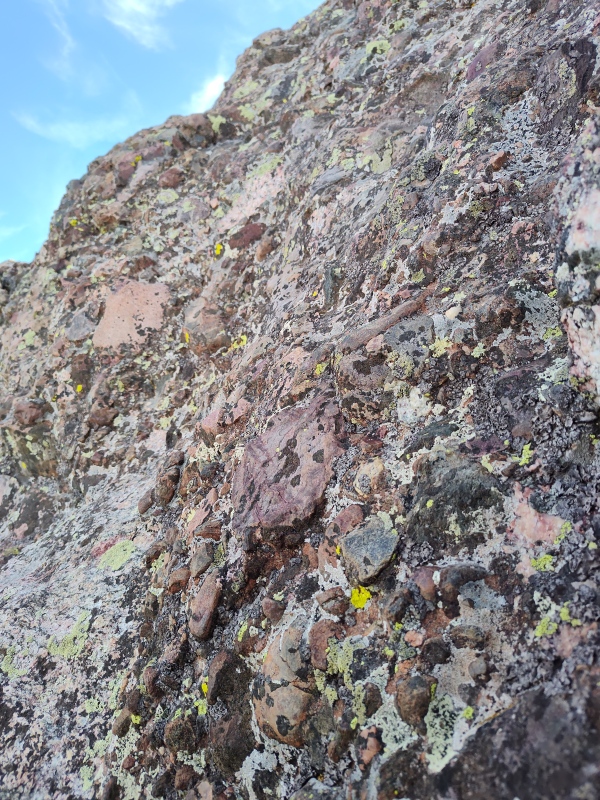
By contrast, looking back into the saddle at the the false summit that rock is very chunky - but there's just barely enough of a stretch to the landing that I see why Gerry called it a 5.0 downclimb. 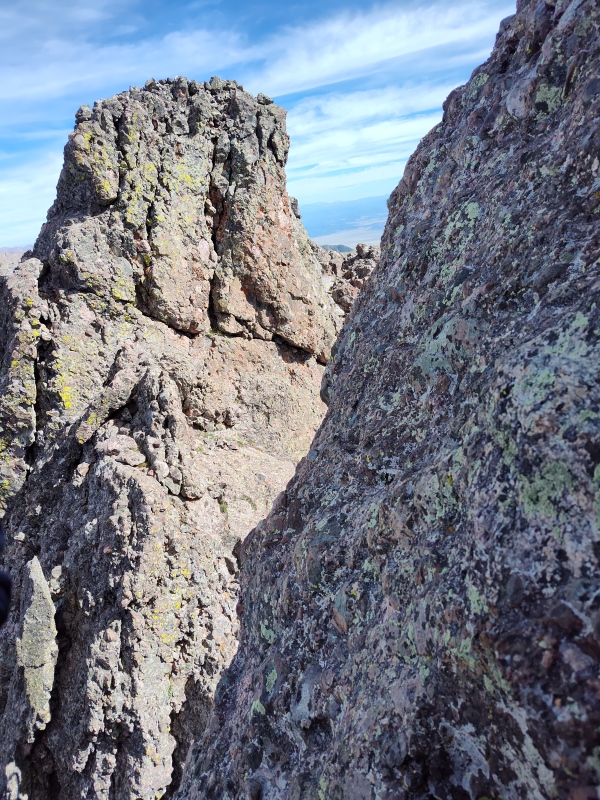
The photo below is looking down from NE Crestone. For extensive details on this section see my previous trip reports: East and Northeast Crestone from Crestone Peak Saddle and Northeast Crestone revisited and explored 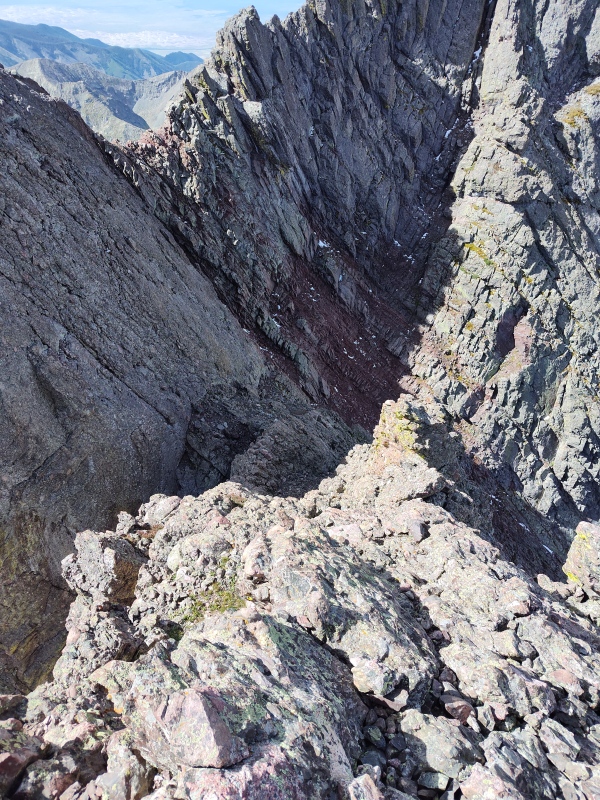
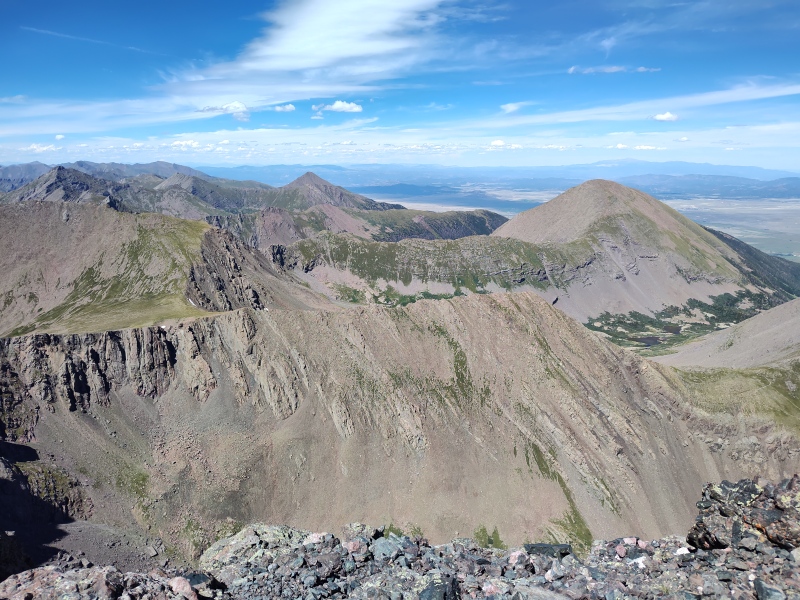
Before moving on to the Crestone Traverse, I just want to briefly restate something I've mentioned in previous trip reports: East Crestone is a super quick and easy class 2 add on to Crestone Peak and since Lidar shows it within 1 foot of the elevation of Crestone Peak, my thought is you should go ahead and climb this peak if you care at all about getting true high points. Plus it's very centrally located within the Crestone Group and offers excellent views of all the other peaks. 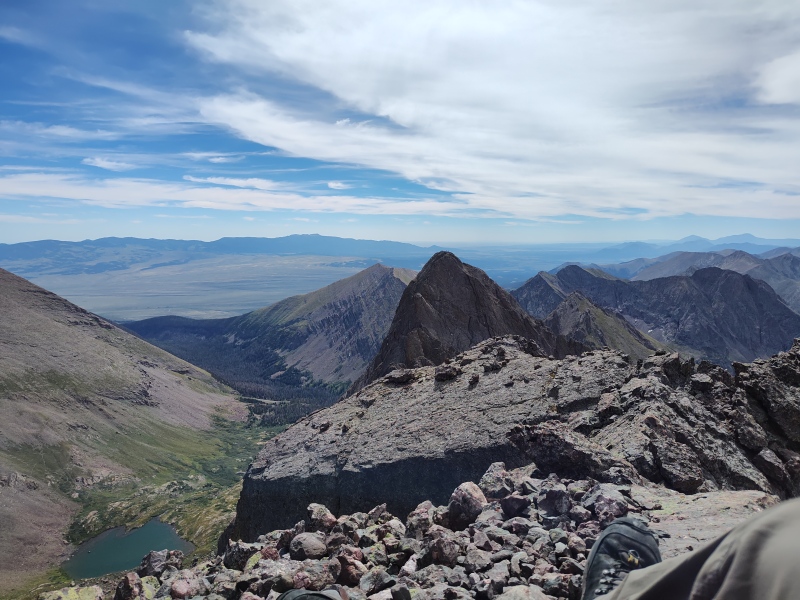
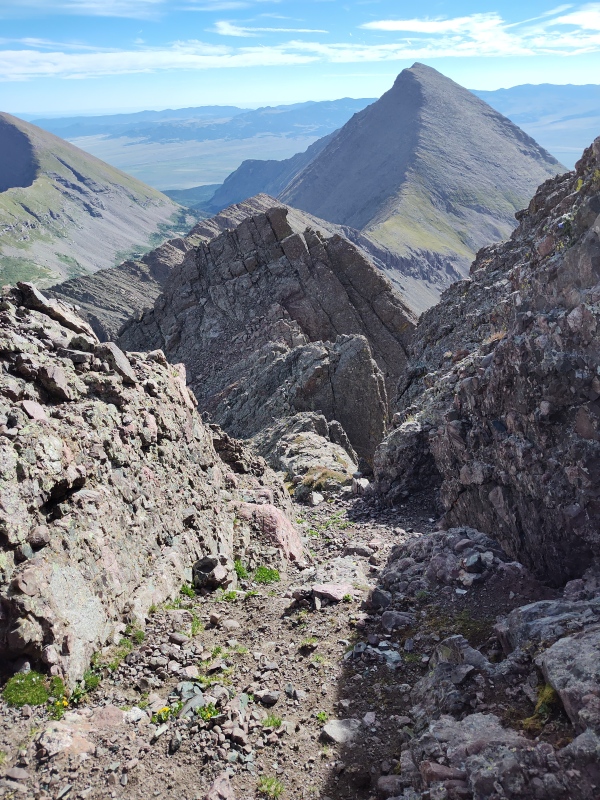
The Crestone Traverse I was cautioned by some that this might seem somewhat anticlimactic doing it after North Buttress. I'd say to a certain extent I'd agree with that but not entirely. This traverse was the least "traverse-y" of any of the 4 Great Traverses. The standard route has you drop so incredibly far down off the ridge and stay so far below the ridge for the majority of the way that it really doesn't feel like a proper traverse until the final little bit from the Black Gendarme to the summit of Crestone Needle via the headwall. Because the route is so far below the ridge, the route-finding is also the least intuitive of any of the 4 Great Traverses. 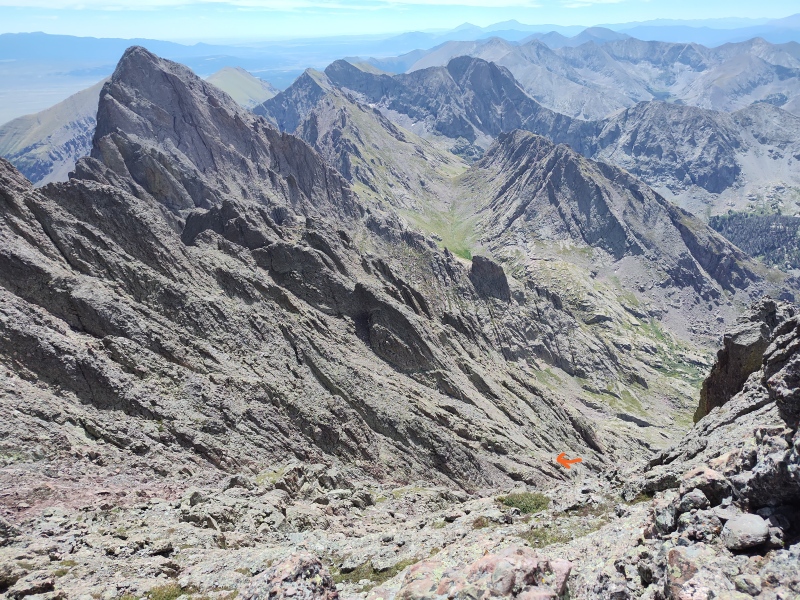
As for the 5.2 bulge move to get up next to the Black Gendarme - personally I found that one more annoying than fun. On the left were some chunky rocks that seemed like they would go ok but felt like it was going to be harder than 5.2. So I backed off those and went over to the right. There I had my left foot up high, grabbed a hold with my right hand, lifted my right foot up and back to land on a large, flat rock and then did this terribly awkward beached whale belly flop to get up over the little overhang. I'm sure there was a smoother way to do that but it had been a long day already and I was more interested in checking out the famous headwall so I just did what I needed to get past this. At which point I had a momentary flash of terror as I looked up at this sheer vertical cliff and thought "oh my goodness - is THAT the headwall?!?!" A quick check of the 14ers.com app with the downloaded route photos showed me I needed to cut right in front of that wall to get up to the real headwall - thank goodness! 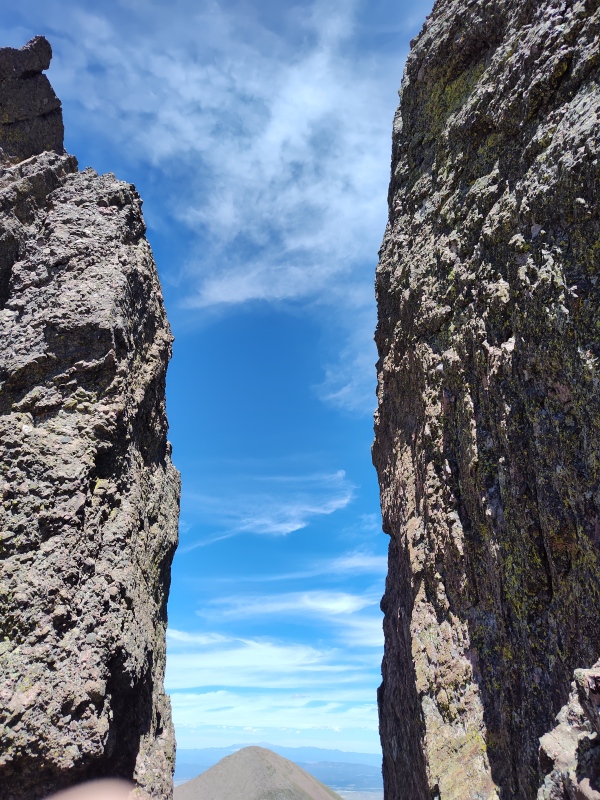
By this time, a couple random guys - Conner and Ryan - caught up and overtook me which was fine because I was getting a little tired of the incredibly random seeming route finding by this point - without the cairns it would have been really difficult to reproduce all the random zigzagging below the ridge. So I was happy to let them lead this last little section while I focused on taking some pictures. 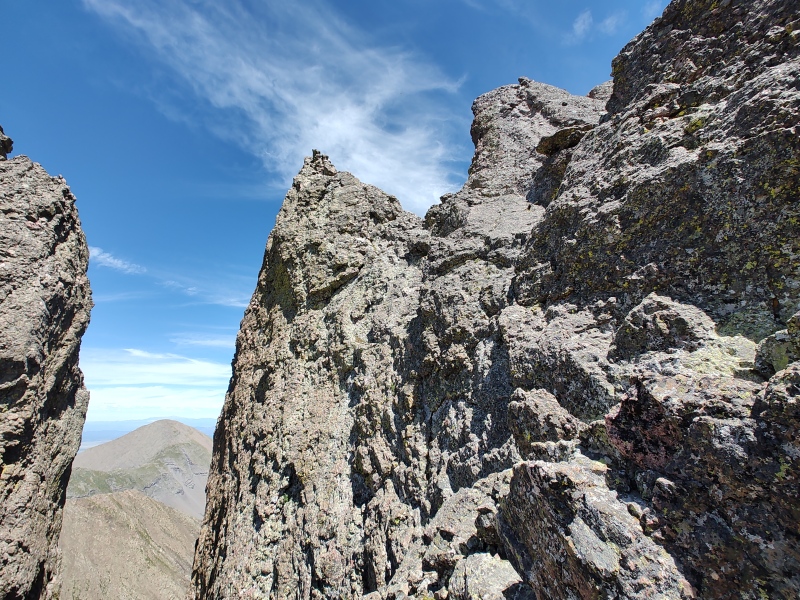
As for the actual headwall itself, the line straight up that the other guys took was indeed seeming a little tame to me after having come up the North Buttress, but swinging just a few feet to the left really livened the route up tremendously with exposure that rivals even that of the Little Bear - Blanca Traverse! (see a few photos below...) 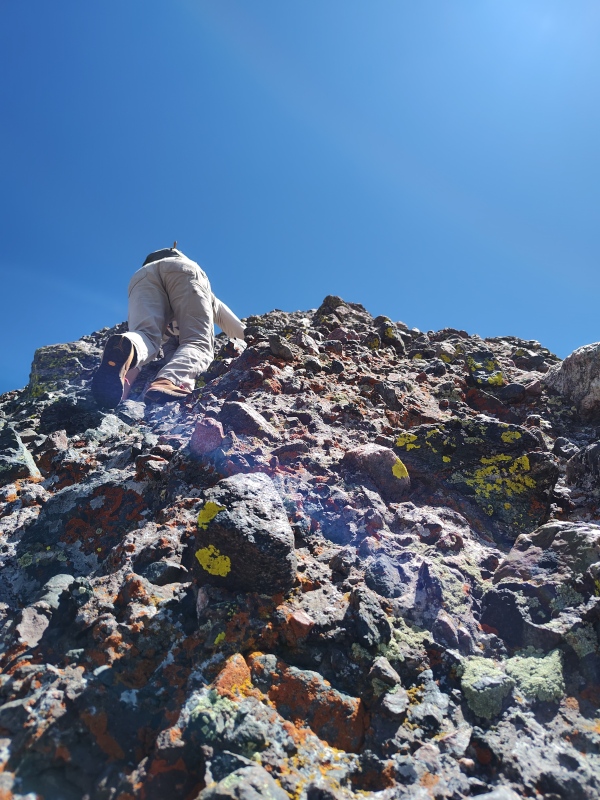


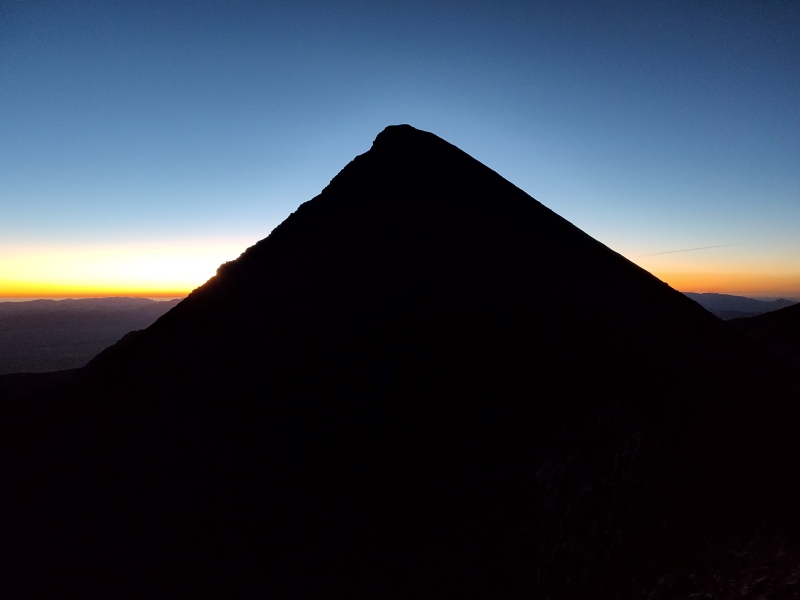
So all in all, I would consider maybe one day coming back to this traverse but maybe do things a little more ridge proper, especially near that end section. Although a completely true ridge proper traverse across the whole thing would be beyond insane and would almost certainly necessitate some major rappelling. I seem to vaguely recall hearing of some guys who did at least a mostly ridge proper version of this... My Times I took a crazy long time to do this route. Part of that is due to the serious climbing involved but part of it also was that I intentionally took a lot of time to savor the experience on this one - getting cool shots of the stars and pausing sometimes to just sit and soak in the surroundings. I try to call out those times I took extended pauses so you can extract those from the overall time and still get some idea of the point to point traverse times required. Friday 2:05pm start up from 4WD trailhead with 43lbs pack! 3:57pm found good camping spot after pausing under trees a couple of times due to rain/hail (weatherman, you're fired!!) Saturday 3:49am start from campsite near South Colony Lakes 5:16am* gained the ridge at the Humboldt saddle (*after close to an hour of snapping photos of the stars over Crestone Needle - see some examples under the Approach section if you missed those...) 6:45am hit the ridge crux - a little class 3 fun at 1.74 miles from camp, 13,258ft 7:18am* Bear's Playground (*I was moving very slow along the ridge - in part due to the terrain, in part by being mesmerized by the views of the Crestone group from there - steady movement could probably easily cut this time in half) 8:22am* Stopped to strap my trekking poles to my pack as I began engaging optional class 5 sections on the climb up North Buttress (*this was after a long break at the grass ramp below) 9:38am on the false summit - time to downclimb into the saddle then hit the crux! 10am sharp - topped out on NE Crestone 10:21am Made it to the Crestone Peak saddle 10:36am start up East Crestone 10:44am on East Crestone summit 11am head over to Crestone Peak 11:17am on Crestone Peak summit 12:09pm leaving the Red Gully and starting the main part of the Crestone Traverse 2:20pm just below the headwall (again took some breaks along the way to soak it all in) 2:33pm Crestone Needle summit 4:21pm Finally reach top of Broken Hand Pass after several route finding blunders - primarily after getting down out of the East Gully... (I was getting rather tired by this point, as were the people I had met up with below the headwall so we killed plenty of time floundering around) 5:18pm back at the tent a little below South Colony Lakes 6:34pm start back to trailhead with crazy heavy pack after taking a rest in the tent 7:40pm back at the 4WD trailhead after hauling ass down the trail Thumbnails for uploaded photos (click to open slideshow): ")
")
")
")
")
")
")
")
")
")
")
")
")
")
")
")
")
")
")
")
")
")
")
")
")
")
")
")
")
")
")
")
")
")
")
")
")
")
")
")
")
")
")
")
")
")
")
")
")
")
|
| Comments or Questions | |||
|---|---|---|---|
|
Caution: The information contained in this report may not be accurate and should not be the only resource used in preparation for your climb. Failure to have the necessary experience, physical conditioning, supplies or equipment can result in injury or death. 14ers.com and the author(s) of this report provide no warranties, either express or implied, that the information provided is accurate or reliable. By using the information provided, you agree to indemnify and hold harmless 14ers.com and the report author(s) with respect to any claims and demands against them, including any attorney fees and expenses. Please read the 14ers.com Safety and Disclaimer pages for more information.
Please respect private property: 14ers.com supports the rights of private landowners to determine how and by whom their land will be used. In Colorado, it is your responsibility to determine if land is private and to obtain the appropriate permission before entering the property.


