Download Agreement, Release, and Acknowledgement of Risk:
You (the person requesting this file download) fully understand mountain climbing ("Activity") involves risks and dangers of serious bodily injury, including permanent disability, paralysis, and death ("Risks") and you fully accept and assume all such risks and all responsibility for losses, costs, and damages you incur as a result of your participation in this Activity.
You acknowledge that information in the file you have chosen to download may not be accurate and may contain errors. You agree to assume all risks when using this information and agree to release and discharge 14ers.com, 14ers Inc. and the author(s) of such information (collectively, the "Released Parties").
You hereby discharge the Released Parties from all damages, actions, claims and liabilities of any nature, specifically including, but not limited to, damages, actions, claims and liabilities arising from or related to the negligence of the Released Parties. You further agree to indemnify, hold harmless and defend 14ers.com, 14ers Inc. and each of the other Released Parties from and against any loss, damage, liability and expense, including costs and attorney fees, incurred by 14ers.com, 14ers Inc. or any of the other Released Parties as a result of you using information provided on the 14ers.com or 14ers Inc. websites.
You have read this agreement, fully understand its terms and intend it to be a complete and unconditional release of all liability to the greatest extent allowed by law and agree that if any portion of this agreement is held to be invalid the balance, notwithstanding, shall continue in full force and effect.
By clicking "OK" you agree to these terms. If you DO NOT agree, click "Cancel"...
Crestones classic class 4 linkup: KC north ridge, Crestone north buttress, and Crestone traverse
There’s a TR for pretty much any conceivable 14er trip you can think of out there. Well, almost every trip. A group of us just did a trip in the Sangres that has not been written about (that I’ve seen), so I’m writing my first (and most likely last) TR, more in the style of a route description, and hopefully people will find something useful in it.
Day 1: drop off a car at Cottonwood Lake Trailhead drive to Willow Lake Trailhead and start Kit Carson north ridge route (class 4) Challenger Point via the Ave (class 2) Back track on the Ave all the way to the end (class 2) Follow KC east ridge route to Bear’s Playground (class 3 / 4) Bivy at Bear’s Playground and enjoy the sunset (class “awesome!”)
Day 2: Crestone Peak via north buttress (class 4 / 5) or NW couloir (class 3 / 4) Crestone Traverse (class 4) Downclimb Crestone Needle standard route (class 3) Exit to Cottonwood Lake Trailhead (class “wet and slippery”) Drive to Willow Lake Trailhead and pick up the other car
Itinerary: The itinerary is pretty unremarkable, just a link up of a bunch of existing routes. But it was done in an interesting combination. The genesis of the trip was my desire to do some long and sustained scrambling on quality rock. The north ridge of KC has been recommended to me more than once, and I was also very intrigued by the north buttress route on Crestone Peak. It just seemed logical to do both the north ridge of KC and the north buttress of Crestone Peak on a thru-hike that also tags Challenger and Crestone Needle (and a whole bunch of bumps along the way). If one’s goal is to tag all four 14ers (KC, Challenger, Crestone Peak and Crestone Needle), then the most efficient way is to do it from South Colony Lake. In fact quite a few people have done it that way, some in a day. But all these trips missed the north ridge of KC, which was one of the highlights of our trip. Plus, we were also the only group bivying on Bear’s Playground (which I have forever re-named Bear’s Campground) on a busy weekend with amazing weather. That alone was worth carrying an overnight pack on a bunch of class 3 / class 4 scrambles.
Kit Carson north ridge: There is plenty beta on the north ridge of KC, so I won’t get too much into the detail on the route. Once you’re above Willow Lake, look for a split in the trail to the upper Willow Lake from the standard KC/Challenger trail. Try to follow the upper Willow Lake trail if you can, but if you lose it, just look for the path of least resistance through the willows up the valley. When Outward Bound Couloir comes into view, swing right and start hiking up the loose slope below OB Couloir. The north ridge is more of a blunt buttress that turns a bit sharper half way up, and at this point is the right skyline to the top. Make your way up following the most obvious line that take you up and right to the ridge.
Gaining the north ridge from the base of OB couloir
Our rough path
Once on the ridge, follow it straight up staying pretty close to ridge proper. The rock is mostly solid, the scrambling is fun, and the exposure just get more and more intense. If the exposure gets to be too much, there is a way to bail off the ridge at the first notch in the ridgeline. Follow a grassy ledge on climber’s left from the notch, and look for the path of least resistance up several grassy ledges on the broad face. The difficulty should be class 3, and most of the grassy ledges can lead you back to the ridge if you so choose. The top ledge is identified by a right facing dihedral next to a smooth face. Traverse climber’s left along this ledge and turn the corner, you will be looking at a class 2 walk to KC summit from here.
Challenger Point: From KC to Challenger Point is pretty straight forward. If you haven’t done the Ave before (like us) and came up the north ridge of KC, the best way to not miss the Ave is to stay skier’s right of the loose standard route off the summit of KC and walk down the class 3 alternative on solid rock. This put you squarely on the Ave by the cairns marking the turn, you simply cannot miss it.
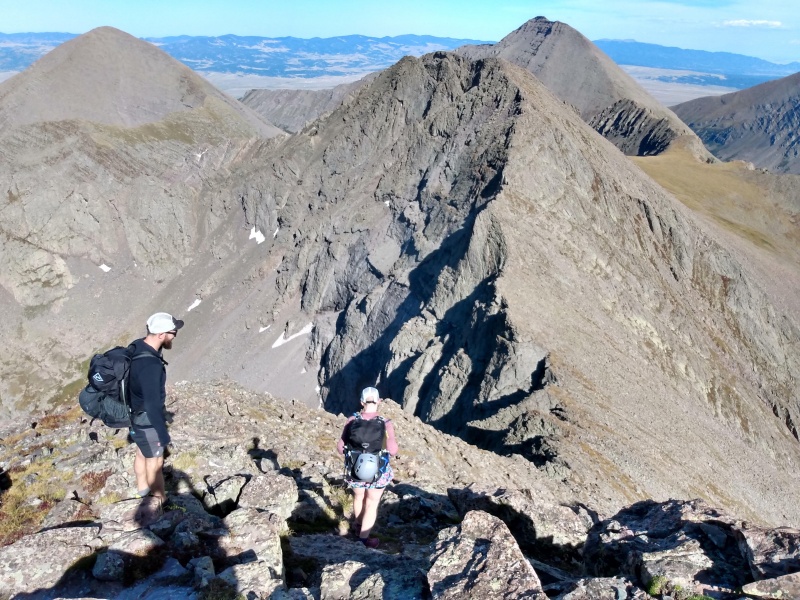
The Crestones from KC
KC from Challenger
KC to Bear’s Playground: From the Ave at the turnoff point to the summit of KC, you can get a preview of the route to Columbia Point. There are three gullies leading up to the sharp fin that take you to below Columbia Point. There are quite a few different ways to do this, we picked the middle gully and just aimed directly for it from the end of the Ave. You will cross a loose slope at the base of the gullies which leads to the notch between KC and Columbia. You can either follow this loose slope up a bit and traverse climber’s right into the middle gully at class 3, or tackle the middle gully directly with some low consequence class 5 moves not far off the ground.
Climbing the middle gully
On top of the fin
The end of the fin, a short scramble to Columbia Point from here
Once on top of the ridge, follow ridge to the end, then pick a class 3 path to the summit of Columbia. After Columbia it is all easy class 2 to Bear’s Playground, but it gets a little tedious after a while.
KC, Challenger, the Prow, and the Ave from Columbia Point
About to drop down from Kitty Kat Carson to Obstruction
Long grind to Obstruction
Dancing with Bears: Bivying at Bear’s Playground was definitely one of the highlights of our trip. It was such an awesome area with the rugged north face between the Crestones as the backdrop. What was even better is that we had it all to ourselves on a busy weekend with amazing weather. But of course, bivying at Bear’s Playground presented some logistic challenges. First, to follow the route we did, you have to do a bunch of class 3 / class 4 scrambles with an overnight pack. So obviously the less stuff you pack the better. I'm not an ultralight packer by any means, I just cut it down to the essentials. I went with no tent, no stove, I just packed six protein bars for food for the two days, and used a sleeping bag/sleeping pad/bivy bag combo for shelter. It worked really well, and I had no problem doing class 3 / class 4, even low class 5 terrain while carrying a pack like that.
Second, where to get water. The closest reliable water source is Bench Lake northeast of Bear’s Playground. You have to drop down a very loose slope to get to it, and having done just that, we don’t know if we’d recommend it to anyone else. The next reliable water source is upper South Colony Lake way to the east. We didn’t go there, but that was our backup plan. It may be possible to go southwest from Bear’s Playground on much gentler slope to Spanish Creek and find water there. But since we did this trip in mid-September, we could see the dry remains of some small ponds in Spanish Creek drainage, so we didn’t want to test our luck.
Bear's Campground!
Bench Lake
Crestone Peak via either north buttress or northwest couloir: The next morning our group of four split up in two, one did the north buttress, the other did the NW couloir. The couple that did the NW couloir encountered snow and ice halfway up the couloir and had their own mini-adventure. I went up the north buttress route with the other person in our group.
Making our way to north buttress and NW couloir
South Colony Lakes
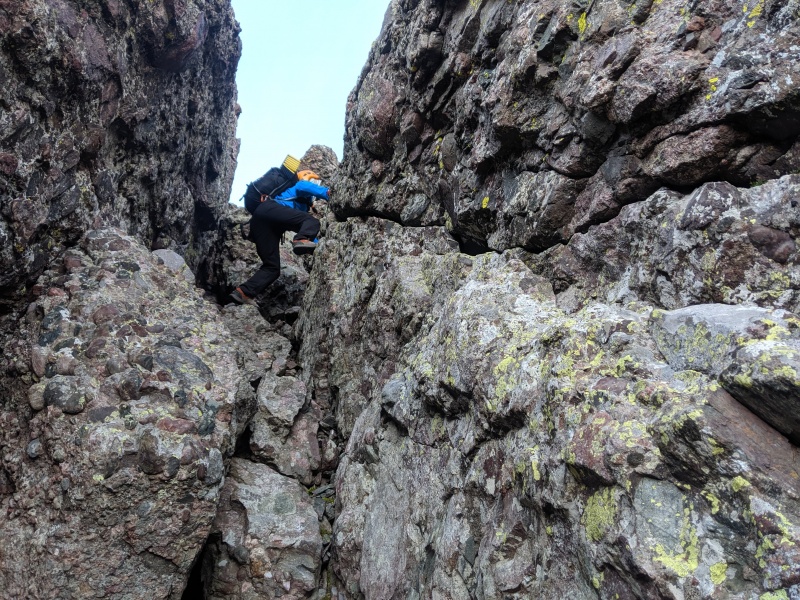
The terrain on the north buttress route is a bit complicated. The “buttress” is really a broad face with many different towers. This is one of those loosely defined routes with many lines and variations possible. I had studied the hell out of this route before the trip, but in the end we just picked the path of least resistance and made our way straight up the face. We kept the scrambling mostly at class 3, except for a short class 4 section right before the false summit.
Our approximate route up the north buttress
We climbed this chimney fairly early on
Same chimney from above
We generally got around towers on the left
Keeping it at class 3
I believe this is the final steep section before the false summit
From the false summit, get into the notch by downclimbing slightly to skier’s right (while looking at the notch) for less than 10 feet, then traverse back and climb down into the notch. From the notch, you can either climb down a large crack / chimney into the gully below and start traversing towards the NW couloir at exposed class 4, or you can take one step to climber’s right from the notch and climb up to the ridge of NE Crestone at exposed class 5. Either way this is definitely the crux of the entire route. The traverse is less difficult but longer, and it bypasses the summit of NE Crestone. Climbing up to NE Crestone is more difficult, but the crux is in the first 10 feet or so. Once you gain the ridge of NE Crestone it’s pretty easy to downclimb into NW couloir from there. See this thread for a more in-depth discussion of the crux: https://www.14ers.com/forum/viewtopic.php?f=2&t=24612
Top of false summit with East Crestone in the background
Crux class 5 climb up from the notch to the NE Crestone ridge
NE Crestone ridge
Downclimbing NE Crestone to the NW Couloir
Once in the NW couloir, it’s fairly easy class 3 scrambling on pretty bad rock to the red notch where the NW couloir meets the standard red gully route to Crestone Peak. From the red notch, it’s fairly easy to tag Crestone Peak and (optionally) East Crestone.
Humbolt from East Crestone
NE Crestone from Crestone Peak
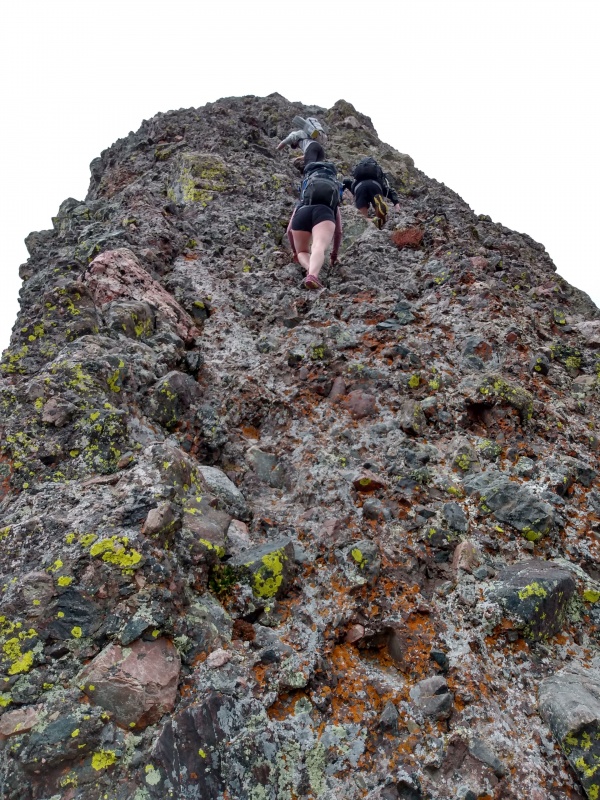
Crestone Needle via the traverse: Plenty of TRs have been written about the traverse, so I won’t pile on too much. To find the start of the traverse you have to drop down quite a bit in the red gully, to a fairly low angle, open area in the red gully. Look for a large flat rock on skier’s left, that’s where the traverse starts. The rest of the traverse is quite easy to follow, and the final headwall before Crestone Needle will feel like cake compared to the crux on north buttress.
On the traverse, red gully is visible in the distance.
"Hmmm... I wonder if it will rain?" Yes, yes it will.
The mini knife edge
The final headwall
Topping out on the headwall
Descend Crestone Needle: If you summited Crestone Needle via the traverse and never climbed up the standard route like us, most of the TRs isn’t too helpful for the descent. But I did find it pretty intuitive. First, don’t go where the sign says “Technical Only”. Second, don’t go down the easy looking gully that points directly at Cottonwood Lake (south). Third, you wouldn’t want to go north where the Ellingwood Arete route tops out because it looks steep in the direction, so (assume you just came up from the traverse) this only leaves you one direction to go: east. Keep following the ridge east until you come to a large bowl, this is where the east gully and west gully meet and turn into one large gully. Half way down this gully there is a very sharp and distinctive looking fin that split the east gully and west gully. Going skier’s left at the fin will take you down the east gully all the way, with some class 4 downclimbing. Going skier’s right at the fin will take you down the west gully, which is class 3, but then you have to cross over to the east gully. The cross over is only a couple hundred feet lower than the fin, so be on the lookout on skier’s left for cairns and a pretty obvious path.
The cross over from west to east gully
Downclimb on the cross over
Once you’re low enough in the east gully where just slightly higher than Broken Hand Pass, there will be multiple paths and multiple cairns on skier’s left for the exit. Take whichever looks the best to you.
Almost out of the east gully
Exit to Cottonwood Lake Trailhead: We were lucky because the weather held until we were all the way to Broken Hand Pass before it started raining and thundering. While majority of the difficulty was behind us, we still had to hike out to Cottonwood Lake Trailhead, and there were still some tricky slabs along the trail especially in the rain. We cut across the stream at the west edge of Cottonwood Lake, and made our way down the grassy slopes while avoiding all the willows to our right. We crossed the stream again at the highest waterfall, worked our way down the slabs (a bit tricky when wet), then found the path through the willows to the meadow below. Then it was more willows, more talus hopping, more slabs, slipping on wet grass, falling on moss, mud… everything from that point on blended together after two long days of hiking and scrambling. But the trail is generally easy to follow and well cairned, so we just cruised right along with soaked clothes and squishy shoes all the way back to the trailhead
Filtering water at Cottonwood Lake
A fun slip-and-slide on the Cottonwood trail
Parting thoughts: For me, this was a very fun trip. It’s not the easiest nor the most efficient way to climb these peaks, but it was a very interesting way. We had great weather the whole weekend (and great weather is a must for this route), and we only saw 6 people the first day, a few more than that on the second day. I set out with the goal to do lots of scrambling, and this route certainly delivered.
Sunset over Crestone Peak and Bear's Playground
Bench Lake at sunset
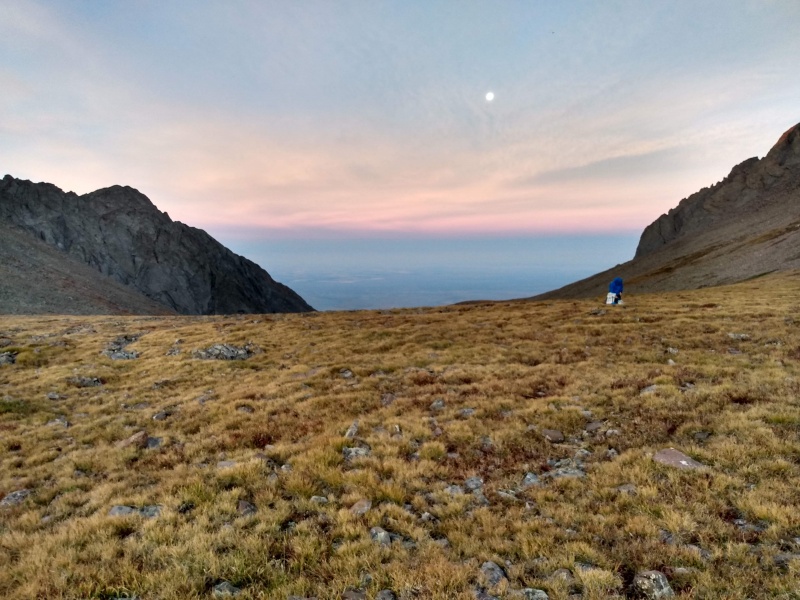
Sunrise and moonset on Bear's Playground
My GPS Tracks on Google Maps (made from a .GPX file upload):
@PaulVee Thanks for reading! I hope it was useful.
@tygr It's a fun way for sure, but definitely don't underestimate it, especially the north buttress route!
Caution: The information contained in this report may not be accurate and should not be the only resource used in preparation for your climb. Failure to have the necessary experience, physical conditioning, supplies or equipment can result in injury or death. 14ers.com and the author(s) of this report provide no warranties, either express or implied, that the information provided is accurate or reliable. By using the information provided, you agree to indemnify and hold harmless 14ers.com and the report author(s) with respect to any claims and demands against them, including any attorney fees and expenses. Please read the 14ers.com Safety and Disclaimer pages for more information.
Please respect private property: 14ers.com supports the rights of private landowners to determine how and by whom their land will be used. In Colorado, it is your responsibility to determine if land is private and to obtain the appropriate permission before entering the property.


")
")
")
")
")
")
")
")
")
")
")
")
")
")
")
")
")
")
")
")
")
")
")
")
")
")
")
")
")
")
")
")
")
")
")
")
")
")
")
")
")
")
")
")


