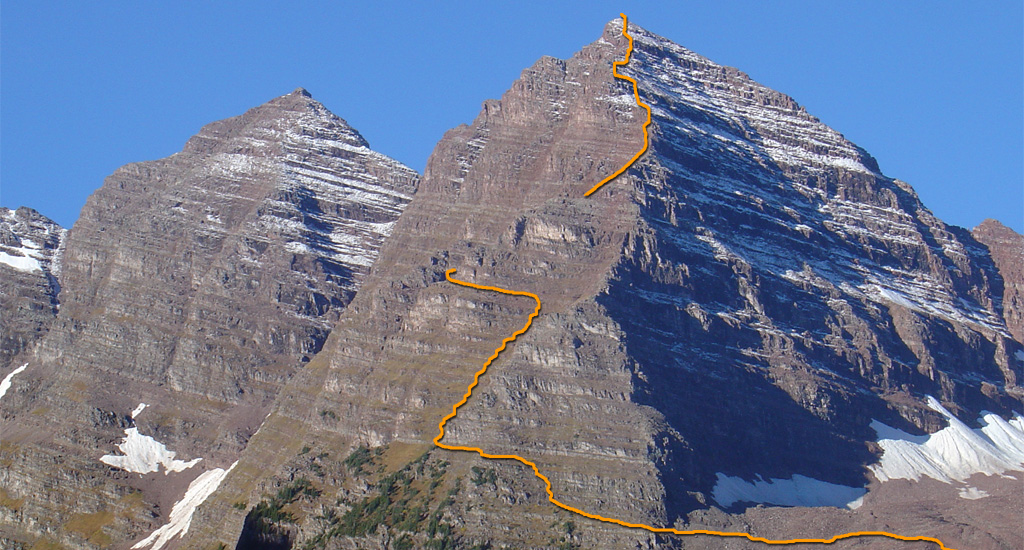
Much of the route up North Maroon can be seen from Maroon Lake (
1). Start at the trailhead and follow the trail west along the edge of Maroon Lake (
2). Pass the lake and ascend the Crater Lake trail for about 1.75 miles until you reach a trail junction (
3). Turn right onto the Maroon-Snowmass trail and continue for another 0.75 miles to the trail junction
for North Maroon (
4). Turn left and descend into Minnehaha Gulch (
5). Cross the creek and follow the well-defined trail as it zigzags through talus fields (
6). Near 11,100', turn left beneath cliffs and continue to another talus field (
7). Around 11,500', reach an open grassy area where North Maroon returns to view (
8). Continue to the rock glacier
at the base of the north face (
9).
Follow cairns and trail segments onto the rock glacier, aiming for a break in the cliffs on the opposite side (
10). As you cross, avoid significant elevation changes while following cairns. Beyond the rock glacier, locate a more-defined trail and follow it south around a corner (
11). Shortly after, turn right and climb 200 feet below cliffs. At 11,950', reach a corner where you can see the next section of the route—a broad gully leading to the northeast ridge (
12 and
13). From this point forward, this gully will be referred to as the 1ST GULLY
. Enter the gully and begin climbing its left side (
14). Over the next 600 feet, ascend steep Class 2 terrain before exiting left, below the white cliffs visible in
13. Above 12,600', follow the trail left and exit the gully (
15). Turn another corner and traverse across ledges to reach the entrance to the 2nd GULLY
near 12,700' (
16).
The route becomes more demanding and time-consuming from this point onward. If the weather begins to deteriorate, turn back! The 2nd GULLY
is steeper than the 1st, with loose rock and scrambling required near the top. Descend slightly to reach the center of the gully before beginning your ascent (
17 and
18). Above 12,900', the gully steepens. Follow the faint trail along the left side of the gully, aiming for a notch in the ridge, just left of a prominent hump of rock (
19). At the notch, turn left and climb through cliff bands (
20 and
21) to reach the ridge crest
near 13,300' (
22).
From here, continue a short distance to a rock band at 13,500' (
23). The rock band is the crux of the route and requires climbing a short Class 4 chimney. An alternate Class 3 route exists to the right, but it is longer and involves looser rock, so most climbers prefer the direct route. To identify the chimney, look for two leaning blocks just above it (
24). Carefully climb the chimney (
25 and
26). Once above it, turn right and navigate easier terrain before climbing left back to the ridge crest (
27 and
28). Ascend onto a precipice where you'll see the final 300 feet to the summit (
29 and
30). Leave the precipice and climb the ridge's exposed edge, navigating steep ledges (
31). Back on easier ground, finish with a short Class 2 section that takes you to the summit (
32,
33, and
34). From Pyramid Peak,
35 provides a view of the east side of North Maroon and the route between the 1st and 2nd gullies.
