| Report Type | Full |
| Peak(s) |
"Coffeepot" - 13,529 feet Teakettle Mountain - 13,815 feet |
| Date Posted | 07/09/2024 |
| Modified | 07/10/2024 |
| Date Climbed | 07/02/2024 |
| Author | daway8 |
| Up a Teakettle Without a Rope |
|---|
|
Have you ever found yourself stuck up a Teakettle without a rope? That's exactly the situation I found myself in on a Tuesday morning in early July - although it was quite intentional on my part. There are several excellent reports out there for this fun pair of class 5 13ers but I wanted to give my own take on and share detailed photos of the interesting sections of these peaks. Included in this report will be:
Trailhead: Yankee Boy Basin 11,300ft near the "biological waste conversion system" (aka the fancy outhouse) Route: SW Ridge to Coffeepot then standard, not-quite-ridge-route to Teakettle. Mileage: 3.5 miles (that's the total round trip mileage - no really...) Time: 8hr 48min (yep, that's a lot of time for such short mileage - but it's steep and loose getting on and between ridges, with technical summits on both peaks, and I did a lot of documenting) 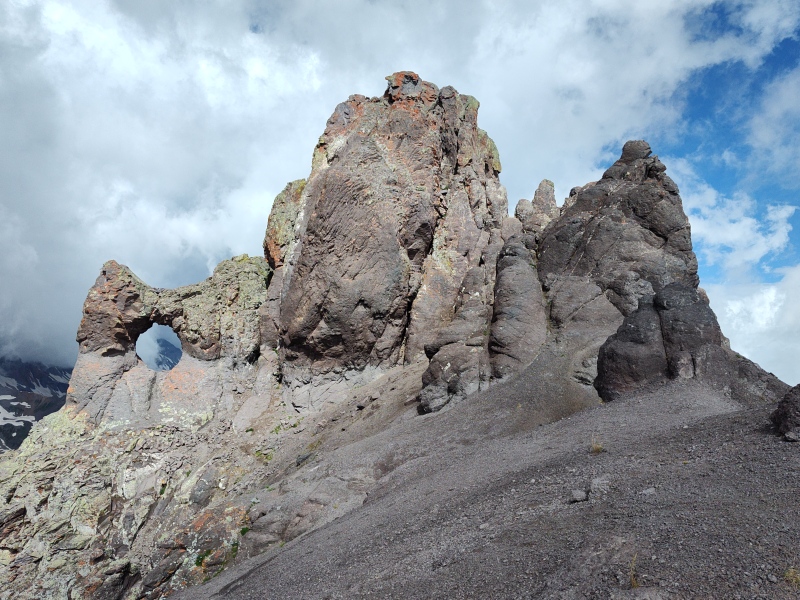
Gear: Since there had been no conditions updates since last year, I had no idea what to expect on this route other than that some recent updates from Sneffels and another nearby peak or two made it look fairly dry. But I couldn't rule out completely that some of the gullies between Coffeepot and Teakettle might possibly be holding bulletproof snow. Given the 14hr round trip drive from Fort Collins, there was no way I was going to let myself fail on this trip for a simple lack of gear (with the exception noted below). As a result, I brought along a lot of gear that I didn't end up needing, but which it made sense to have. Gear I carried with me the whole way but never used:
(I was determined not to let snow keep me from these summits, but that turned out to be a non-issue, despite squeezing past a few snowfields). Gear I didn't bring with me:
*Notes on deciding not to bring a rope: This was the big decision for the trip. Many people who are better climbers than me have roped up for these peaks - either up and down or at least for rappelling down. But I wanted to test myself to see if I could handle climbing this grade at alpine on my own for intimidating summit pitches like these. These weren't my first class 5 routes for 13ers/14ers - I've slowly and cautiously built up my climbing skills over the years and greatly enjoyed getting little tastes of class 5 in the Flatirons, on the West Ridge Direct approach for Little Bear, the Bells Traverse (largely ridge direct), the El Diente - Wilson ridge direct traverse (including PinPoint and other fun ridgetop additions) plus various other bits of climbing at or near low class 5. But these two peaks both have a a fairly steep finish and have a reputation for a significant percentage of the people doing them bringing rope, at least for the rappel off the summits. So I didn't want to lightly disregard that fact. As such, I contacted a few friends who had done one or both of these before and they all felt that they were within my reach to do unroped. That provided the reassurance that I wasn't fooling myself to think I was ready to try these peaks unroped. But why not carry a rope just in case, since I was obviously willing to carry extra weight on this very short route? Because that totally changes the mental calculus. If I know I have a bailout option it would be super easy to push myself beyond my limits and then extremely tempting to just not even try the downclimbs. My overarching motivation for doing these peaks was to level up my confidence on class 5 summits. So I decided I was going to do them clean or not do them at all this trip. If I failed then I would fail and come back some other time with partners and a rope. But I had no intention of failing and would not even have attempted this without a very high level of confidence going in that it was going to be viable for me to do these without a rope. 4WD Road to TH The road to Yankee Boy Basin isn't horrible but it's not great either. Lots of serious rutting, some major washout making a mess in sections and a couple uncomfortable, narrow shelf sections. There are places where someone has to back up a bit to let another pass, but typically you're never too far from a good passing spot so the backing up was never very painful on the days I went in and out (many thanks to the New Mexican Taco who I followed on the way out for clearing the path and giving advanced warning of oncoming traffic!) The trailhead itself at 11,300ft, is fairly large, with ample room for multiple vehicles and various options a little before and after where you could potentially park. Carpooling is still not a bad idea so as to minimize logistical headaches in passing folks on the narrow sections of the road, but this isn't a location with room for only a couple cars so you don't need to be super worried about parking unless maybe it's a holiday weekend or something. Note: on the map it looks like there might be a better route up a little ways up the road at the next junction where there seems to be a low a angle way to gain the ridge. I checked it out and concluded that it was so dense with willows that it didn't make sense you try that way, so I stuck with the faint hikers trail across from the outhouse. The biological waste conversion system: Ok, all y'all who can't figure out this fancy toilet: here's a quick tutorial on how to use a "biological waste conversion system" - don't worry, this is a G-rated trip report, or maybe PG-13 at worst. 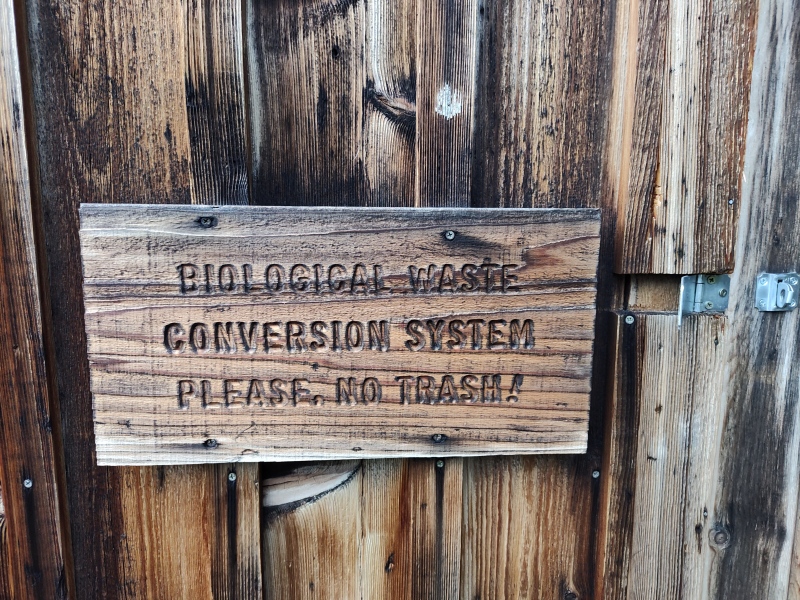
So on the outside it looks like a very aesthetic wooden outhouse. Inside is what at first glance looks like your typical outhouse toilet. But wait, what's with the slanted conveyer belt inside it and the weird foot pedal on the side? Well it's quite simple actually, although notably different than either a typical pit toilet or a standard flush toilet. If all you're doing is #1, then you can treat it as a pit toilet and walk out without further action. If you need to do a #2, take care of your business like normal but then to "flush" you have to step on the foot pedal 4-5 times to rotate the conveyor belt around to where everything drops down inside. Occasionally the foot pedal gets stuck - when that happens, just tap it with your foot to get it to come back up and then continue pushing the foot pedal until everything is transported out of sight by the conveyor belt inside the toilet. That's all there is to it! Gaining the Ridge: So first, take the faint hikers path directly across from the outhouse. It takes you up some step-like rocks and then disappears pretty quickly after pointing you to the right towards a cleaning filled with rocks. Cross onto those rocks and then follow a rock band up the hill where you might see occasional faint hints of a trail leading you up onto the ridge. There's a faint path the through about 10 feet worth of willows and then things open up going towards the steep slopes beyond. 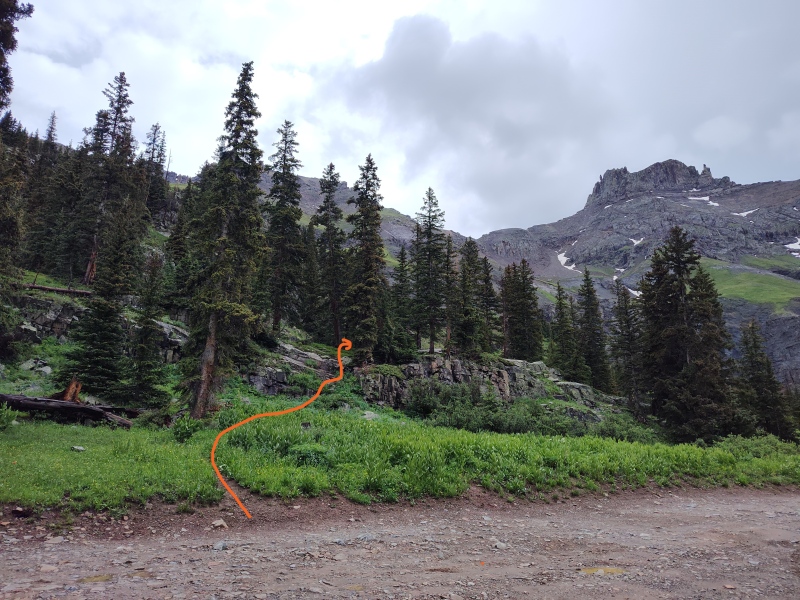
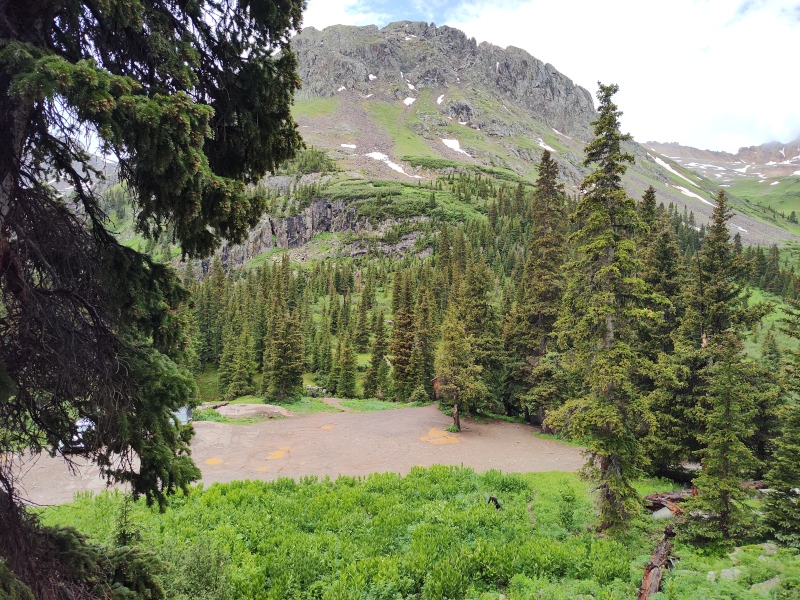
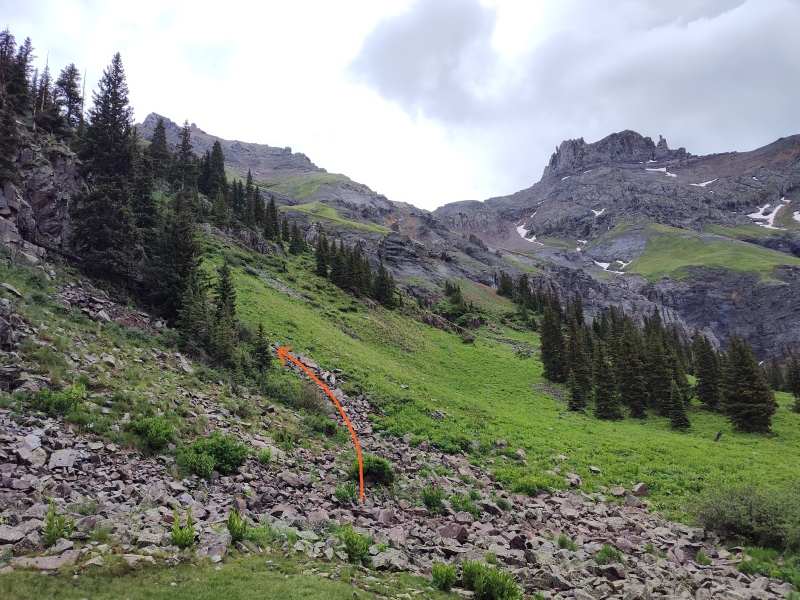
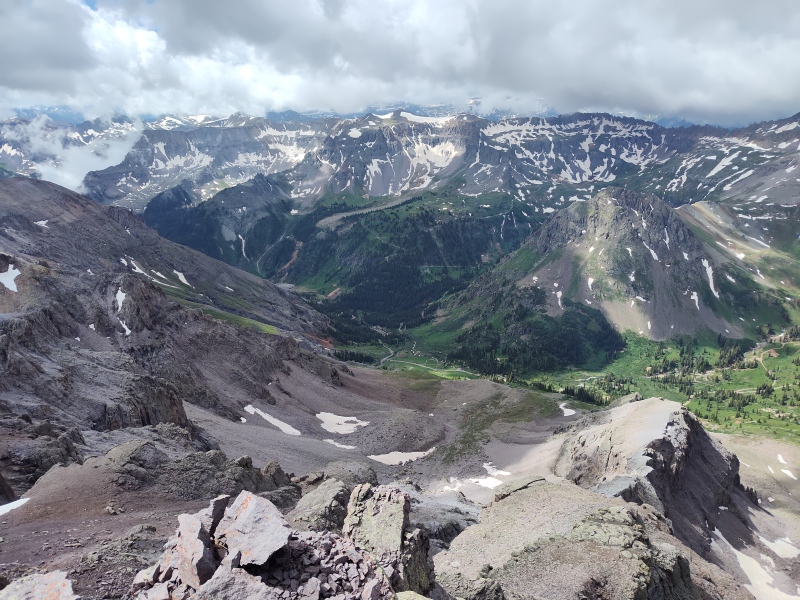
The approach for these peaks has a reputation for being one of the worst scree fields out there. But there are lines that are worse than others. Between tips from others and some of my own exploration, here are some tidbits I can offer for how to potentially minimize the torment of the steep scree. A brave Chipmunk told me you can avoid a lot of the worst of the scree by gaining the ridge proper going up to Coffeepot, rather than going well over to the right like most of the gpx tracks for this route do. So this is what I initially set out to do. But on the approach I was lured to the right by the seductive but deceitful call of what at first appears to be some easy tundra ramps going up to the ridge. Don't be fooled. The siren call of these seductive ramps will only lure you towards some of the worst, steepest, loosest parts of the scree field where, with every step, the rocks move more than you do. 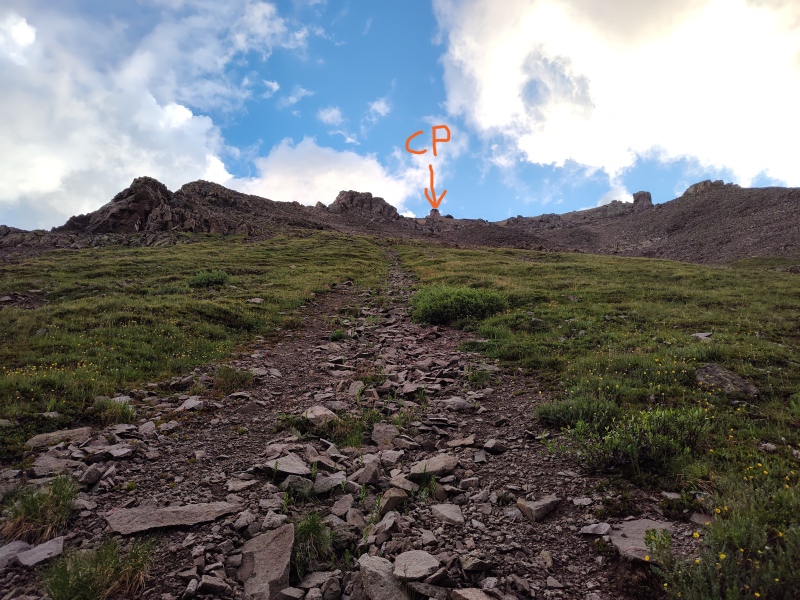
I spotted this trap at the last moment and was saved by a rock ramp that went straight up and was relatively non-miserable. I was then fixating on how/where to gain the fabled Ridge of Reduced Suffering but was not liking the options I was seeing for getting up there. That's when, at about 12,800ft, I looked to my right and saw an extended rock band and discovered that I could pass horizontally below this band in relative ease to what looked like some gullies that might be less steep. It was nice to be able to move quickly on level and pretty much stable ground. Eventually I found a gully that was indeed a smidge less steep than the rest of the surrounding scree fields, and also less horrible. There were some sections of loose dirt and even a rare patch of solid ground here and there. I followed this not-horrible gully straight up for about a thousand feet. Thus far the ascent had been surprisingly non-excruciating. If you're reading this report unawares of what others have had to say about these slopes, you may be wondering why I keep using terms like "not-horrible" and "non-excruciating." Weeeellll... let's just say that there doesn't really seem to be a completely carefree way to simply stroll right up these slopes. So when someone finds a line that's "not-horrible" that's actually high praise for a line up these slopes. 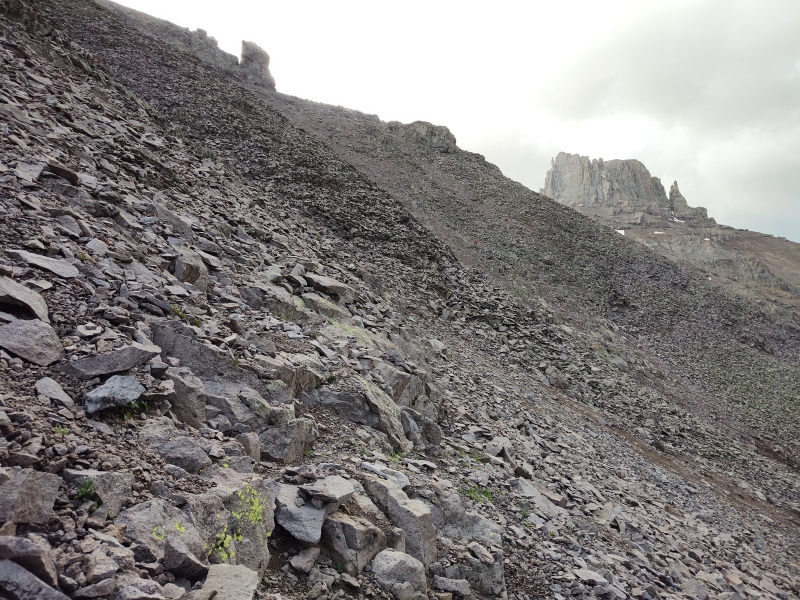
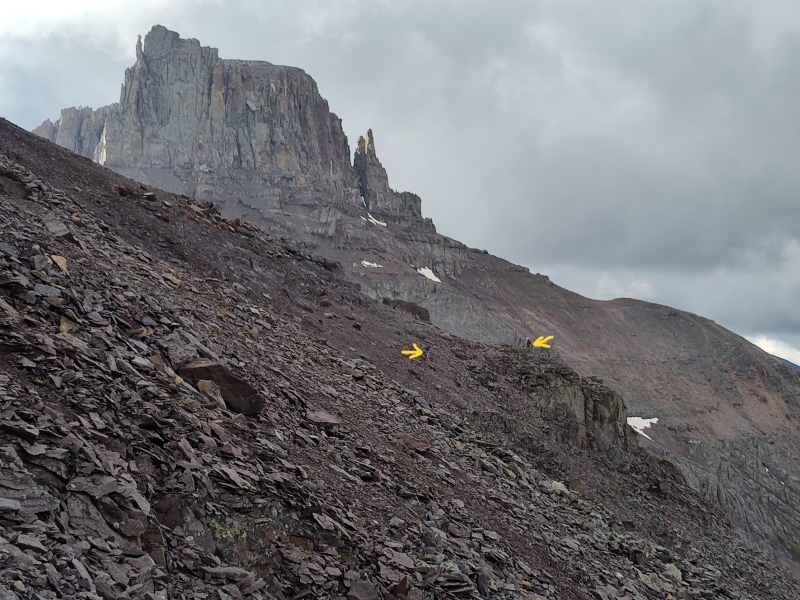
From where that gully somewhat petered out, I debated about cutting over to the ridge or following other potentially promising lines. In retrospect, I probably should have gone for the ridge at that point, as the rest of the way to the ridge became "less-non-horrible." On the way down I probably should have stayed on the ridge as much as possible but somehow got lured back into the scree fields and lured even further towards Potosi (climber's right, skiers left). This proved to be a very effective way of descending directly into Dante's Inferno. Naturally, as I was coming down, there was a couple returning from Potosi (I had spotted them going up as I had been going up to Coffeepot) who were crossing the slopes below me. Otherwise, I could have potentially not cared as much if I sent half of the mountain tumbling down the slopes. As it was, I had to step carefully so as to try to not dislodge more than a hundred or so rocks at any one time (a goal that I didn't consistently meet in this section). Eventually I crossed back over to my ascent path and at long last hit the rock ramp which was almost like heaven at this point since loose dirt and small rocks made for trivial scree-surfing. 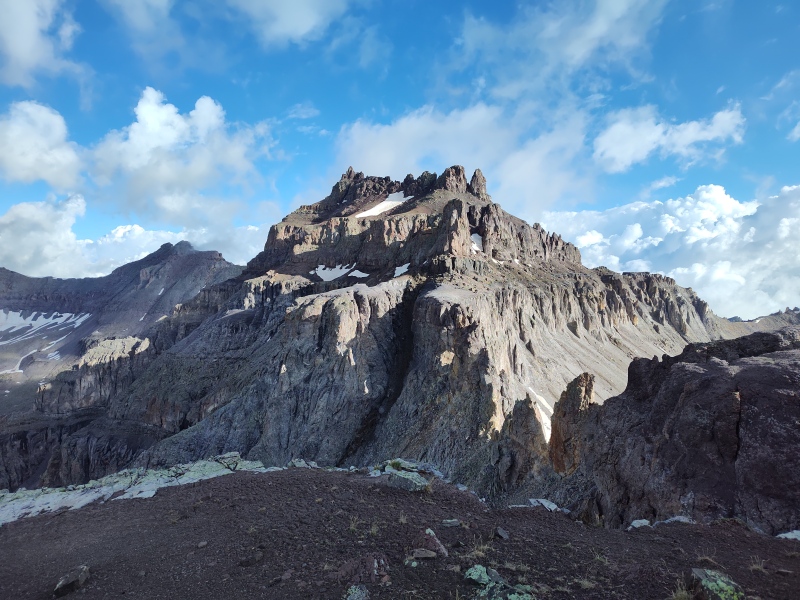
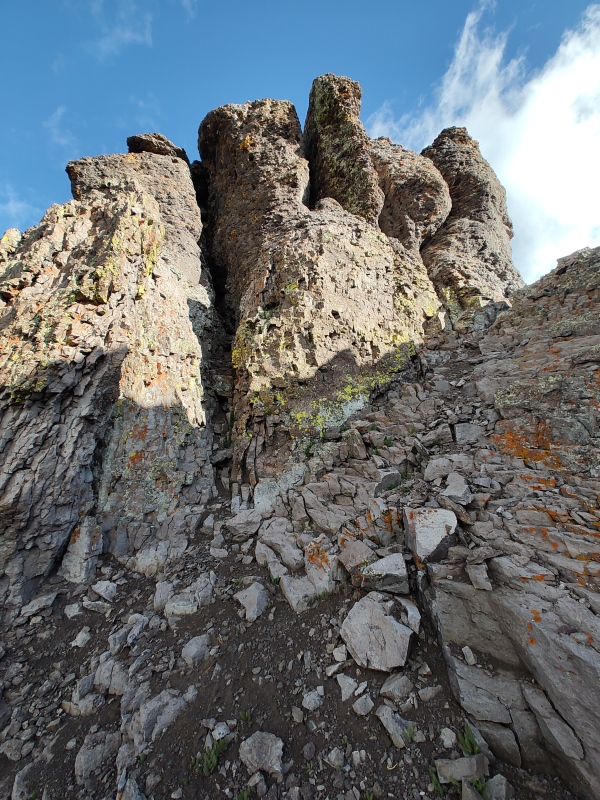
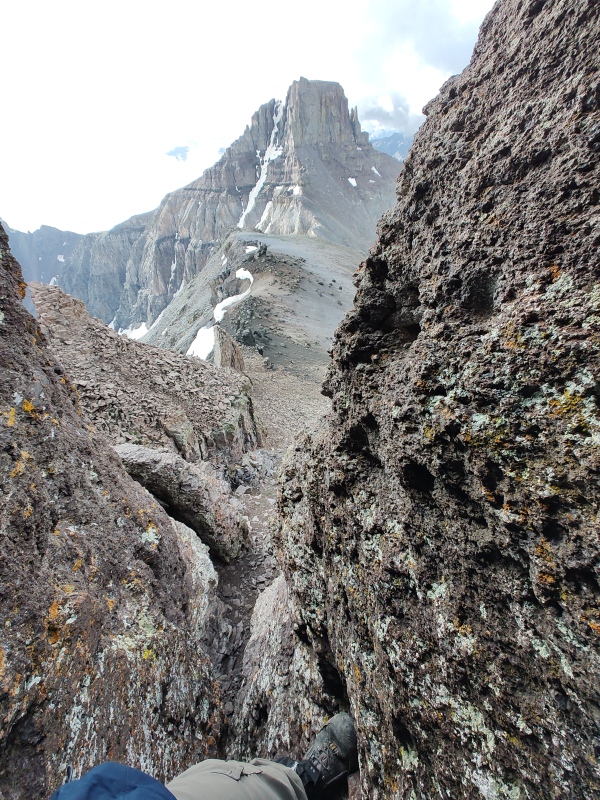
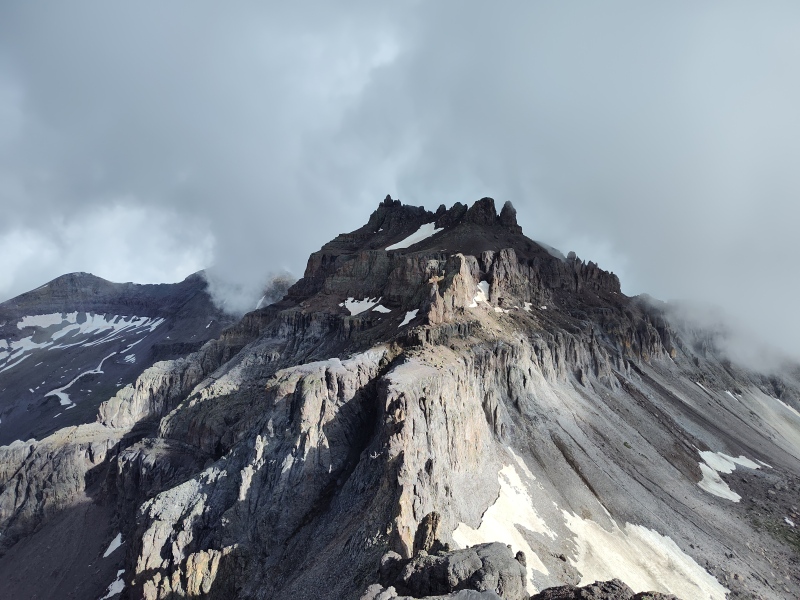
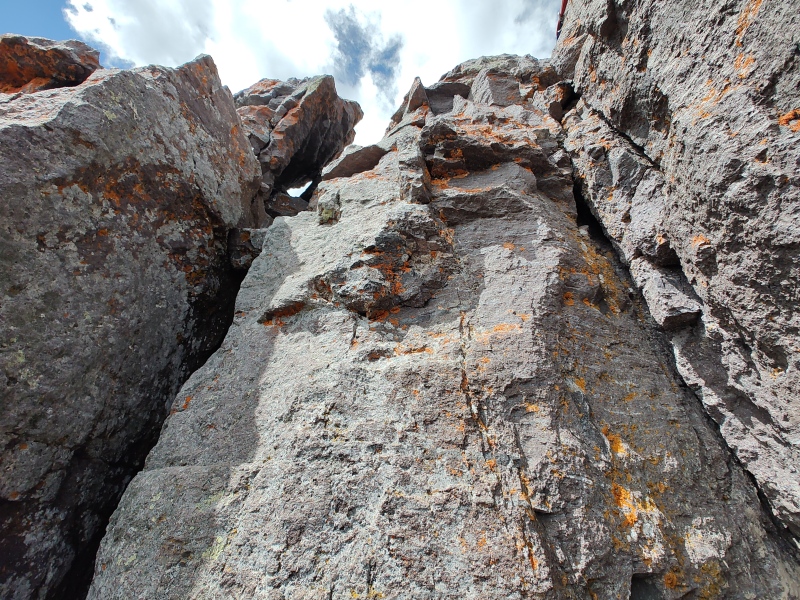
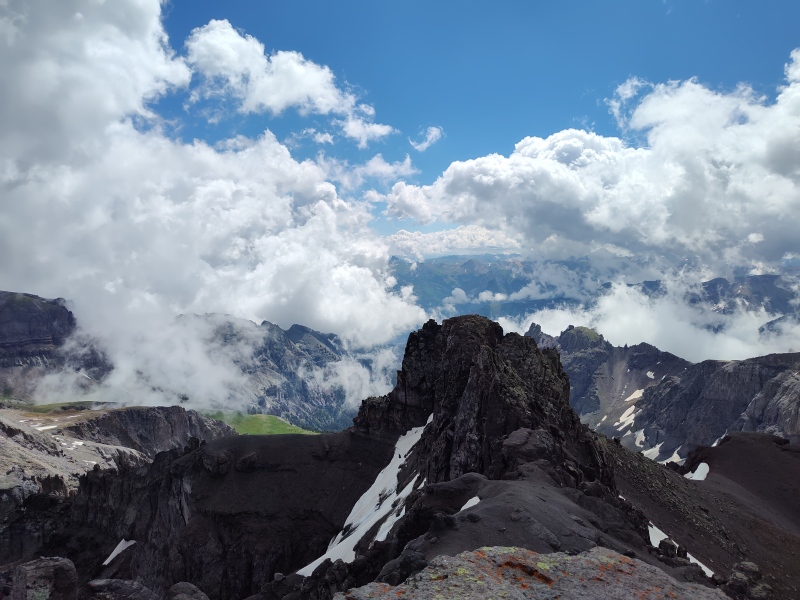
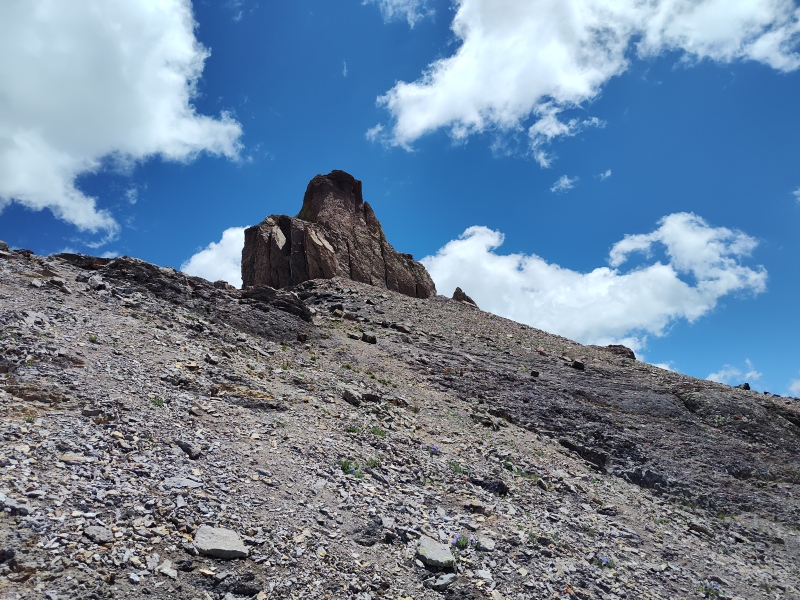
Coffeepot Since I ended up on a line that had me gain the ridge almost directly below Coffeepot, the first view I had was of a very tall face with some chimney-like features that sort of matched some pictures I remembered from scanning some TR's. Thinking that might be the route up, I started getting nervous. "Wow, this is going to be really sketch!" But to be sure, I went around the corner to verify the route. 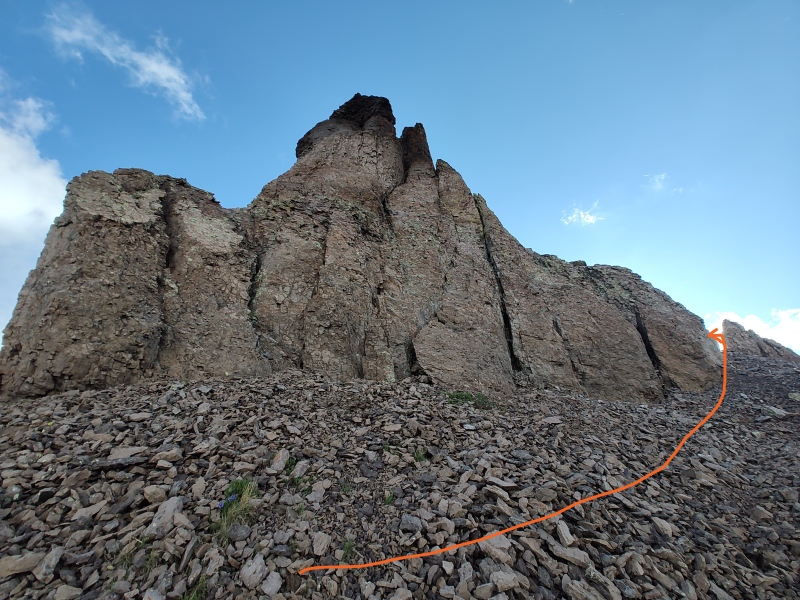
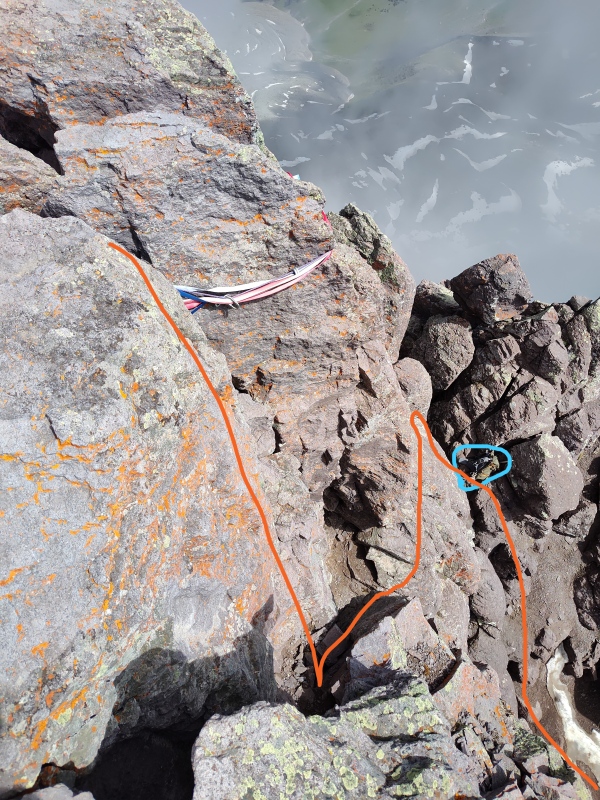
Much to my relief, I found the much more pleasant class 3 scramble up to the base of a far less intimidating looking chimney. It was still a bit awkward - anytime you're alone on unfamiliar terrain in the alpine where there exists a possibility of a fatal fall there's always a little unease. But overall it really was fairly secure feeling. You basically need to go all the way around to the right - on the side closest to Potosi. Look for a rock feature that looks a little bit like a spout on the very ridge and then turn a sharp left towards the main formation. That's where you'll see the more protected chimney with a short little class 3 scramble to get to a small semi-level area at its base. 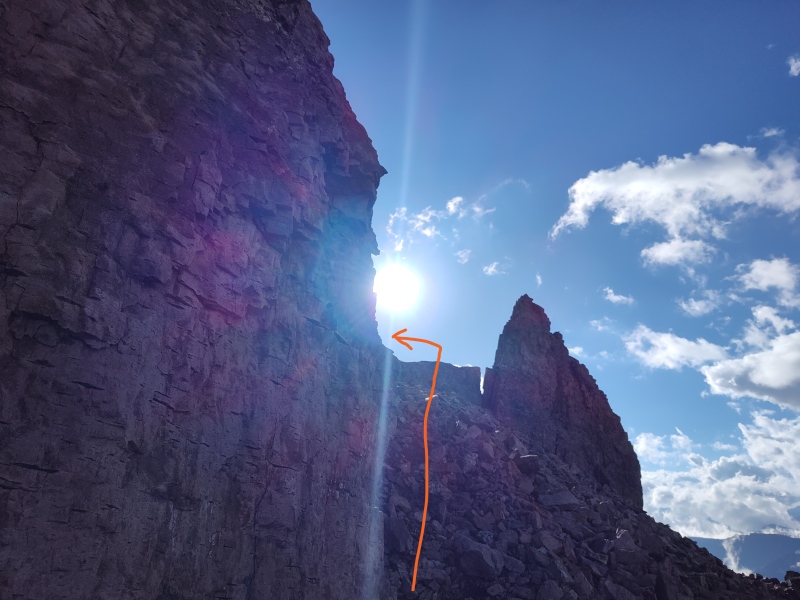
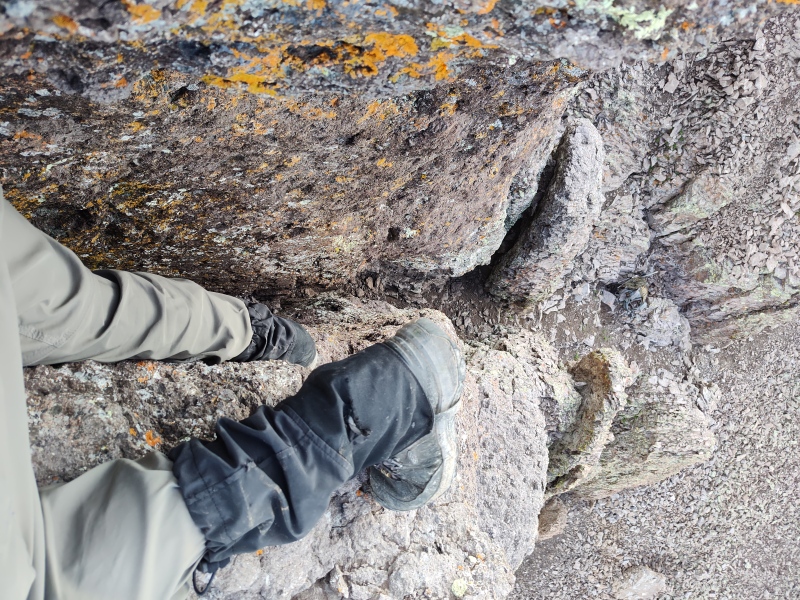
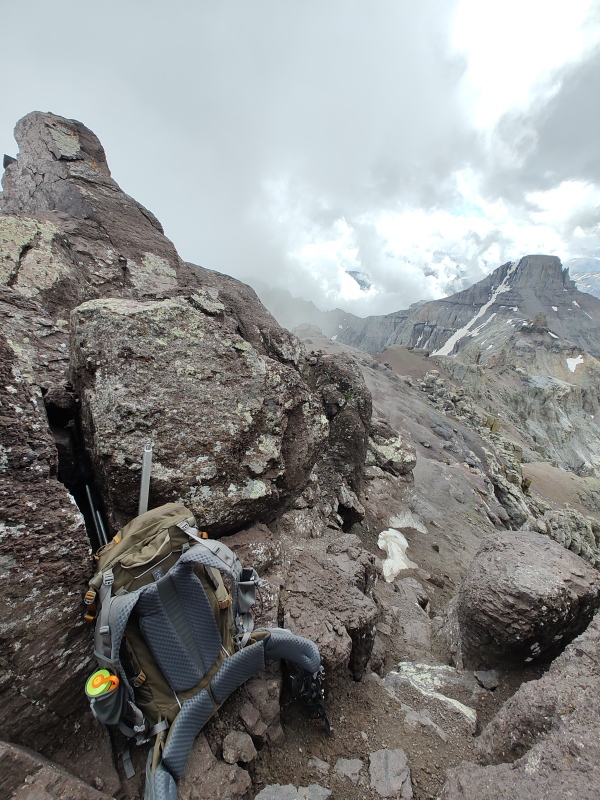
That's where, based on advice from other TR's, I stashed my backpack, knowing it would be too hard to squeeze up the chimney with it. But I was reluctant to be fully separated from all my gear so I detached the top part of the pack (containing some food, water and Garmin In-Reach, among other items) and put it on like a fanny pack, but worn in front. I had to swivel it around my hips a time or time going up as I squeezed into one position or another but overall it worked out ok. Wearing a backpack up this chimney would make things a lot more trouble and you'd probably scrape up your pack pretty good. So you're probably better off leaving the pack below. 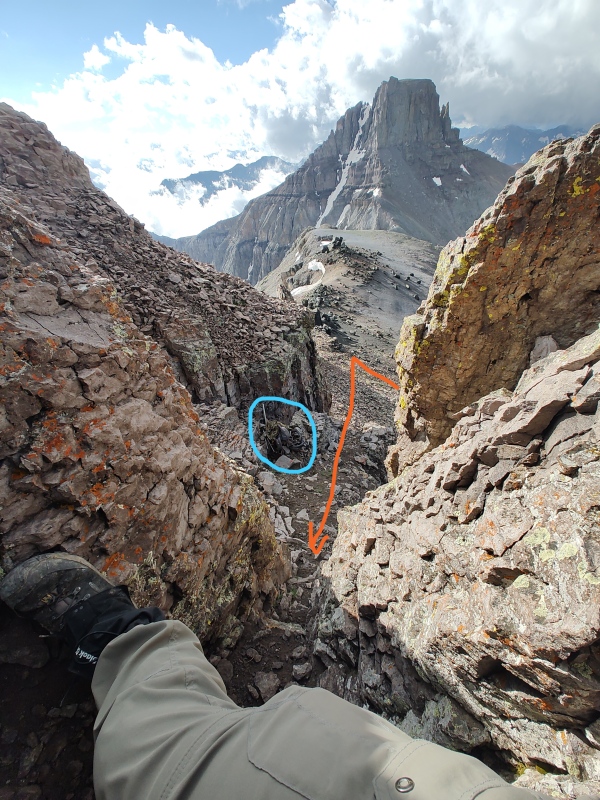
As others have stated, the crux is the overhang partly covering the top of the chimney but it wasn't too bad slipping over onto the rock feature to the left and then up onto the summit. 
On the way back down there was a bomber handhold that made it real easy to lower myself back into the chimney. Slightly awkward and I banged my helmet on the rocks a time or two but it wasn't all that bad overall (but please note I climb 5.10 in the gym so don't take it for granted that you can cruise right up this if you don't have prior class 5 experience. A fall from the top of the chimney would leave you extremely messed up if you managed to survive it). 
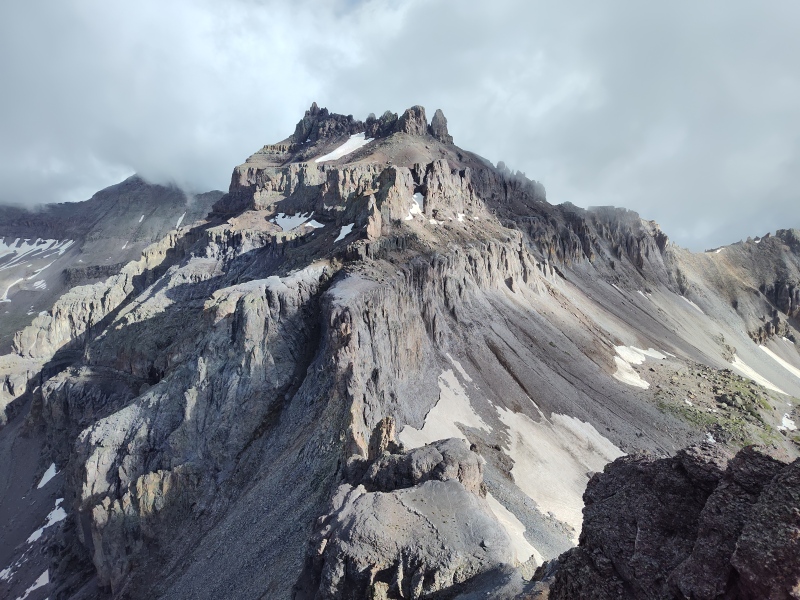
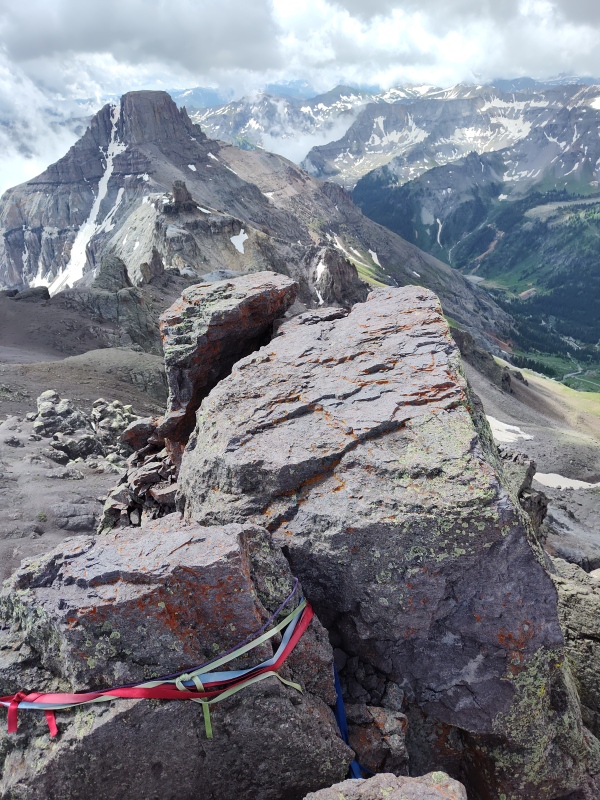
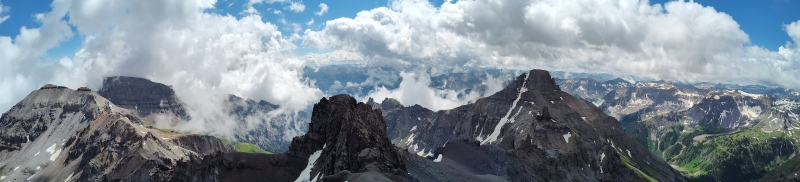
If you're comfortable on exposed class 5 and don't mind a slightly awkward exit move at the one place where a fall would most likely be fatal, then you can probably handle this without a rope. Otherwise, bring a friend who doesn't mind going unprotected to the top and have them setup a belay. There's a big rock at the top of the chimney with a bunch of old slings that people have obviously used to rappel from. Should be easy enough, with one good climber up front, to setup a top rope belay for less confident team members. That's what Yaktoleft13 did in this trip report: Teakoffee for Five From Coffeepot to Teakettle: When you're up on Coffeepot and look over to Teakettle your first reaction may well be: "Dang! How am I supposed to get over there?!" This ain't your pansy little stroll from Bross to Cameron - this is an impressive fortress daring you to try to invade! 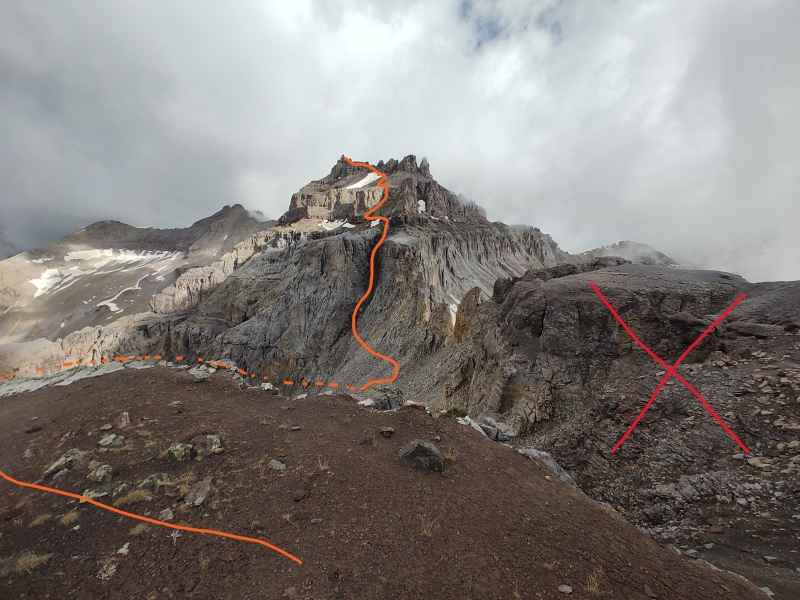
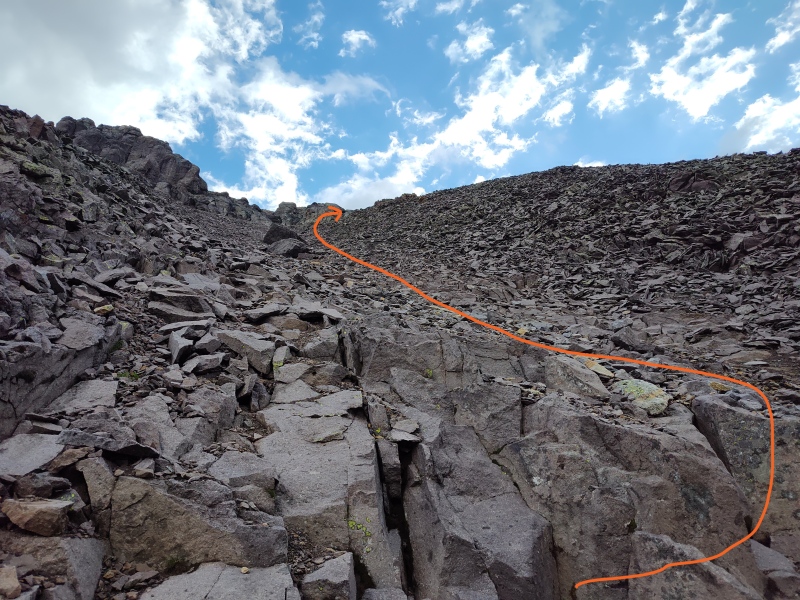
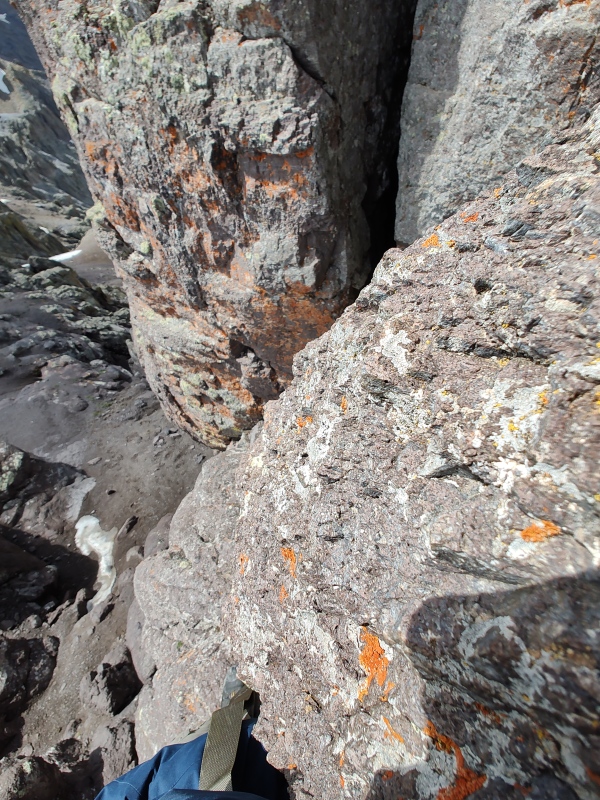
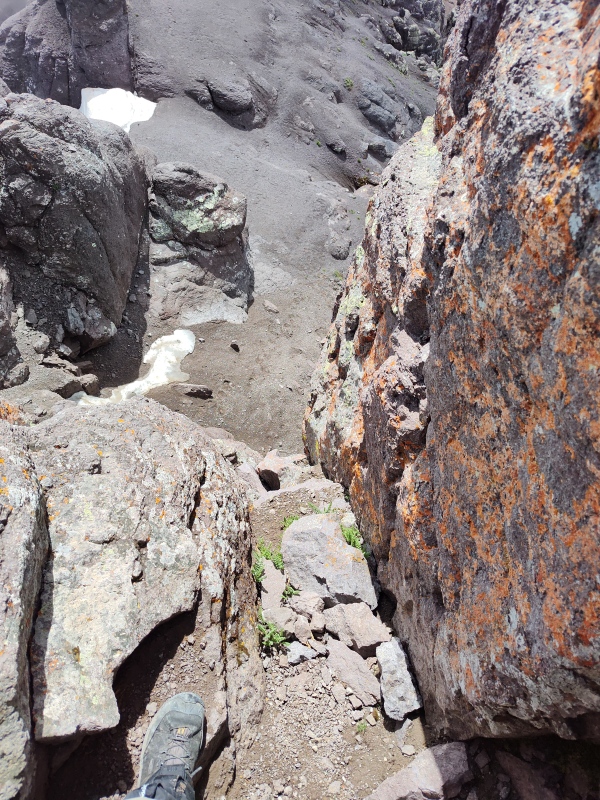
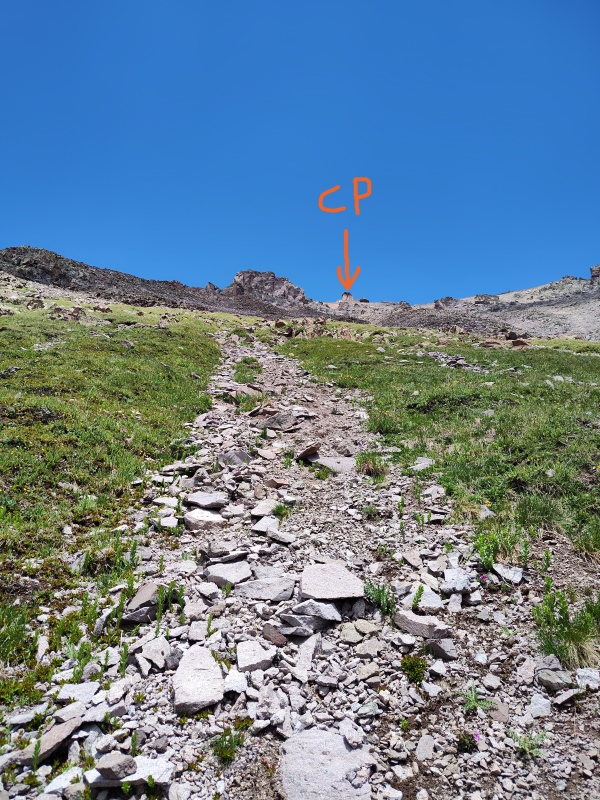
Ridge direct is not the standard route over there and it would be quite spicy, I imagine. I was on a somewhat tight schedule so didn't have time to try to play with the extra spicy route. Instead I stuck pretty much to the gpx tracks I had downloaded before. This has you partly backtrack down towards the trailhead but then cut hard right (northwest) to drop down below the ridge, across some more steep scree to the base of the Black Gully. 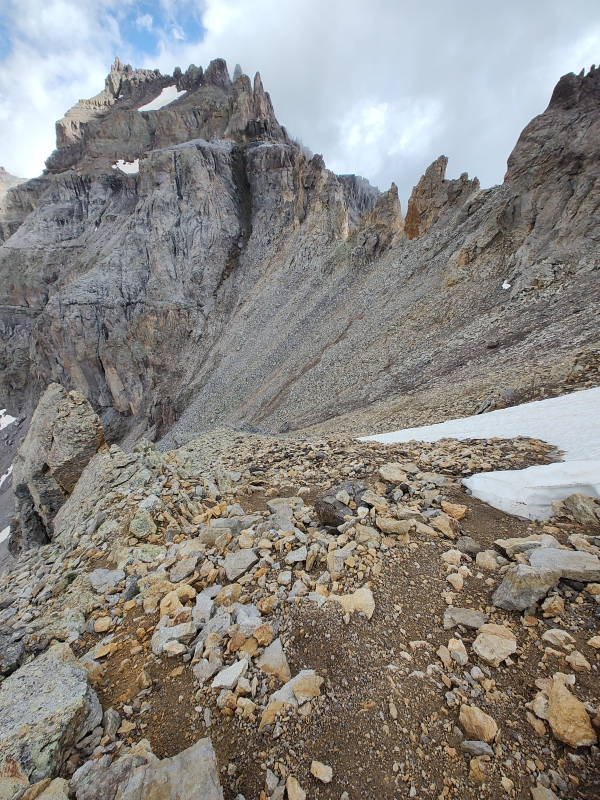
The Black Gully looks intimidating from a distance but is far less so once you actually get into it. It's steep enough to get you sucking wind but not as much of a miserable mess as the slopes leading up to Coffeepot. Then you cut horizontally over to the Sand Gulley, which becomes obvious as you get closer, and finally continue over and up a bit more until the iconic Teakettle and its handle come into view. 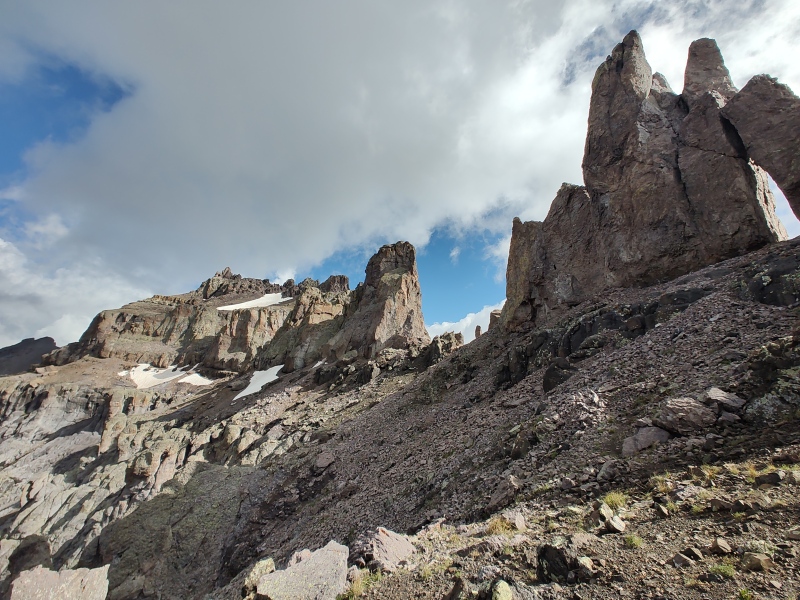
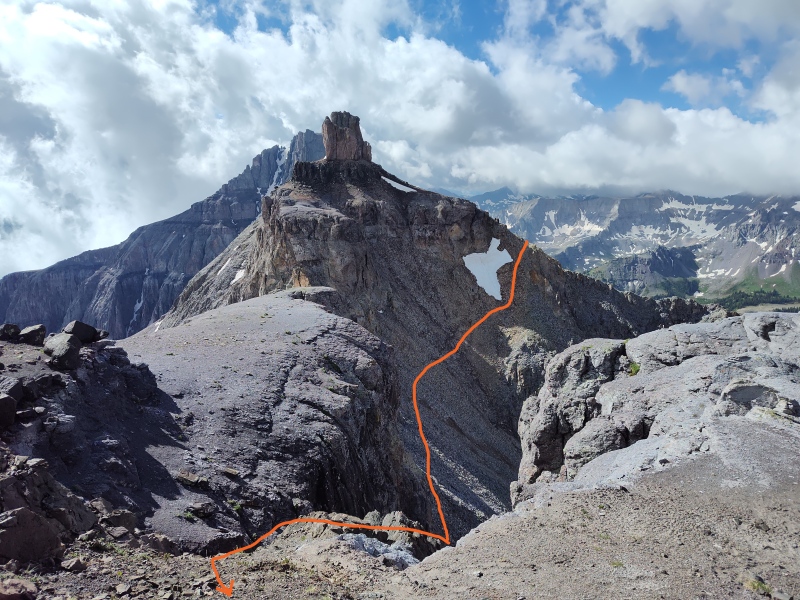
Be sure to note where you drop down - on this occasion a snowfield made for a handy landmark; without that it might have been tricky to pick out where to aim for on the way back (hint, it looks like dropping down the scree between would not end well, despite looking tempting you're better off backtracking and doing the little reclimb). 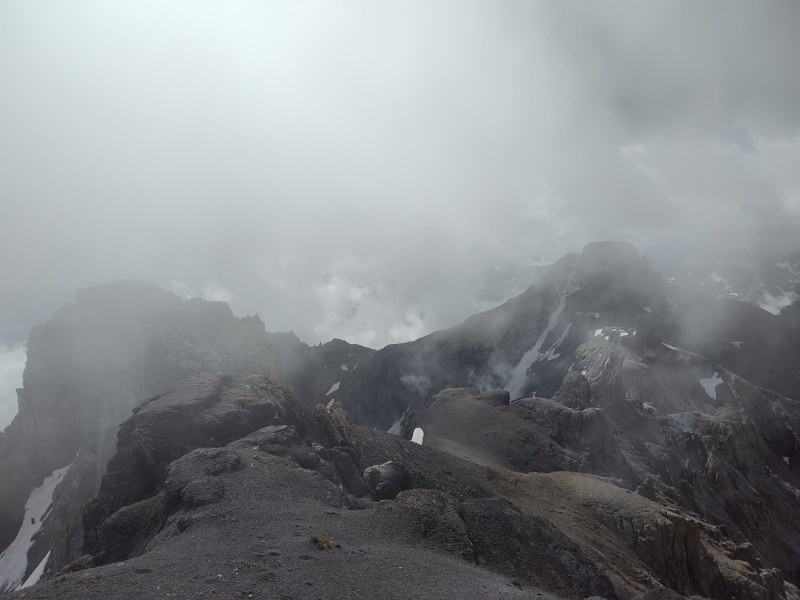
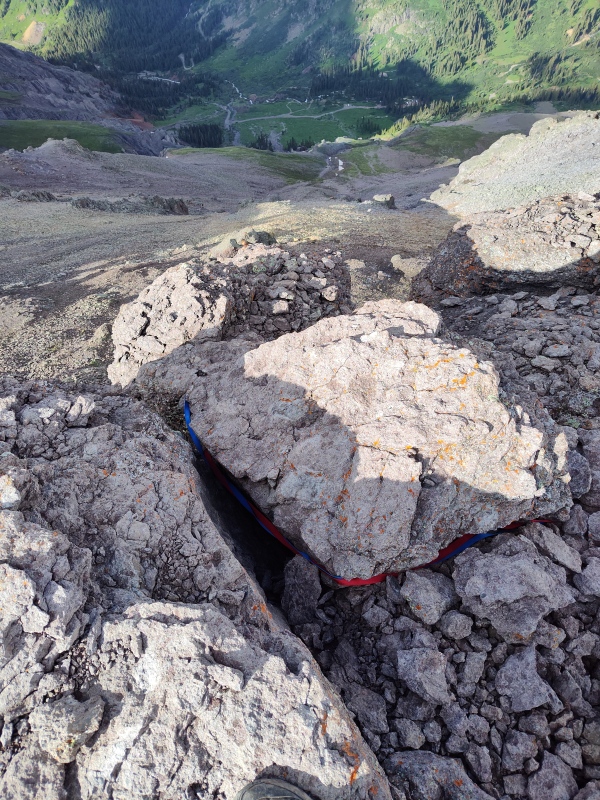
The Handle Quick intermission: it's obligatory to get a photo in the handle of Teakettle - without a photo in the handle, any alleged summit of this peak is invalid. Being solo, this presented quite a challenge. I had considered using the timer feature of my camera to try to pull off a selfie. But given the terrain, this would be all but impossible to do, especially if you wanted a photo from the correct angle to show the entire Teakettle and handle. 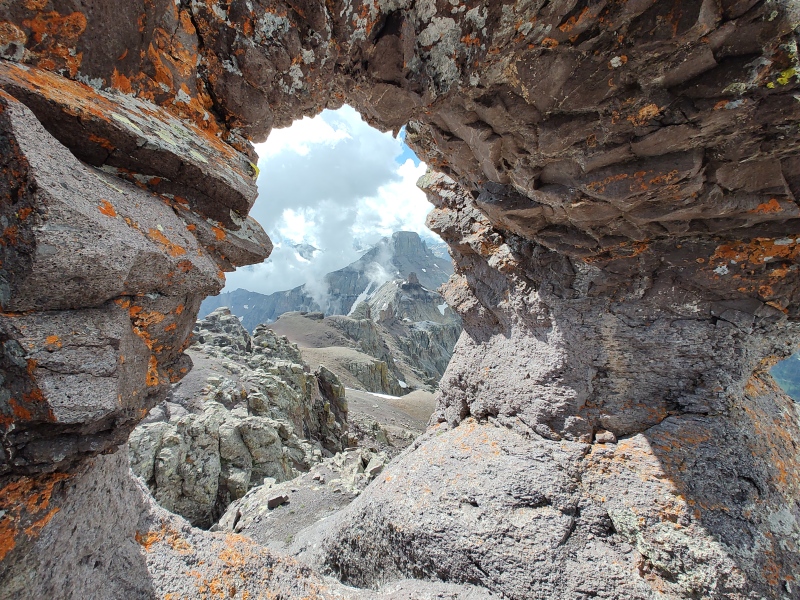
Fortunately, I had predicted a high probability that this would be the case and one of my nephews had given me a tripod for Christmas a ways back. The unique feature of this gift was the Bluetooth remote control that allows you to take photos from at least 30 feet or so away. This was good because the nearest perch from which to capture the full view is a ways away from the handle. Remote control was the only viable option for someone without a partner. The remote I have only has a single button, so you have to setup the shot first, with the proper zoom level, etc. I had forgotten to test beforehand if I keeps the screen from turning off when you have the remote connected but I figured it would stay on if I periodically took pictures. So I have a series of photos of me moving over into position because I wanted to make sure the camera didn't turn off before I could get into position. 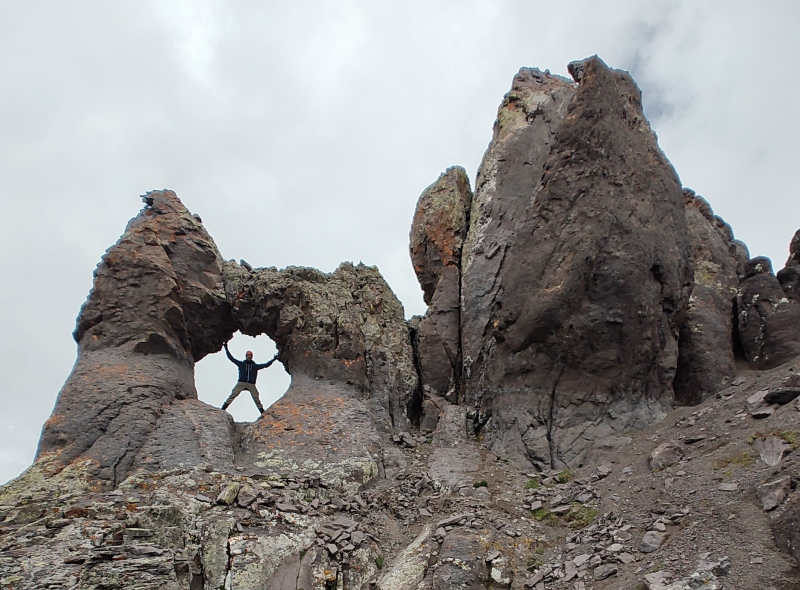
Fortunately it all worked very well on the first try except that for my more creative positions I was inadvertently holding the remote in the hand away from the camera and so it didn't trigger for those poses. Oh well, the world will never know what it missed... Teakettle: As I approached the summit there were a great deal of low flying clouds swirling up from beneath me on the north side of the summit. I was concerned that they were going to swirl on up over me and cause me to lose all visibility just as I was doing the few class 5 moves to the summit. But I knew better than to try to rush up it while fatigued. So I took my time getting the handle selfie and then I made myself take a break at the bottom of the summit pitch, where I dropped my pack, except for the top detachable mini pack and, after I felt ready, got going. 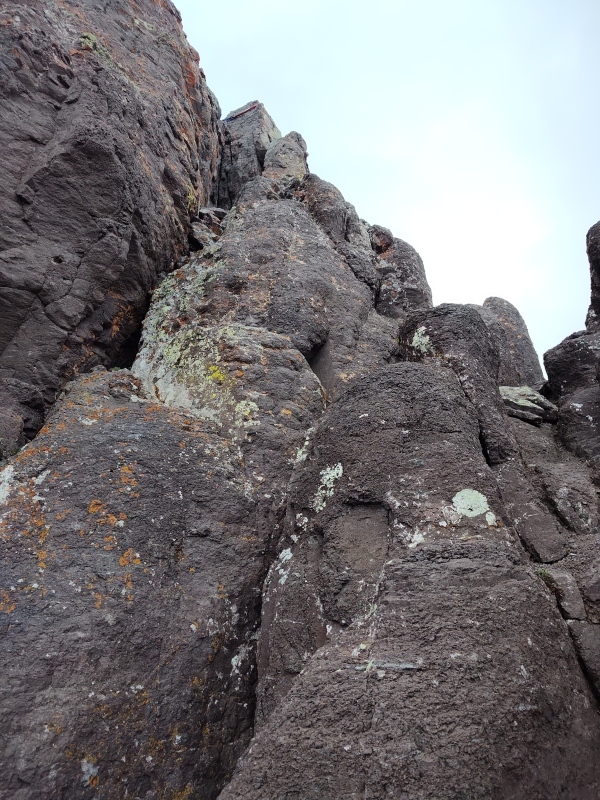
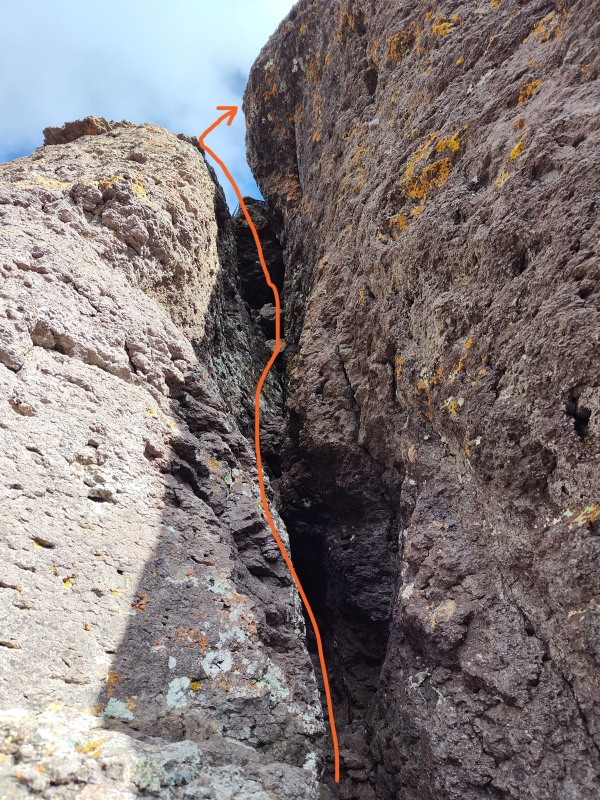
It was slightly awkward but not terribly hard to get up onto the class 3 section leading to the base of the chimney There are a couple different options just beyond to the right (north) of the bottom of the belay. I worked my way up and then a rather exposed step around a bulging rock got me into the chimney itself. There were some great holds in the chimney but I was one solid foothold shy of it being a fairly easy climb up and down (for reference I'm 6'2"). But without that one hold I was nervous about the downclimb. 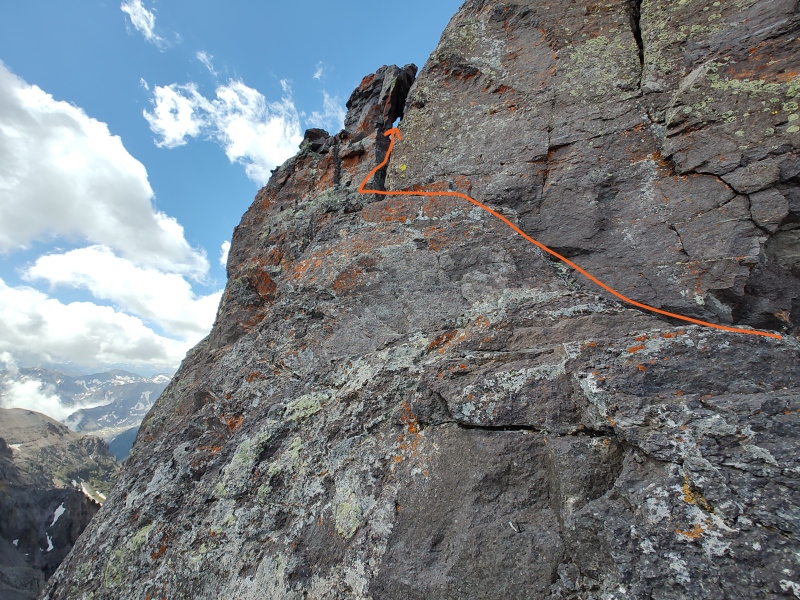
Reportedly this goes at somewhere around 5.3 - supposedly little to no harder than Coffeepot, so I assume if I had spent a little more time I would have eventually spotted the one extra hold I needed to have made it as comfortable as Coffeepot. But the nearby swirling clouds coming up from below the north side had me worried that I would lose my nerve if I lost visibility so I gave up looking for a smooth, easy way up and ended up doing an awkward backwards stemming maneuver (facing away from the peak) to get up. I'm pretty sure my funky maneuver was probably rated higher than a 5.3 but it was the only way that was presenting itself under the pressure of getting up before potentially getting swallowed in clouds. 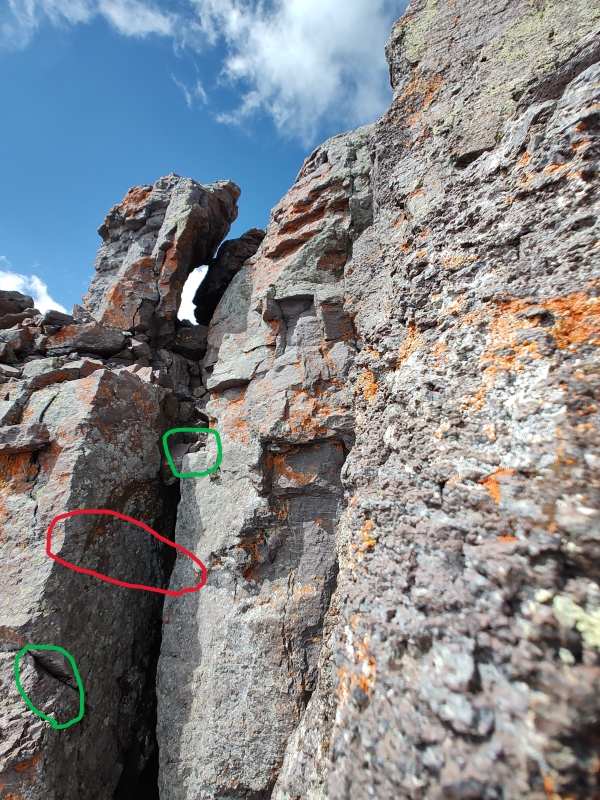
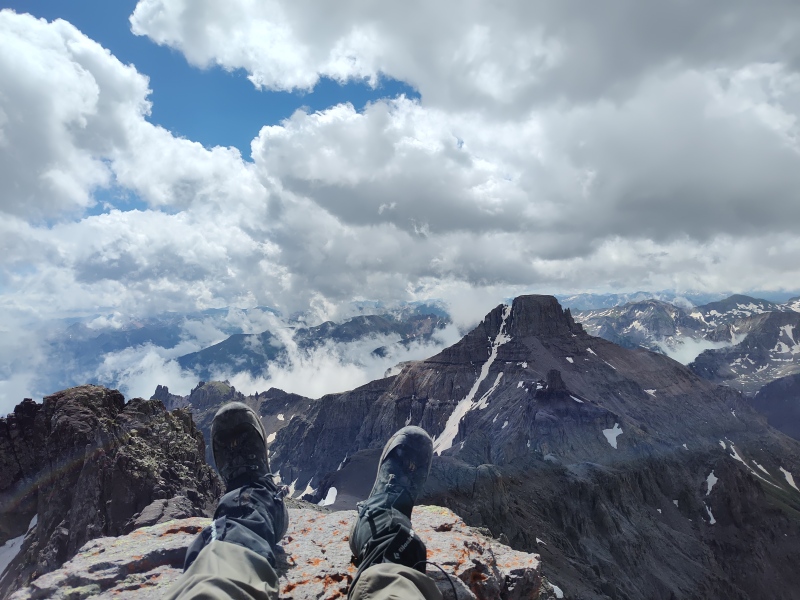
Thankfully, the clouds never did rise up beyond their swirling just north of the peak. So after resting for a while and taking plenty of photos, on the way down I did an "exotic variation" (as I said in my CR) of my ascending maneuver. It was not by any means the safest or smartest move I ever pulled in the alpine. It was only even viable at all because I was in a chimney and had already come up the route so I knew that if I pulled off this maneuver I would end up back in a position I had been in on the climb up and would have no problem with the rest of the descent. I also had proven on the way up that the holds I would be aiming for were absolutely solid. So given those caveats, I felt ok in violating the normal climbing mantra of never doing a move that you can't undo - because this was a full-on commit, no turning back sort of move. I could stretch out in a stemming move across the chimney but wasn't confident my hiking boots would allow me to safely stem my way down and so that one stinking foothold that I just couldn't seem to find was really messing me up in terms of making a clean descent without risking any holds that could end in disaster if I slipped without a rope. So I tried to stretch down to the next really solid foothold I could see below. I was only about a foot or so shy of making it work. Finally I decided that given the structure of the chimney and how huge the foothold I was trying to reach was, I felt adequately confident to risk what I'll call a "flying stem," as an option that would be quicker and easier than trying to reverse the backwards stem I did to get up. I'm not sure if there's an official name in the climbing world for this maneuver - maybe it's just called stupid. Or perhaps it has some fancy name. Even though I was 99% certain I could pull it off, that little 1% "what-if" got my heart pumping pretty solid. So for this "flying stem" I basically planted my left foot and then pivoted down in what essentially amounted to a semi-controlled fall which, upon sticking the landing, would have me end up in a stemming position spanning the chimney, or upon not sticking the landing would hopefully have left enough non-broken bones to pull out my Garmin In-Reach and signal SOS. But I wouldn't have gone through with the maneuver if I didn't have extremely high confidence that I was positioned well enough to pull it off and that it would be less sketch than some of the other more traditional contortions I had been considering (down climbing with neither a rope nor a partner to tell you move your foot 1 inch to the left, can be tricky business). Well, stick the landing I did, and ended up with all four limbs positioned on robust holds. From there it was trivial to step down into the bottom of the chimney. I then sat down in the bottom of the chimney for a moment to let the pounding of my heart subside before working my way back down to my pack. To be clear, this flying stem is not a maneuver I recommend, nor am I likely to repeat it. I primarily mention it hear as a cautionary tale that someone relatively comfortable in exposed, unroped low 5th class climbing felt the need to resort to this somewhat exotic move to get down the chimney without rappelling. Granted a better climber would have probably either spotted the better hold I couldn't find or would have had enough confidence to trust some of the smaller footholds I wasn't willing to trust unroped and alone. 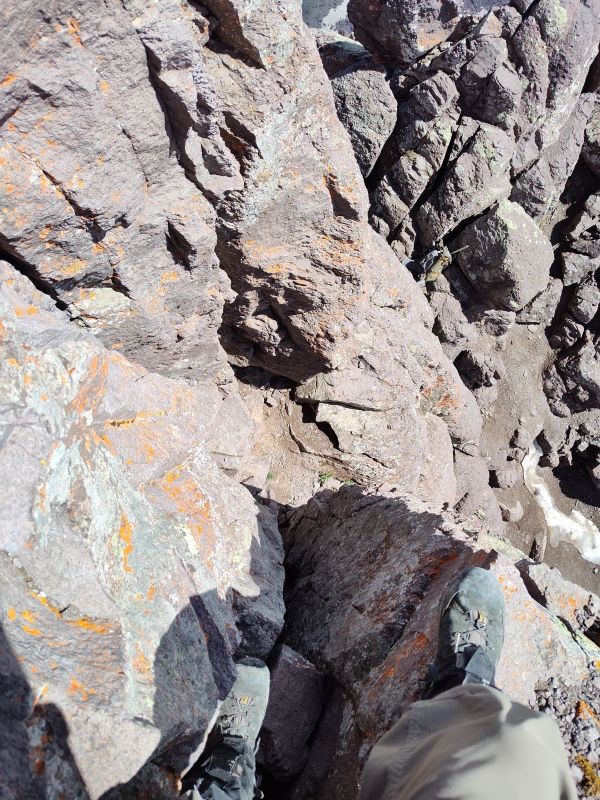
So please don't flippantly blow off the need for a rope on Teakettle just because some people pull it off. Clearly it is possible, but unless you're very confident in your ability to either seek out hidden holds or trust smaller ones, or maybe you're a lot more flexible and better at stemming than I am - I would otherwise plan to bring a short rope for a rappel. Skilled climbers could probably do ok without, but if you're a mediocre climber like me and/or you end up feeling some manner of time pressure like I did with the worry of the clouds seemingly about to envelope me, then you can save yourself some stress by bringing a rope to rappel with. 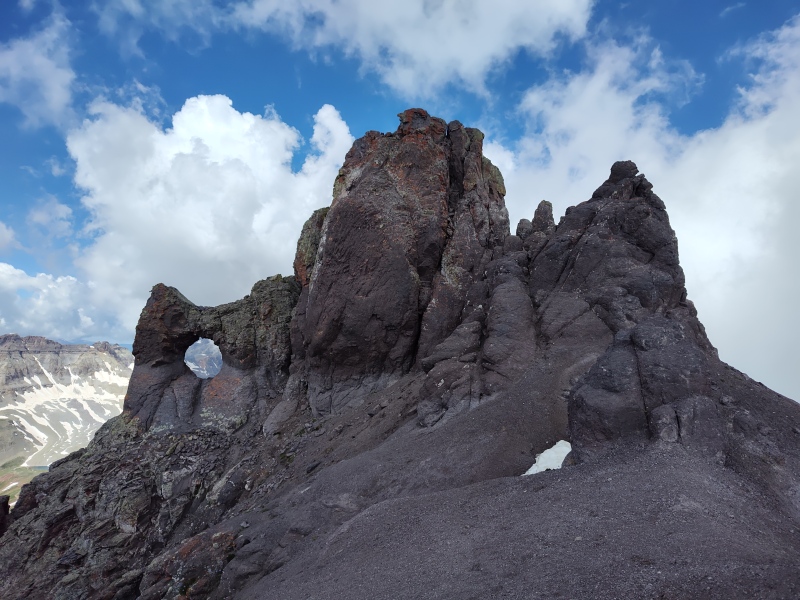
Overall I'm happy with my decision to forego bringing a rope and very pleased that I managed to get these peaks done solo. My Teakettle summit shows I probably need to start getting back to the climbing gym more than once a quarter but having been able to pull these off gives me the confidence to continue to slowly level up the difficulty of the climbs I take on. But it also gives me reason to consider practicing how to safely setup a quick rappel for things like this. It's an enjoyable challenge to do peaks like this without a rope but I can see how some basic rope work skills could make things more efficient for myself and also open up the possibility of letting me lead a route like this and setup a rope for partners who aren't confident enough to do a peak like this unroped. I've done a couple classes at the gym covering the basics but I need to do some refreshers and lower consequence practice before having someone entrust their life to my anchoring skills... 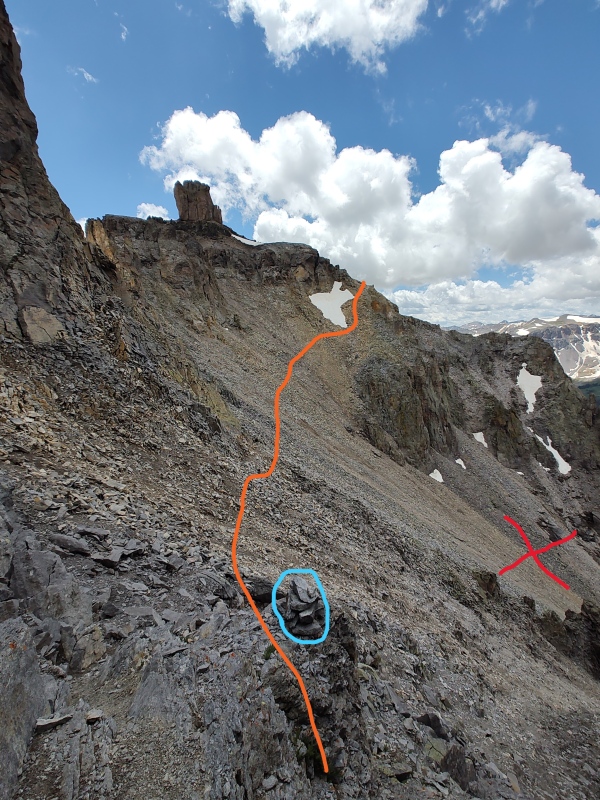

Overall conclusions: The amazing thing about this route is how short it is. Garmin clocked it at just 3.6mi but it still took me a little shy of 9hrs to complete. That includes extensive time documenting it in detail and dealing with the slow downclimbs rather than a quick rappel. Also the darn scree at various stages of the hike really gets annoying at times. If you're only interested in class 5 climbing and not peakbagging (or list chasing or whatever you want to call it) then these peaks are a lot of steep scree for a little bit of climbing and so likely aren't worth it for just the climbing aspect alone. But if you want to grab a former Centennial (now a bicent, thanks to Lidar) and want a pair of peaks to test out some class 5 moves on, then these peaks are absolutely not to be missed! These are some of the funnest peaks I've done yet, and the scenery is amazing! For Coffeepot: if I were to repeat it, I'd feel perfectly comfortable going up/down without a rope again but it might be fun to setup a rappel for the descent to compare to this time. But some people may be sketched out by the move getting up out of the chimney. If that's you, then bring a rope and a partner (you could probably tie into an existing sling from just below the top but that would require trusting old, untested gear, and if you're comfortable enough trying to tie into an old anchor while wedged into the top of a chimney then you probably don't need a rope for this anyways). For Teakettle: I'm on the fence. Part of me would like a rematch, unroped, to see if with a little less time pressure, I might pull it off more easily than my clumsy up/down this time. But, like with Coffeepot, a rappel could make getting down quicker, easier and possibly kinda fun. But if you're not into class 5 climbing, you'll probably want a rope and a partner for this one so you can get up/down comfortably. Neither of these peaks have any exposure beyond the height of the summit blocks themselves - there's no gaping chasm beneath you into which to plummet to certain death. But both of them have summit blocks that are tall enough for you to get seriously (or possibly even fatally) injured if you fell near the top. So if that freaks you out, come with a partner and a rope. 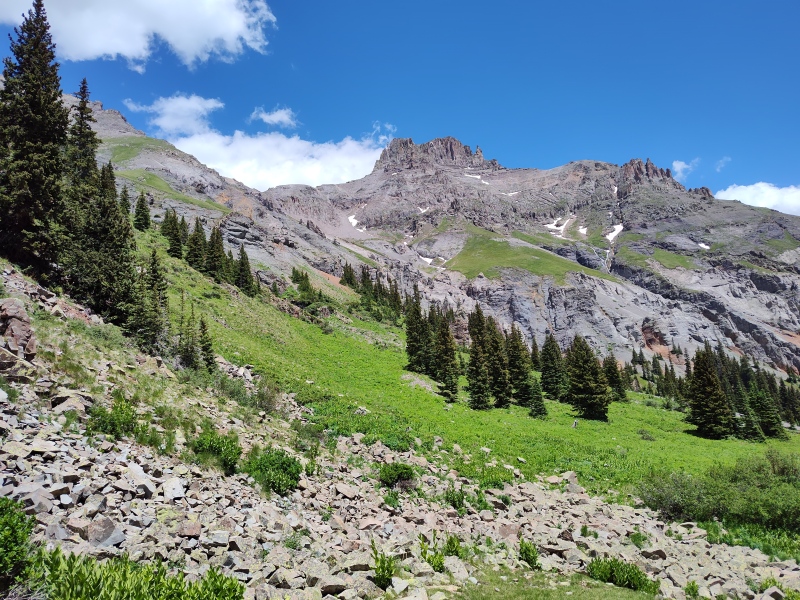
My Times: For such short mileage you might expect a real short time. You might also expect a foot rub at the summit. I wouldn't hold my breath for either. Between the steep scree fields and the technical pitches, these peaks take longer than you'd expect from mere mileage - or at least they did for me. 5:15am start from 11,300ft across from the outhouse 5:30am top of first ridge 6:55am reach horizontal rock band at 12,800ft 7:50am gained the ridge right below Coffeepot 8:08am stashed pack at base of chimney 8:20am Coffeepot summit 8:32am continue to Teakettle 9:05am base of Black Gully 9:15am top of Black Gully 9:32am base of Sand Gully 9:42am top of Sand Gully 9:55am in front of Teakettle summit block 10:28am start final pitch up to summit 10:42am Teakettle summit 11:06am back down at pack 11:33am start back 12:39pm back just below Coffeepot 2:04pm back at trailhead 2:18-2:48pm drive out to main road Thumbnails for uploaded photos (click to open slideshow): ")
")
")
")
")
")
")
")
")
")
")
")
")
")
")
")
")
")
")
")
")
")
")
")
")
")
")
")
")
")
")
")
")
")
")
")
")
")
")
")
")
")
")
")
")
")
")
")
")
")
|
| Comments or Questions | |||||||||
|---|---|---|---|---|---|---|---|---|---|
|
Caution: The information contained in this report may not be accurate and should not be the only resource used in preparation for your climb. Failure to have the necessary experience, physical conditioning, supplies or equipment can result in injury or death. 14ers.com and the author(s) of this report provide no warranties, either express or implied, that the information provided is accurate or reliable. By using the information provided, you agree to indemnify and hold harmless 14ers.com and the report author(s) with respect to any claims and demands against them, including any attorney fees and expenses. Please read the 14ers.com Safety and Disclaimer pages for more information.
Please respect private property: 14ers.com supports the rights of private landowners to determine how and by whom their land will be used. In Colorado, it is your responsibility to determine if land is private and to obtain the appropriate permission before entering the property.


