| Report Type | Full |
| Peak(s) |
Snowmass Mountain - 14,105 feet "North Snowmass" - 14,024 feet |
| Date Posted | 10/12/2020 |
| Date Climbed | 10/09/2020 |
| Author | daway8 |
| Additional Members | HikesInGeologicTime |
| Snowmass: Up S-Ridge, down West Slopes + N. Snowmass |
|---|
|
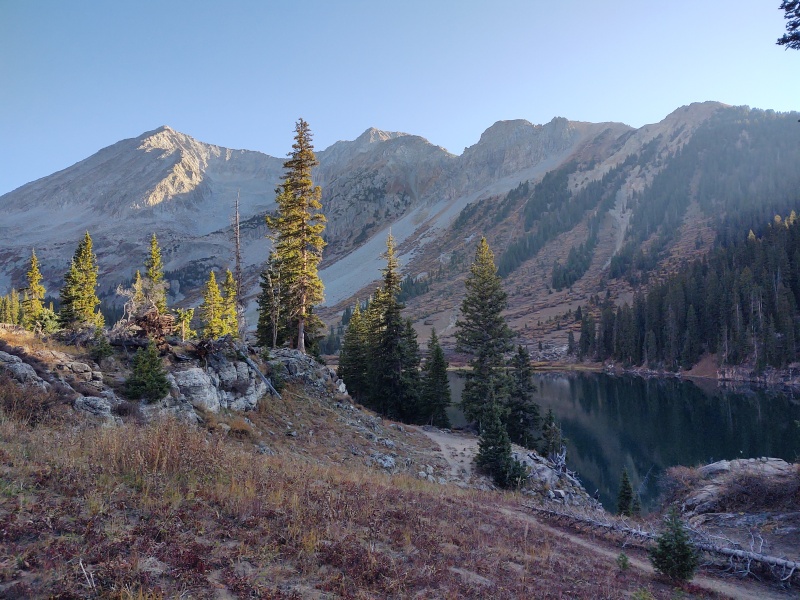
This was another fun class 3+ route but, unlike some of the recent ones I've done, I didn't have to go out of my way to get some good, serious scrambling in. This one has engaging terrain whether you want it or not. I'll give credit to FCSquid for putting up a good trip report on this route: "S" is for Stress from which I grabbed and occasionally used the GPX file (this report is a supplement of sorts to that one). I also teamed up once again with HikesInGeologicTime for this trek (I'll use Geo for short), who again helped provide scale to some of the photos of the more interesting terrain. Route: Lead King Basin Trailhead (via upper FR315, not through Crystal) - S-Ridge ascent to Snowmass - tag North Snowmass - West Slope descent Stats: Total mileage = 9.7mi; total elevation gain = ~5,417ft (~2,500ft of this is w/in the last 1 mile!); total time: 15 hours, 18 min** **My partner HikesInGeologicTime, who has never set an FKT on a good day, was having some additional health challenges but was determined to summit Snowmass this weekend. However, it should be noted that FCSquid posted times that were only perhaps a couple hours faster (a fact that I overlooked until writing this report - otherwise I likely would have tried to start the hike earlier than we did). So BEWARE - this route can take a long time! The mileage may be much shorter than the standard 22 miles for the East Slopes route but there's a price to pay for that... We had one guy blow past us never to be seen again (two guys on the summit confirmed he came up and then descended the West Slope) and FCSquid also reported being out paced, so it can be done much faster than this but don't expect this to be a quick, easy stroll just because it's so much shorter than the standard route up Snowmass. Included in this report (under appropriate section headers for easy access) will be:
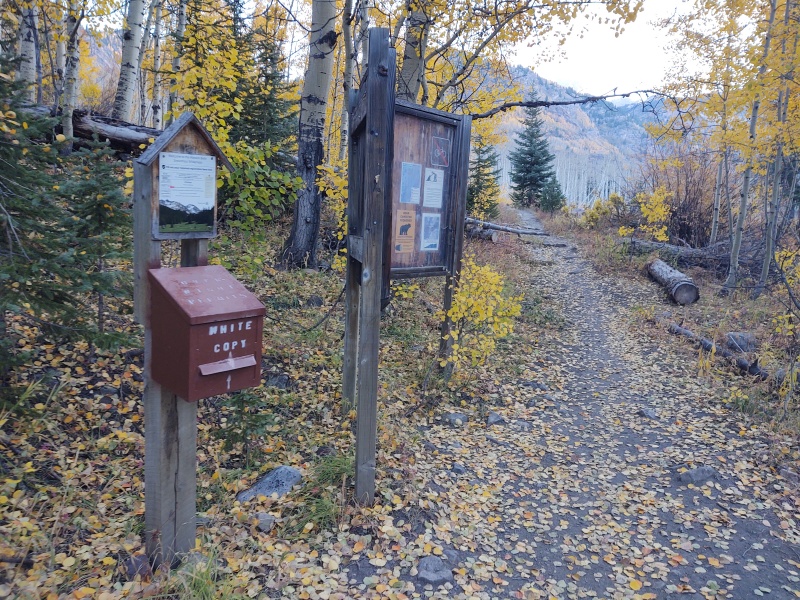
4WD Road to Lead King Basin So this road has gained a bit of a reputation and deservedly so. While I didn't have any serious trouble doing it in my Jeep Renegade (8.7" clearance), it was enough of a legitimate 4WD road to make me quite tense for good sections of it (and this coming from the guy who made it to 10,200ft on the infamous Lake Como road with this same Renegade). I did much of it in the dark on the way there and all of it in the dark on the way back, so given that and the seriousness of the road I didn't really get many photos except this one of the avy debris that has received a lot of attention. Thankfully it's been cleaned up to the point of almost no longer being an issue, though it doesn't look that way when you first approach, especially if it's dark. 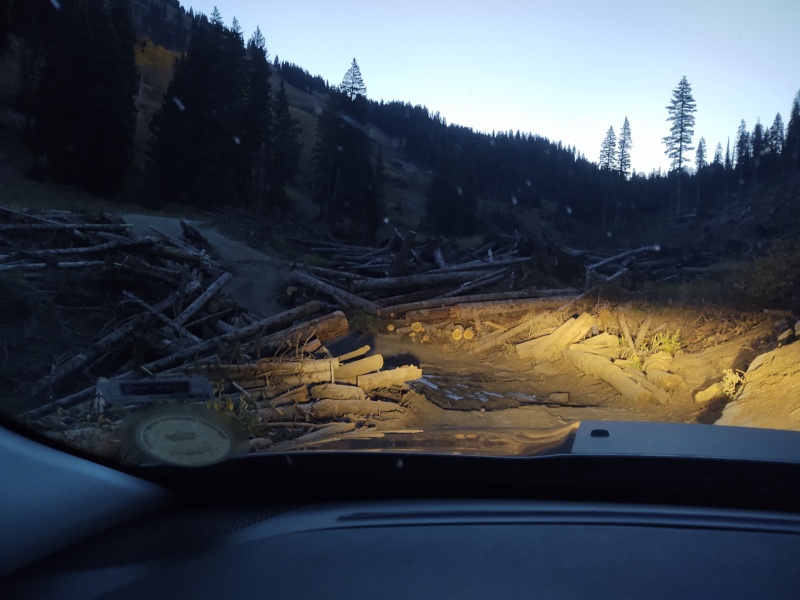
As you approach the avy debris you can tell that someone has chopped apart the major logs that had been blocking the road but then it curves and goes uphill in such a way that, in the dark, it's not immediately clear if they cut a path all the way through or maybe gave up part way. But as soon as you venture forward it becomes obvious that it is indeed clear except for one chunk of roots just as it starts going uphill. I was in 4LO at this point and only had a momentary slippage of a tire or two but this is a spot where clearance might be an issue for some folks. Besides the debris there are some very tight switchbacks, some of which are scooped out on the inside in such a way that you could get seriously off camber if you didn't pick the right line on your way back to Marble (going to Lead King Basin the worst switchbacks were uphill so I just put it in 4LO and gunned it while wrenching the wheel around. Had to take them much more slow and carefully on the return trip going down them). There are also some pretty epic ruts in places which I lined my wheels up in such as way as not to drop into. Plus large portions of this road are VERY narrow, including some rough uphill sections where you really, really hope you don't meet someone going the other direction. When you do it in the dark there are all sorts of little bumps that cast huge shadows that leave you wondering if there is an enormous pit on the far side. Most of the time there wasn't, but there were one or two sizeable potholes so you have to treat every shadow with caution. Note: I expect that this trail could get VERY, VERY ugly when wet (as the incredibly deep ruts in some locations testify). I've read that the lower road through Crystal is much worse than this upper one along FR315 (Lost Trail Road). Trail to Little Gem Lake From the Lead King Basin trailhead there is an excellent and easy trail, though not without some decent elevation gain. We almost missed it walking down the road from where we parked but once on it there was little trouble following it except for one little section just before Gem Lake where we somehow briefly lost it on the way up but easily followed it on the way down. 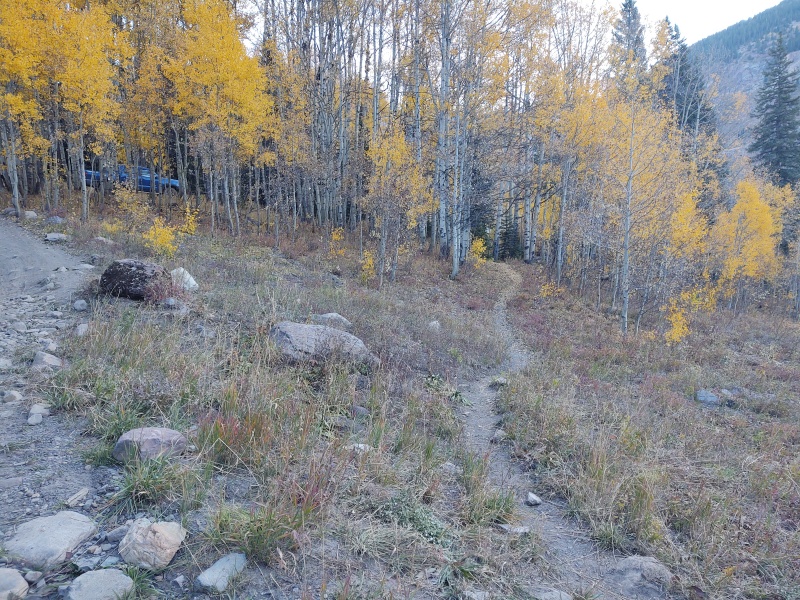

Getting to the S-Ridge So one detail that was glazed over in the otherwise fairly thorough report that FCSquid wrote is how exactly you get over to the S-Ridge. The terrain between Little Gem Lake and the very obvious gullies at the bottom of the S-Ridge was more interesting than I expected - lots of little cliff bands, hills and valleys. The route we took weaved back and forth across the GPX tracks posted by FCSquid but it was what seemed to make the most sense to us at the time (I consulted the GPX tracks for the initial turn off point but then mostly made the route up on the fly and compared tracks afterwards). 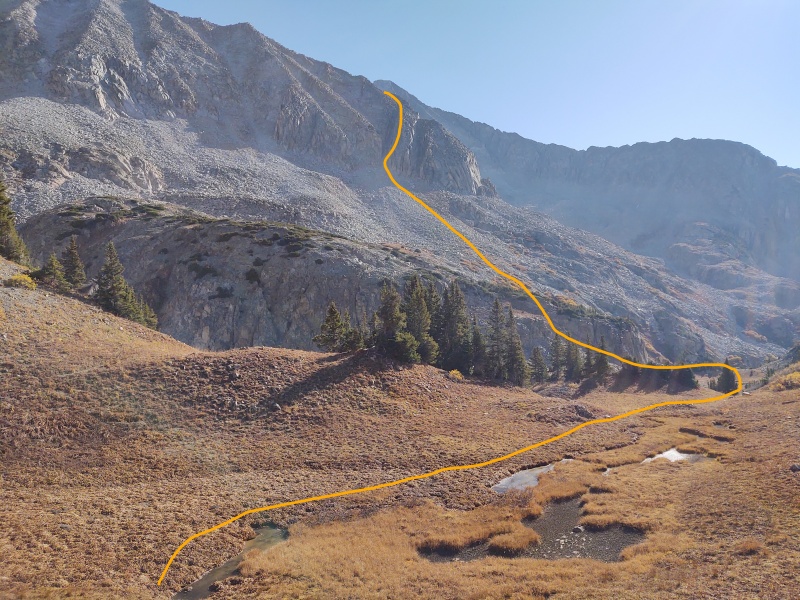
There was nothing like an established trail or even an obvious place to go, though from above we did see one hint of an actual trail in this region, although it didn't seem to lead to the S-Ridge. 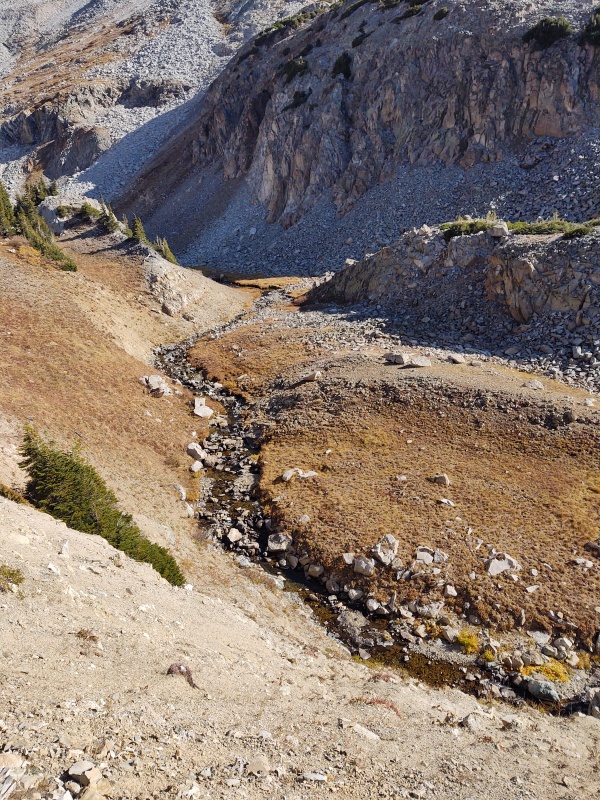
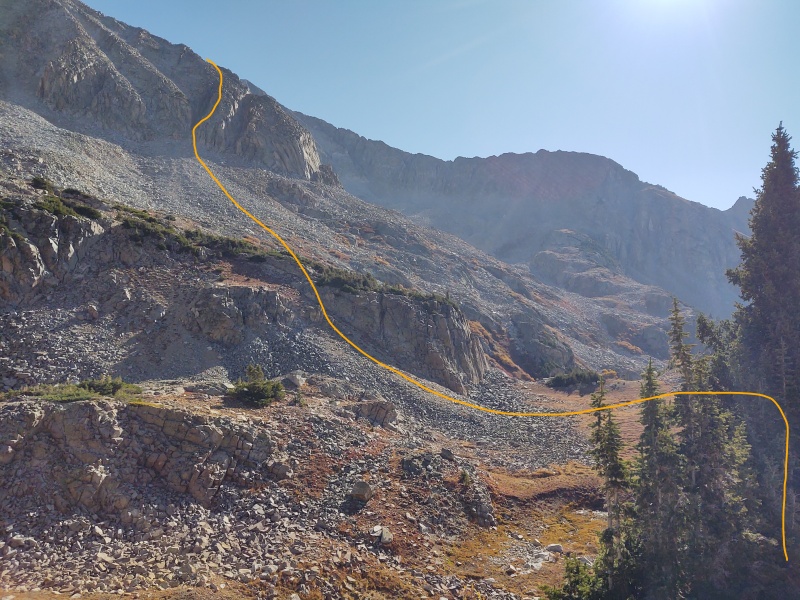
There were lots of little obstacles along the way but nothing serious. 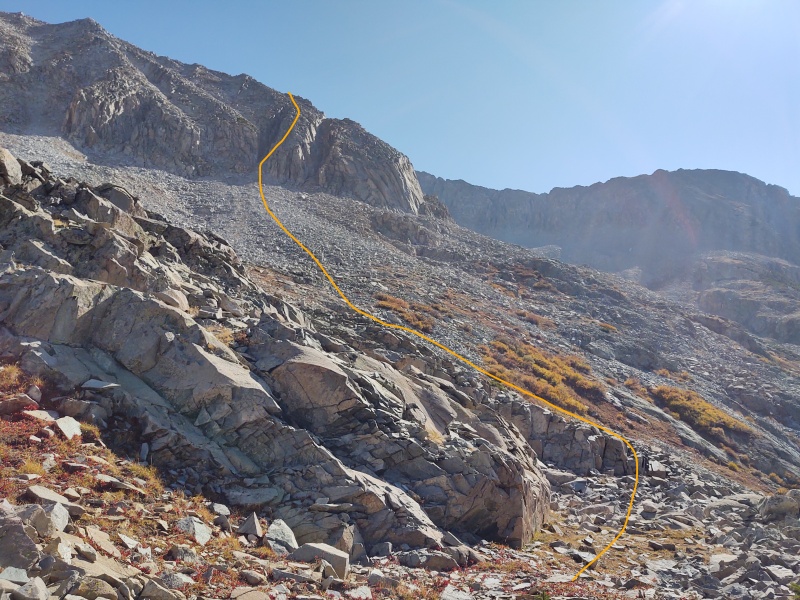
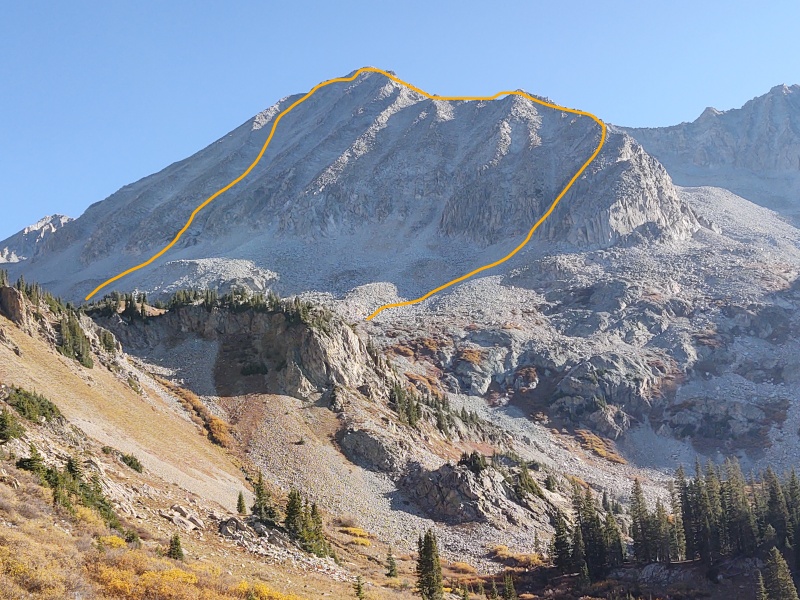
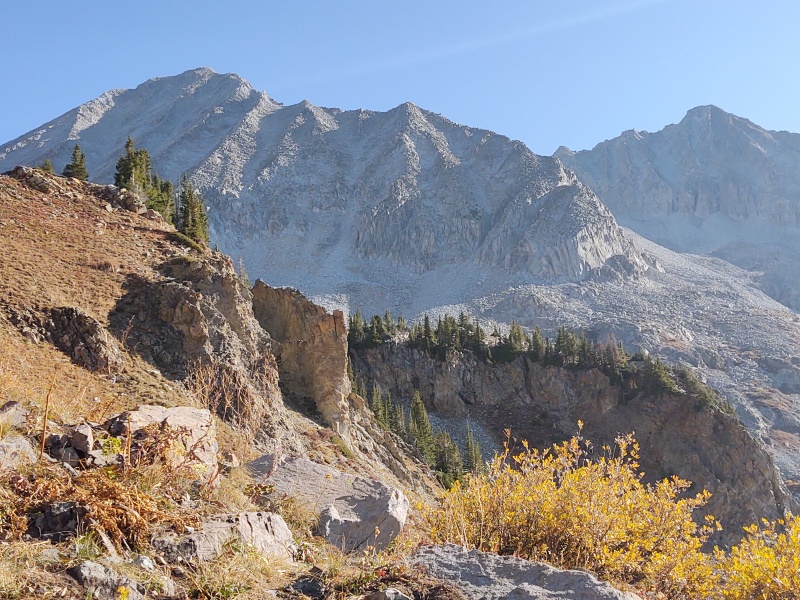
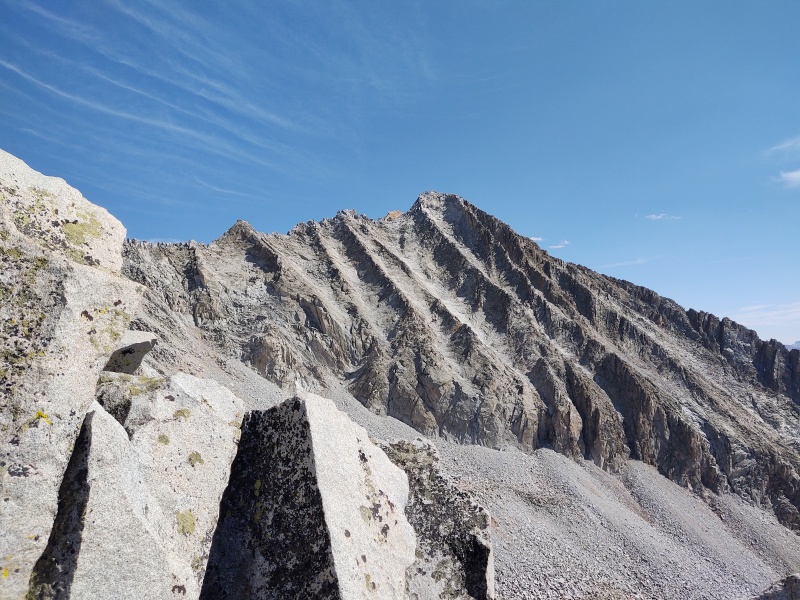
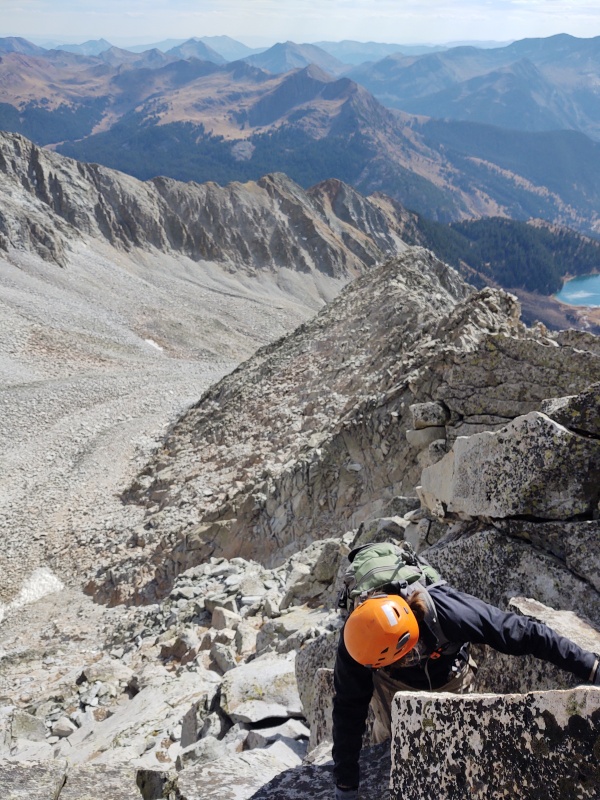
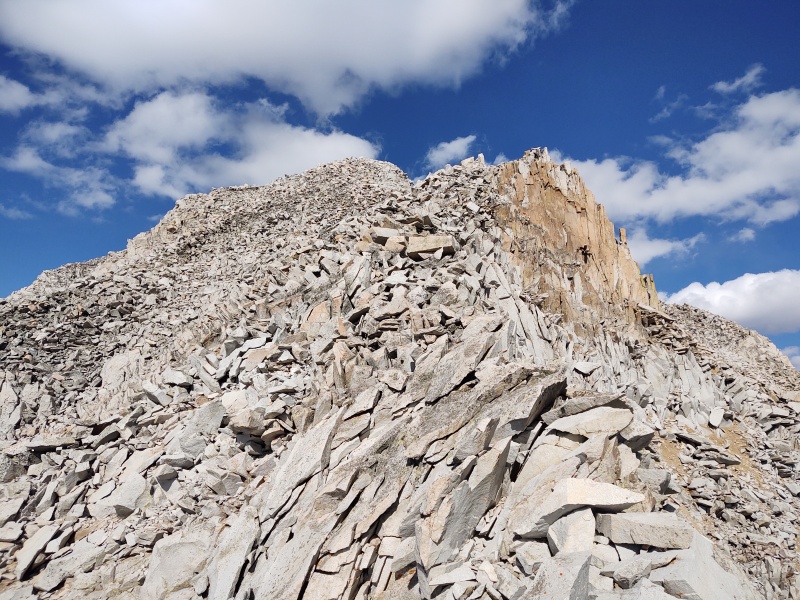
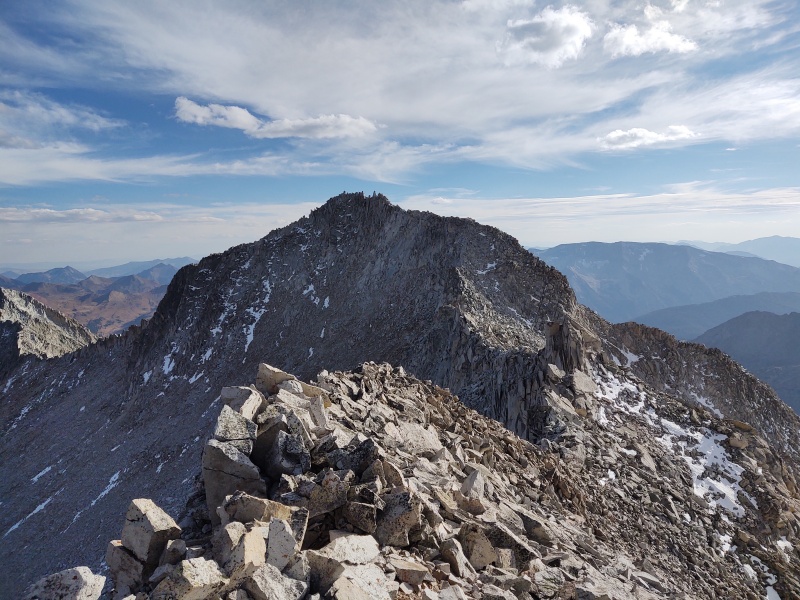
Climbing the S-Ridge Here's where the action begins and it doesn't let up much until you're on the summit (well actually it even notches up a level there with that delightfully dangerous summit block!). People often debate about whether a route is class 3 or 4 or whatever but one thing is for certain - this is absolutely not a class 2 route from here on nor is it something that only just barely hits class 3 for a few scattered moves. This is serious, sustained class 3 with class 4 terrain sprinkled around. The exact rating for this route will depend on how good your route finding skills are but I'd say at a minimum the class 3+ rating that Gerry Roach gives it is fitting. This is not a weeny version of class 3 that has to be spiced up by going out of your way to make it hard (see for example Ruby to Grays Traverse: Gratuitous Class 4 on a Class 3 Ridge which I also did with Geo) this is the real deal. If you're new to class 3 ridges I recommend you start with something like that Ruby-Grays traverse or the Buckskin-Democrat traverse (Buckskin to Decalibron traverse plus South Bross) before you tackle something like this S-Ridge (and you might want to get some regular class 3 peaks done before trying those). In fact, it's probably best to just assume you're going to have to deal with class 4 on this route because you might find yourself somewhat hard pressed to avoid it and/or realize that life is easier by doing some class 4 along the way. The exposure can actually be kept relatively moderate (for a ridgeline) for much of the ridge but there were a few places where we ended up doing some class 3 and 4 moves over some pretty significant exposure. 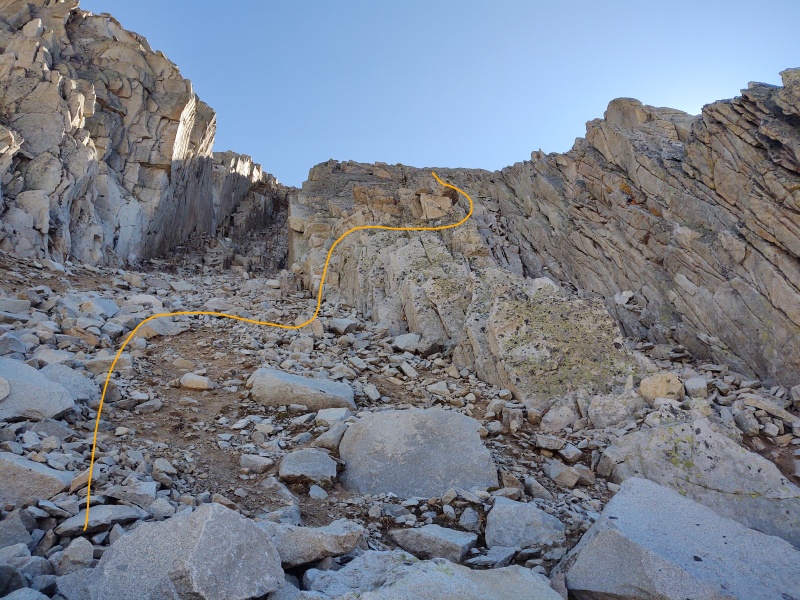
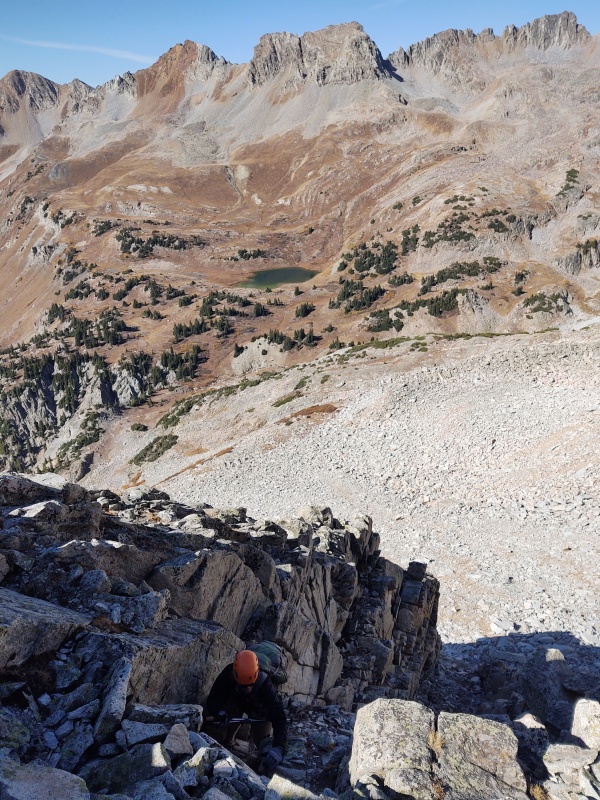
The gullies start very gentle but towards the back part they looked very steep and loose (the end of the gullies did NOT look like class 2 terrain to me). The rock between the gullies was generally very solid. In fact, I'd say about 95% of the rock going up the S-Ridge is generally fairly solid - but you have to watch out for that 5%... (that was my same conclusion as for West Dyer - Dyer). 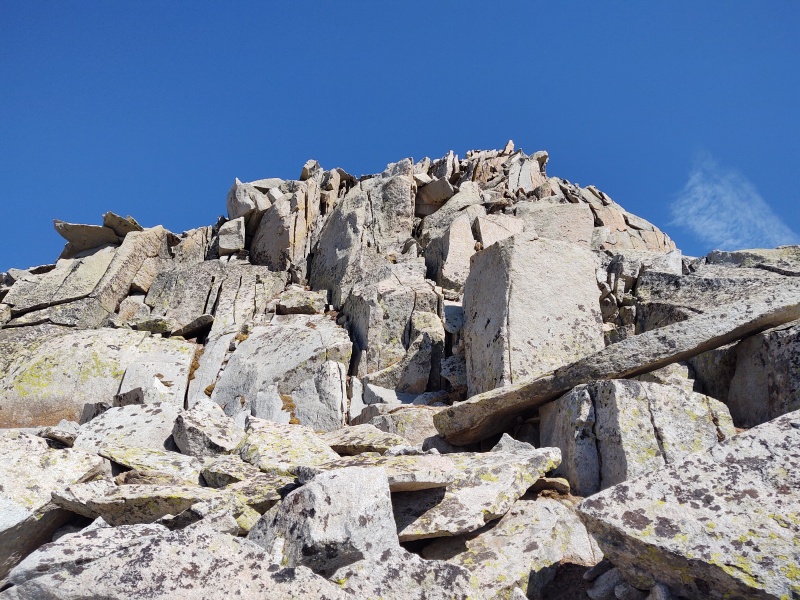
Once on the ridge you'll have the option of staying more to the left and dealing with steep, potentially loose gullies, or more to the right along the ridgetop where you'll have at times some decent exposure just off the ridge. This first portion of the ridge is pretty straightforward but even "easy" scrambling on steep terrain at altitude can be tiring. 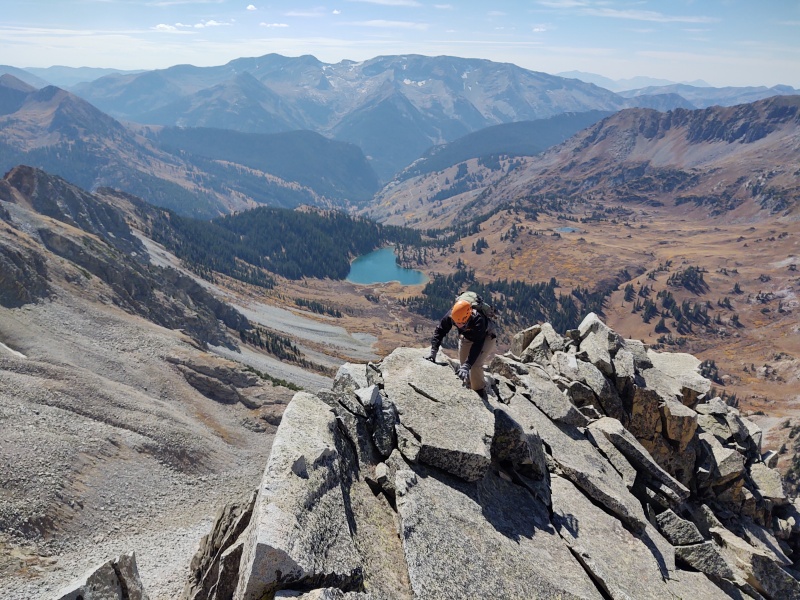
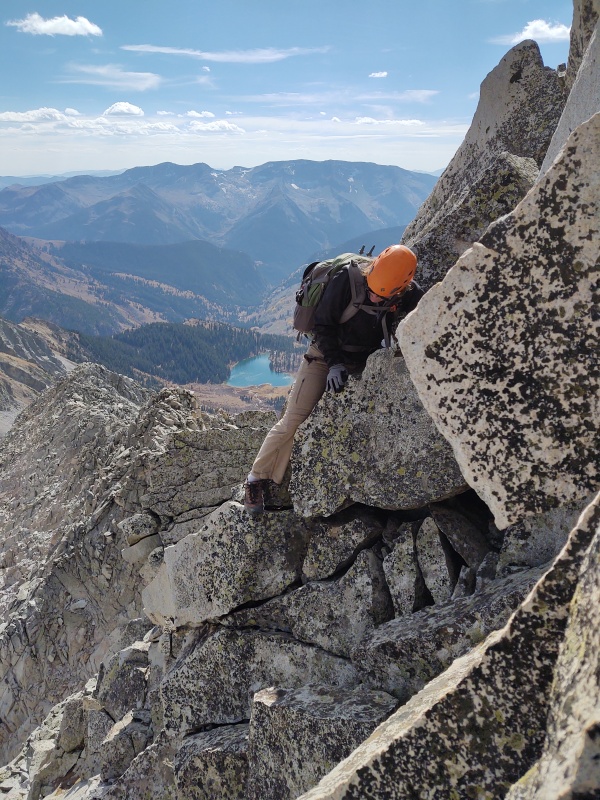
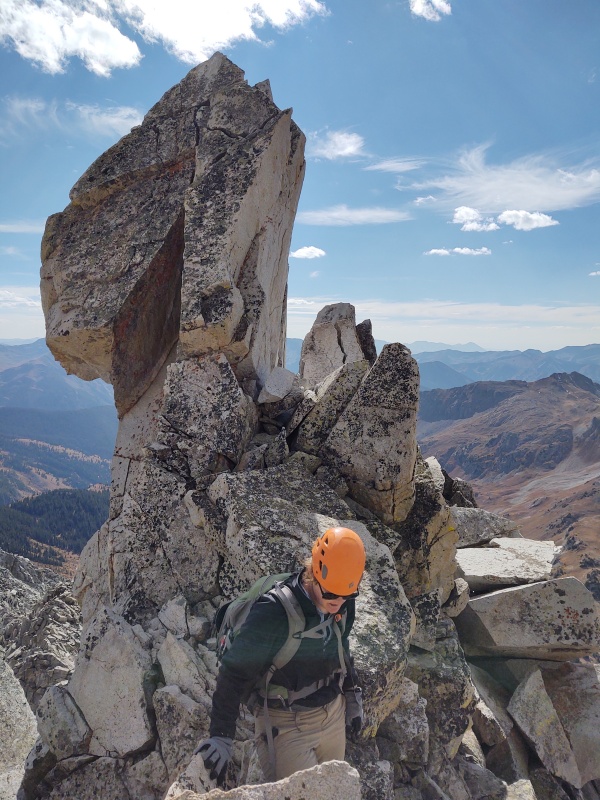
While I intentionally avoided, for the most part, going out of my way to spice things up, there were a couple small features here and there that I just couldn't resist such as the exposed, cracked-open rock face below. 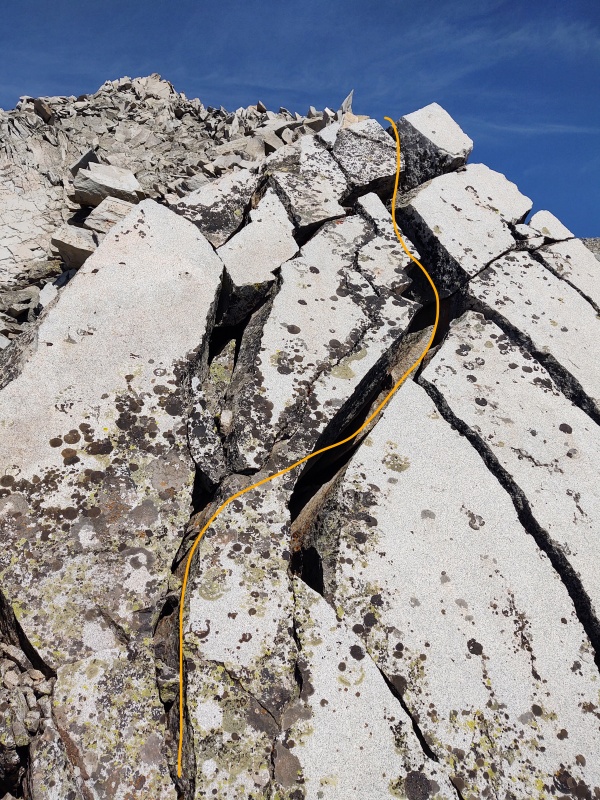

The Crux Wall So up to this point the ridge has been a good workout with nice scrambling that keeps you on your toes and a couple fun little features. But this crux wall, as Geo put it, is very cruxy. And the shorter you are the cruxier it will be... There were, as I saw it, basically 4 main options for this crux wall: Option A) At far left, go through the notch and drop into the steep, loose gully that you can slip and slide about on - no thanks (we ended up on a tiny portion of the top of the gully and hated it). Option B) Go up the steep rocks next to the notch where there were multiple rocks several times larger than a microwave which appeared to be just barely secured to the side of the mountain. Uh, no thanks. Option C) Go up the really sweet looking slab to the right of that. I was immediately drawn to that and it started great but then the holds got few and far between such that I would have had to really reach to make it up and my shorter partner would have been in a real bind. Thus... Option D) The last main option is to go up the easy - almost boringly easy looking rock to the right. I reluctantly opted to give up on the fun slab and go to the right for the sake of my partner - but oh boy, that right side is a deceptive lure! Don't think I really helped Geo with this "easy" bypass. Just around the corner we hit some seriously exposed class 3/4 moves. 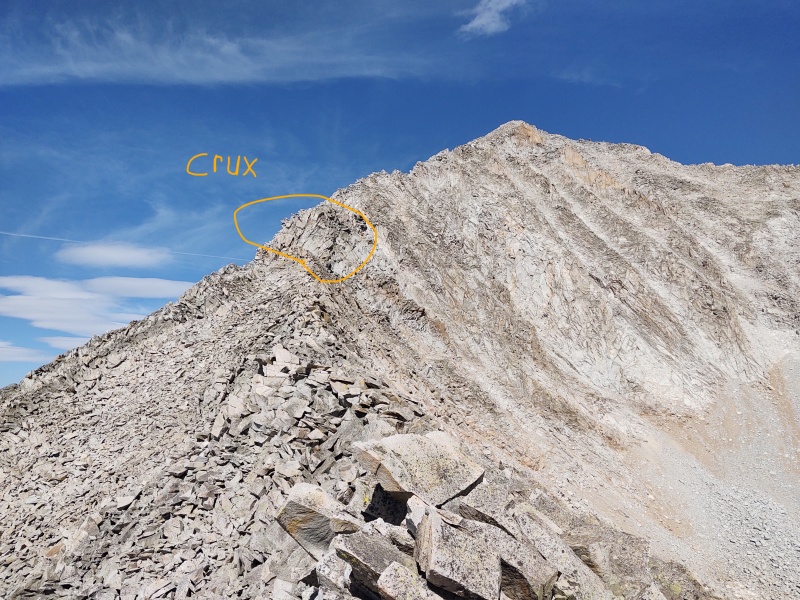
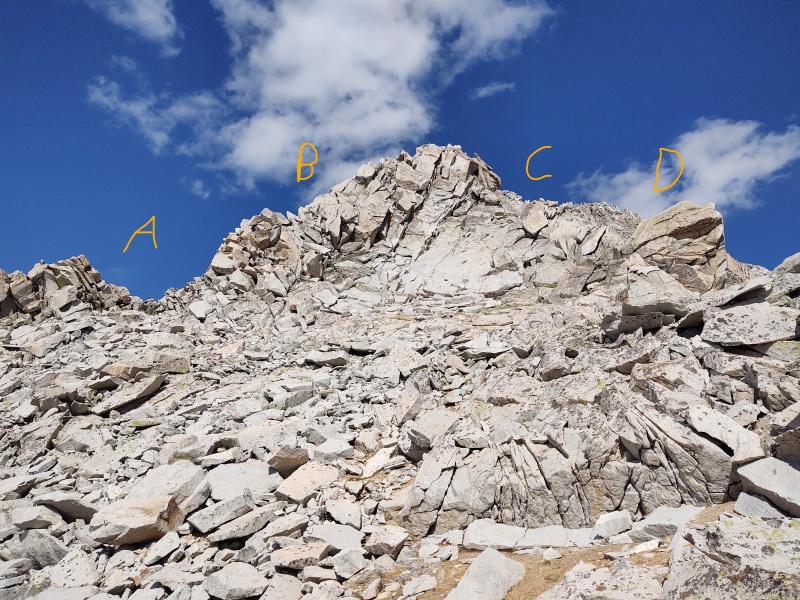
Perhaps some day I might eventually come back for a rematch on the slab - it certainly looked doable but you either need really good reach or need to be comfortable with small holds on a somewhat steep, exposed slab (but it's not actually as exposed as the pictures below make it seem - the base is actually somewhat flat). 

As Geo and I started to swing out around the right side (Option D) we quickly realized this wasn't going to be as trivial as it looked. Before long we were doing class 3 or 4 moves (closer to 3 for me but more like 4 for Geo) over the most exposed terrain of the day. 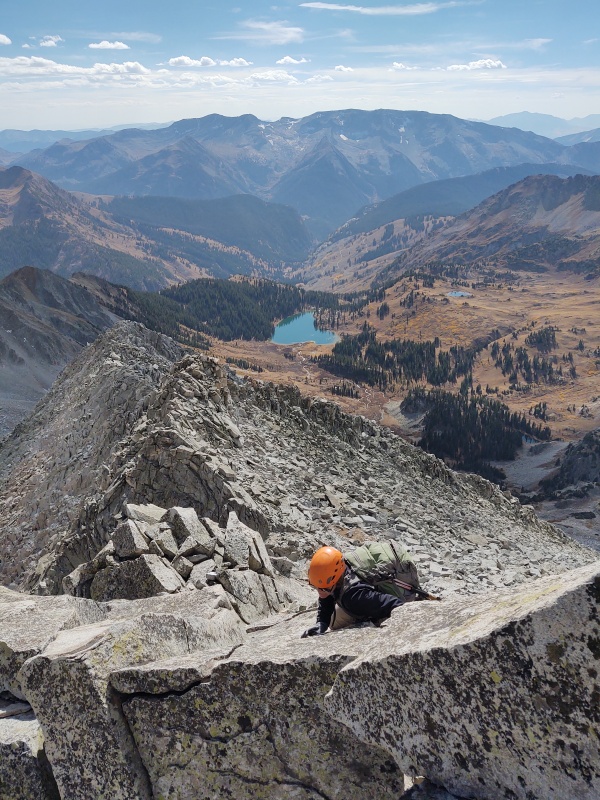

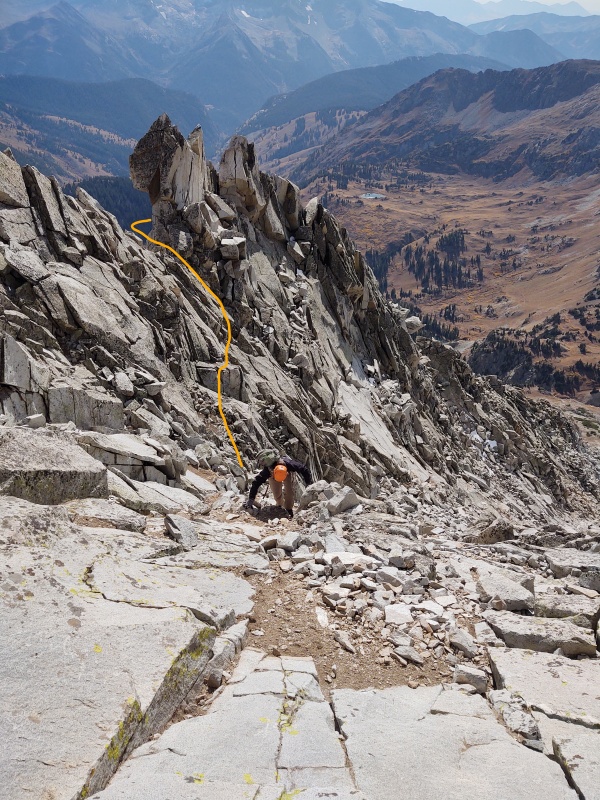
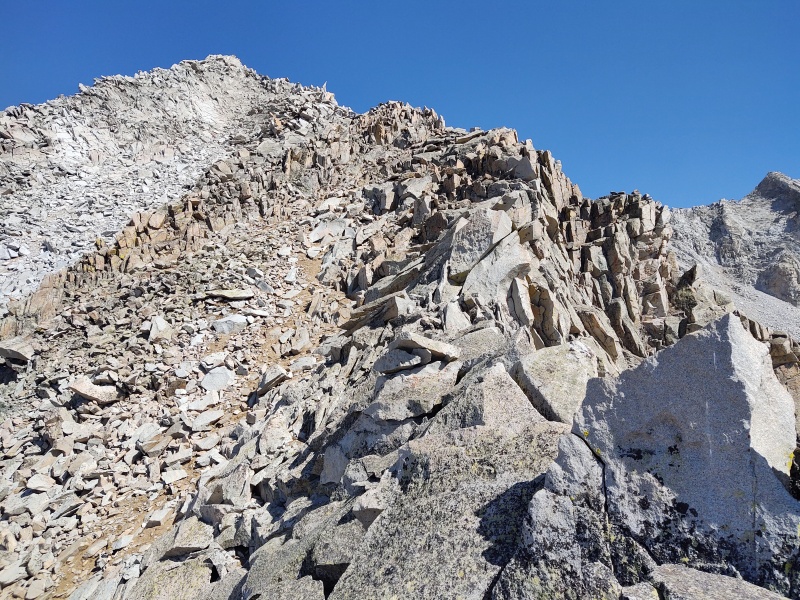
Beyond the Crux So after coming around the far side of the crux wall there was the option to continue up along the ridge proper or drop into the top of the gully and cut across the rock face. Since many of the moves along the ridge were a bit reachy, I didn't want to give Geo too much of a workout so decided to instead drop into the top of the gully. It only took a couple of steps in that gully to decide I was very, very glad we didn't use the Option A bypass - what a wretched steep mess. I quickly stepped back to the side on the rocks until getting up to where we could cut over on solid rock. 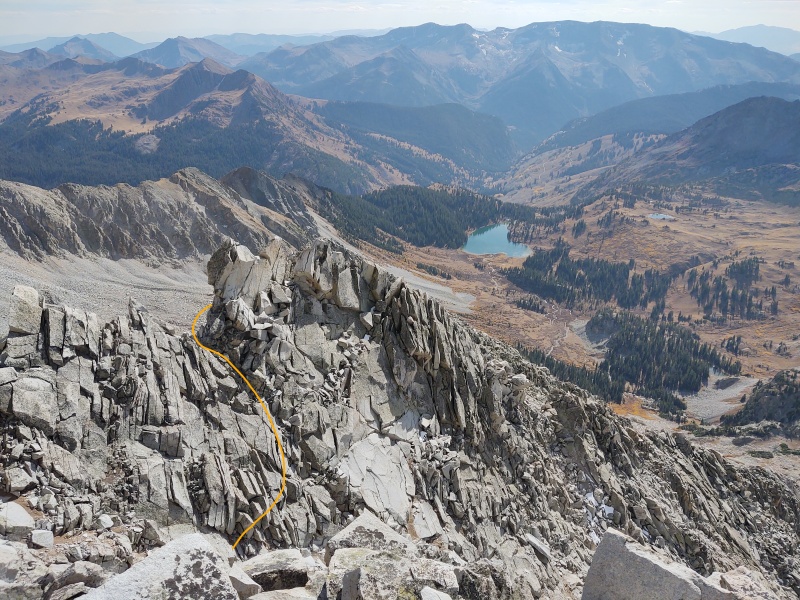
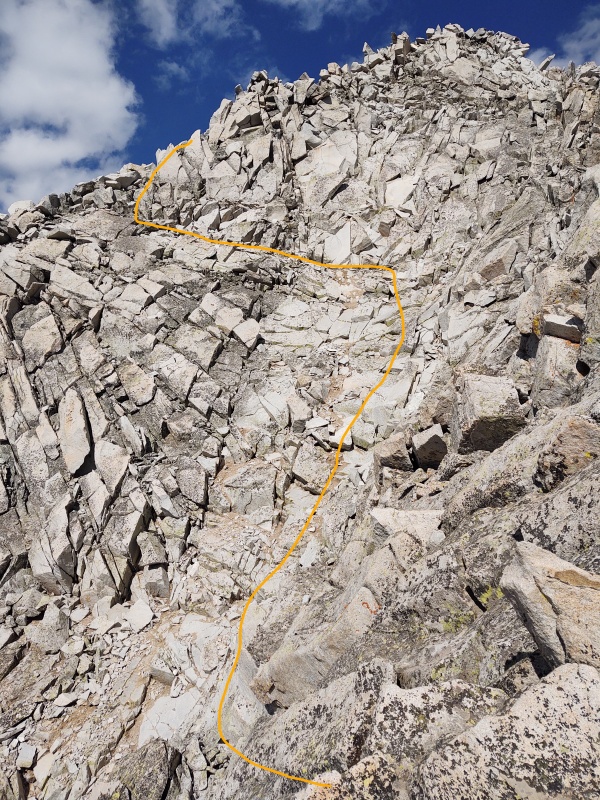
Once past that point the major obstacles are done but there's still plenty of non-trivial scrambling left to get up to the summit. As I said before, about 95% of the rock going up the S-Ridge is generally fairly solid - but watch out for that 5% - it tends to show up when you least expect it. Geo seemed especially skilled at finding the 5% that day, lol... 
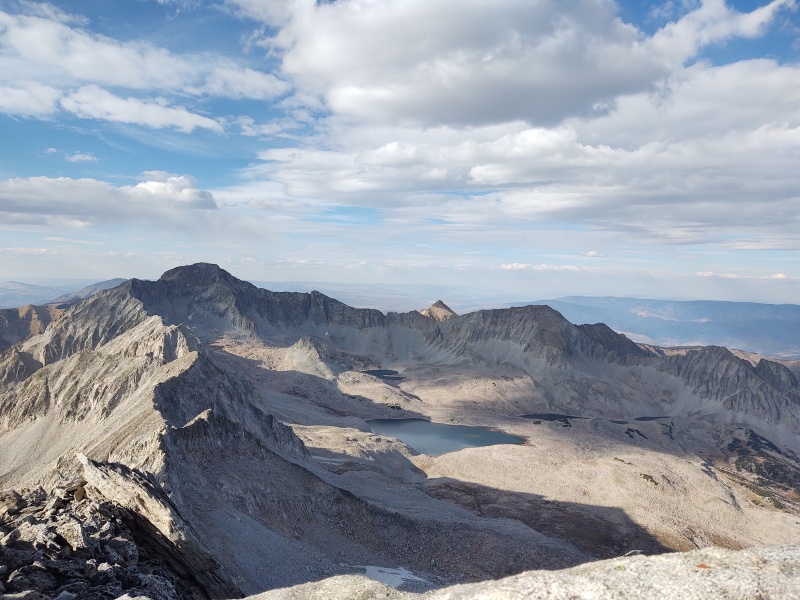
The Snowmass Summit Block This is one of the 14er greats and honestly played a part in me be willing to go back and do this summit again (along with the need to get North Snowmass, the appeal of the fun S-Ridge and the challenge of an interesting 4WD road...). This summit block is much smaller than the more infamous Sunlight summit block and, unlike the epic exposure on Sunlight, this one is on the large flat summit of Snowmass, though it's not too far behind me in the photo below that there is some significant exposure. 
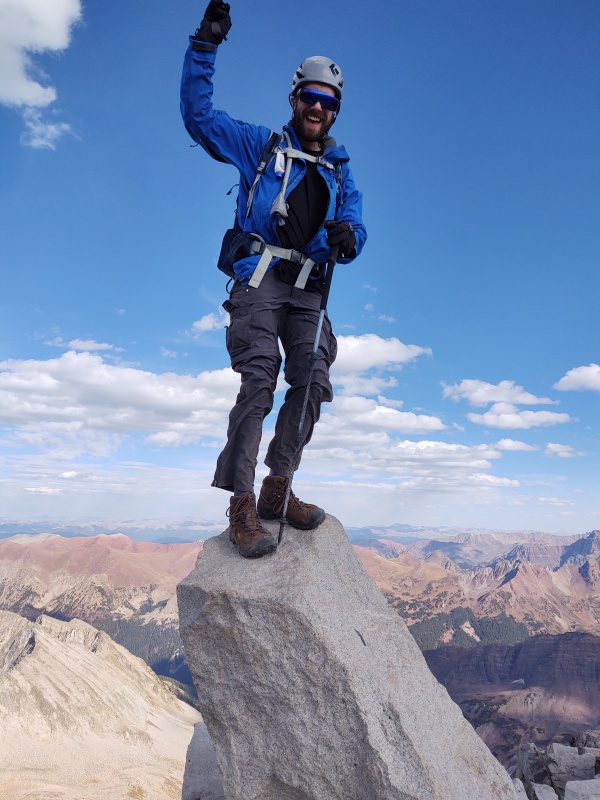
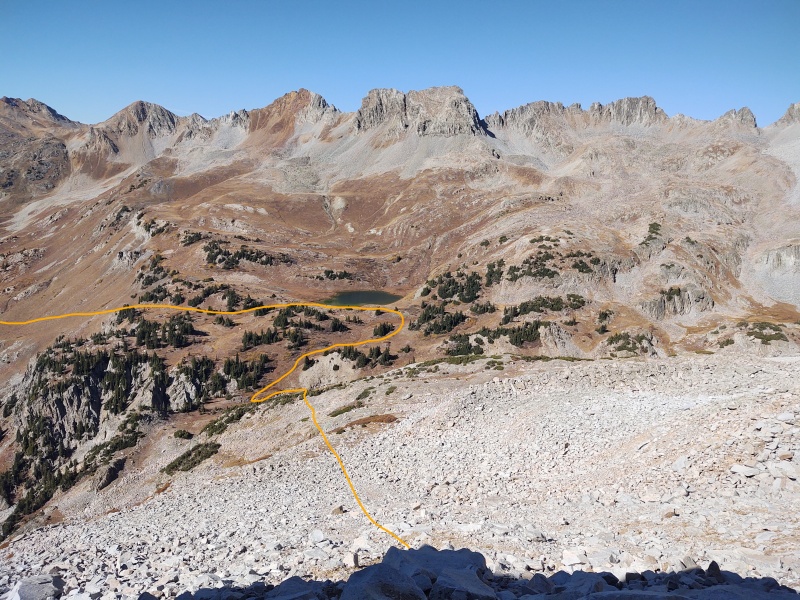
Getting up onto the summit block isn't trivial and being tall helps. Behind the block (as pictured above) is a rock that goes may 1/3 of the way up which you can stand on. The backside of the top is sloped the opposite direction of what's seen here. So basically you stand on that rock, get your arms on top and hoist yourself up to where you can get a foot on the slope on the backside. Then slowly and carefully rise up for the photo finish (and hope the wind doesn't gust too strongly at that moment!). I can confirm my climbing partner, Geo, did indeed put both feet on top of the summit block (pictures omitted to avoid controversy, lol...). North Snowmass So in my admittedly minimal research for this sub-summit I had expected a quick easy stroll over to North Snowmass (I wasn't even really aware of sub-summits the first time I did Snowmass so I had no real recollection of what was nearby). I had looked on this site and seen that North Snowmass was a measly 0.17mi from Snowmass and when you take a quick glance at the topo map it looks like a virtually flat stroll over to a small hump. I really have to stop taking those quick glances... When I got to the summit I was shocked and dismayed to see a VERY non-flat, non-stroll awaiting me in order to get this sub-summit. Upon a more careful inspection of the map after returning home I quickly identified my error. I've been so numbed to the sight of seeing lots and lots of topo lines squeezed close together on the routes I do that the sight of just a few lines seems negligible. But then I recalled that every line on the topo map represents 40ft of gain. 40 feet is roughly the height of a 4-story building. So when you see 3 topo lines between the summit and the saddle you can think of that as being like three 4-story buildings stacked on top of each other! And even a measly single topo line still equates to a 4-story building! That made it fit better with the reality I saw. Not that I'm trying to make this little sub-summit into some grand drama - it is indeed trivial compared to what was just climbed - it's just that a quick glance at the topo map left me with a wrong impression of what to expect. It still seems like that lack of topo lines in the middle doesn't match reality but I guess there's only so much detail they can show... 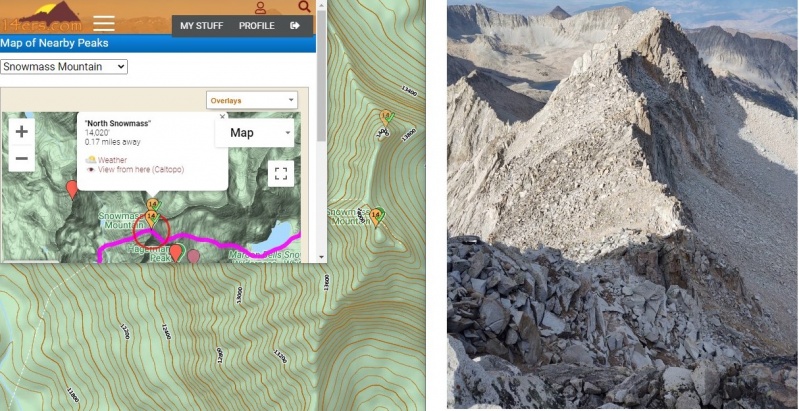
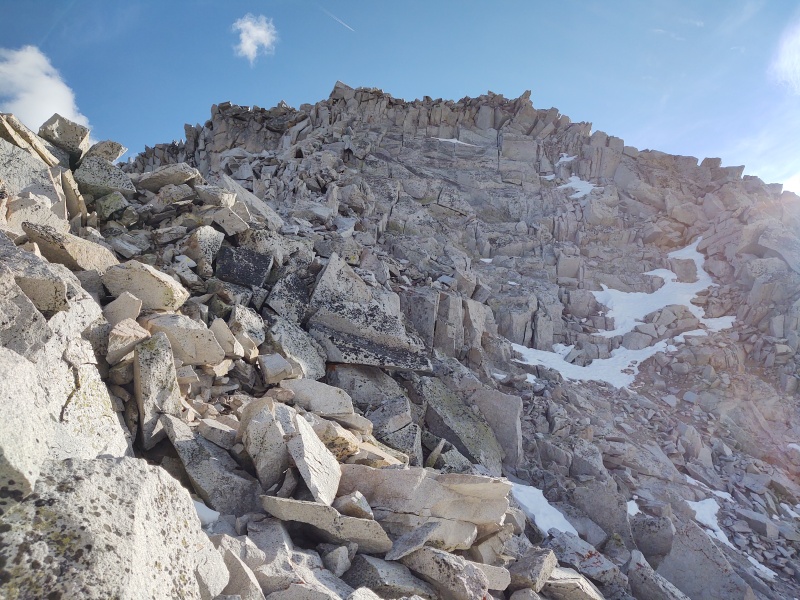
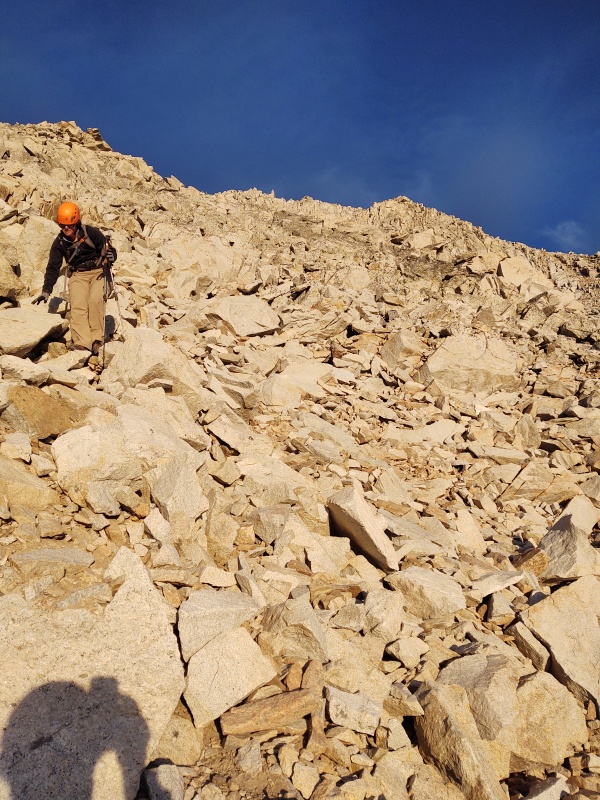
Descending Snowmass West Slope (in the dark...) So we at least started it before the sun went down but this took so stinking long to get down (3.5hrs!) that it was dark by the time we got to the cliff bands near the base of the ridge (more on that in a little bit...). I've heard lots of terrible things about how awful and loose this gully is. Actually neither Geo nor I felt it was particularly all that loose, but then again we've both been exposed to some pretty retched gullies, and we were going insanely slow. Now it was certainly tedious in the extreme and you could knock stuff down if not careful, but compared to other gullies out there it wasn't nearly as loose as we had feared. 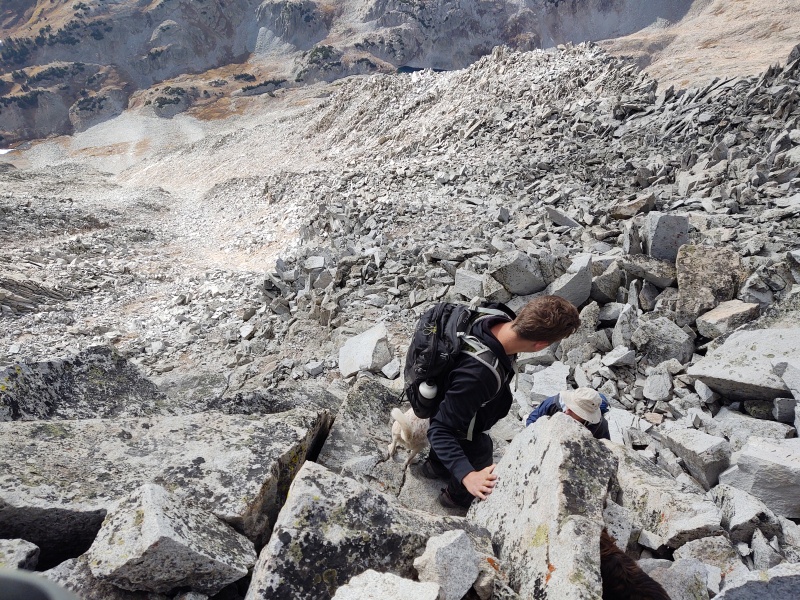
The very top section is the only place with some class 3 moves (except possibly the cliff bands at the bottom). The rest of the gully is trivial but very annoying class 2. 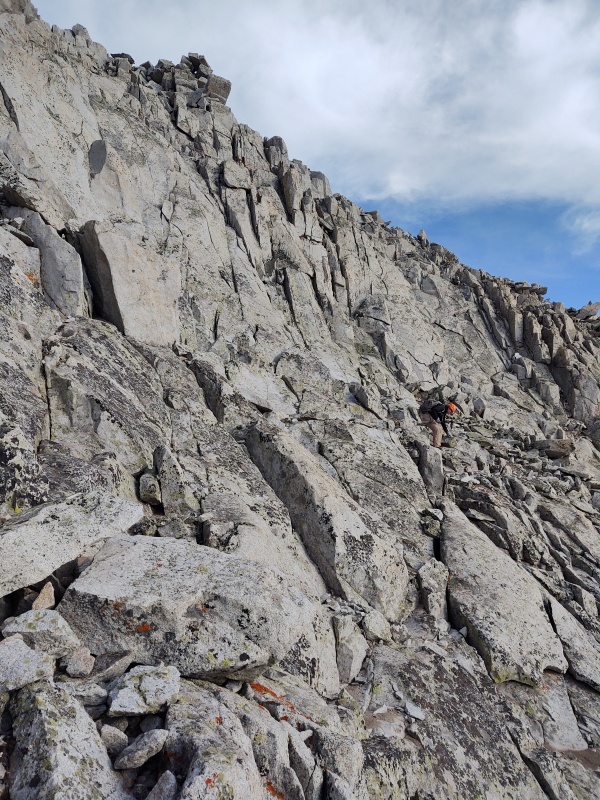
Now the side of a mountain can be a beautiful place to be as the sun is setting but this particular side of this particular mountain is not the best place to be as it gets dark... 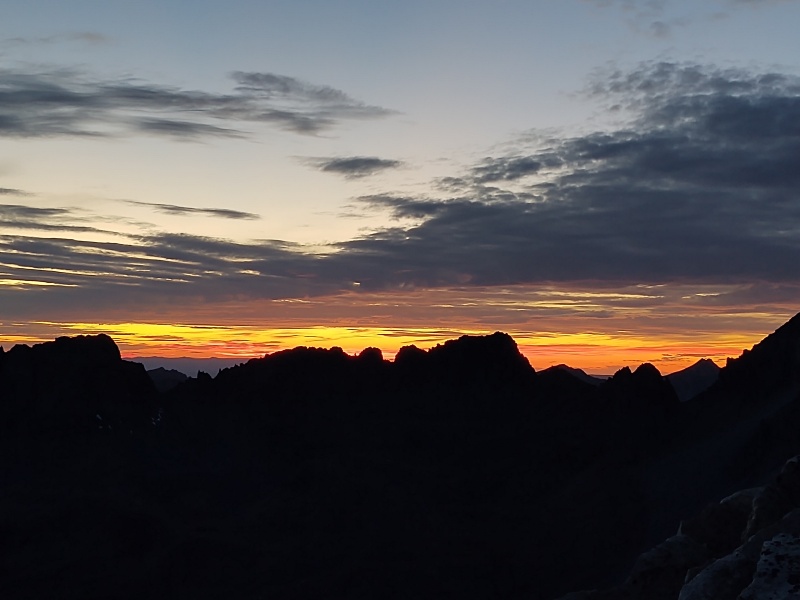
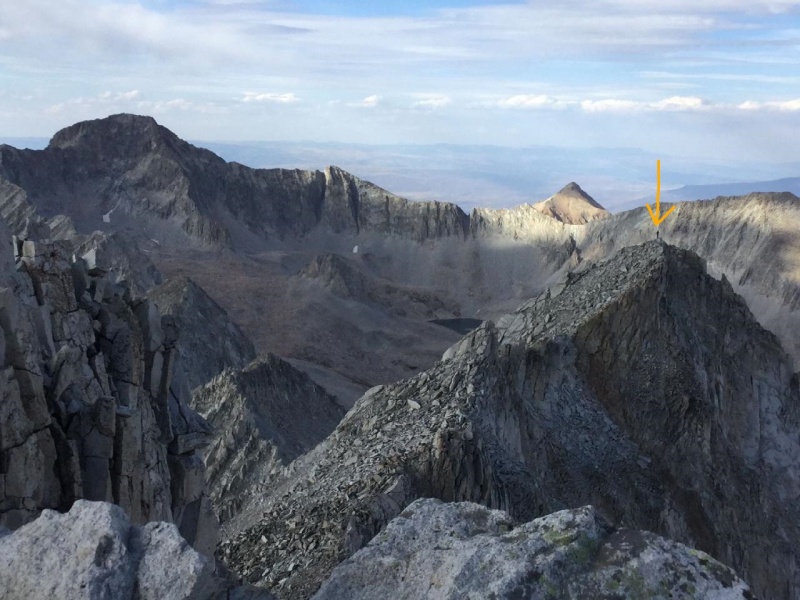
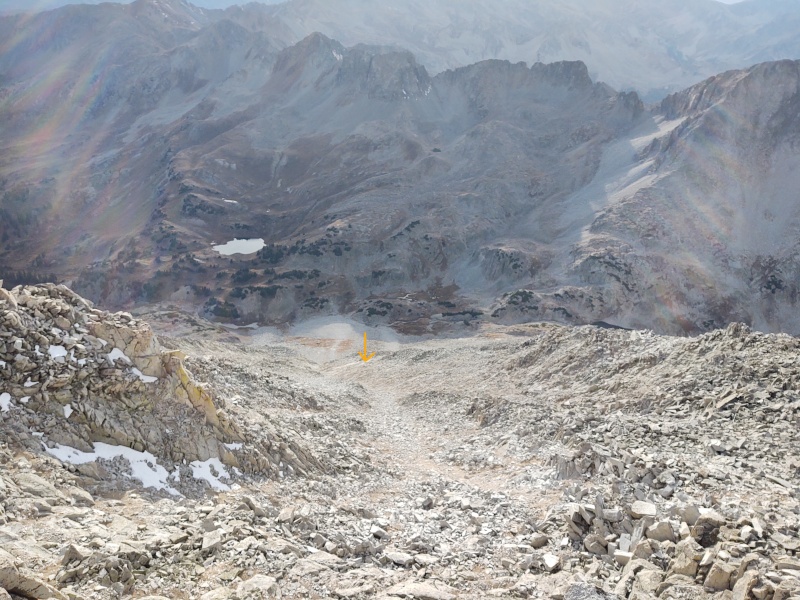
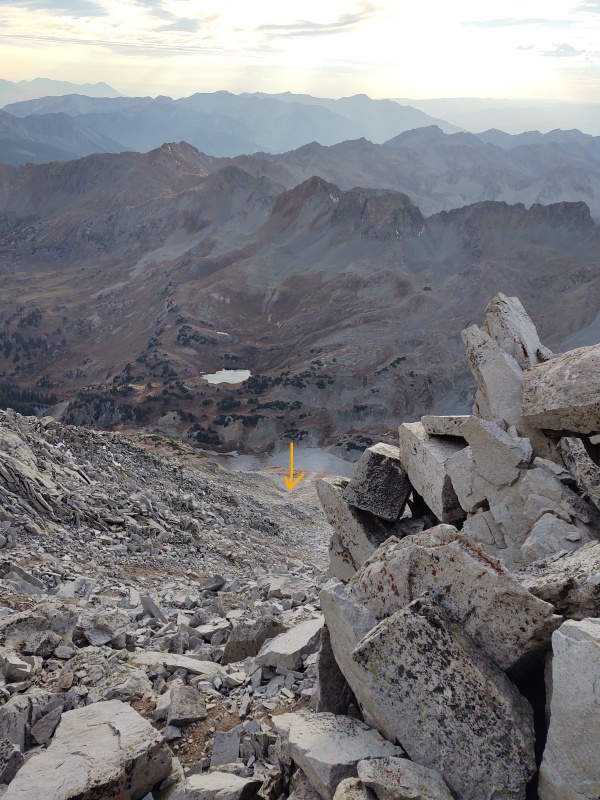
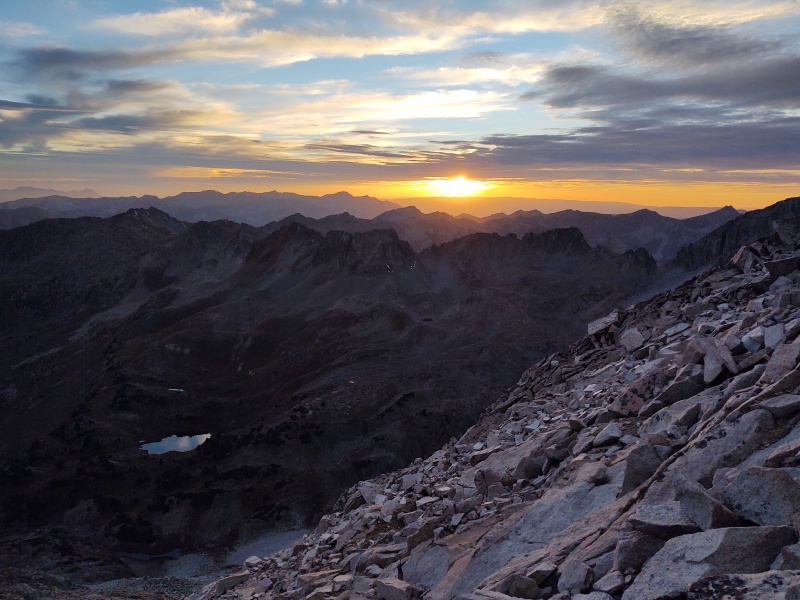
I didn't get any good photos of this section other than the very first two pictures in this trip report where you can get at least some idea of the cliff bands that are somewhere around 12,600 - 12,800ft. I had a couple different GPX tracks downloaded into my GAIA app but they took significantly different paths in this critical area and, though I forget where exactly I grabbed the purple track from, I suspect it may have been a track from a ski descent, given how straight the line is and how totally no-go that route seemed in the dark near 12,600ft (you can see a significant squiggle in our orange track below as we wandered back and forth above the cliff looking for a way down. That started to get nerve wracking for a bit but eventually we went over to where there was a trickle of a waterfall and found a workable class 3 descent onto rocks... and more rocks... and more rocks... and more rocks. Oh man we really got sick of all those stinking rocks, and especially that 5% that kept trying to catch us off guard. 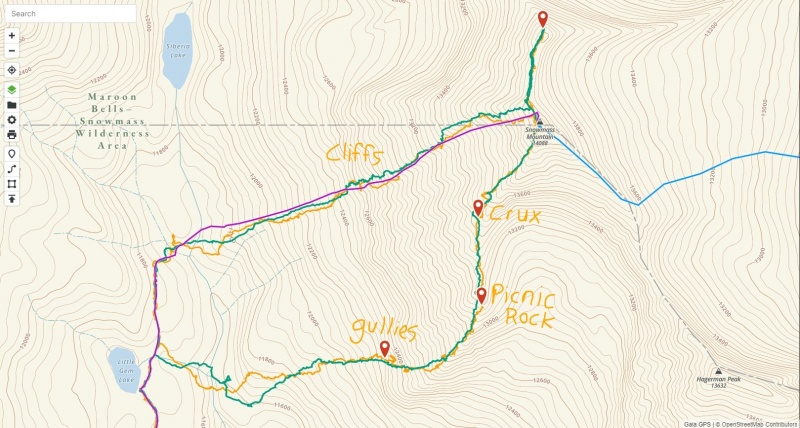
We finally got back down to flat land a mind-numbing 3.5hrs after leaving the summit - still not sure why that section took so long. I guess we were just very cautious and rather tired. Then we floundered around a bit to find the trail but once we finally connected it was an easy but very long stroll back to the trailhead followed by a repeat of the 4WD road but this time 100% pitch black the whole way and driving it at the end of a 15hr+ hike! The shocking thing is that coming out from Lead King Basin a little after 11pm on Friday night we actually encountered another vehicle coming our way! Talk about late arrivals! I edged my Renegade over to the left where I was hugging a drop off so as to let the intruder, uh I mean other party, pass on the protected side. Wasn't honestly sure there was room enough but thankfully they made it past. Our Times 7:39am start from Lead King Basin Trailhead Traihead to Gullies = ~3.5hrs Gullies to ridge top = ~1.5hrs Ridge to Snowmass summit = ~3hrs My round trip to North Snowmass and back = ~1 hour (includes falling on my tailbone, setting up a new summit register, resting said tailbone and eating "dinner") Down the West Slopes in the dark = ~3.5hrs!!! (you've got to be kidding me!?! That's exactly what we said over and over again. BTW, I would HIGHLY recommend doing this in the daylight) Back to trailhead = ~2.5hrs 10:58pm at the Lead King Basin Trailhead at last! Total time = 15hrs 18 minutes trailhead to trailhead. Ouch. Yes, part of that slowness was the trademark of HikesInGeologicTime combined with sometimes sloppy route finding on my part but this also is a pretty serious route that takes longer than you might expect based upon mileage and elevation. Again there is ~2,500ft gain in just the last mile to the summit! Thumbnails for uploaded photos (click to open slideshow): ")
")
")
")
")
")
")
")
")
")
")
")
")
")
")
")
")
")
")
")
")
")
")
")
")
")
")
")
")
")
")
")
")
")
")
")
")
")
")
")
")
")
")
")
")
")
")
")
")
")
|
| Comments or Questions | |||||||||||||||
|---|---|---|---|---|---|---|---|---|---|---|---|---|---|---|---|
|
Caution: The information contained in this report may not be accurate and should not be the only resource used in preparation for your climb. Failure to have the necessary experience, physical conditioning, supplies or equipment can result in injury or death. 14ers.com and the author(s) of this report provide no warranties, either express or implied, that the information provided is accurate or reliable. By using the information provided, you agree to indemnify and hold harmless 14ers.com and the report author(s) with respect to any claims and demands against them, including any attorney fees and expenses. Please read the 14ers.com Safety and Disclaimer pages for more information.
Please respect private property: 14ers.com supports the rights of private landowners to determine how and by whom their land will be used. In Colorado, it is your responsibility to determine if land is private and to obtain the appropriate permission before entering the property.


