Download Agreement, Release, and Acknowledgement of Risk:
You (the person requesting this file download) fully understand mountain climbing ("Activity") involves risks and dangers of serious bodily injury, including permanent disability, paralysis, and death ("Risks") and you fully accept and assume all such risks and all responsibility for losses, costs, and damages you incur as a result of your participation in this Activity.
You acknowledge that information in the file you have chosen to download may not be accurate and may contain errors. You agree to assume all risks when using this information and agree to release and discharge 14ers.com, 14ers Inc. and the author(s) of such information (collectively, the "Released Parties").
You hereby discharge the Released Parties from all damages, actions, claims and liabilities of any nature, specifically including, but not limited to, damages, actions, claims and liabilities arising from or related to the negligence of the Released Parties. You further agree to indemnify, hold harmless and defend 14ers.com, 14ers Inc. and each of the other Released Parties from and against any loss, damage, liability and expense, including costs and attorney fees, incurred by 14ers.com, 14ers Inc. or any of the other Released Parties as a result of you using information provided on the 14ers.com or 14ers Inc. websites.
You have read this agreement, fully understand its terms and intend it to be a complete and unconditional release of all liability to the greatest extent allowed by law and agree that if any portion of this agreement is held to be invalid the balance, notwithstanding, shall continue in full force and effect.
By clicking "OK" you agree to these terms. If you DO NOT agree, click "Cancel"...
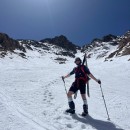
Took a trip out to Quandary on 6/20 to give a shot at the Inwood Arete.
Researching the Route: In researching this route I found relatively limited information. The most information I could find featured primarily the starting options followed by a little bit of information about the slab immediately above the starting options. Lastly, I found some information on navigating through the three towers above those slabs. Beyond this, I wasn't able to find much else. It is now apparent to me that there is little to no information to because it's very simply a class 3-4, pick your route, scramble past the towers up to 13,800 where you exit the scrambling elements of the route. Not much navigation assistance is necessary as it's mostly talus hopping and just navigating the terrain. I generally like to attempt climbs like these with a GPX so I can have a good sense of where to go. I was not able to find a GPX for this route so part of my goal was to make and publish what appears to be the first GPX track for this route.
Getting there: I took the shuttle from Breckenridge in town to the Quandary Standard Trailhead. From there I walked up the McCullough Gulch Road all the way around the mountain, up past the waterfalls and to the lake right below the starting point of the Arete. There were varying recommendations on where exactly you should cut up from the trail in McCullough Gulch up to the starting point of the Arete. I ultimately decided to hike all the way up to the lake and cut south (towards the Arete) ~20 yards before hitting the lake and and follow a small trail to a stream crossing to where I was able to cross and very easily navigate to the base.
Getting Started: I was most interested in the 5.2 - 5.4 variation. My route is depicted as the green line in this image. Just to the right of where I started, you can see the slab as reported 5.7, also known as the "direct" start. I saw a few other trip reports where some folks started between the slab and my starting point (the depression between the slab on the right and my starting point). It looked a little too easy for what I was interested in.
The Route: the first 2-3 pitches are where I saw most of the difficulty however the difficulty was not sustained. The initial 2-3 moves getting onto the rock were the most awkward with a backpack on. Other than that the route was very manageable. I would describe the overall difficulty as nothing more difficult than the freeway in the Flatirons. After getting up the chimney and onto the route, the climb is ledgy up to the top of a small grassy knoll, where you then work up some very straightforward slab.
Looking up from the very bottom of the route, take note that what appears to be the high point as far as you are able to see is Tower 1. As you work up and past the slab an towards Tower 1, you will pass the Tower on the left in a very obvious gully. Once you pass over to the right side through this small gully, you will then walk up on the right side of Towers 2 and 3. From this point it's class 3-4, nothing to write home about. As you continue up the route and stay close to ridge direct as possible, you will encounter a feature that looks like a 6 foot tall wall running along the ridge a couple hundred yards above the towers. Here you will notice a need to downclimb as you'll encounter a gash in the ridge. You can circumvent this by descending easily to the right and continue up.
Other Route Comments: For the most part, you will work to stay as close to the ridge on the right side. You will notice the left side of the ridge is carries most of the exposure. As you work up above and past the towers, you will encounter places here and there where you're able to increase the difficulty to your desire. Some slab is present further up the route where you can veer off route a little bit to climb (I did in a few spots - as indicated on my GPX track).
Stolen from another report, this was helpful for me in visualizing the overall route.A visualization of the first half of my route up through the three towers.A closer look at the starting point. The first 10 feet felt very similar to a chimney from the Bells Traverse.
A small section of boulder hopping immediately following the slab underneath the first tower (pictured here). You will work your way to the left to an obvious gully to pass in between the first and second towers, which will spit you out to the right side between the first and second towers, where you will continue up past the third tower from the right side.
Top of the 3 Towers. Note the first (lower) tower is the highpoint seen from the start of the route.
Misc Class 3/4 Scrambling after the towers. Most of the remaining route after the towers is different versions of this.Continued scrambling.
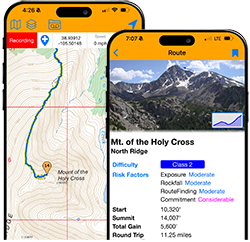
My GPS Tracks on Google Maps (made from a .GPX file upload):
Attempted this one January MANY years ago (5.4 start) and failed due to temperatures. We backed off and rappelled back down. Attempted it again the following summer (5.8 direct) and succeeded. The crack is significantly more stable btw. Rest of the route like you hinted at, is complete C3 garbage. Not something I would bother repeating. Solid work on a lesser known route! Not a lot of people know of it.
Caution: The information contained in this report may not be accurate and should not be the only resource used in preparation for your climb. Failure to have the necessary experience, physical conditioning, supplies or equipment can result in injury or death. 14ers.com and the author(s) of this report provide no warranties, either express or implied, that the information provided is accurate or reliable. By using the information provided, you agree to indemnify and hold harmless 14ers.com and the report author(s) with respect to any claims and demands against them, including any attorney fees and expenses. Please read the 14ers.com Safety and Disclaimer pages for more information.
Please respect private property: 14ers.com supports the rights of private landowners to determine how and by whom their land will be used. In Colorado, it is your responsibility to determine if land is private and to obtain the appropriate permission before entering the property.


 Top of the")
 Misc Class 3/4 Scrambling after the towers")
 More Scrambling after the towers")
 Stolen from another report, this was helpful for me in visualizing the route.")
 More Talus hopping")
 A visualization of the path I took")
 A closer look at the starting point")