| Report Type | Full |
| Peak(s) |
"Climber`s Point" - 13,022 feet "Mt. Solitude" - 13,085 feet "Vista Pk" 13075 "X Prime" 12700 "Peak W" 12771 "East Partner Peak" - 13,057 feet |
| Date Posted | 10/11/2023 |
| Date Climbed | 10/07/2023 |
| Author | pgres |
| Climbers Solitude Ridge (A Gore Sufferfest) |
|---|
|
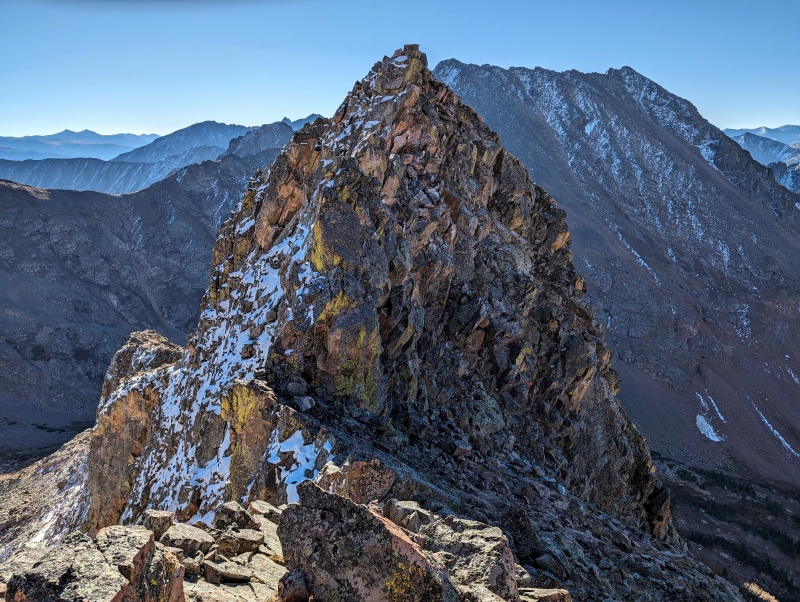
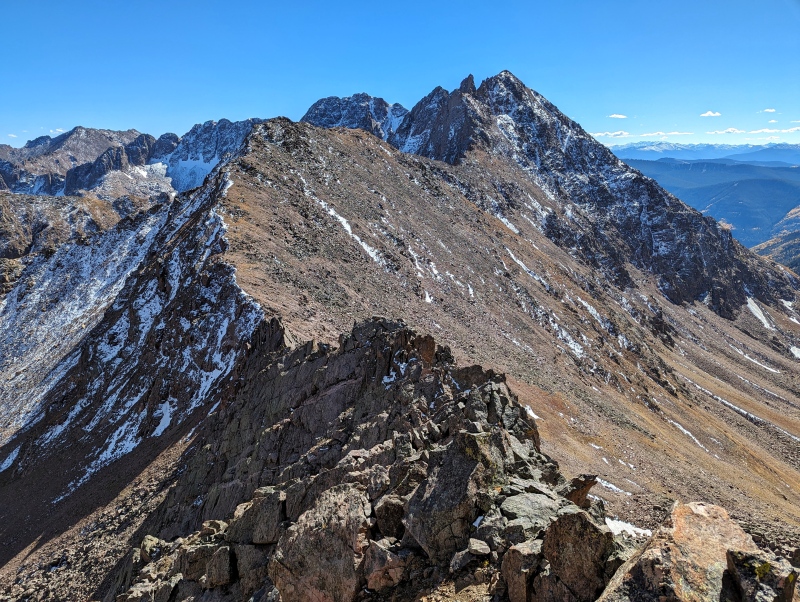
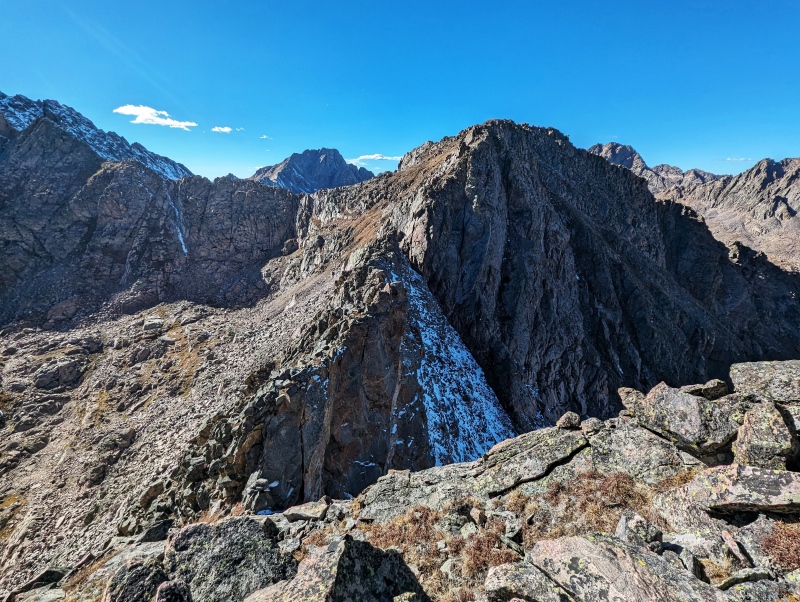
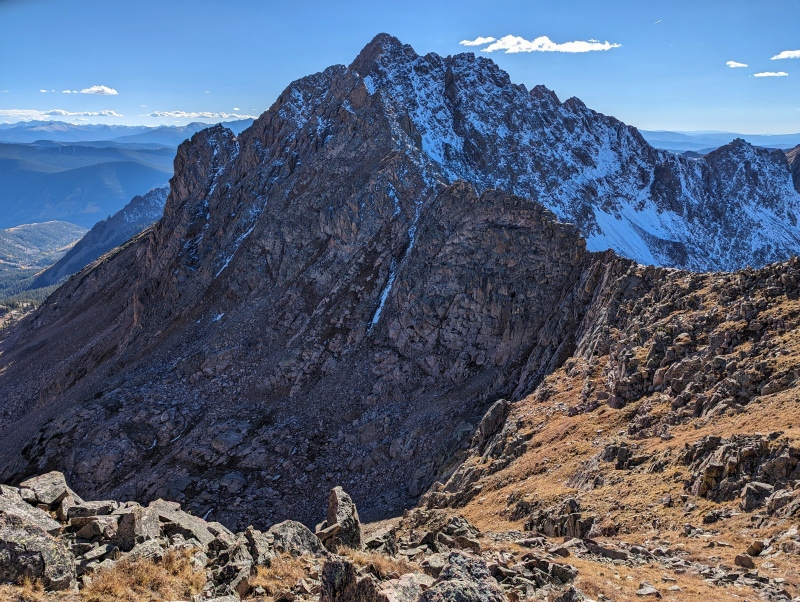
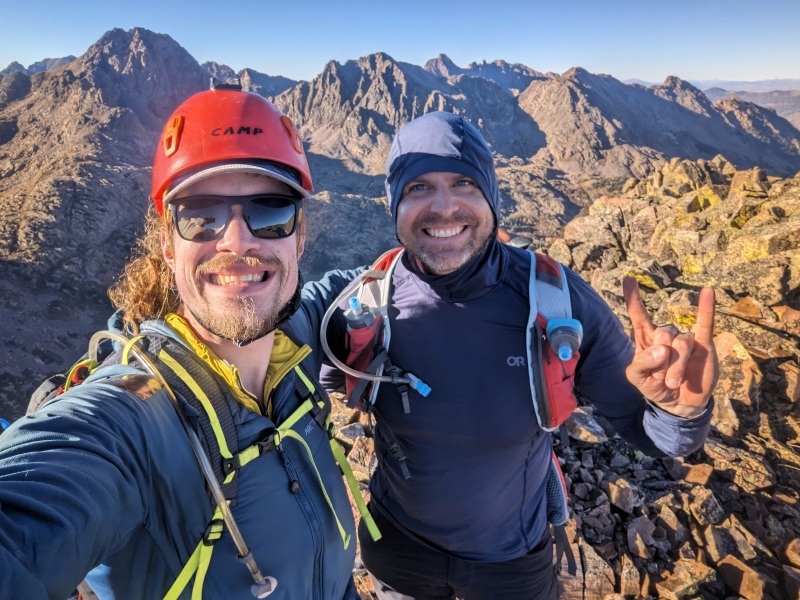
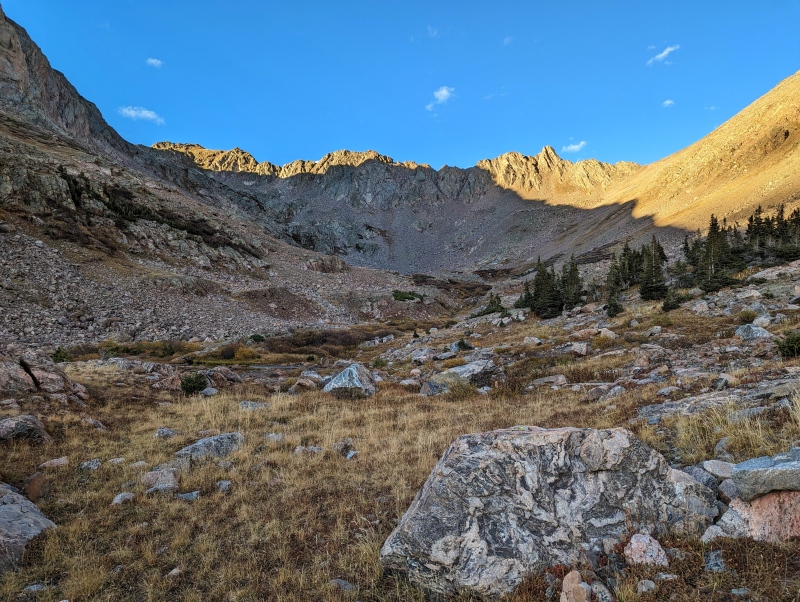
Climber's Solitude Ridge (A Gore Sufferfest) Prelude: This traverse attempts to combine two distinct ridges - the ridge from X Prime to East Partner and the SE ridge of Climbers' Point, along with Mount Solitude, Vista Peak, and Peak W. My primary goal was to do a link-up of the unnamed portion of the ridge between Grand Traverse and the Partners Traverse. I'd looked at starting this traverse from Keller, but didn't want to worry about setting up a car shuttle. I'd also thought about starting from the saddle between North Traverse Peak and Keller Mountain and taking the East Ridge to Climber's Point, but there appeared to be a lot of ho-hum, class 2, up-and-down terrain. During my search for beta I found an entry for the SE ridge of Climber's Point on Summit Post (https://www.summitpost.org/east-southeast-ridge-bighorn-valley/434657) and was instantly sold! From Climber's Point we would continue over to Mount Solitude and Vista Point via what appeared to be a chill, class 2 ridge. From Vista Point there's a brief section of scrambling along the ridge before the route returns to class 2 terrain over to Usable Pass. From Usable Pass, we scrambled up to the summit of X Prime, which I'd previously done as part of the X Prime, X, Y, Z, and Z Prime linkup (https://www.14ers.com/php14ers/tripreport.php?trip=21895&cpgm=tripmine), but then we were on our own. I couldn't find any beta for the ridge between X Prime and W outside of a report where the author bypassed the difficulties of the ridge due to inclement weather (https://www.exploringtherockies.com/2013/09/29/w-and-x-prime-a-gore-chess-match-91513/). The report was a good source of beta for the section of ridge from W to East Partner. Unfortunately, we did not make it to East Partner, though that portion of the ridge looked significantly more straightforward. This ridge is the most challenging one I've completed so far in the Gore - physically, mentally, and technically. However, it was also a fantastic adventure! For the most part, the snow on the North side of the ridge didn't interfere with our ability to safely complete the route, but there were a few instances where it prevented us from taking the easier way down/around an obstacle, driving us into more technical terrain on the Southern aspect of the ridge... I say this because it may have made the ridge more difficult than it would have been otherwise and you may find easier routes in dry conditions. I would highly suggest bringing rappelling gear and maybe even a light alpine rack depending on your comfort level. We did find an anchor at the notch noted in the Summit Post report, but had deferred on bringing rappelling gear. This was a mistake. In retrospect, Nate and I both agree that it resulted in us taking some unnecessary risks that would have otherwise been mitigated. In comparison to the Partner's Traverse (5.3), I feel that both sections of the ridge (SE ridge of Climber's Point and X Prime to Peak W) had more challenging cruxes. This ridge linkup also had more loose rock to manage than ridges like the Partner's Traverse, Saw, or Ripsaw, but was still solid by Colorado standards. I'm no expert on rankings, but I would say there were 2-3 sections that were 5.4/5.5. I decided to name the report after two of the highest peaks along the ridge that also speak to the difficulty and seclusion of this particular outing. You're not likely to run into anyone and you need to be comfortable with some 5th class climbing. I will take some time later in the report to discuss the risks we felt were unnecessary. I feel that it's important to have open and honest conversations about mistakes we make in the mountains. I learned some valuable lessons on this ridge and my hope is that sharing those lessons can help others as well. Approach/Route: We approached the SE ridge via the Bighorn Trailhead... I highly recommend having a map to identify the bottom of the ridge. We almost went up the East Ridge of Skiers Point be accident because everything blends in back there in the early morning light! Follow the basin up to the South East Ridge (as though approaching for the Grand Traverse). There are some willows to meander around, but for the most part, the approach is chill. Follow the ridge and choose your own adventure to East Partner Peak Route Information: Mileage: Approximately 18.5 Miles 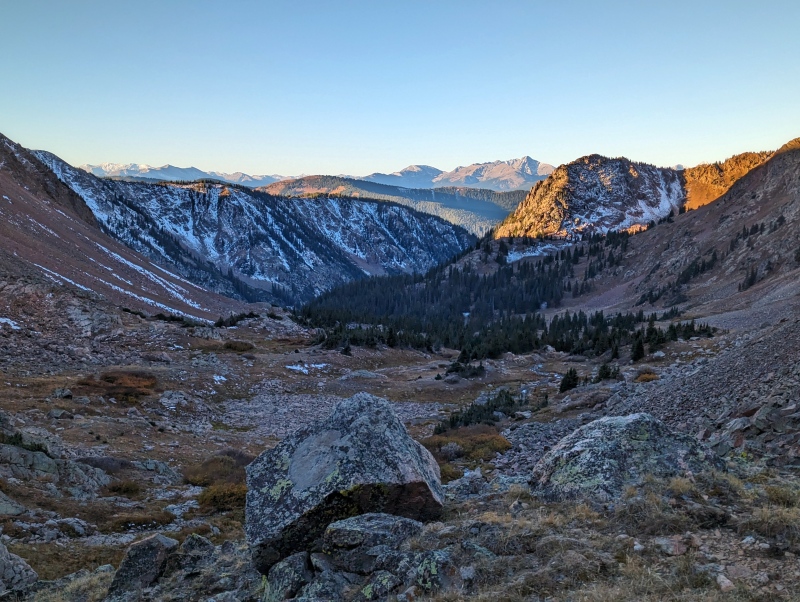
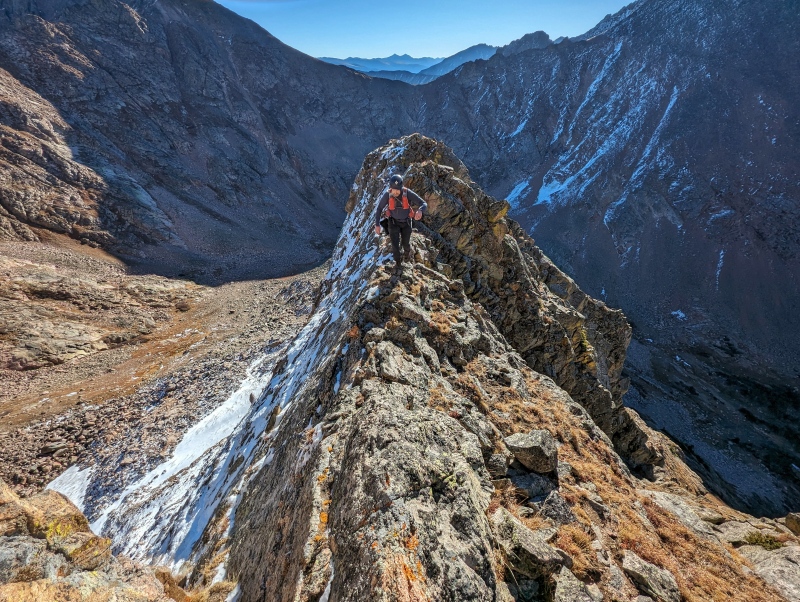
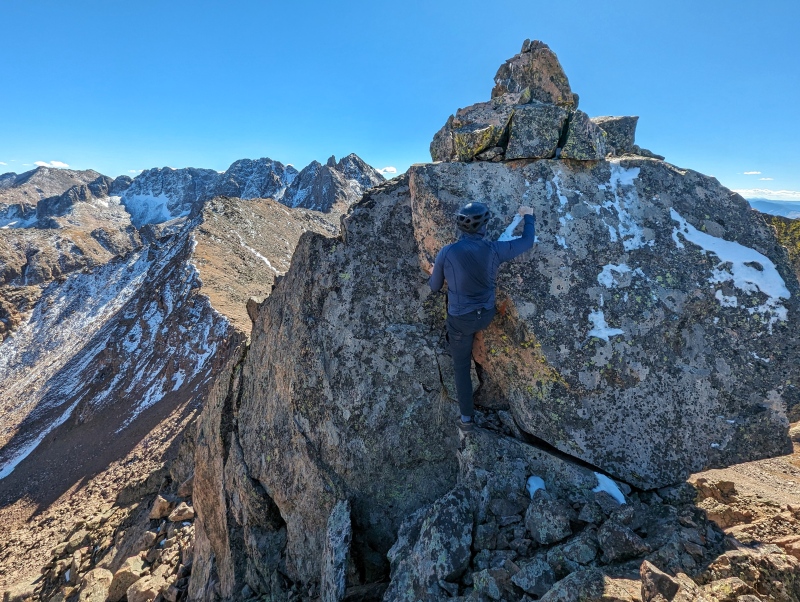
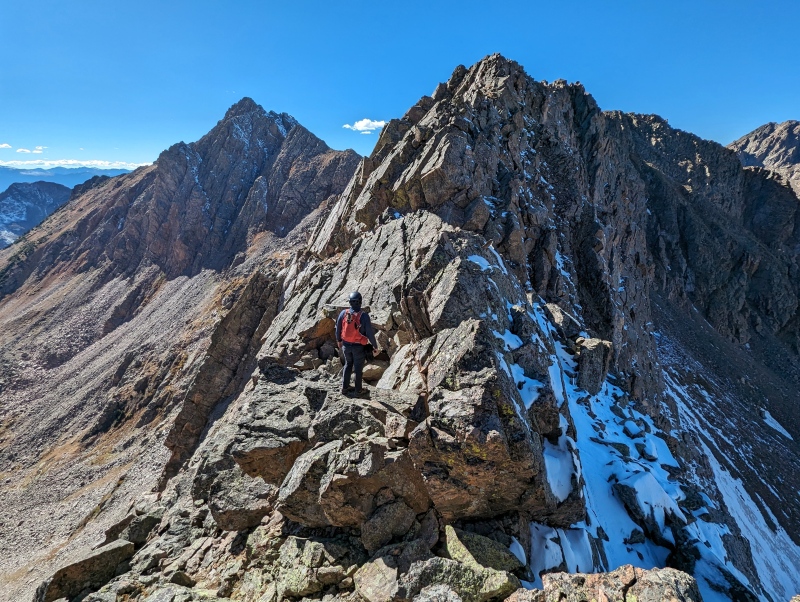
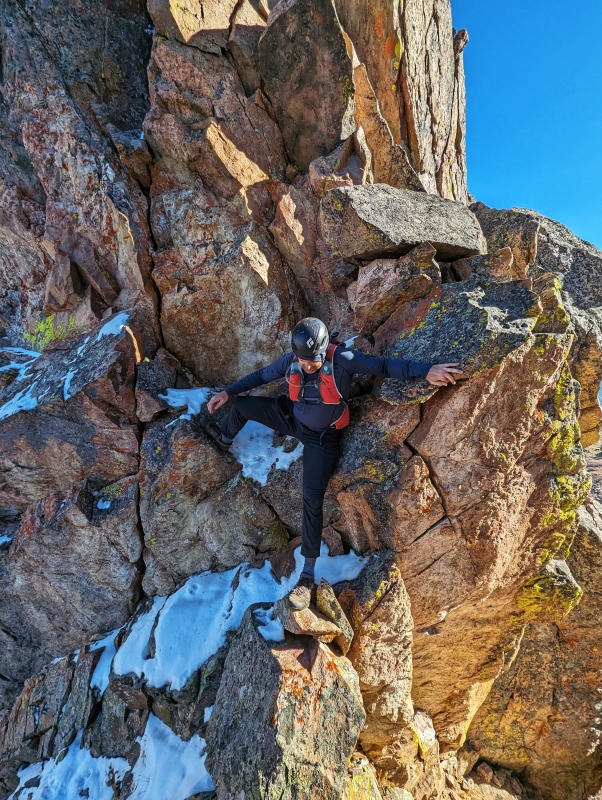
SE Ridge of Climber's Point The SE ridge of Climbers Point is an exciting scramble to the summit of a low 13er in the heart of the Gore Range. For the most part, the rock is solid and the scrambling is intuitive. The scrambling is largely class 3/4 with significant exposure on the North side. Ridge proper goes as a general rule until you get to the significant notch near the summit of Climber's Point. The notch is at the end of a very exposed knife edge. There didn't appear to be straightforward way to get down to the talus below the cliffs without significant backtracking. The downclimbing wasn't terribly difficult (good hands and feet), but was definitely 5th class with significant exposure. The way we climbed down is the direction I would suggest rappelling. Even if you were to rappel directly over the end of the knife edge, you'd land on a notch comprised of a knife edge of loose/rotten rock. If you were to traverse the knife edge, there's a thumb of rock sticking up from the center of the notch with a cliff on either side. I don't think there's a safe way to navigate across this portion of the ridge and the only way is to go down and around. From the bottom of the rappel, there's minimal elevation that needs to be regained to get to the top of the broad gully. 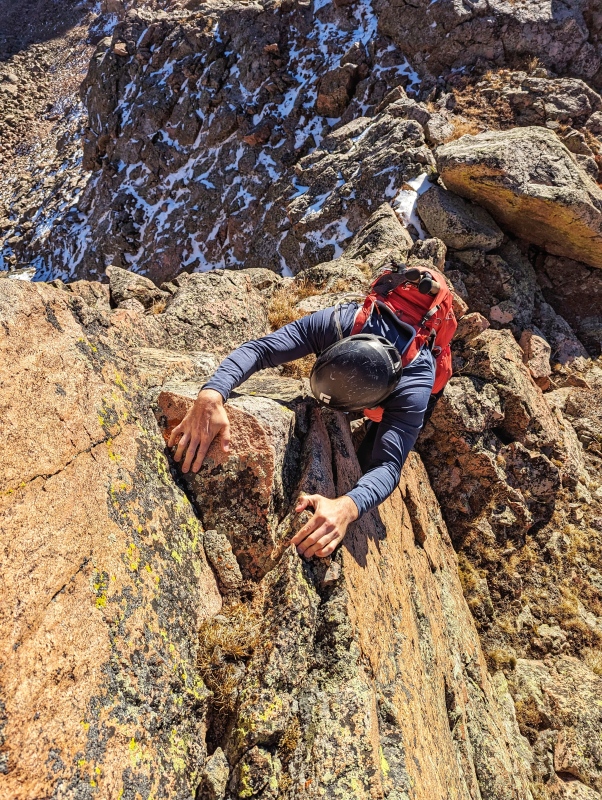


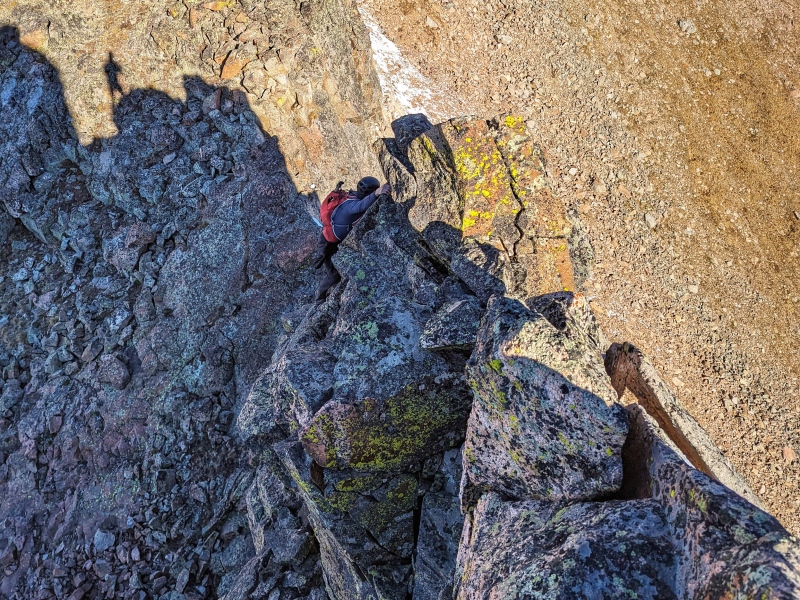


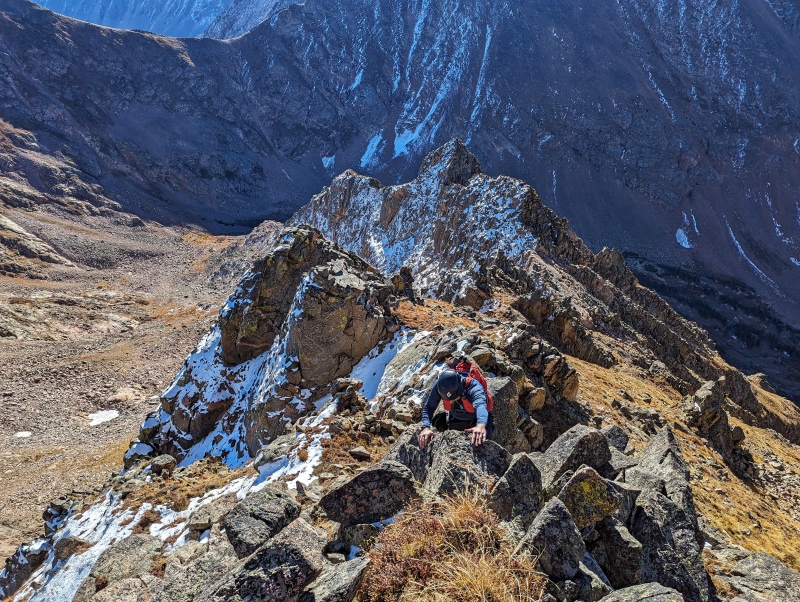
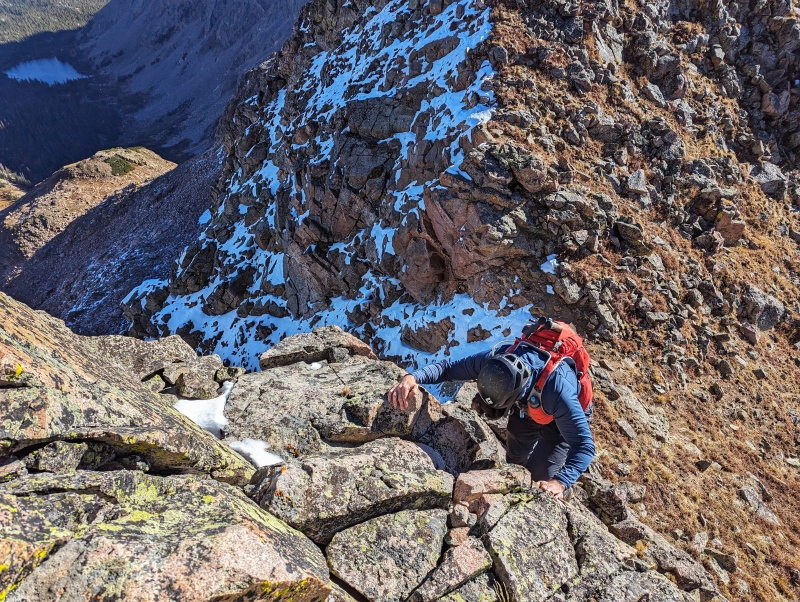


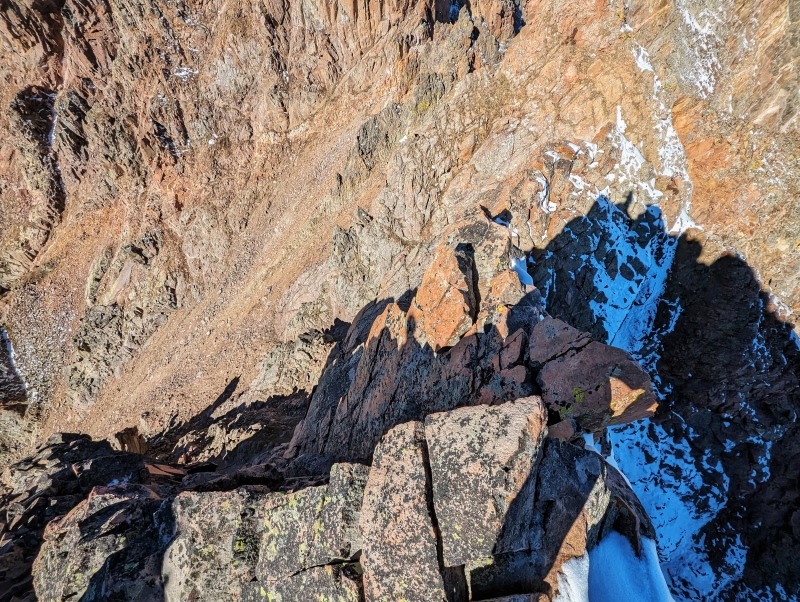
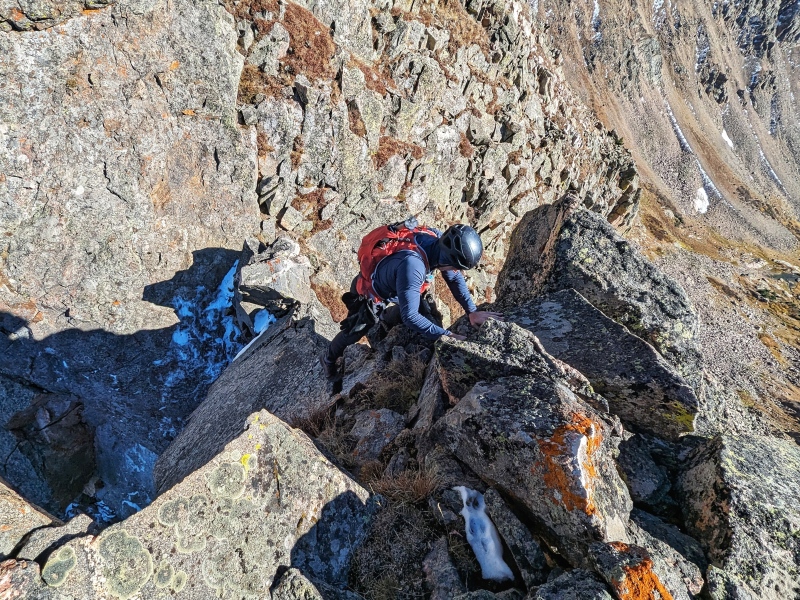
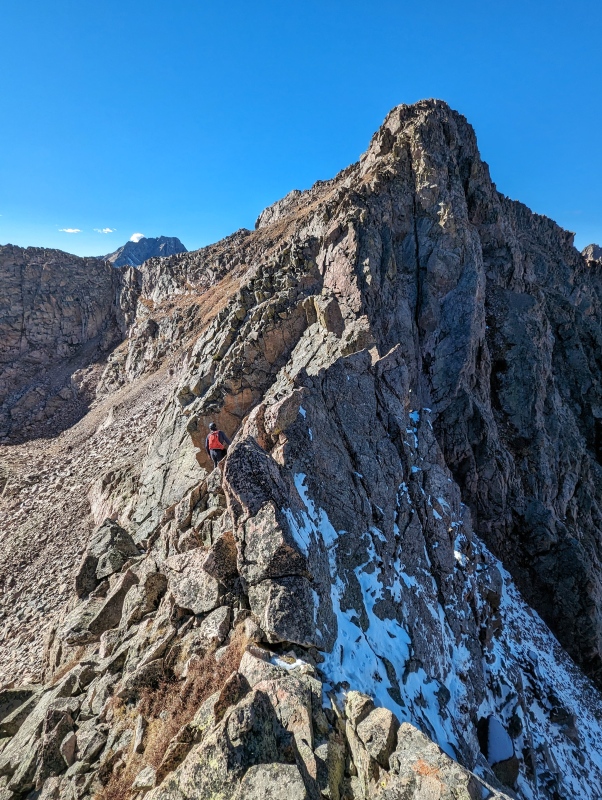
Mistakes on the SE Ridge Crux The original route description had said you would need to rappel at this point of the ridge or proceed with a class 4/5 downclimb. The inclusion of "4" in the previous write up gave us a false sense of confidence and led us to believe that the downclimb might be stout, but not unreasonable. For this reason, we decided against bringing the rappelling gear (rope, harnesses, etc.), which was a mistake. The only viable route we could see involved working our way carefully down a very narrow, steep, and exposed dihedral. The previous report also mentioned a gully that you could follow down to the talus below (loosing a lot of elevation in the process), cross under the cliffs, and then work your way back up to the ridge. There wasn't a readily apparent "gully" and we couldn't tell if the terrain nearby would end in a cliff. Additionally, there wasn't anything on the slope angle shading that indicated a route that would provide easy access to the talus below without backtracking a significant portion of the ridge (perhaps all of it) and potentially putting us in a similar-but-different situation of equal hazard. The nice thing about the narrow dihedral was that we could see straight down to a ledge at the bottom. While exposed, we could also see good hand holds, foot holds, and the rock was solid. Objective hazard was minimal and we would be relying almost completely on our technical skillset. In retrospect, I think the smart decision would have been to turn around. I was very apprehensive looking down at the steep dihedral we'd have to negotiate if we wanted to continue the ridge, but decided to proceed anyway. A lot of that decision had to do with not being able separate whether my fear/apprehension was a rational response to the scenario presented, or if it was just nerves. The downclimb itself wasn't technically very difficult - 5th class for sure, but no worse than shorter sections of 5th class that I had completed on other ridge scrambles in the Gore or on Teakettles summit block for that matter. The main difference was the duration of the technical terrain and consequence of a fall. Airy exposure is my mental crux and I've let it determine several of my route finding decisions in the past in much more reasonable terrain. I didn't want an irrational fear to drive a decision that involved backtracking the entire ridge, but I made the mistake of boiling this situation down to fear vs. technical capability. I neglected to look at it from the objective standpoint of risk management... In other words, what is my margin for error and what are the consequences should the unexpected happen? If I'd thought it about it from that perspective, I like to think I would have opted for a different path forward. If downclimbing or rappelling descend about 10 feet from the top of the ridge in class 3/4 terrain. From there, we found an anchor made of beige webbing and well-defined foot and hand holds that traversed onto a slab and lead down to a standing-width ledge in the dihedral. From there, we could take a quick breather before continuing with the rest of the downclimb. There also appeared to be a direct descent down to the ledge without the traverse. Nate tackled the traverse in and descended from there to the ledge without issue. I attempted to descend directly down to the ledge thinking I could avoid the more significant exposure on the upper portion of the slab by taking a direct route down, which was steeper, but appeared solid and technically simple... Unfortunately, the move required to reach the next foot hold was too far down and too awkward to reach. With good feet, I repositioned my hands and body multiple times to see if I could confidently make the move, but no luck. In the shade, my hands began to go numb so I abandoned the attempt. I traversed further out onto the slab, merging with Nate's original downclimb to the ledge. I quickly put my hands in my pockets to warm them up and took a moment to steady myself before tackling the remaining dihedral, which was difficult, but not sketchy. The remaining downclimb took a good amount of breathing control to manage my fear of heights in combination with sub-par climbing conditions (cold rock). It was the most unnerved I've ever been during a downclimb and the more I think about it, the more confident I am that this was objectively very risky. There was no margin for error and the consequence of a fall from that height was death... or a life worse than death. I'm happy that this situation turned out well, but I'm disappointed in myself for having made those decisions. I've included the photos of this downclimb below so anyone who wants to do this ridge can make an educated decision based on their own risk tolerance and ability level. 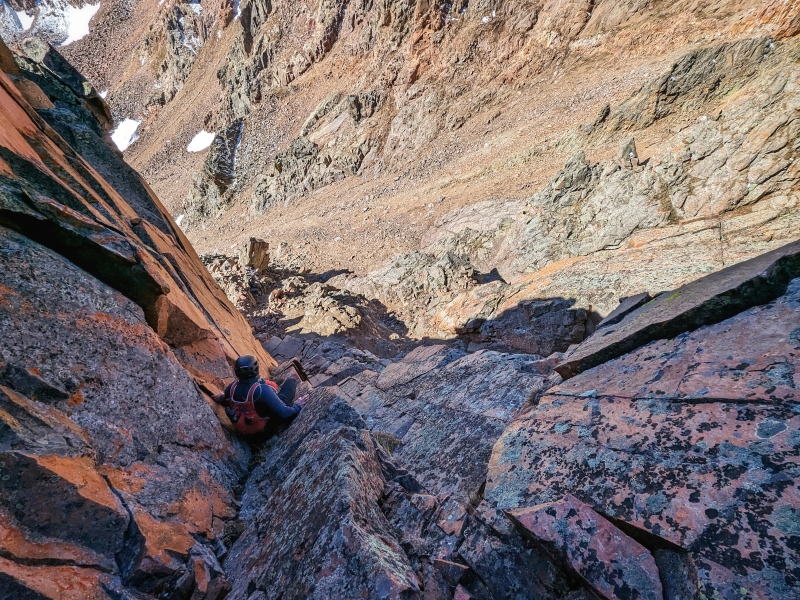


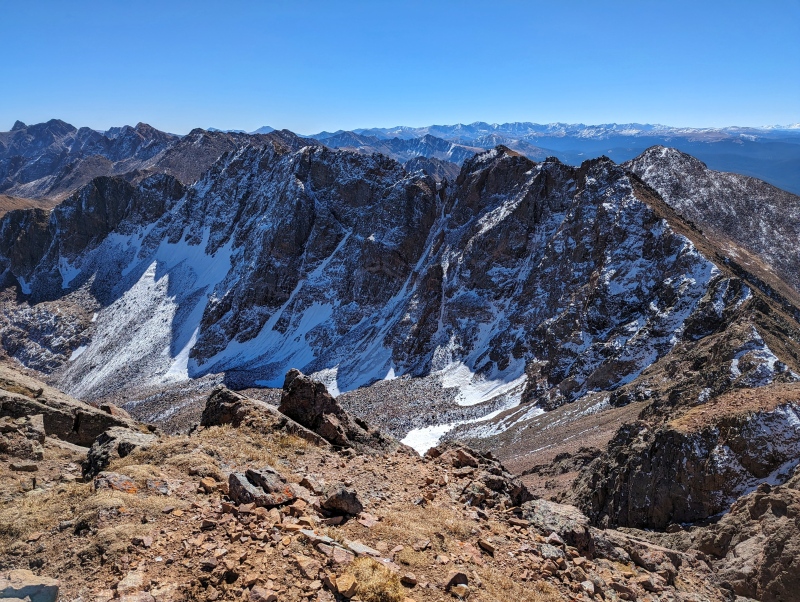
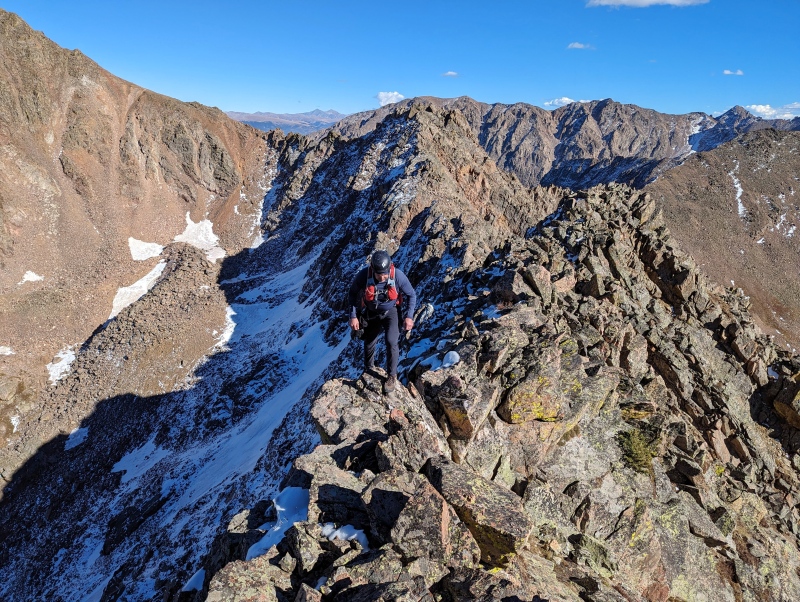
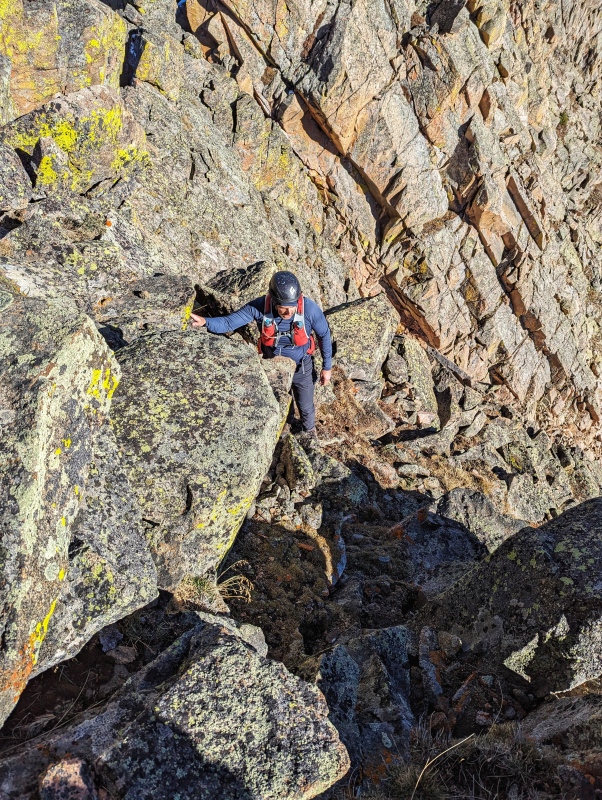
Climber's Point to Usable Pass From Climber's Point, the traverse to Usable Pass was largely Class 1/2. Mount Solitude and Vista Peak came and went quickly as we tried to make up some of the time we'd lost deliberating at the top of the crux notch. We encountered some unexpectedly stout scrambling on Vista Peak, but the chill terrain before helped get us back into the right mindset to scramble confidently. Ridge proper went at stout Class 4 and there may have been a 5.low move or two, but nothing compared to the crux downclimb. The rock in this area was still not ideal - it was more crumbly than normal, but bearable. A stout scramble to the top of a minor tower yielded to a more relaxed, class 3 downclimb on the backside. From there, a prominent tower presented itself on the ridge. We were there, so decided to climb up and see if the ridge proper would go - it didn't. We ascended to the top of the airy tower only to find a cliff on the back side. We backtracked down the tower and descended down a gully to the left. There was still some snow here, but the slope angle was very manageable and there were dry areas for our feet. We followed the class 2 terrain down and around the base of the cliffs, which circled back to the ridge without loosing any unnecessary elevation. From there, it was chill, class 1/2 terrain to Usable Pass. 


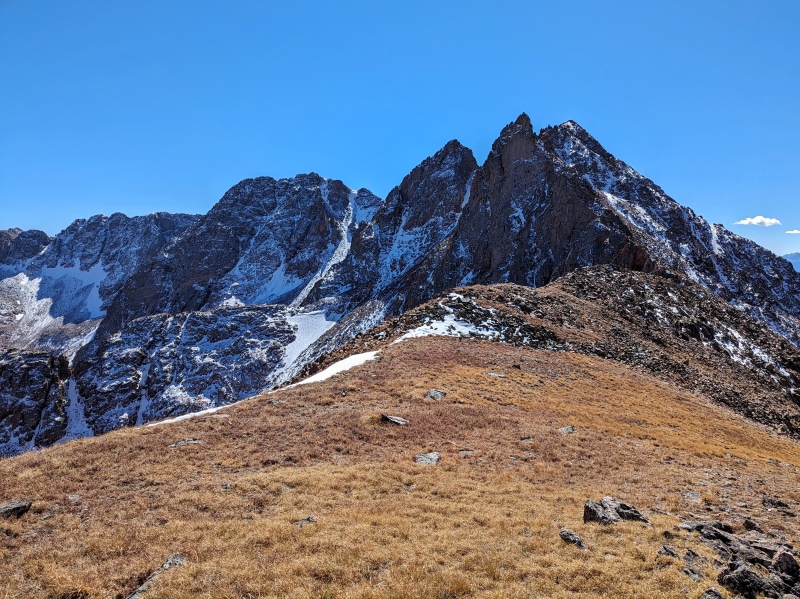
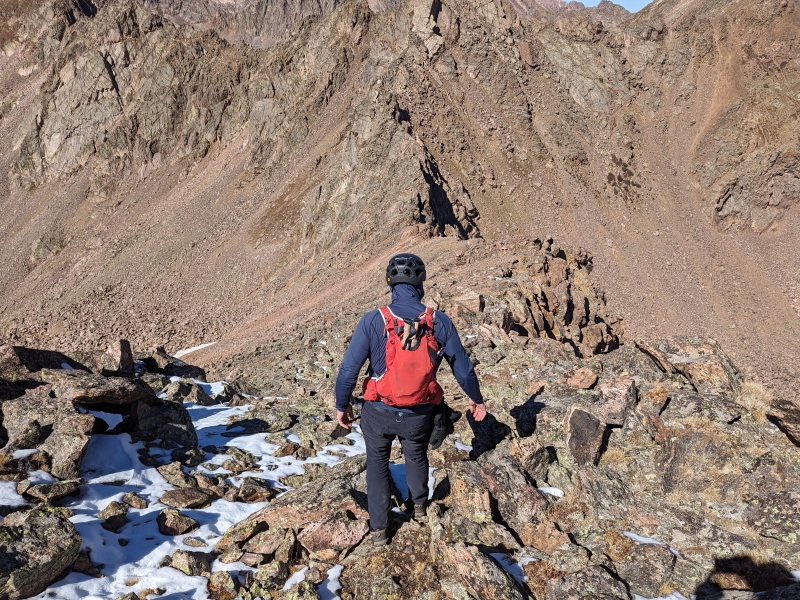
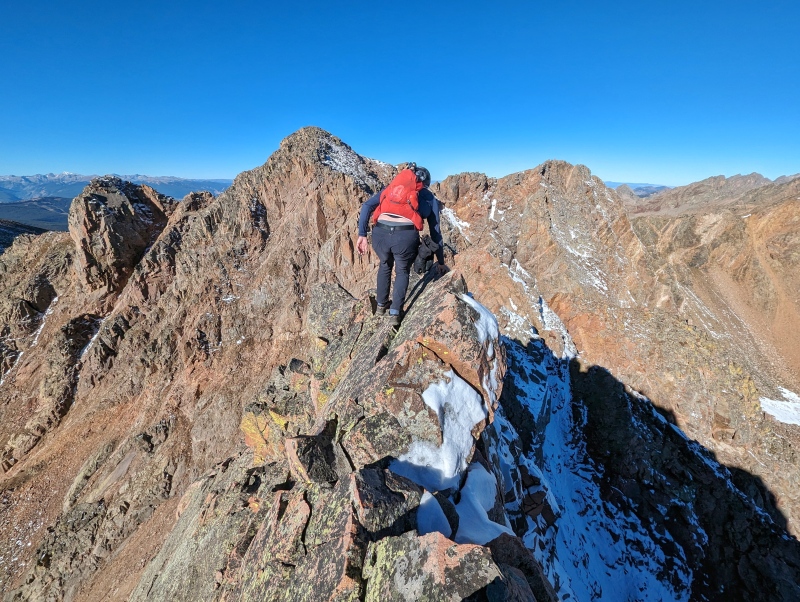
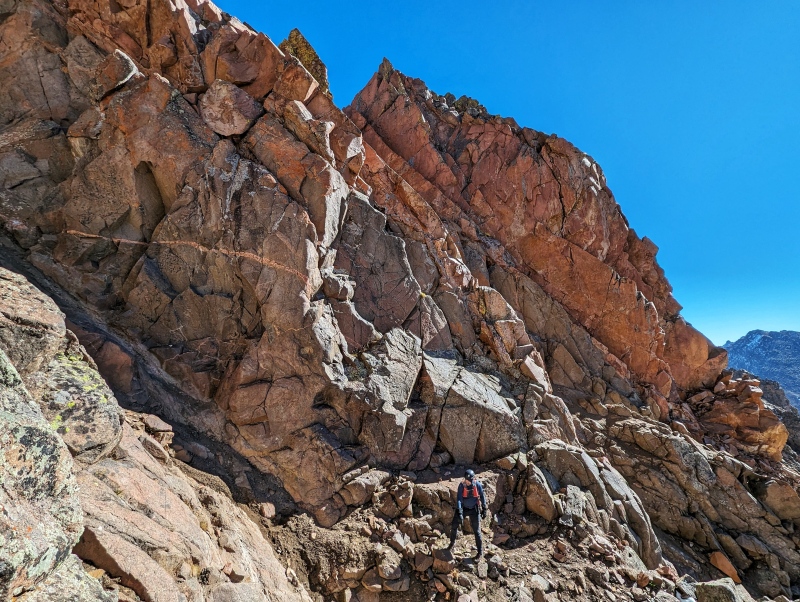
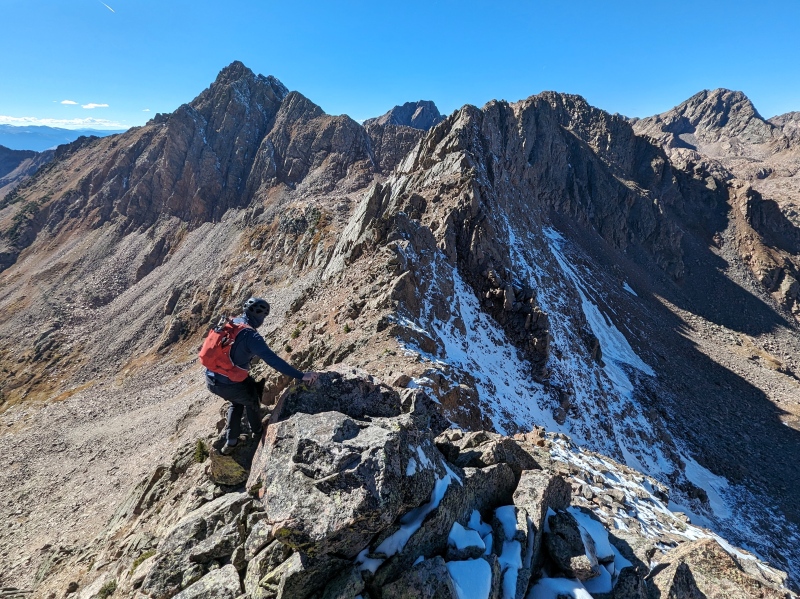
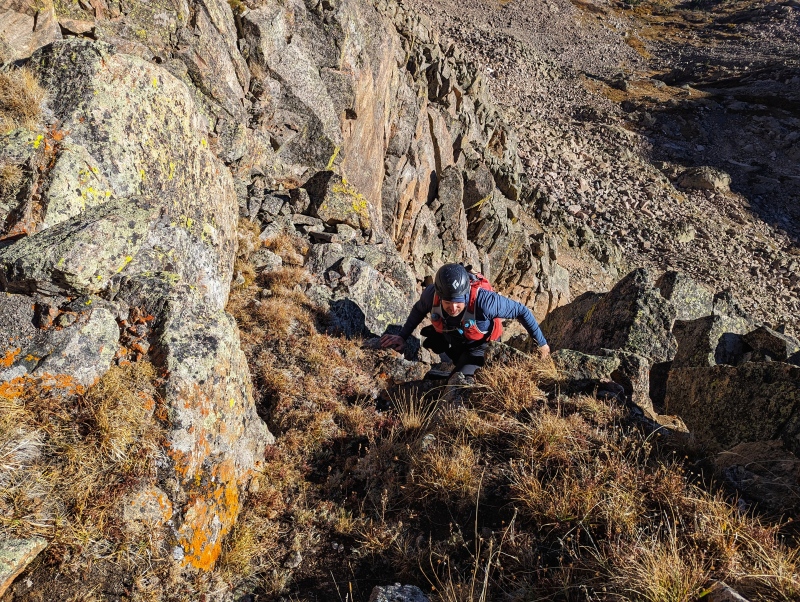
Usable Pass and X Prime to Peak W From Usable Pass, the scrambling starts again. The scrambling can be kept at Class 3 most of the way to the summit of X Prime, but requires a committing and exposed class 4 move to get to the summit. The summit is difficult to discern until you've gained the ridge, but is marked by a large cairn. From the summit, descend 4th class terrain down to the ridge connecting with Peak W. At this point in the day, the exposed, class 4 difficulties blended together. None of this ridge came easy and there were several low 5th class sections that required tricky downclimb and up-climbing. The vast majority of these difficulties occurred at deeply-inset, steep notches. Two notches in-particular presented stout scrambling challenges near the end of the ridge. In a way, this ridge is fairly intuitive - the easiest path forward near the ridge proper will get you through the end. The problem is, it's intuitively hard. 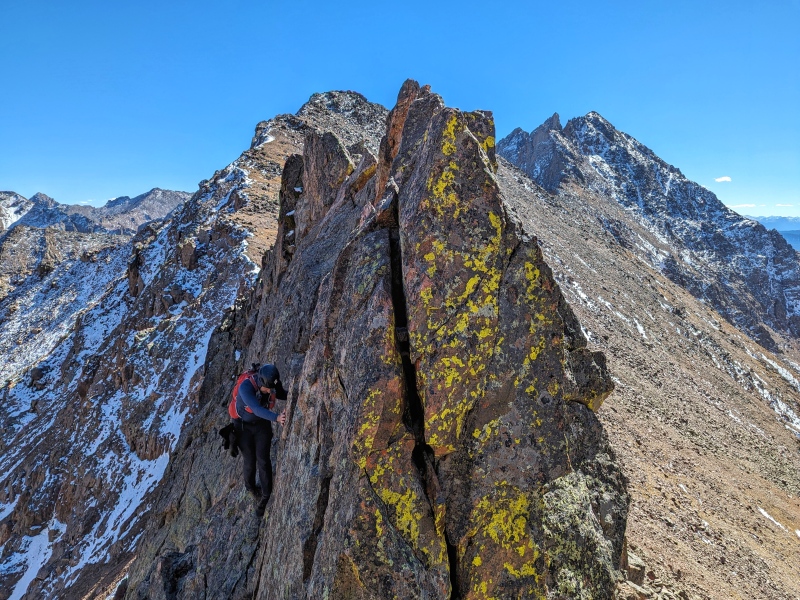
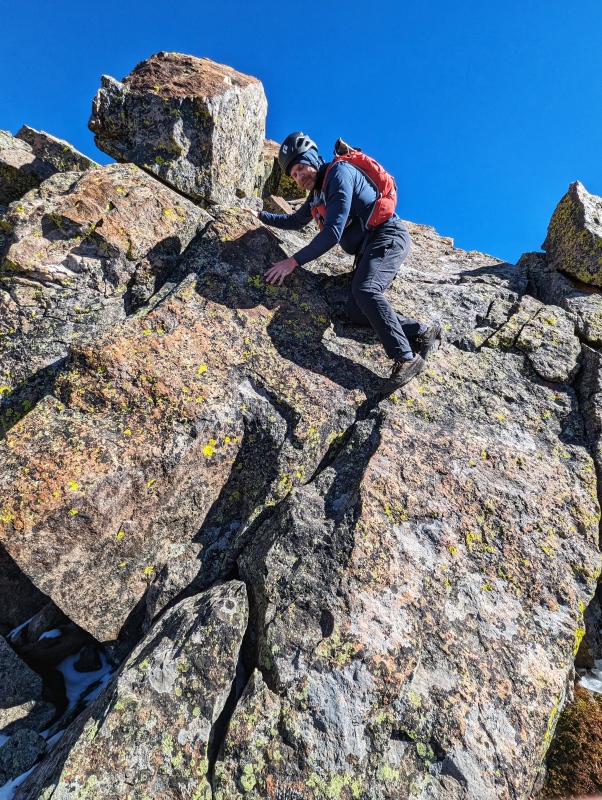

The Chimney The next prominent difficulty on the ridge is a cliff band that's split by a deep cleft. The target cleft is the first major crack from the right (North) side of the ridge. The moves to get to the top involve surmounting two solid chock stones and require some low-5th class movements. The crack is tight and definitely required some tricky, physical maneuvering with a backpack on, but wasn't terrible exposed and provided what appeared to be the only feasible way to stay on the ridge proper. This section was actually a pretty fun, quasi-canyoneering challenge! 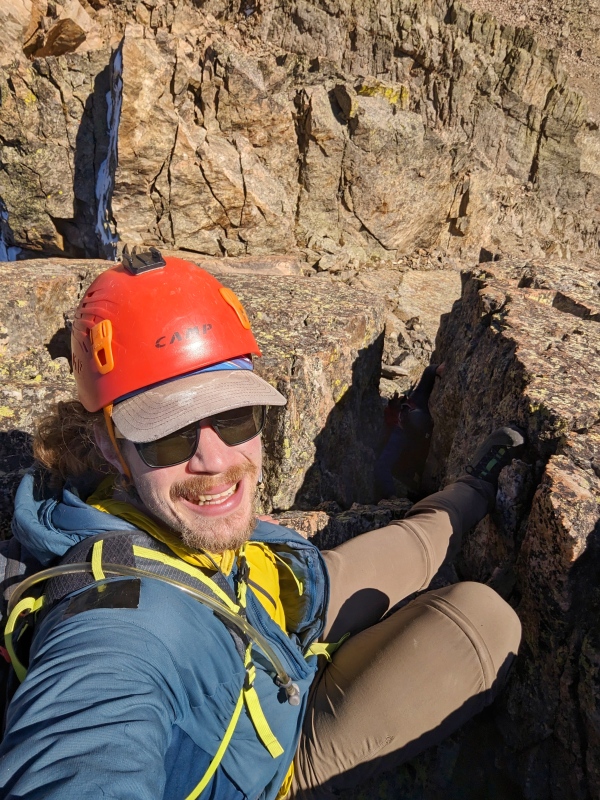
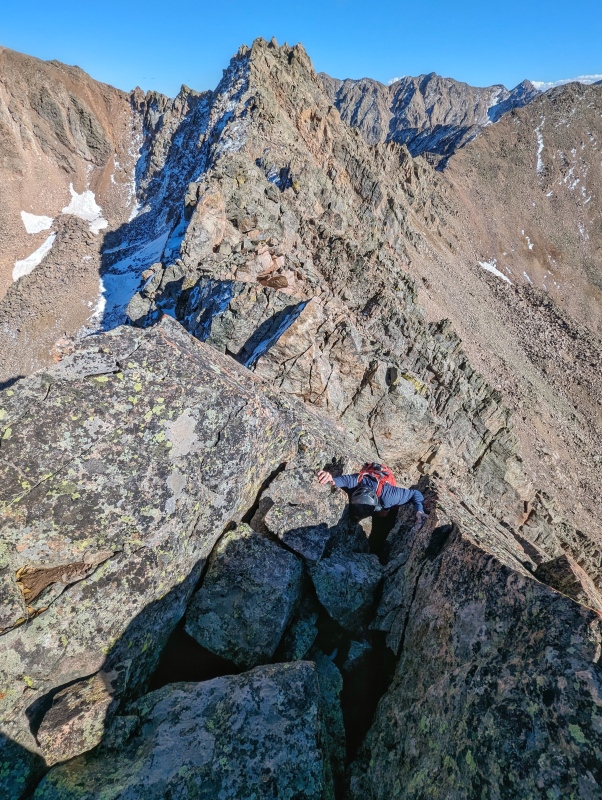
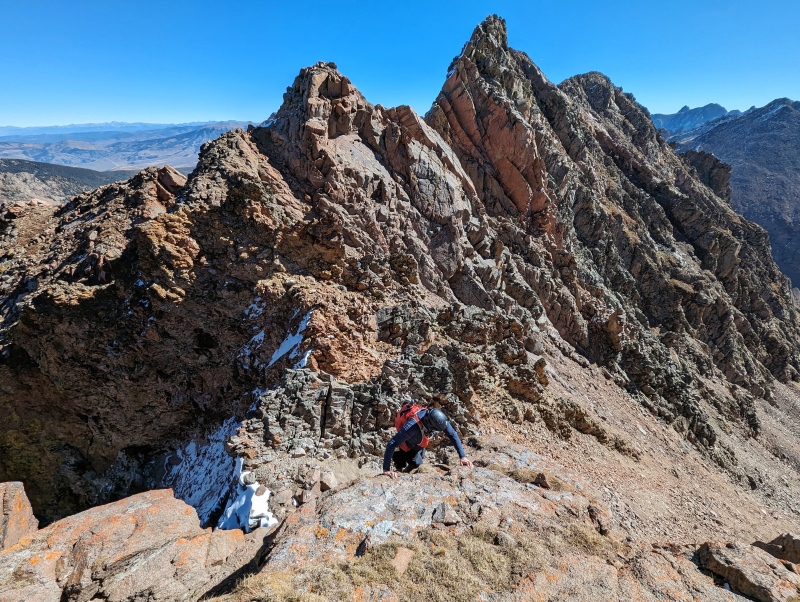
X Prime - W Crux and Another Lesson in Risk Management I don't have a good photo of it, but the following notch is very committing. Once in the notch, a refrigerator-sized chock stone sits below you to the left over a small cliff, which blocks easy access to a gully that would otherwise be a fairly simple escape option. The movements may have been easier without snow, but the snow necessitated that we lower ourselves into a stemming move with legs stretched out across a v-notch. Carefully checking each rock for verglas, we then lowered ourselves fully into the notch, which had secure, flat footing. From there we could descend down the cliffy gully or ascend a 5th class face onto the next tower. Slope angle shading indicated significantly easier terrain on the backside of the tower going into the next notch, as well as a better escape gully (should we need it). We committed to 10-15 feet of 5.4/5.5 climbing, starting on the far right side of the face, which began to ease very quickly as we exited the notch. The rock had good hands and feet. We then had to work our way across a slabby face via a small ledge in order to traverse beneath some large blocks that made up the top of the ridge. A final 10-foot, low 5th climb gained the easier class 3/4 terrain on the face of the tower. From there, we descended into the next notch and traversed around the large slab that would have required mid-5th class crack climbing (noted in one of the previous photos) and ascended a Class 4 (maybe a low 5th move or two) gully that took us back up to the ridge proper. From there, the difficulties ended and we enjoyed straightforward class 2/3 terrain to the summit of Peak W. While downclimbing into the notch, I got an extraordinarily painful charley horse in my lower calf, which made it difficult to focus and complete the remaining movements down into the notch. Had this happened in more exposed or complicated terrain (thinking the crux downclimb), I'm not quite sure how it would have ended. I also had a foot unexpected slip while climbing out of the notch - thankfully I had good hands (rule of 3). These two occurrences altered my thought process around risk - it's not only about whether the terrain is within your comfort zone and technical ability, but whether you're operating far enough away from the edge that unexpected incidents like these aren't the determining factor between life and injury/death. Ultimately, nobody can plan for every eventuality, but I think we can provide ourselves with the margin to take instances like this in stride... something I didn't do when descending the dihedral. 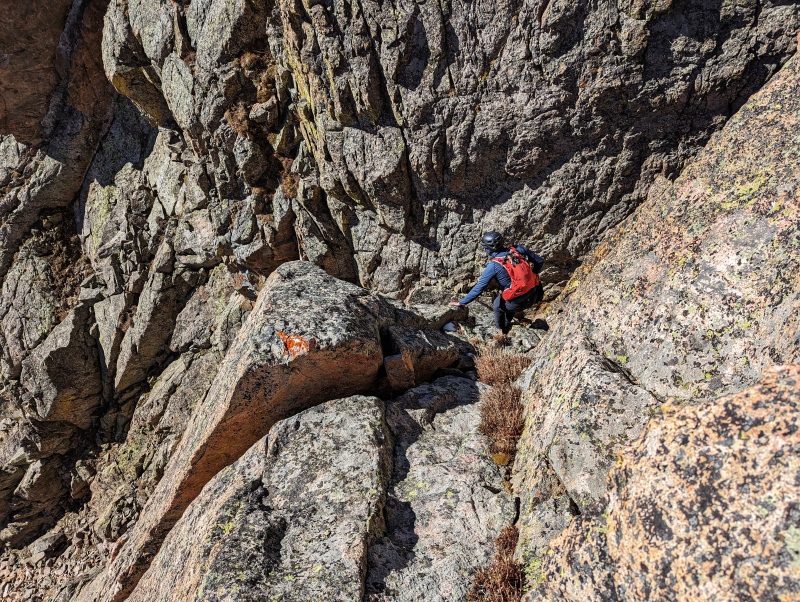
Overall, this ridge was a pretty big learning opportunity for me and brought a lot of clarity to how I want to approach the mountains in the future. From a route perspective, this ridge was exceptional; adventurous, challenging, and a Gore classic. I think it would have been substantially more reasonable with a rope and I would do it again with the proper gear. I'll have to come back to finish up the ridge from Peak W to East Partner... Thumbnails for uploaded photos (click to open slideshow): ")
")
")
")
")
")
")
")
")
")
")
")
")
")
")
")
")
")
")
")
")
")
")
")
")
")
")
")
")
")
")
")
")
")
")
")
")
")
")
")
")
")
")
")
")
")
")
")
")
")
|
| Comments or Questions | |||||||||
|---|---|---|---|---|---|---|---|---|---|
|
Caution: The information contained in this report may not be accurate and should not be the only resource used in preparation for your climb. Failure to have the necessary experience, physical conditioning, supplies or equipment can result in injury or death. 14ers.com and the author(s) of this report provide no warranties, either express or implied, that the information provided is accurate or reliable. By using the information provided, you agree to indemnify and hold harmless 14ers.com and the report author(s) with respect to any claims and demands against them, including any attorney fees and expenses. Please read the 14ers.com Safety and Disclaimer pages for more information.
Please respect private property: 14ers.com supports the rights of private landowners to determine how and by whom their land will be used. In Colorado, it is your responsibility to determine if land is private and to obtain the appropriate permission before entering the property.


