Download Agreement, Release, and Acknowledgement of Risk:
You (the person requesting this file download) fully understand mountain climbing ("Activity") involves risks and dangers of serious bodily injury, including permanent disability, paralysis, and death ("Risks") and you fully accept and assume all such risks and all responsibility for losses, costs, and damages you incur as a result of your participation in this Activity.
You acknowledge that information in the file you have chosen to download may not be accurate and may contain errors. You agree to assume all risks when using this information and agree to release and discharge 14ers.com, 14ers Inc. and the author(s) of such information (collectively, the "Released Parties").
You hereby discharge the Released Parties from all damages, actions, claims and liabilities of any nature, specifically including, but not limited to, damages, actions, claims and liabilities arising from or related to the negligence of the Released Parties. You further agree to indemnify, hold harmless and defend 14ers.com, 14ers Inc. and each of the other Released Parties from and against any loss, damage, liability and expense, including costs and attorney fees, incurred by 14ers.com, 14ers Inc. or any of the other Released Parties as a result of you using information provided on the 14ers.com or 14ers Inc. websites.
You have read this agreement, fully understand its terms and intend it to be a complete and unconditional release of all liability to the greatest extent allowed by law and agree that if any portion of this agreement is held to be invalid the balance, notwithstanding, shall continue in full force and effect.
By clicking "OK" you agree to these terms. If you DO NOT agree, click "Cancel"...
The Saw is a seldom-done, absolutely fantastic ridge that connects Peak H over to Peak J in the Gore (I'm pretty sure @gina_gets_on_top would like for me to shut up about the Gore at this point, but oh well). We also added on Peak J to Peak P (Jigsaw) and Peak P to West Partner (Rocking Horse). Rocking Horse was a repeat for me (https://www.14ers.com/php14ers/tripreport.php?trip=21930&cpgm=tripmine), but new for Gina and Ben. This report will cover the ridge sections between Peak H and Peak J (The Saw) and Peak J to Peak P (Jigsaw). Okay, so Peak J to Peak P doesn't technically have a name and I'm not the first person to do it, but it's a unique section of the ridge and has similar, but different characteristics to both Ripsaw (C - H) and The Saw (H - J). Jigsaw seems a fitting name for this small, but fun portion of the ridge. I will also say that we did NOT go to the summit of Peak H or West Partner because of time constraints, but since the ridge scrambles listed technically include those peaks, I wanted to make sure to include the only searchable peaks that are part of this ridge. Also, we'd already been on both Peak H and West Partner and the interesting scrambling ends prior to either summit. Per the usual, big thanks to @jbchalk for the original beta (http://brandonandkristine.com/colorado-traverses/the-saw-gore-range/)!
The Saw and Jigsaw are both very challenging, solid, and packed with fun scrambling! Compared to it's neighbor, Ripsaw, The Saw is harder and requires more route finding, but has smaller towers. Outside of the large initial descent from Peak H, the descents/climbs on the towers are short. I would compare its difficulty on the ridge proper (with a few small bypasses) to The Partners Traverse... challenging, but never desperate. It's difficult to make a direct comparison because the character of the ridges are so different. In any event, if you choose to tackle this traverse, expect lots of 5.low scrambling (everyone's favorite ambiguous rating), solid rock, magnificent views, and lot of fun! I highly recommend going in the direction of Peak H to Peak J... generally, all 5.low moves were on the climbs and the descents relented to Class 3/4. As a general note, I write my Gore trip reports from the perspective of trying to stay as ridge proper as possible because (IMO) the ridgelines in the Gore are what make them special!
This trip report brought to you by: Shits and Giggles (Sometimes Giggles and Shits, AKA @Altitoots), Buttcrack Princess, and Wipe Back to Front (as signed on the Peak P register).
Approach/Route:
There are two different approaches for this route.
1) Go up and over Booth Pass, Descend almost to Upper Piney Lake (traversing high would take way too much time), then head up to the low point on the ridge between Peak H and Peak J. This is what we did and in retrospect, I'm not sure I recommend it. By the time you get to the low point below peak H, you've ascended 5,000' and you have to deal with the Booth Falls TH nonsense (e.g. parking at Pitkin and walking over). The advantage is not having to drive the extra hour (ish) to Piney Lake TH. The road is rough, annoying, and tedious... even if you want to go fast, there's probably someone in front of you going 5 mph. Another advantage (if approaching in the dark) is easier route finding and trail quality.
2) Start at Piney Lake TH and take the horse trail towards Upper Piney Lake, eventually splitting off to the left. This has much less elevation gain (3,400'), but the trail is difficult to follow due to deadfall and there are some really marshy areas if you're not careful.
Despite the extra elevation gain (mileage is about the same), I thought we would save time by not having to drive up to Piney and not trying to find the trail in the dark. Coming down from Ripsaw in good light we still had trouble re-finding the faint trail when deviations were required for deadfall. Pick your poison!
Route Information (Booth Falls Approach):
Mileage: Approximately 18.5 Miles Elevation: Approximately 7000' Class: 5.low Time to Complete: 15 Hours [The Saw: 3.5 Hours, Jigsaw (1 Hour), Rocking Horse (1.5 Hours)]
Exposure: Extreme Rockfall: Medium Route-Finding: High Commitment: High (There are no simple bail options until you get past Peak P)
Approach (From Booth Pass)
I don't recommend descending straight down from Booth Pass. The gully is loose and steep. Traversing to the right on some Class 3 terrain will quickly yield to a broad grassy (ish) slope that can be used to traverse down and across without a lot of steep side hilling or loose terrain - reference the attached GPX track.
Looking out over Upper Piney Basin from just below Booth Pass - Peak H is the prominent peak on the right.A bit of fall color looking towards Upper Piney Lake, The Spider, and The Fly.
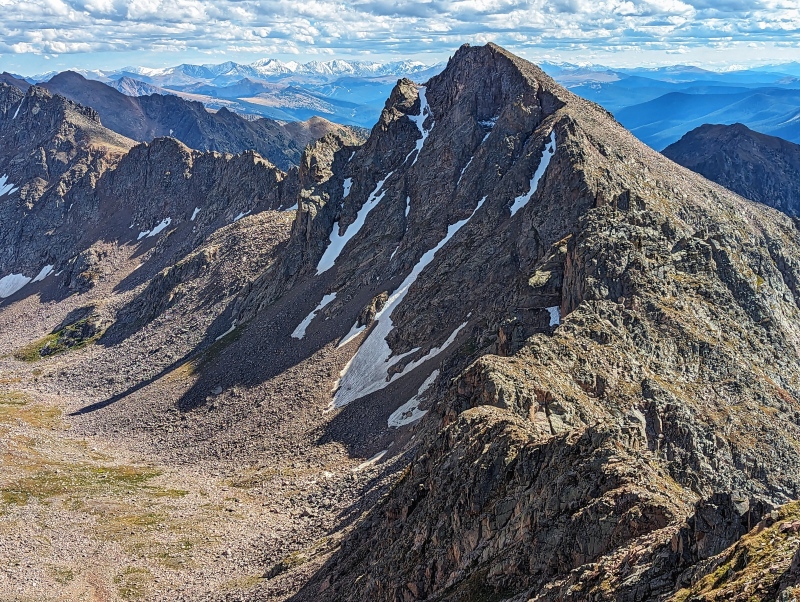
The Saw
From the lake, gradually make your way up towards the low point on the ridge, following grassy weaknesses, aiming for a broad grassy ledge around 12,000'. From the broad grassy ledge, you're looking for an absolutely massive quartzite slab. I recommend traversing around the bottom of the slab to the left, and then gaining the ridge right at the saddle. The slab marks the start of the scrambling and it's a super cool introduction to the ridge. We generally stayed ridge proper. There are 1 or 2 towers that we initially bypassed to the left or right, but there was almost always an immediate path back up to ridge. I don't remember exactly where we dropped or when (it's a long ridge), but route finding is generally intuitive. The photos are more to showcase how incredible this ridge is than to provide specific route beta. Have fun!
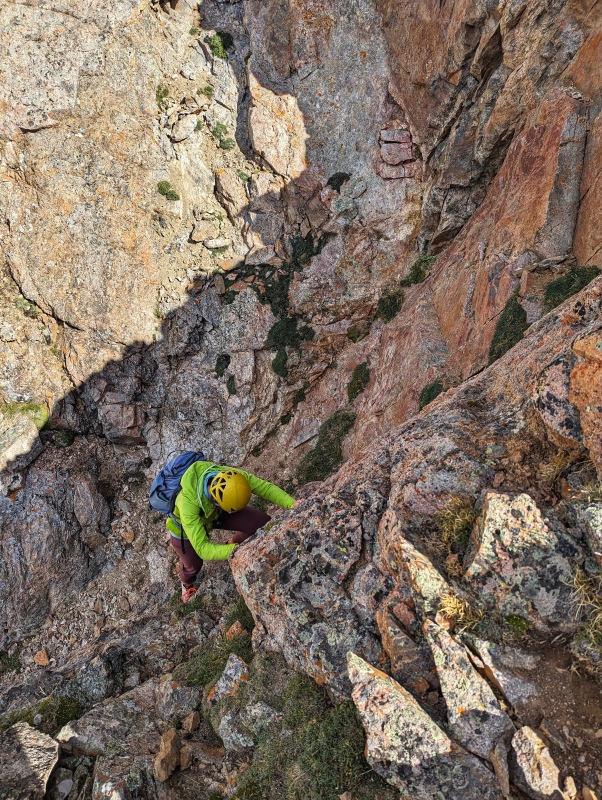
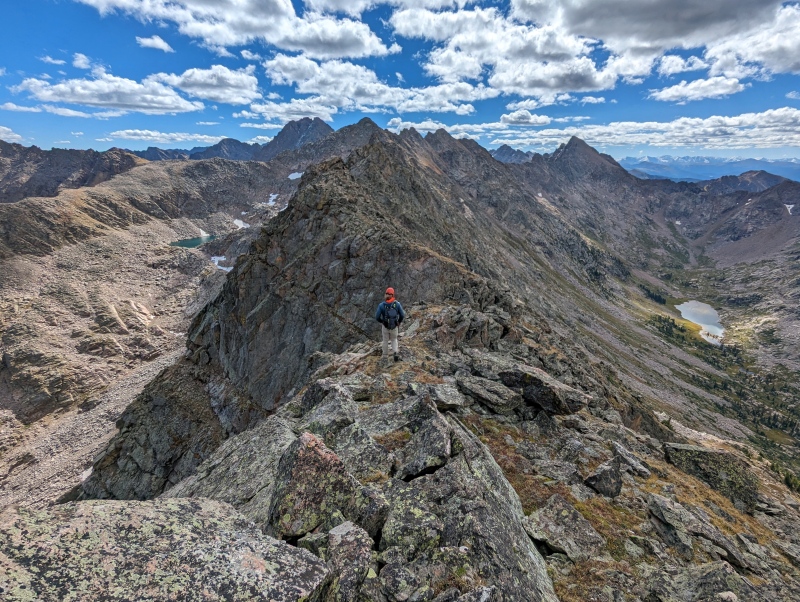
The slab creates a really cool catwalk that transitions into a super aesthetic knife edgeThe ridge is not continuous from the notch marking the end of the slab - descend a grassy weakness in the slab and climb out of the notch. The more orange rock to the left is also a feasible ascent route, but is more stout and has some loose stuff at the top. The crack I'm climbing felt like Class 4.Looking down on the climb out.The slab in the background - back on ridge proper!An unnamed lake below, Peak K to the right, and then Peaks L, Gore Thumb, M, N, and O (R-L)A brief easy sectionAaaaand back to the fun thingsThere's an elephant in there somewhere...Look, more pretty rocksA brief traverse across a narrow ledge, we ascended up and to the left shortly afterUp this lovely dihedral back to ridge properFrom Left to Right - Peak Q, Peak L, big-daddy tower, Peak P, West Partner Peak, and a snow 10-Mile Range.Getting on top of big daddy (Peak H in the background)Mounting big daddy (I'm just rolling with the innuendo at this point)Descending big daddy's backsideOne of the trickier downclimbsThis section was a bit dumb and way sketchier than it needed to be. Descending 10 more feet to the left and then back up to the ridge proper was a lot more reasonable. The descent point will be marked by a pointy spire that doesn't immediately look climbable.Up the next tower.By far one of the coolest parts of the ridgeHonestly kinda run out of things to say eventuallyI should really work on my creative writing skillsYay rocksLots of narrow cat walksI'm not doing very well with this whole 'creative writing' thingI'll just go back to describing the obvious and pretend like my words have actually contributed additional usefulness beyond the photo.One of the most exposed parts of the ridge - a block with extreme exposure on either side. Luckily, there's an extremely solid knob that acts as a fantastic jug in every direction.Reminiscent of some ridgelines in the white elks... except, you know, actually solid.One of the highlights of the ridge. From Ben's position you have to move between these spiky, exposed blocks. Gina used a high heel hook to transition onto the block in the photo. Ben and I mantled up in between the two.Ben mid-transitionFinishing up the sequenceAnother cool catwalkAfter the catwalk, the ridge eases and stays class 2 for a bit, before transitioning back into an easy class 3 scramble to the summit of Peak J.Summit of Peak J!
Jigsaw
Jigsaw has a bit of a different character than The Saw. Jigsaw's towers have the appearance of being comprised of large stacked rectangles as opposed to the more solid looking towers from The Saw, but it's still very solid. The traverse from J-P is easier than H-J, but isn't a cakewalk by any means. This section of the ridge shouldn't be missed!
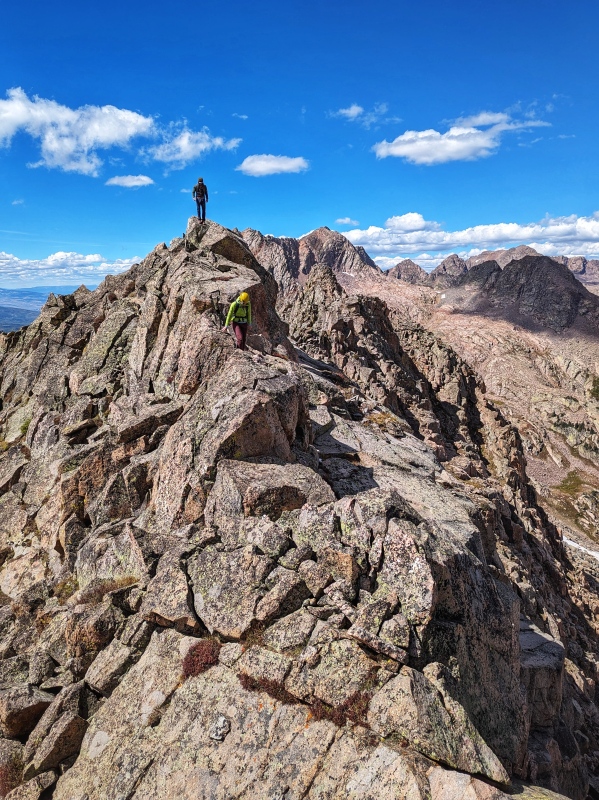
Looking out along the traverse from Peak J to Peak P (Left) and West Partner (Right).The initial downclimb off of Peak PThe first towerYay, rocks!?Just a bit of exposure to the leftLooking back on Peak J and Peak HA particularly tough chimneyContinuing along the ridge properThis one had a tricky up-climb. We ended up taking the dihedral just above my red helmet, which required a HIGH right foot and stemming with the left hand... It appeared that there was a an easier route around to the left, but there was a bit of snow and wet lichen on the rocks, so we chose the harder, dry route.My personality consists of climbing rocks; big rocks, small rocks, solid rocks, loose rocks, rocks with green eggs and hamIf you're holding out hope that the captions are going to get better, sorry to disappoint.Peak Q and Upper Slate Lake / South American Lake in the backgroundNearing Peak P!Rocking Horse Ridge over to West Partner peakA Closeup of West Partner Peak with snowy 10-Mile peaks in the background
Rocking Horse Ridge
Rocking Horse Ridge is the easiest portion of scrambling from Peak C all the way to East Partner and goes very quickly outside of the two crux notches and Rocking Horse Tower. If you're planning on going back over Booth Pass, it makes sense to stay on the ridge as opposed to dropping down into the basin, then back up and out. It took us about 1.5 hours to get to the end of the ridge and then it was a quick and efficient descent back down to the Booth Falls Trail. If you want to drop without completing the ridge over to West Partner, it's easiest to descend along Rocking Horse Ridge from Peak P summit to about 12,700' and following a grassy slope down into Upper Piney. You can also descend the gullies from either of the crux notches.
My GPS Tracks on Google Maps (made from a .GPX file upload):
A friend and I were just talking about how cool a mega linkup from c to w partner would be, but didnt have much info on this section of ridge. No idea if I'll ever actually do the linkup, but it's gonna itch a bit with this beta. Really awesome work
Looks like a lot of fun, and some breathtaking views. Thanks for posting! Now have sone worthier objectives in the Gores than the ranked peaks I have left there.
@yaktoleft13 - Thanks man! It'd be a HUGE day, but definitely possible to link up all of the Piney Basin peaks from C to West Partner. If you're really interested in suffering, the name of traverse that goes along the ridge of the entire Gore Range is Naa Ohn Kara. Looks like they skipped a lot of the interesting bits on the ridge proper though.
@Marmot72 - It's a gorgeous ridge! Ironically, a lot of the best scrambling I've found is on unranked peaks (with a few notable exceptions) lol one of the reasons Gina and I refuse to go back to another list (especially after seeing some of the choss nightmares that make up the Sneffels Range).
This route is on the short list of those that I'd look forward to repeating. The excellent 'choose your own adventure' nature of the ridge and the incredible scenery are hard to beat.
Caution: The information contained in this report may not be accurate and should not be the only resource used in preparation for your climb. Failure to have the necessary experience, physical conditioning, supplies or equipment can result in injury or death. 14ers.com and the author(s) of this report provide no warranties, either express or implied, that the information provided is accurate or reliable. By using the information provided, you agree to indemnify and hold harmless 14ers.com and the report author(s) with respect to any claims and demands against them, including any attorney fees and expenses. Please read the 14ers.com Safety and Disclaimer pages for more information.
Please respect private property: 14ers.com supports the rights of private landowners to determine how and by whom their land will be used. In Colorado, it is your responsibility to determine if land is private and to obtain the appropriate permission before entering the property.


")
")
")
")
")
")
")
")
")
")
")
")
")
")
")
")
")
")
")
")
")
")
")
")
")
")
")
")
")
")
")
")
")
")
")
")
")
")
")
")
")
")
")
")
")
")
")
")
")
")


