Download Agreement, Release, and Acknowledgement of Risk:
You (the person requesting this file download) fully understand mountain climbing ("Activity") involves risks and dangers of serious bodily injury, including permanent disability, paralysis, and death ("Risks") and you fully accept and assume all such risks and all responsibility for losses, costs, and damages you incur as a result of your participation in this Activity.
You acknowledge that information in the file you have chosen to download may not be accurate and may contain errors. You agree to assume all risks when using this information and agree to release and discharge 14ers.com, 14ers Inc. and the author(s) of such information (collectively, the "Released Parties").
You hereby discharge the Released Parties from all damages, actions, claims and liabilities of any nature, specifically including, but not limited to, damages, actions, claims and liabilities arising from or related to the negligence of the Released Parties. You further agree to indemnify, hold harmless and defend 14ers.com, 14ers Inc. and each of the other Released Parties from and against any loss, damage, liability and expense, including costs and attorney fees, incurred by 14ers.com, 14ers Inc. or any of the other Released Parties as a result of you using information provided on the 14ers.com or 14ers Inc. websites.
You have read this agreement, fully understand its terms and intend it to be a complete and unconditional release of all liability to the greatest extent allowed by law and agree that if any portion of this agreement is held to be invalid the balance, notwithstanding, shall continue in full force and effect.
By clicking "OK" you agree to these terms. If you DO NOT agree, click "Cancel"...
This mountain is generally ignored by the vast majority of 14er climbers due its status as an unnamed and unranked summit (although El Diente next door is also unranked but almost always included), and maybe that's a good thing. The only people who go to the trouble of tagging this one are those truly masochistic completionists who insist on hitting all the 14ers, ranked or not, named or not. As such, there is precious little information available on the best way to tackle South Wilson, and the few reports that do exist are widely varied. This writeup is my small contribution to the beta pile in the hopes that future completionists who attempt this godforsaken rock can get a better idea of the mistake they're about to make.
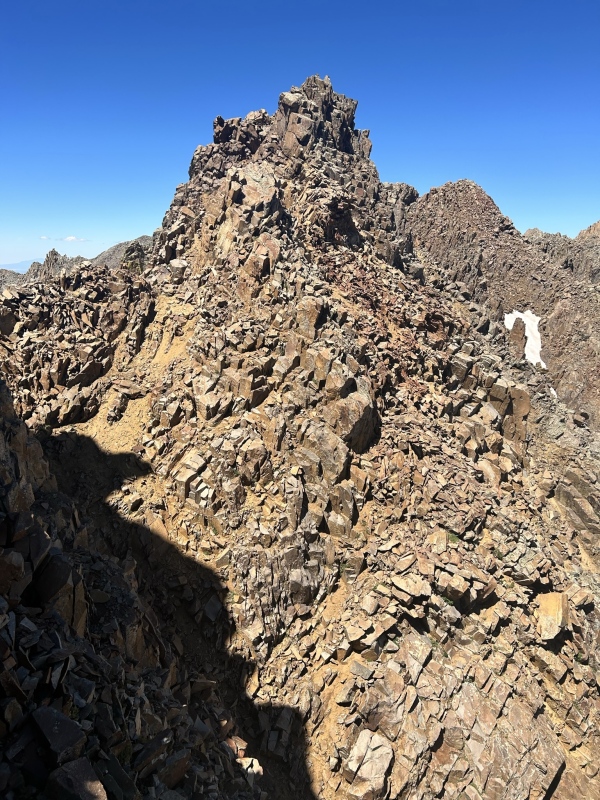
South Wilson is undoubtedly the chossiest of an extremely loose and unstable cluster of 14ers. Luckily for most climbers, the routes to and from El Diente, "West Wilson, " and Mount Wilson are all relatively stable due to the amount of traffic they get; people climbing them and completing the traverse tend to remove loose debris as they test their holds and beat in the paths. Even the newer unranked 14er "Pin Point" was fairly pleasant and stable as it's part of a major formation of large pillars with solid foundations. These things are not true of South Wilson, whose summit block is a series of rotten rock teeth with every available surface covered with unconsolidated dirt and kitty litter. If you attempt this mountain in dry conditions, you must clean and test every single foothold and handhold before weighting it, and despite your best efforts you will cause several minor and major rockslides. I would definitely not recommend bringing a partner on this one simply because of the rockfall hazard you'll pose to each other.
There are a few ways to tackle South Wilson (I'll discuss the alternative approaches later), but in the interest of aesthetics I wanted to complete the traverse from Mt. Wilson. I'd done the El Diente traverse the week prior but decided against continuing on to South Wilson at the time, so this time the plan was to hike back in from Kilpacker, gain the saddle between Mt. Wilson and South Wilson, and complete the traverse as if I was continuing on from Mt. Wilson. There are five major high points on the ridge from the saddle to the summit, and for this report I've numbered them from North to South (saddle to summit). The cruxes of the route are the descent off tower #1, and the ascent up tower #4.
High point #5 is the true summit of South Wilson
If you're coming from Mt. Wilson, the easiest route to the saddle is not descending the ridge direct as there are several small cliffs that would be tough to downclimb. Instead, follow Mt. Wilson's SW Slopes route down a gulley until you reach the base of the cliff bands, then traverse south over the ocean of sideways scree and regain the saddle. Since I was approaching from lower in the basin, I split off a bit early from the SW Slopes route and ascended a more direct line. From the saddle, your first challenge is getting up tower #1.
Mt. Wilson's SW Slopes descent followed by traverse to the saddle.
If you want to avoid the difficulties posed by tower #1, there's a steep scree gulley that ascends straight up to the ridge in between towers 1 and 2. I didn't use it, but it looked like it would go depending on your tolerance for loose garbage
The line in orange bypasses the first tower, but would require considerable elevation loss if coming from Mt. Wilson
To tackle the first tower, traverse right (west) from the saddle and locate a 3rd class chimney that goes most of the way to the top. The sides of this chimney were nice and solid, and provided quick access to the top.
Chimney on tower #1
Once you top out, you're confronted with what I would consider the crux of the route; downclimbing 30 feet to the saddle with the second tower. I wandered around for a bit trying to find the best way down and eventually settled on a narrow section of gray rock slightly to the right (west) of the ridge crest. It was vertical, but had good holds and cracks. Lots of loose rock in the gaps and fissures which took time to remove before stepping down each time. My line was about 20 feet of low 5th class.
Looking straight down the crux from tower #1Looking north from tower #2. I descended the crack system in the gray rocks immediately to the left of the green lichen.Rock spire between tower #1 and #2 at right. This is the gulley that skips the crux on tower #1
From here it's a steep but straightforward scramble up the second tower. Walk around the left side the rock spire poking out of the saddle (visible in the first pic of this report) and follow the loose dirt gulley to the top.
Route up the second tower
The other side of tower #2 is a fairly steep hike down dirty scree ledges. Take your time and try not to fall on your ass. At this point you'll want to stay more to the left (east) of the ridge crest, but don't descend any lower than you have to.
Looking back at the downclimb from tower #2
The third tower can be bypassed on the left (east) side. The top of the tower is just a fan of rock shards, so you need to skirt underneath them but if you go too low you'll get onto stuff that's way too steep. Once you're above the next notch it's another descent on loose dirt to the saddle.
Sidehilling on loose dinner platesLooking back at the downclimb from tower #3
Finally the second crux comes into view: the headwall of tower #4. It's taller than it looks in these pictures, and any viable line on the right (west) side looked like it cliffed out near the top. There's a weakness on the lower left (east) side of the wall that can be accessed by downclimbing the gulley a bit on exposed, loose dirt.
Second crux viewed from tower #3
From the saddle between towers #3 and #4, hug the wall and work your way down the gulley, being careful not to slip on the loose dirt and tumble down the couloir. Make your way up a staircase of blocky gaps in the headwall, then onto grassy ledges that provide access to a final gulley on the left (east) side of tower #4.
Lower portion of the second crux viewed from tower #3
Your immediate difficulties are finally over when you top out on tower #4. From there it's a short jaunt across the final dip to the true summit of South Wilson. Stay directly on the ridge crest for the most stable rock. The view of Lizard Head was phenomenal, but I was disappointed to find a pile of glass shards where the summit register once was. Curious how long it will be for someone to lug a new one up there.
Last little divot before the true summit
Now that you've summited, you're still a long way from home. Reversing the route is impractical, which gives you only one other reasonable descent option: following the southwest ridge down as it sweeps to the west, and picking a spot to dive off the side and scree surf your way back to the upper basin. The scree fields on the northwest side of this ridgeline are uncomfortably steep, and every single rock in the valley is perched at its very limit of sliding, so expect to set off waves of tumbling rocks with every step you take. The shallowest and safest descent option is on the other side of an extremely narrow, exposed catwalk of rotten rock so you can either avoid the exposure and take a steeper slide down the valley wall, or tiptoe your way across the scary, unstable ridgeline until you reach the saddle below the next high point on the ridge. The former option is actually a route that some have used to ascend South Wilson in the past, and I gotta say hats off to those guys because I couldn't imagine climbing up that nastiness let alone sliding down it. I opted to traverse the catwalk, which was about 40 feet of careful balancing and crabwalking with quite a bit of exposure. It can be most expedient to cross knife edge ridges by stepping low on one side and holding onto the ridge crest with your hands, but that won't work here. You definitely do not want to put any lateral force on any part of this section because it will probably pull out on you. I carefully walked directly over the top of the ridge, and could feel most of the plates grind and shift underneath me the whole way.
Looking down at the ridge from the shoulderStarting across the catwalkLooking back at the catwalk. Several of the rocks here are flat, but that doesn't mean they're stableLooking back at the SW ridge from across the catwalk. The descent option that avoids the catwalk can be seen on the left of the ridge crest.
At last the ridge relents and you reach a nice, wide saddle. From there it's a straightforward (but still steep) plunge down the choss fields back toward the Mt. Wilson trail. Once things start to level out, don't go too far left or you'll cliff out in the upper basin.
Looking back at the easier descent option from the upper basin
It was a huge relief to get down from this mountain. I'll echo previous users of this forum by saying that South Wilson is probably best done as a snow climb to mitigate the looseness of the rock. If I ever had to do this again, I would wait for consolidated spring snow conditions and either ascend the steeper option on the SW ridge to avoid the catwalk, or bushwhack in from the Cross Mountain side and ascend the snow on the southeast face/ridge. As it stands, I think in summer conditions this is the most difficult single 14er in Colorado (still easier than Sunlight Spire though). The rockfall danger is exponentially worse than any other route I have ever done, and makes the Hourglass on LB look like child's play. Do not underestimate this one.
This little excursion took about 7 hours car to car from the Kilpacker trailhead. You can view my exact route here. I hope this helps any unranked 14er enthusiasts in the future!
Thumbnails for uploaded photos (click to open slideshow):
I salute you for climbing this pile of junk in dry conditions. I tried to climb it from Kilpacker Basin yesterday but I turned around at the catwalk. The snow to the ridge was great but the rocks on that section were moving of their own accord and I thought I was going to fall off. Ascending the snow to a higher point on the ridge, beyond the catwalk, might not work either. The snow does not go all the way up, and you would be left with somehow exiting 60 degree snow onto junk rock that is just as steep. The snow ascent from the south side is definitely the way to go. I cannot believe this entire 14er group is still standing. It would be a lot easier if it would just fall down and spare us all the trouble.
Thank you for this excellent guide! I used it in combination with JJEI's trip report to make my way from Mt. Wison to "South Wilson" and managed to walk away with no more than a few cuts and bruises. If I didn't know better, I'd say this mountain actively tried to murder me! While I still have a handful of peaks left to finish all 58, "South Wilson" was the final one the 15 Unnamed. Again, thank you!
Caution: The information contained in this report may not be accurate and should not be the only resource used in preparation for your climb. Failure to have the necessary experience, physical conditioning, supplies or equipment can result in injury or death. 14ers.com and the author(s) of this report provide no warranties, either express or implied, that the information provided is accurate or reliable. By using the information provided, you agree to indemnify and hold harmless 14ers.com and the report author(s) with respect to any claims and demands against them, including any attorney fees and expenses. Please read the 14ers.com Safety and Disclaimer pages for more information.
Copyright: Route information, text, risk factors, maps, GPX files, charts, photos, 14ers.com-created map imagery, flythroughs, and other content provided in this route description are copyrighted by 14ers.com and may not be copied, reproduced, republished, distributed, modified, or used to create derivative works without prior written permission.
Please respect private property: 14ers.com supports the rights of private landowners to determine how and by whom their land will be used. In Colorado, it is your responsibility to determine if land is private and to obtain the appropriate permission before entering the property.