Download Agreement, Release, and Acknowledgement of Risk:
You (the person requesting this file download) fully understand mountain climbing ("Activity") involves risks and dangers of serious bodily injury, including permanent disability, paralysis, and death ("Risks") and you fully accept and assume all such risks and all responsibility for losses, costs, and damages you incur as a result of your participation in this Activity.
You acknowledge that information in the file you have chosen to download may not be accurate and may contain errors. You agree to assume all risks when using this information and agree to release and discharge 14ers.com, 14ers Inc. and the author(s) of such information (collectively, the "Released Parties").
You hereby discharge the Released Parties from all damages, actions, claims and liabilities of any nature, specifically including, but not limited to, damages, actions, claims and liabilities arising from or related to the negligence of the Released Parties. You further agree to indemnify, hold harmless and defend 14ers.com, 14ers Inc. and each of the other Released Parties from and against any loss, damage, liability and expense, including costs and attorney fees, incurred by 14ers.com, 14ers Inc. or any of the other Released Parties as a result of you using information provided on the 14ers.com or 14ers Inc. websites.
You have read this agreement, fully understand its terms and intend it to be a complete and unconditional release of all liability to the greatest extent allowed by law and agree that if any portion of this agreement is held to be invalid the balance, notwithstanding, shall continue in full force and effect.
By clicking "OK" you agree to these terms. If you DO NOT agree, click "Cancel"...
Prelude: There's a ton of supplemental information and existing trip reports on this route, but the reason I'm writing this report is to provide some additional photos and details regarding the crux section; from the saddle between East and West Partner to the summit of West Partner (primarily). I also enjoy writing trip reports for objectives that have been special for me, personally. I had quite a bit of trepidation leading up to attempting the Partners Traverse because of its reputation and completing it felt like a big milestone as I move into more technical terrain. Big thanks to OG @jbchalk, @Kevin Baker, @lordhelmut, and @Monster5 for the existing beta that we read through before tackling this traverse. This year has had a myriad of Gore ridge romps; QRS, LMN, Deluge Linkup, East Thorne to Silverthorne, and Ripsaw Ridge. The Partners Traverse has been my favorite so far. The scrambling is exposed and challenging, but also incredibly solid, fairly intuitive, exhilarating, and just plain fun! We did NOT use a rope, though I could certainly understand why someone would choose to in certain spots. We ended up bringing harnesses, webbing, and a 60 meter twin rope in case we felt the need to repel something, but never did... We never felt that the scrambling was desperate or sketchy and I think a lot of that has to do with just how solid and confidence-inspiring the rock on this ridge is.
That being said, don't underestimate this route and definitely work through some less-committing Gore Range scrambles to get a feel for the type of rock. If you are on the Partner's Traverse, you should be comfortable in 4th and low 5th class terrain without beta because you may find that alternative lines suite your ability and style better! Welcome to the Gore - There is no standard route, good route-finding is rewarded, and you choose your own adventure. That being said, this is a ridge where getting cliffed out isn't very common and staying ridge proper can lead you into some of best ridge scrambling terrain the Gore has to offer! If you get through the downclimbing and feel like the ridge is too much, the saddle is a great spot to bail back into the basin below. Earlier bailouts appear to be possible, but are in long, steep couloirs that are likely filled with loose rock. You can also bypass the crux section - see TR by @yaktoleft13. One thing is for sure, this traverse is a gem, even by Gore standards.
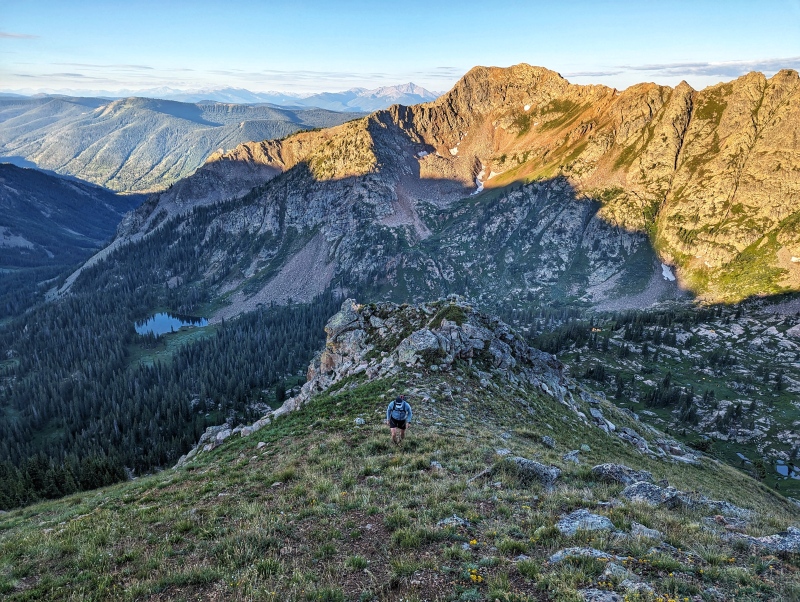
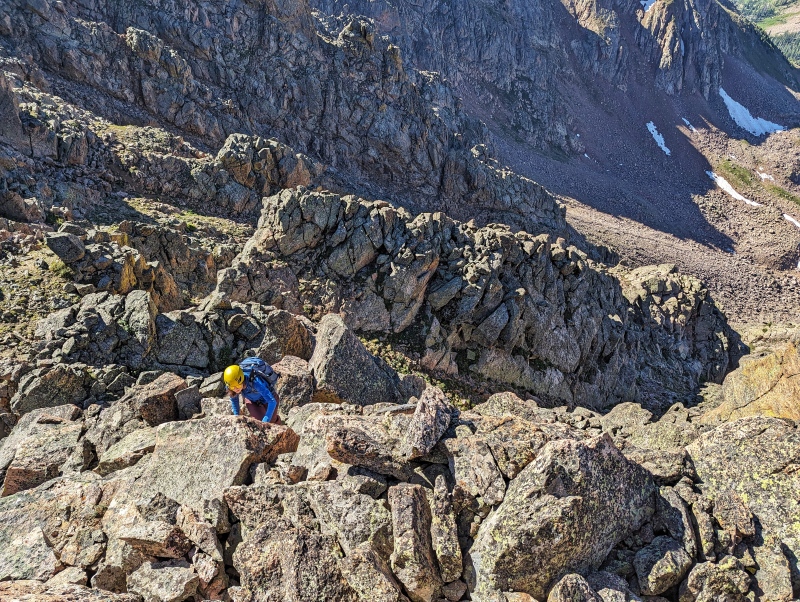
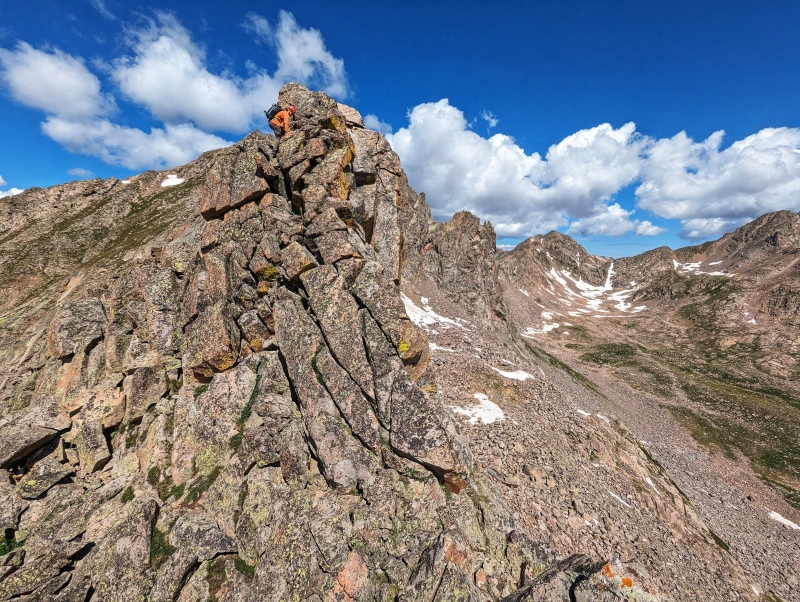
Approach/Route: Park at Pitkin Lake Trailhead and take the trail just past the 11,000' contour... there should be a large clearing. The clearing is marshy, but crossing along the back edge of the marsh allows for dry and easy access to the South Ridge terminus. There are other approaches up East Partner, but the South Ridge seems to be the most efficient and doesn't add too much additional scrambling. The slope leading up to the South Ridge can be kept Class 1, but you may encounter some brief sections of Class 2 or 3 depending on your route selection. Follow the ridge, which has some brief sections of Class 4 along the crest. A knife edge marks the end of the South Ridge and the beginning of your traverse onto the East Face of East Partner's summit block. There's a number of different routes you can take to the summit. We ended up finding a comfy, Class 4 dihedral that lead us almost all the way to the summit.
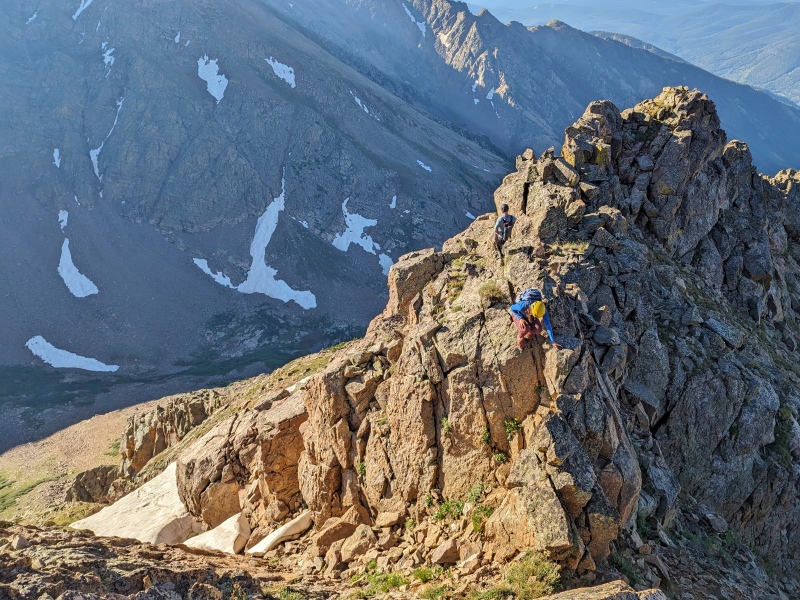
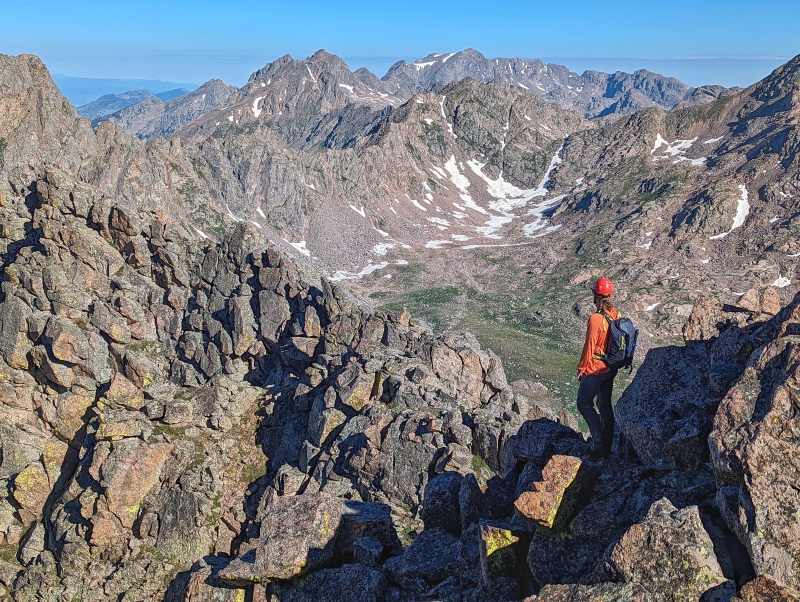
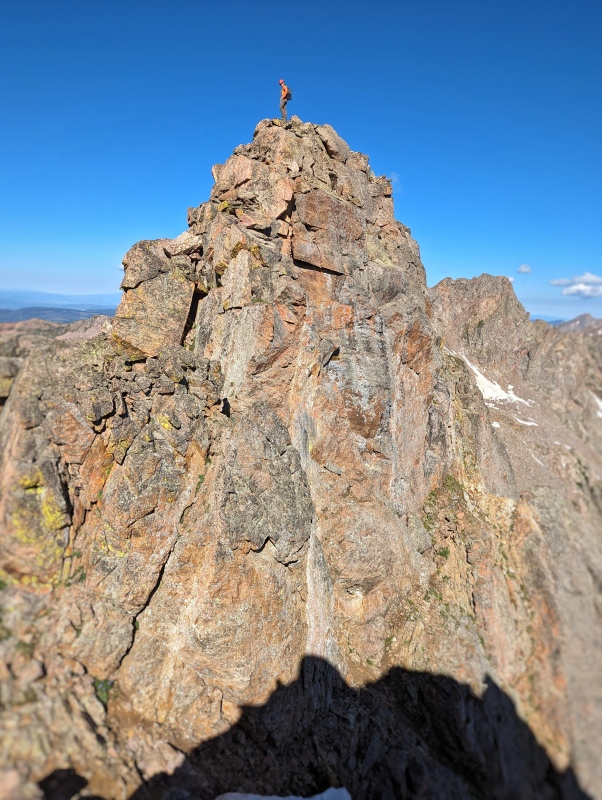
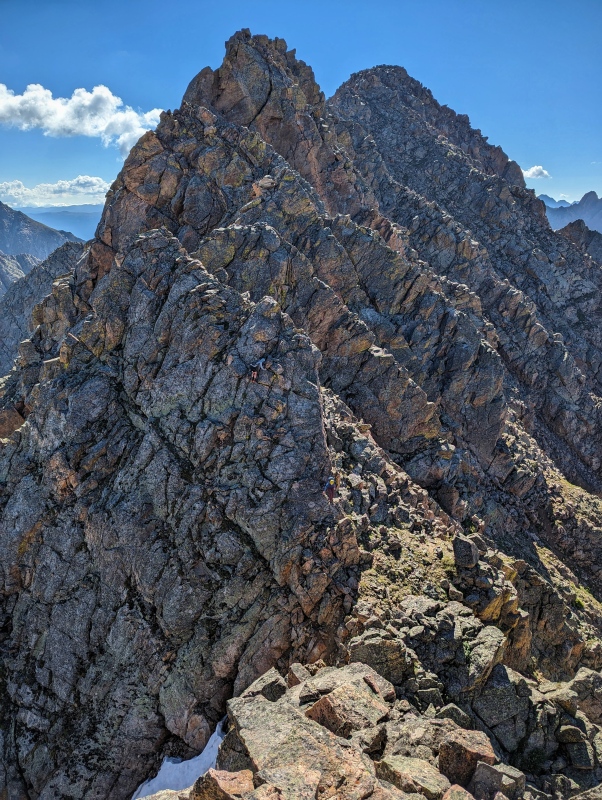
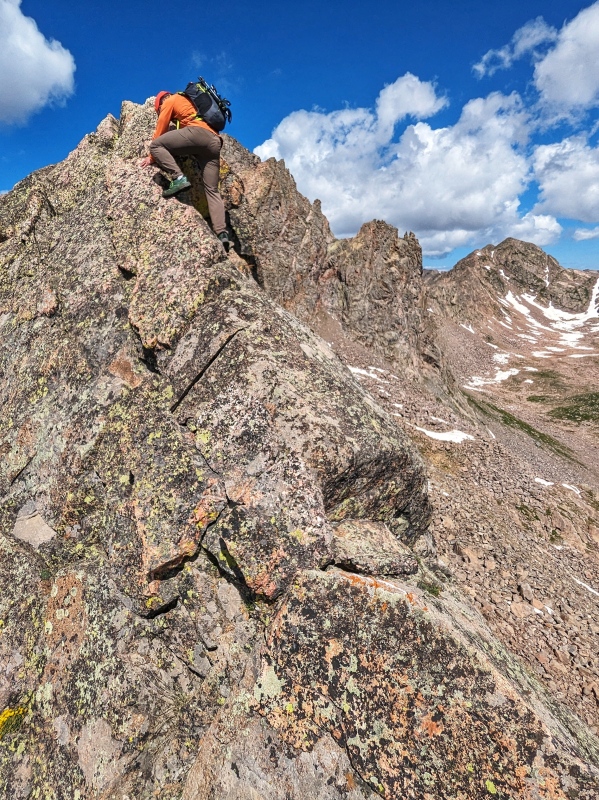
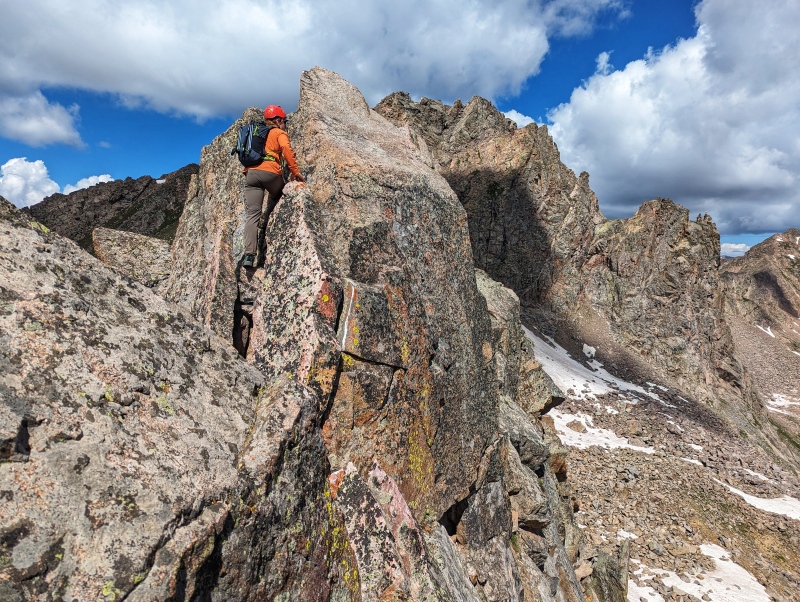
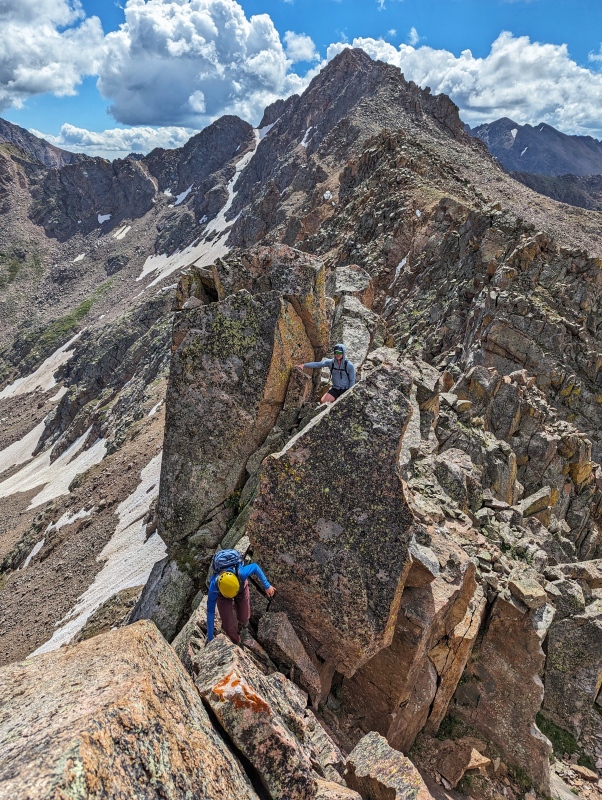
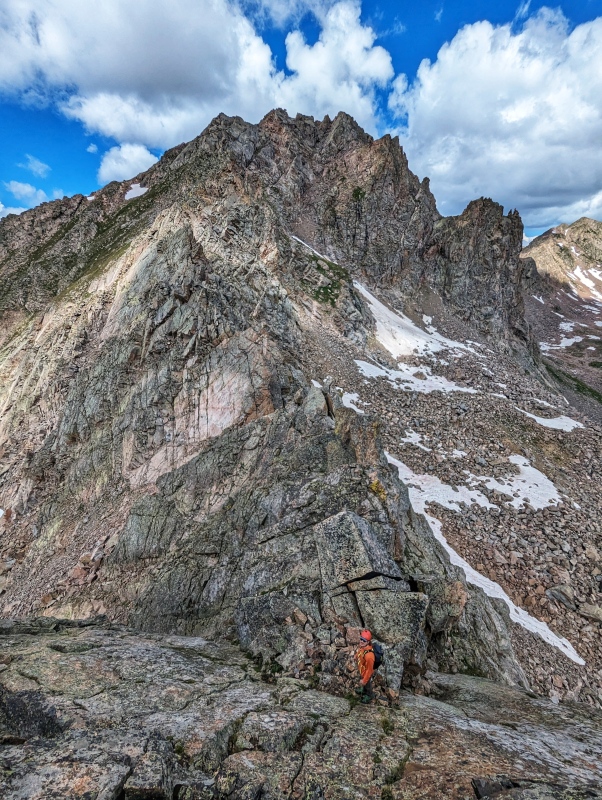
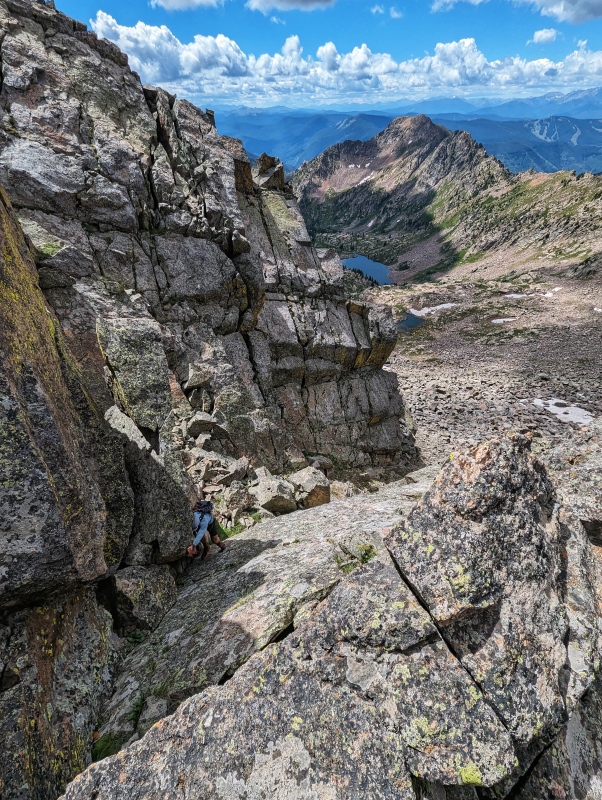
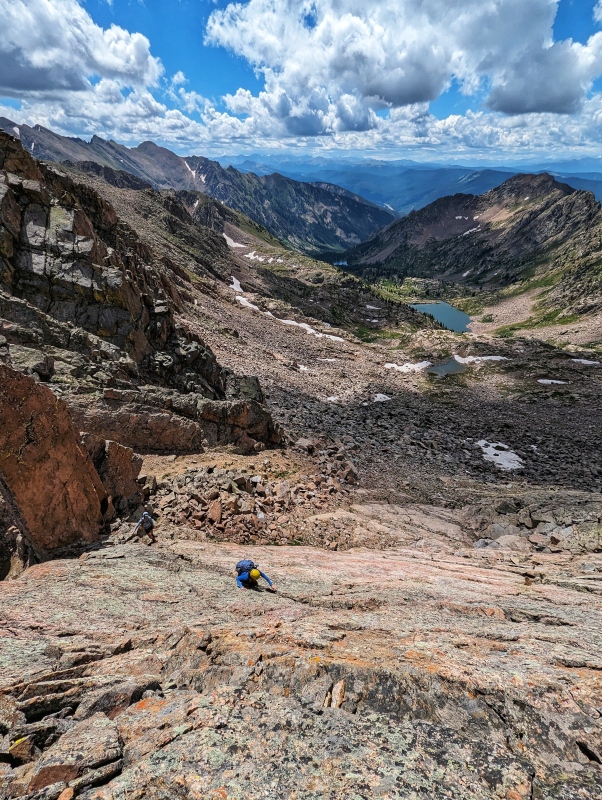
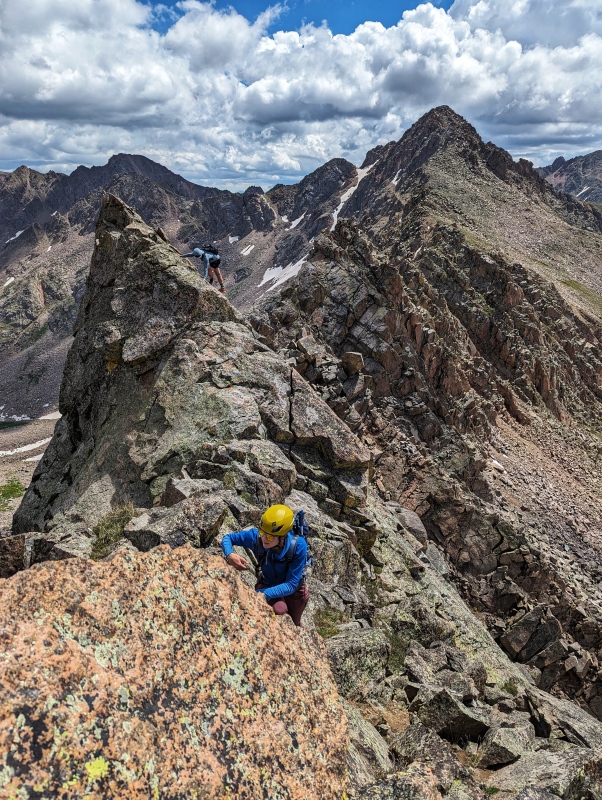
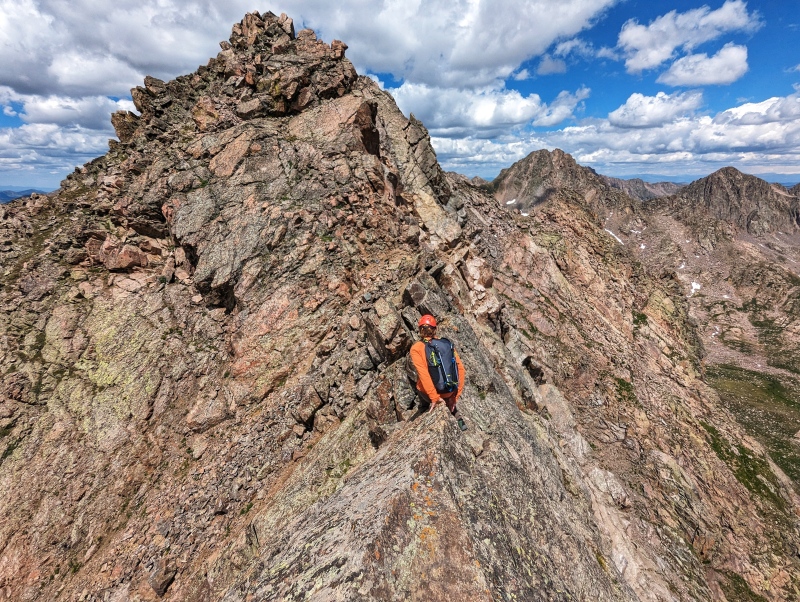
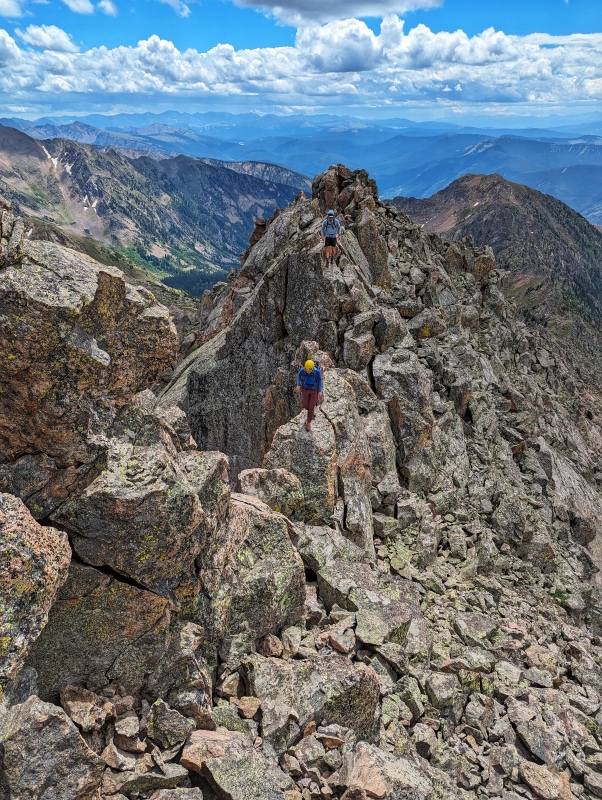
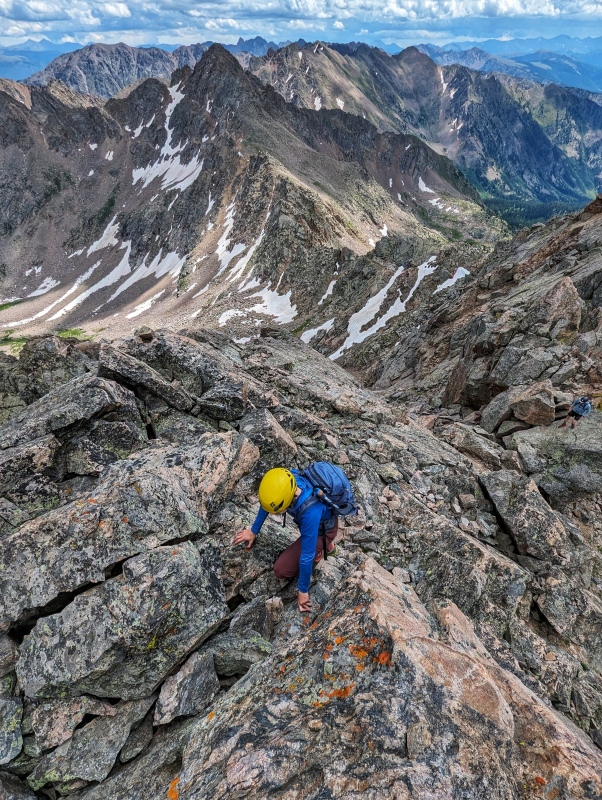
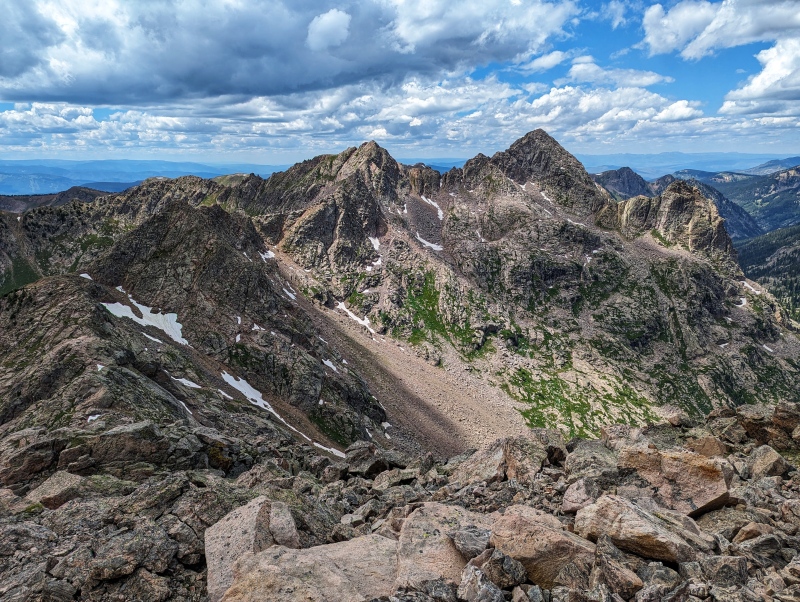
From the Summit, route finding is simple - as a general rule of thumb, follow the ridge! Don't use this rule-of-thumb as law. As always, if you scope a route that looks more comfortable to you, then default to your best judgement. There are a few small bumps initially that we passed 5-10 feet below on the right along a large grassy ledge. There's definitely some tricky downclimbing as you go towards the saddle, but there are lots of hands and feet and it's all generally solid! Once the rocky downclimbs transition to grass, it's smooth sailing to the saddle between the two peaks. The next section of the ridge is the crux. The crux section is what makes this route special. For such a short section of the ridge, it hides a lot of towers, knife edges, dihedrals, and one particularly interesting chimney!
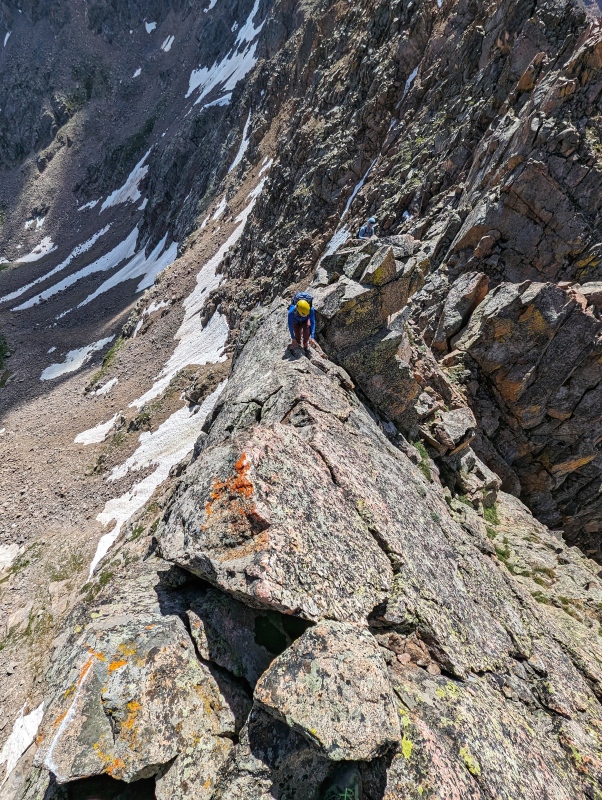
Coming up the South Ridge.Scrambling along the South Ridge in the early morning light. The knife edge marking the end of the scrambling along the South Ridge and the traverse over onto the East FaceLooking down at the end of the knife edge section. The dihedral we took to the summit of East Partner.Looking out at the start of the ridge traverse. One of the more interesting downclimbs - this ridge doesn't come easy, but there are a ton of hand and foot holds that make it relatively intuitive! One of several towers on the descent - I believe we scrambled up the left side. Cool-looking rocks. People for scale! The towers aren't small and the down-climbing definitely takes a while (but is also a lot of fun).
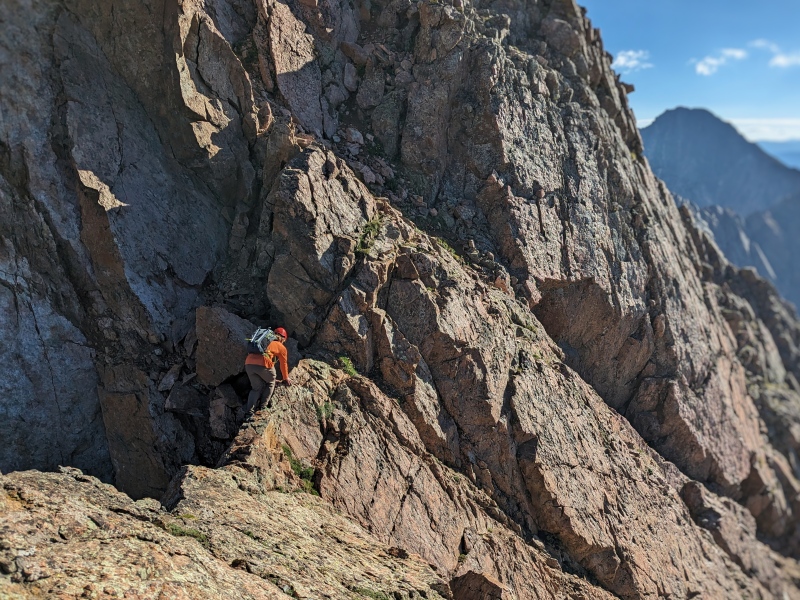
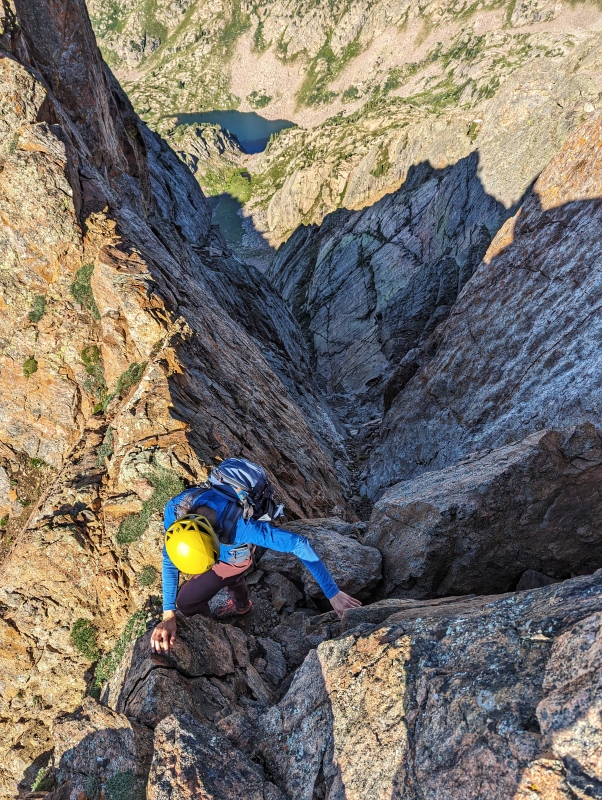
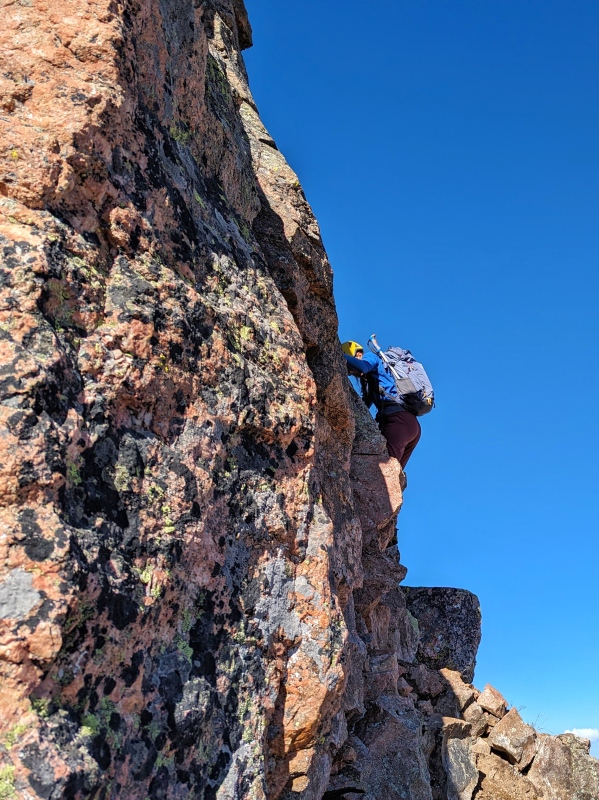
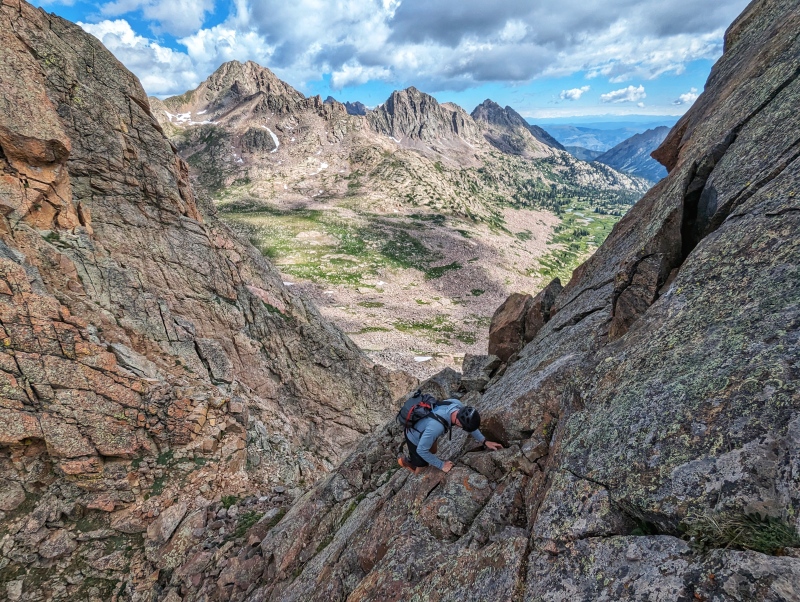
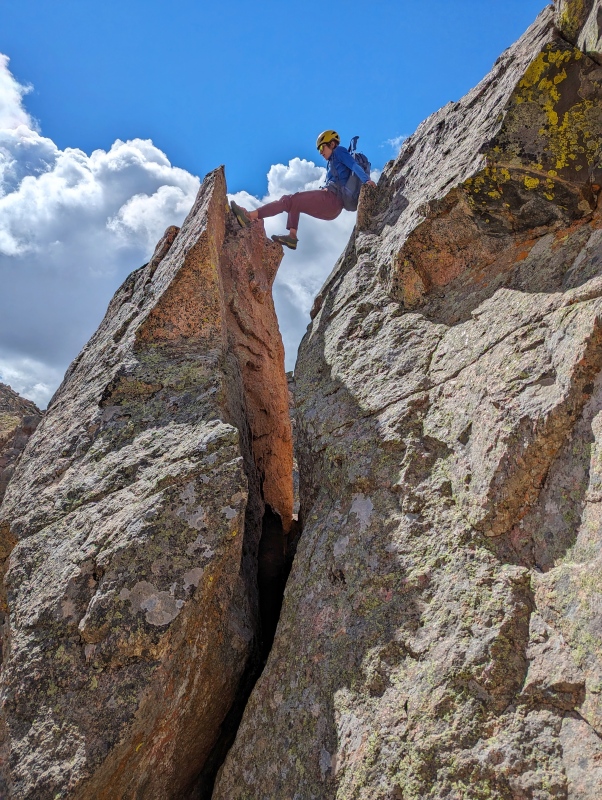
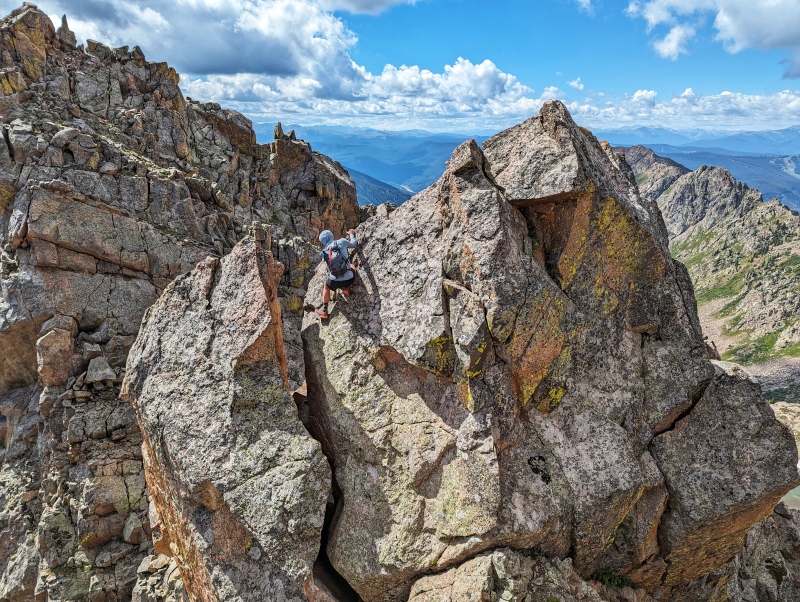
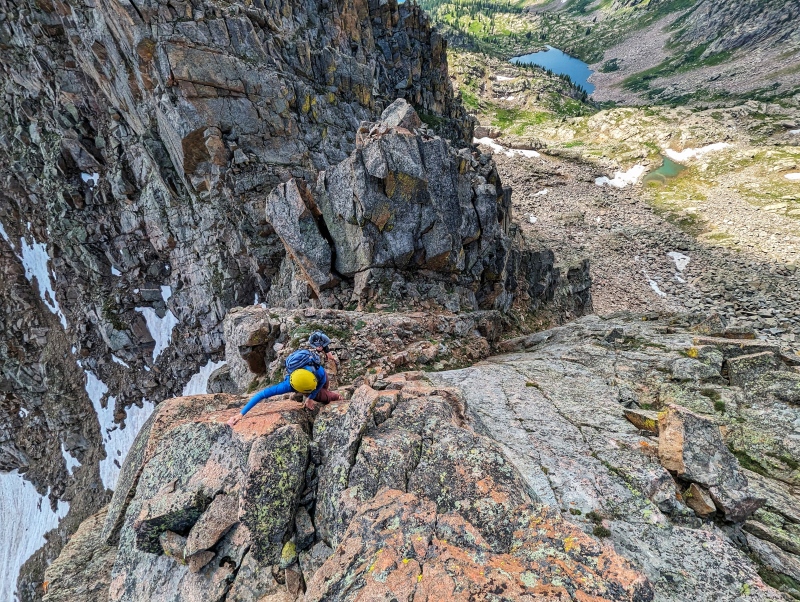
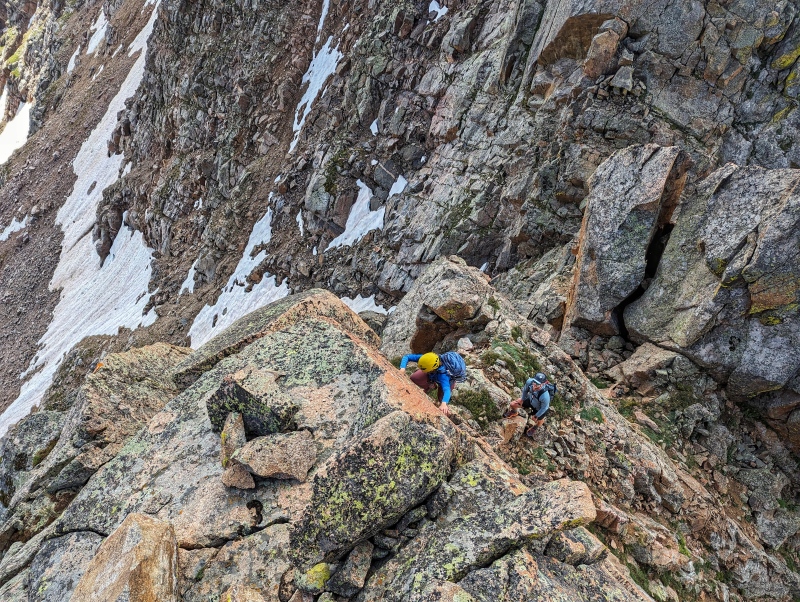
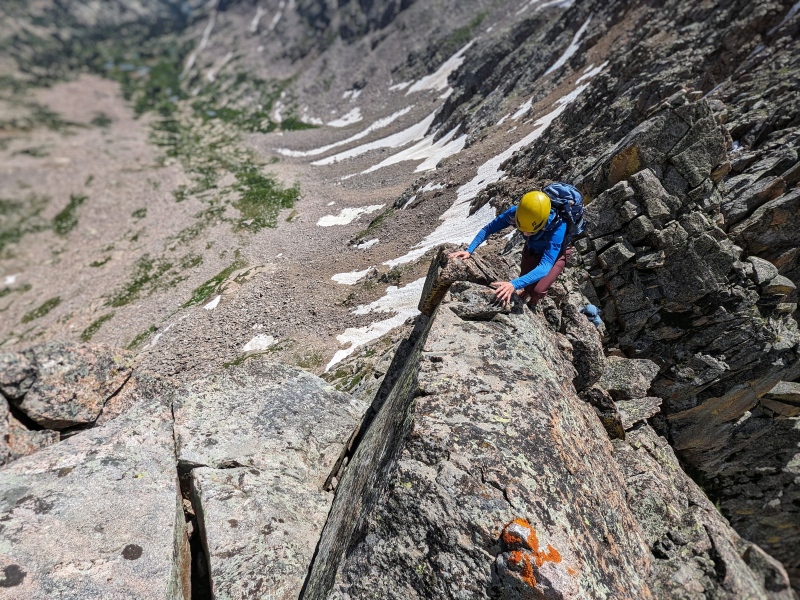
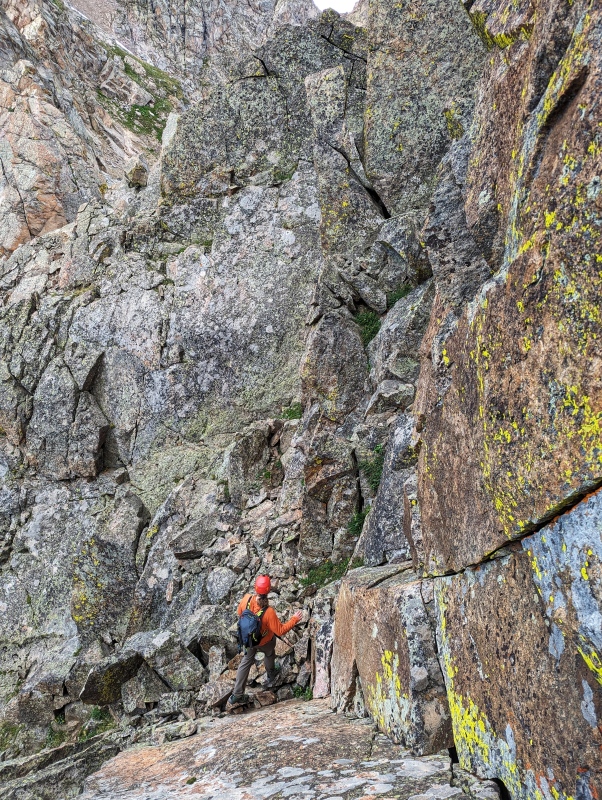
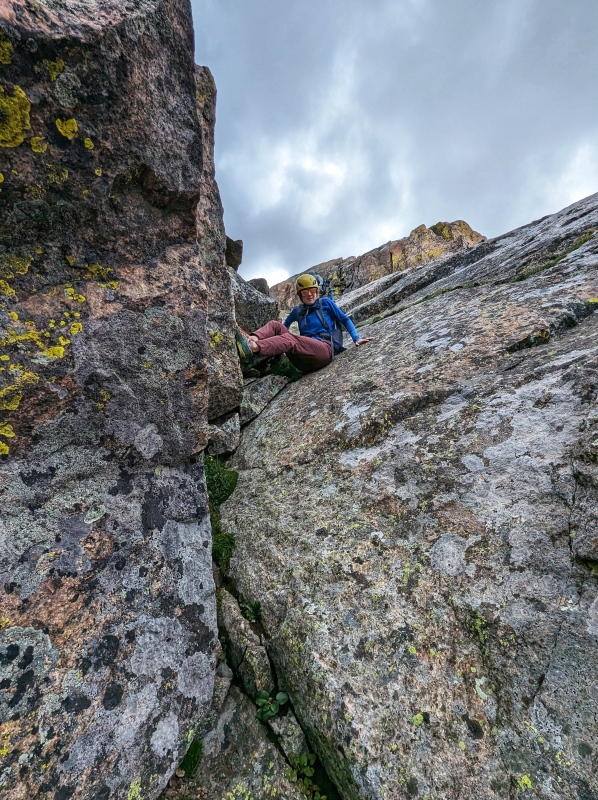
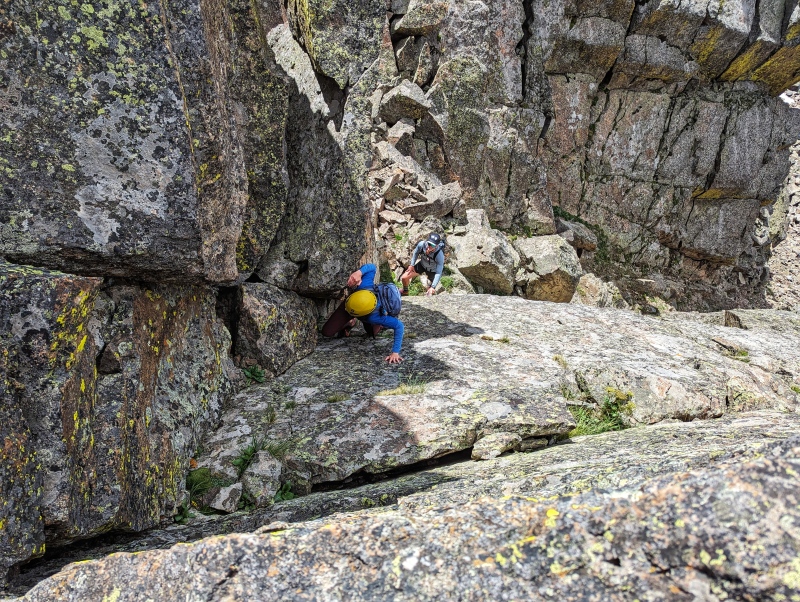
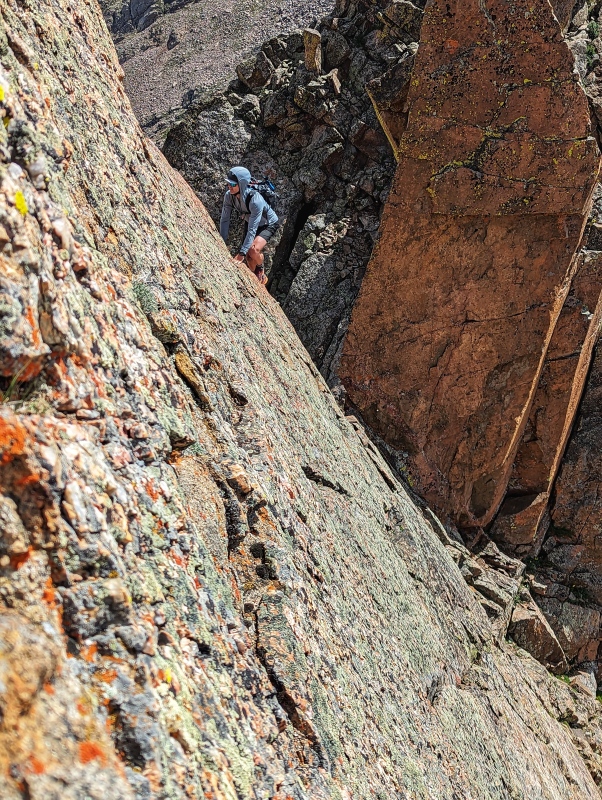
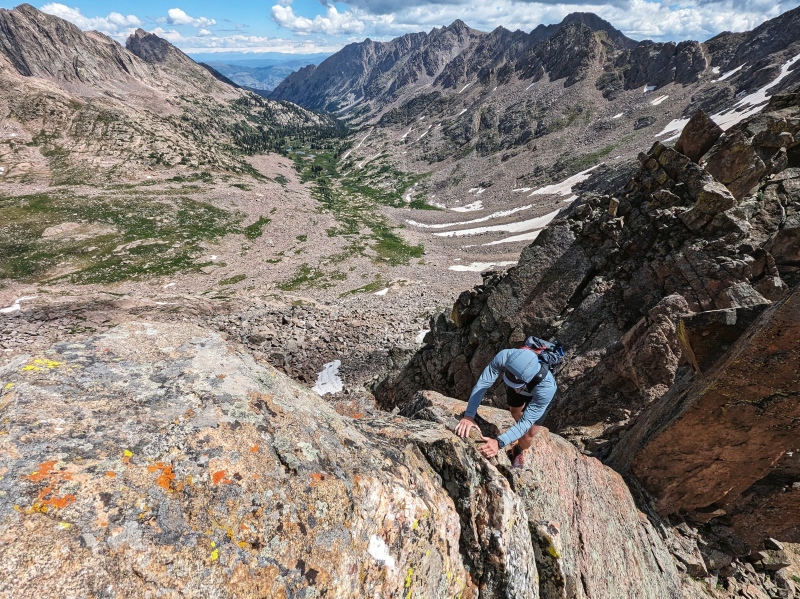
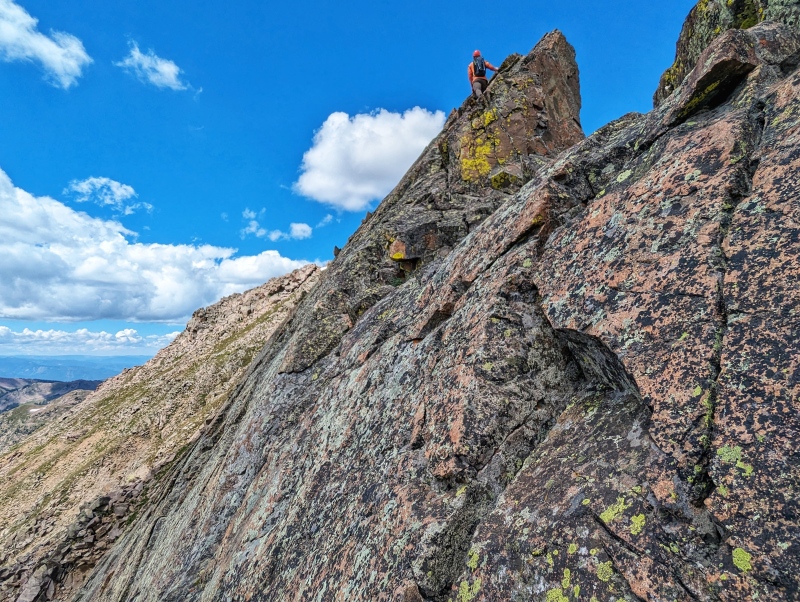
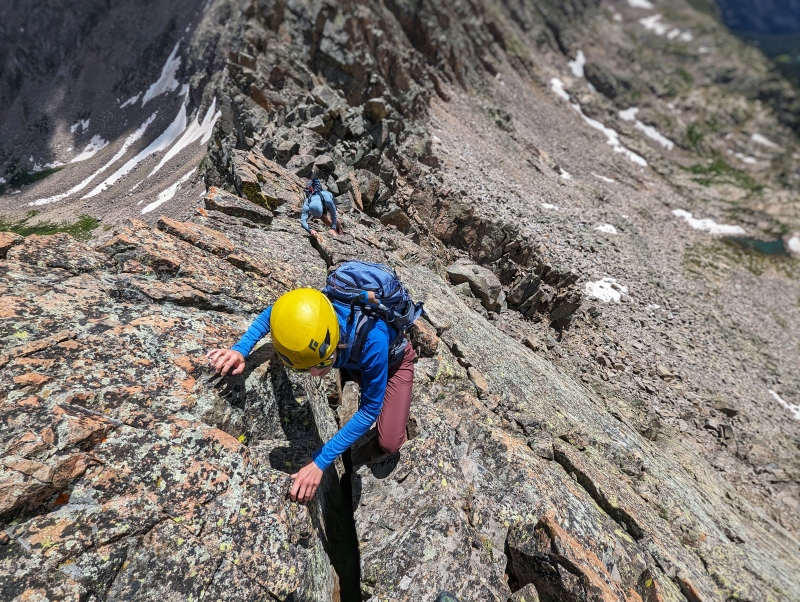
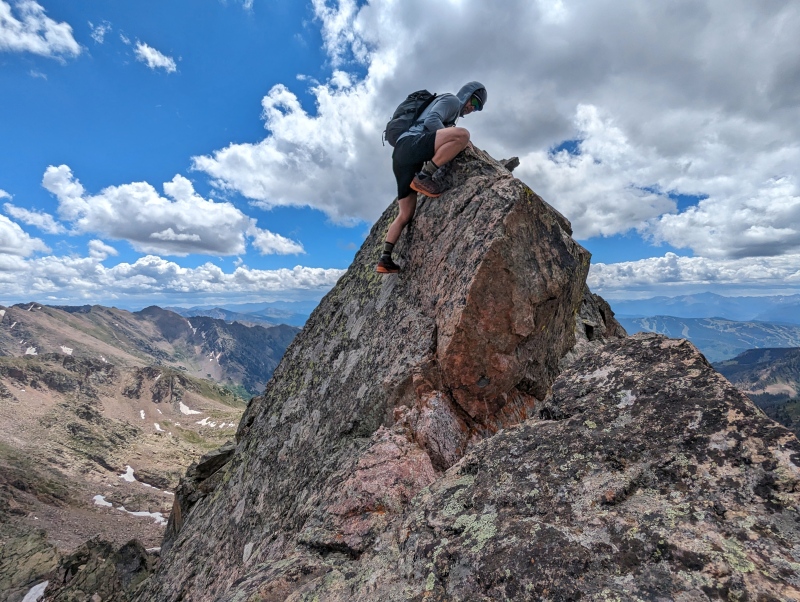
The Crux The terrain gradually becomes more rugged as you approach the crux section, starting with a steep downclimb into a notch. One of the first features you'll come to is commonly considered the "crux" of the route (Class 5.3). The crux is a knife edge that leads to a large crack in a boulder (you can spot this feature on the approach from earlier on the ridge). Allegedly, this portion of the ridge is harder for shorter people, but Gina (5' 5") didn't have any issues. Scoot to the edge of the knife ridge and stretch your legs across the gap - stemming your way down and transitioning to some awkward downclimbing moves as the crack narrows. After the crack, we climbed directly up some red rock that was (again) low 5th class... There are a lot of low 5th class or exposed 4th class up-climbs. I was the primary when it came to scoping out the route and it was definitely a bit unnerving not knowing whether that particular climb went or not. However, every stout up-climb resulted in passable (often easier) terrain. There was 1 tower that we bypassed (didn't look climbable) using a dihedral that descended down and to the left. At the end of the dihedral, we immediately re-ascended up to the ridge, which placed us at one of the more recognizable features - the crack that most people use to traverse a large slab to get back up to the ridge proper. This was definitely the most memorable section of the ridge.
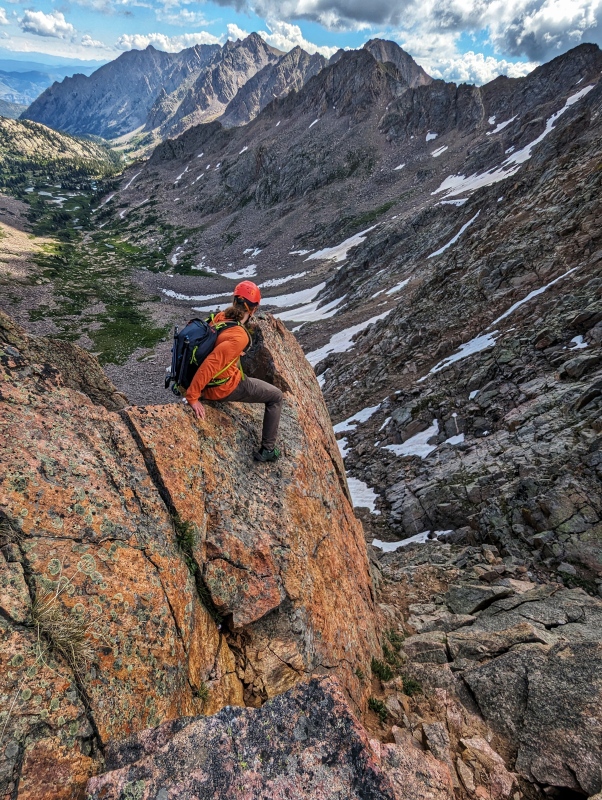
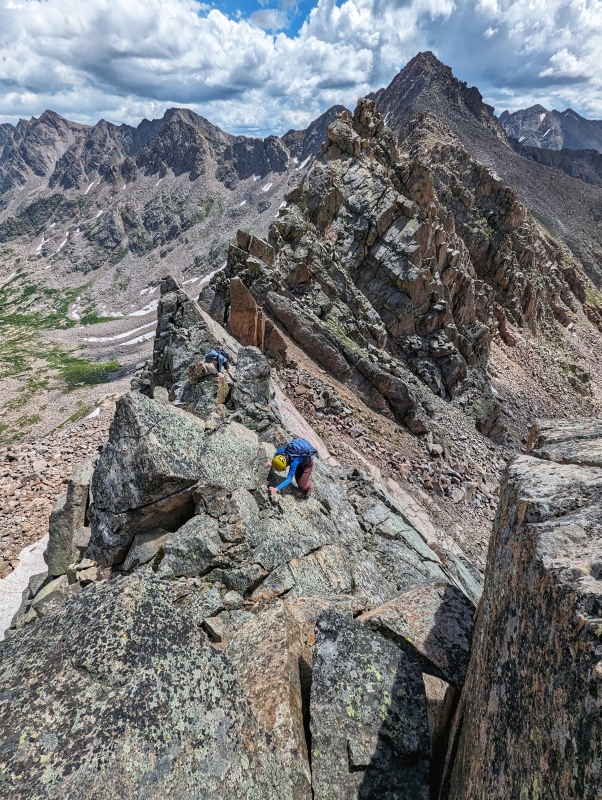
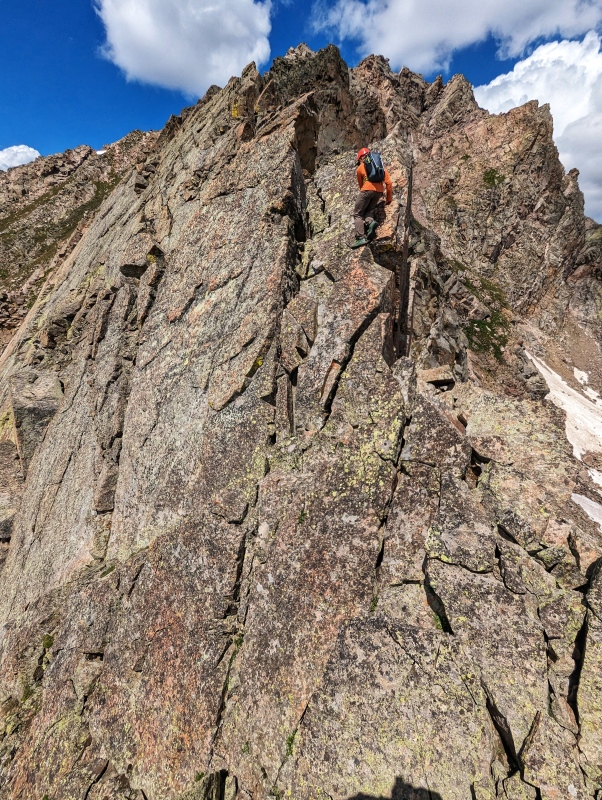
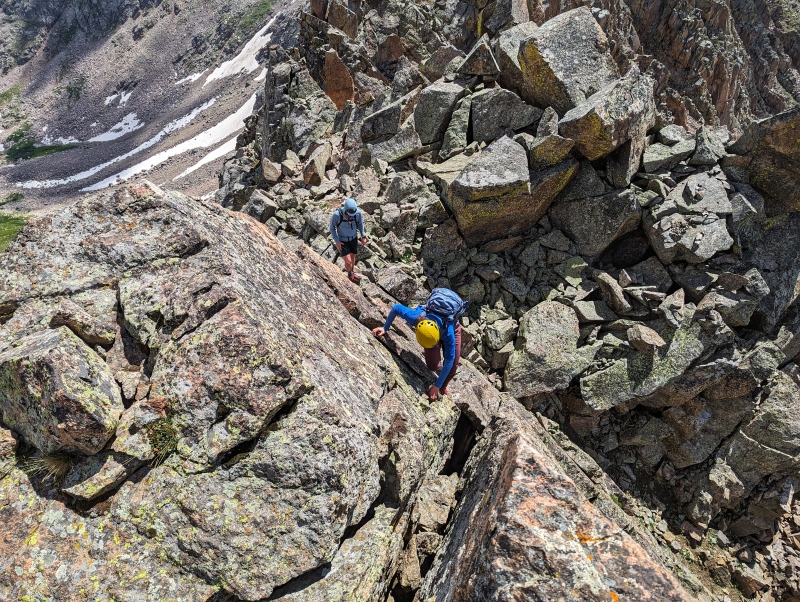
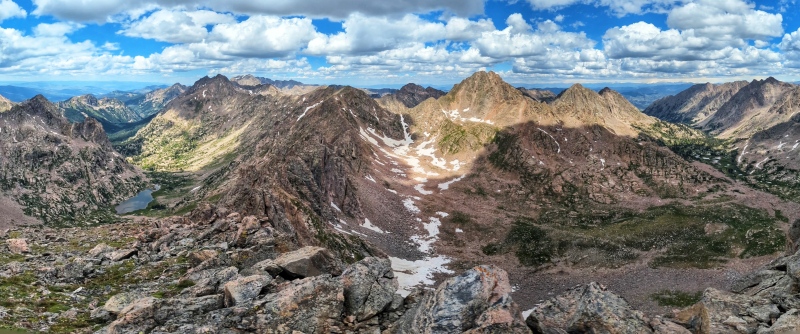
Downclimbing into the prominent notch - the crux section begins! But scooching to the end of the knife edge, approaching the large crack. Gina stemming across the large crack. Ben downclimbing instead of using the stemming move... because Ben likes to climb 5.12+ outside! Climbing up the red rock immediately after the crack featureAnother view of the up-climb after the crack. An exposed knife edge after the up-climb - wonderfully solid! Looking back on the same knife edge - the photos looking forward don't show the exposure nearly as well,Up the next tower!Gina topping out! Ben! Another fun little crack on the ridge proper - no fancy climbing moves required... Though Gina couldn't resist some funky movesWeeeeeeA small down-climb - lots of ridge to go... it really does take a while, but it's all fantastic - I don't have a photo of the specific tower we bypassed, but it's just past this section. The dihedral we downclimbed (looking down from the top)Looking up the dihedral from the bottomClimbing back up to re-gain the ridge immediately after the dihedral - this spot required some tricky friction moves, but you have great under-hand jugs in the prominent crack to the right and exposure is minimal. As you ascend, the climbing becomes easier. Looking down the same feature - Gina tackling the 5th class sectionBen making it look easy (again). From the top of the crack, you have two options on this very prominent slab - the first is to traverse the crack that's mid-way up the slab (easier and the crack is wider than it looks, but still exposed) and then climb up a move or two to gain the ridge. The second is to climb up to the notch in the ridge and ascend the knife edge. The knife edge was definitely harder with the initial move requiring a fair amount of commitment. However, after the first move, there are a lot more hands and feet. Gina traversing the ledge across the slab. Gina finishing off the ledge traverse and gaining the ridge Ben starting up the knife edge. Looking down from the top of the knife edge. The fun terrain continues! El spicy boiLooking back on the climb up that same section (I think)... Definitely one of the more exposed portions of the traverse... Gina and Ben - fantastic hands and feet and VERY solid rock. East Partner in the background - once you're through the knife edge section, the majority of the difficult terrain is over! There are a few remaining spicy areas if you continue to follow the ridge proper, but the vast majority of the ridge eases to Class 2+/3. One more spicy knife edge with a tricky step downThe tricky downclimb off the knife edge. Interesting catwalk, though less interesting because at this point, you'd probably find ground with vegetation interestingAlmost there! Finally :DLooking out towards Q, Rocking Horse Ridge, and the Upper Piney Basin from the top of West PartnerCool light in Upper PineyLooking over to the Spider and the Fly. This summer has been incredible for flowers!
Thumbnails for uploaded photos (click to open slideshow):
@jbchalk - Lol thanks man! If it weren't for your trip reports, I wouldn't have realized the endless number of incredible scrambles back there. You and me both - had to look up what OG meant when I was a camp counselor. That being said, they lost me when they started saying things like "sus, no cap, etc."
@yaktoleft13 - Thanks! Yeah, that's exactly where I thought you turned around based on your description. Definitely tricky and different from what you'd normally expect!
Caution: The information contained in this report may not be accurate and should not be the only resource used in preparation for your climb. Failure to have the necessary experience, physical conditioning, supplies or equipment can result in injury or death. 14ers.com and the author(s) of this report provide no warranties, either express or implied, that the information provided is accurate or reliable. By using the information provided, you agree to indemnify and hold harmless 14ers.com and the report author(s) with respect to any claims and demands against them, including any attorney fees and expenses. Please read the 14ers.com Safety and Disclaimer pages for more information.
Please respect private property: 14ers.com supports the rights of private landowners to determine how and by whom their land will be used. In Colorado, it is your responsibility to determine if land is private and to obtain the appropriate permission before entering the property.


")
")
")
")
")
")
")
")
")
")
")
")
")
")
")
")
")
")
")
")
")
")
")
")
")
")
")
")
")
")
")
")
")
")
")
")
")
")
")
")
")
")
")
")
")
")
")
")
")
")


