Download Agreement, Release, and Acknowledgement of Risk:
You (the person requesting this file download) fully understand mountain climbing ("Activity") involves risks and dangers of serious bodily injury, including permanent disability, paralysis, and death ("Risks") and you fully accept and assume all such risks and all responsibility for losses, costs, and damages you incur as a result of your participation in this Activity.
You acknowledge that information in the file you have chosen to download may not be accurate and may contain errors. You agree to assume all risks when using this information and agree to release and discharge 14ers.com, 14ers Inc. and the author(s) of such information (collectively, the "Released Parties").
You hereby discharge the Released Parties from all damages, actions, claims and liabilities of any nature, specifically including, but not limited to, damages, actions, claims and liabilities arising from or related to the negligence of the Released Parties. You further agree to indemnify, hold harmless and defend 14ers.com, 14ers Inc. and each of the other Released Parties from and against any loss, damage, liability and expense, including costs and attorney fees, incurred by 14ers.com, 14ers Inc. or any of the other Released Parties as a result of you using information provided on the 14ers.com or 14ers Inc. websites.
You have read this agreement, fully understand its terms and intend it to be a complete and unconditional release of all liability to the greatest extent allowed by law and agree that if any portion of this agreement is held to be invalid the balance, notwithstanding, shall continue in full force and effect.
By clicking "OK" you agree to these terms. If you DO NOT agree, click "Cancel"...
Ridge Traverse: Wetterhorn to Matterhorn + Uncompahgre
Hello everyone! This'll be my first trip report, so bear with me. My partner and I have been anxious to get a nice long scramble and I still had Wetterhorn and Uncompahgre on my to-do list for completing the 14ers (50 and 51), so we settled on the Wetterhorn -> Matterhorn traverse. We couldn't find much beta other than a text-only trip report and a report that went in the opposite direction, so we knew we were going to be in for an adventure, but didn't realize just how challenging the route finding and scrambling were going to be! The ridgeline challenged every aspect of our scrambling experience. From bomber knife ridges to narrow 3rd/4th class catwalks comprised of ass-tastic rock with over a thousand feet of exposure on either side, this ridge was scary, exciting, humbling, and one that I definitely wouldn't recommend unless you are very confident in your scrambling and route-finding abilities. That being said, it was also a great challenge and a ton of fun! A brief caveat that this is the route that worked for us and is by no means the only route available to complete the ridge - just the one we were able to find :)
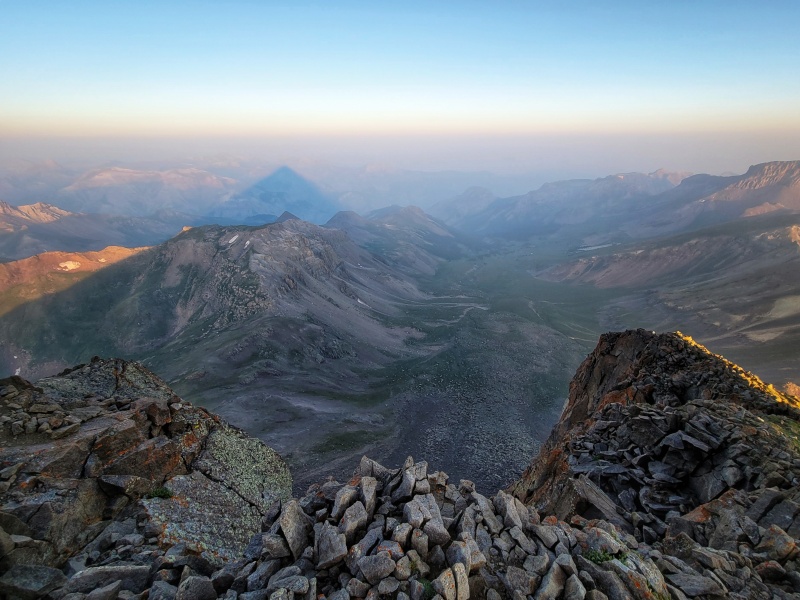
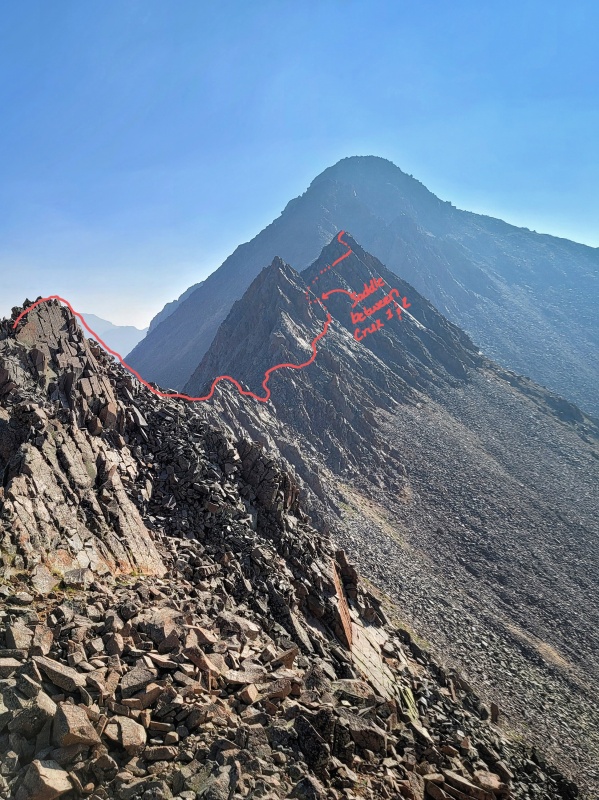
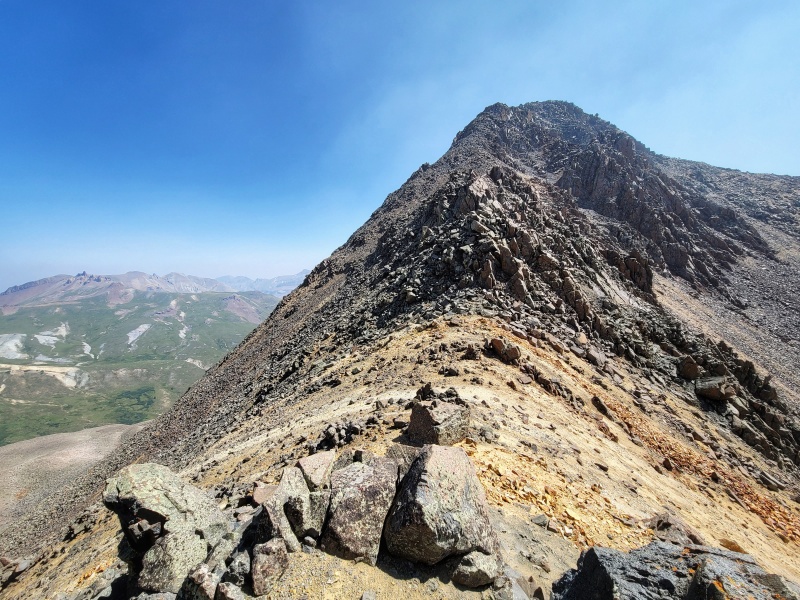
Top of WetterhornRoute Overview (Wetterhorn Not Pictured)
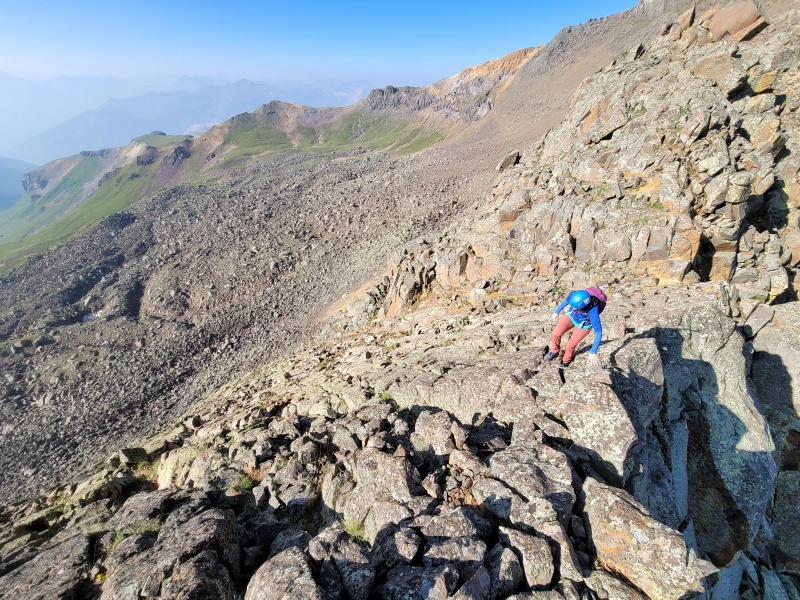
The route doesn't start from the top of Wetterhorn, but from just below the Prow. Mostly steep class 2 with ball-bearing dirt, but with lots of rocks to step on for stability. Plenty of loose rocks to be mindful of when traversing to the ridge.
Approximate Route to the Ridge from the Prow
The ridge until the saddle was a lot of fun and kind of blended together. It ranged from short sections of Class 2 to Class 3/4. Rock in this area was mostly solid, but we still had to be mindful of the occasional loose rock. We were able to stay on the ridge proper for a lot of the time but when necessary, obstacles were easy and quick to circumvent. I've read in trip reports that it's best to stay on the South (Right) side until you hit the saddle between Wetterhorn and Matterhorn. We didn't find this to be true and actually had a pretty even split of which side of the ridge we used to circumvent obstacles. If you hit an obstacle that you don't want to tackle head on, look to the South and North and use your best judgement to choose the route that looks the most intuitive. This method worked really well for us and we didn't hit any sections until the saddle where we needed to back track.
Standard Ridge Conditions Until the Saddle
The first easily identifiable section of the ridge is a "knife edge" that's got a medium-angle slab on the South side with bomber rock and a ton of hand/foot holds. We stayed on the ridge proper up and over this tower.
"Knife Edge" Section"Knife Edge" w/ Exposure
The next section was Crux 0.5. This tower wasn't actually too challenging unless you attempted to climb up and over (5.something). We decided to traverse around this obstacle on the North side of the ridge (no photos unfortunately). From crux 0.5 to the saddle, the traverse was largely similar to the ridge prior to the Knife Edge. Things became significantly more challenging when we hit the saddle.
Note: There were multiple bail-out gullies that descended from the ridge down into the Wetterhorn/Matterhorn Basin that looked to go at steep Class 2+ up to the saddle. While they didn't look pleasant, they looked like entirely viable options for descending down into the basin.
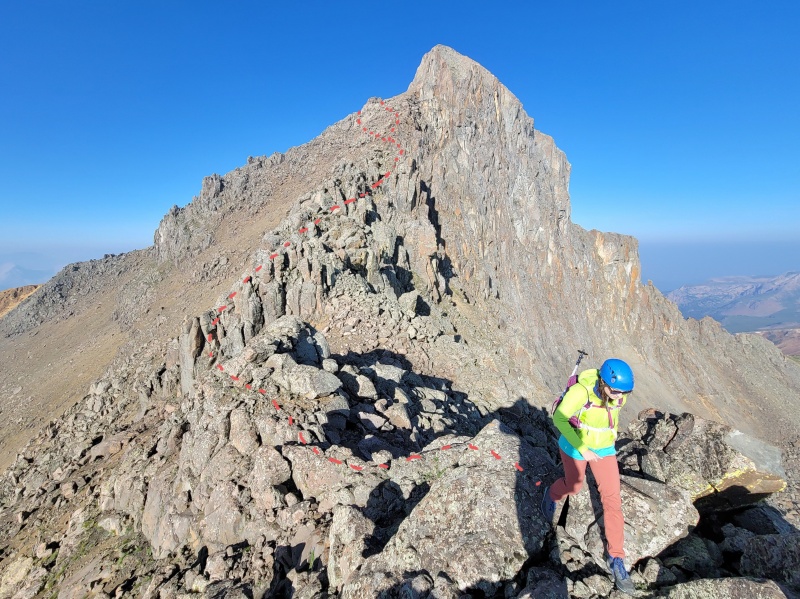
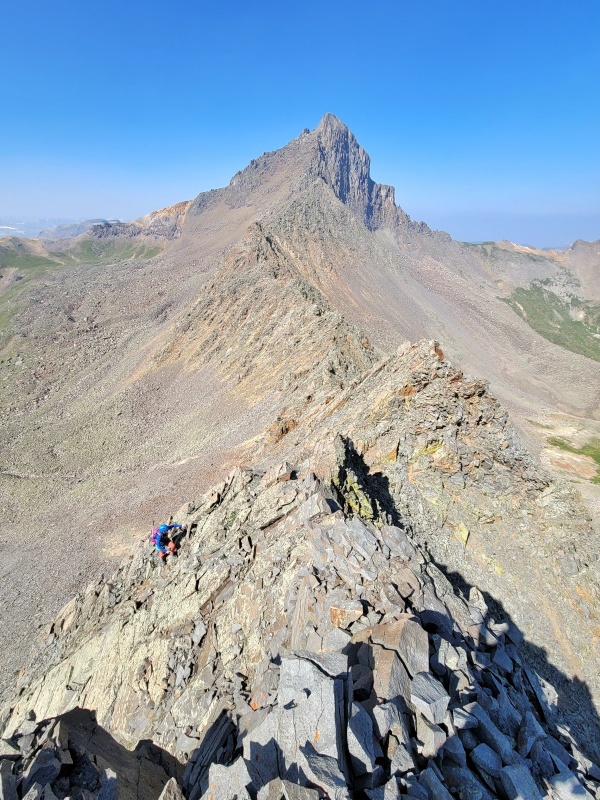
The ridge from Wetterhorn to the Saddle has fairly stable rock, but that all goes to hell once you hit the first crux past the saddle. The 2 cruxes are large towers that guard the the remainder of the route. The towers are a combination of unconsolidated and shifting talus, 5th class slabs, and 4th to 5.low gullies with hand holds that needed to be tested before every movement.
View of our Route Over Cruxes 1 and 2
For the towers, we'd read that the best path stayed on the North side and that climbing directly to the top would have required 5.mid class climbing. We almost immediately ruled out trying to stay on the ridge proper to get over the first tower and took about 30 minutes trying and scouting different routes on the North side, but without any luck. Anything that would have taken us around the North side of the tower would have gone at 5th Class or on dangerously steep and shifty talus with plenty of exposure. There were several moments on the North side of this tower that were truly scary and by the time I made it back down to an area of relative safety, I was pretty shaken and needed to take a few moments to get my heart rate back down. Eventually we conceded that the only route on the North side would have involved descending all the way to the base of the tower to go around. Instead, we decide to try our luck with the South Side. I'd spotted a lower-angle ledge from one of the failed attempts that looked promising.
Attempted Paths and our Route around Crux 1
The route shown going around the south side is approximate. I don't remember how far down we descended toward the saddle before traversing around onto a flatter portion of the South Facing slabs. The South slabs had a combination of solid rock and more stable talus that what we'd encountered on the North Side and we were able to quickly work our way around. On the other side, we found a dirt gully that lead to a saddle between the first and second towers. The dirt gully was steep, but there were plenty of hand/foot holds on the left side of the gully (3rd Class). Using these, we gained the saddle between the two towers. Unfortunately I don't have any photos of this part, so I'm going by description only.
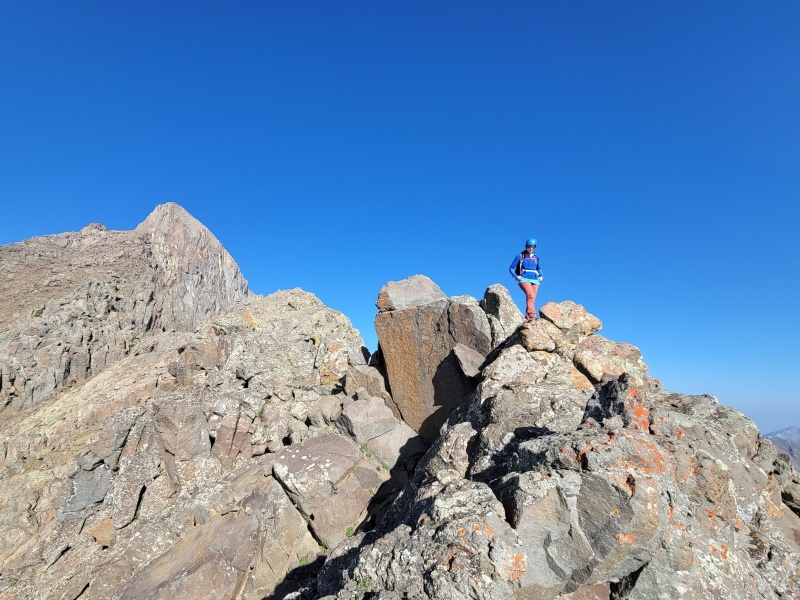
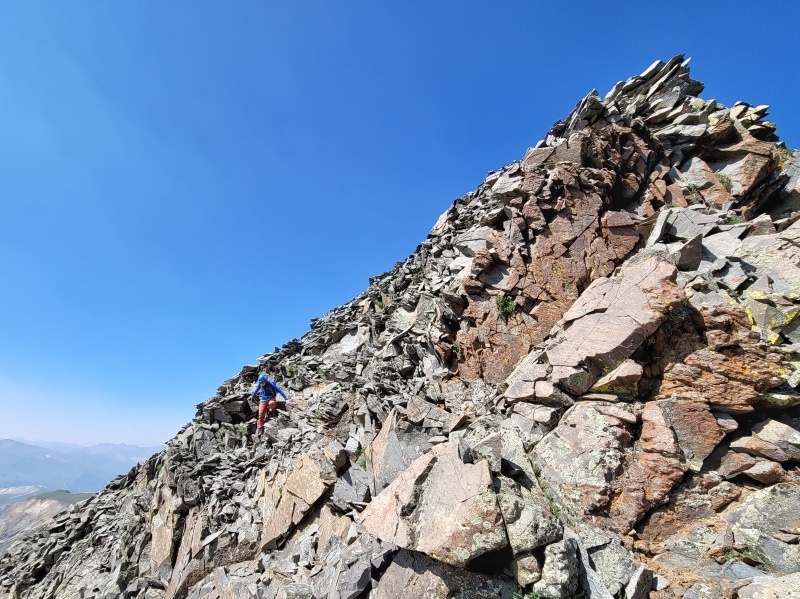
From the saddle, we crossed onto the North side of the second crux/tower where we immediately spotted a stiff Class 4 gully that went up and to the left before topping out. We didn't see any better routes that would have traversed on the North Side. We agreed with the previous trip report that highly recommended staying off of the South slopes. The rock in the gully was loose and we had to test every foot/hand hold, but it went. At the top of the gully, we transitioned up and over onto a South-Facing slab (see photo below for approximate transition spot and slab). The slab had plenty of hand/foot holds, but we still had to be careful with loose rocks when searching for holds and the exposure was unnerving. After gaining the slab, we worked our way up to the ridge proper just below the gray rock seen in the photo. The next moves up the gray rock were extremely exposed and airy. There were two large gray rocks that stuck out that we were able to use as "steps" to gain the top of the tower. These rocks were solid, but the talus at the top was major sketch-balls. From the stable top step, there were 2-3 additional steps on loose rock with extreme exposure to either side before gaining the more solid summit. The rock was loose, but aiming our feet toward the center of the ridge in flat areas of the talus provided a fairly stable platform with minimal shifting
South Facing Slab and Gray Rock Just Below Crux 2 Summit
From the top of the second tower, we descended down and encountered what would be the most annoying portion of the ridge - the Choss Pile. We couldn't spot a good way around this dumb lump and so resigned ourselves to walking down a series of ledges made largely out of talus and choss on the South Side. Thankfully the exposure was much lower this time.
Gina Coming down from the Choss Pile
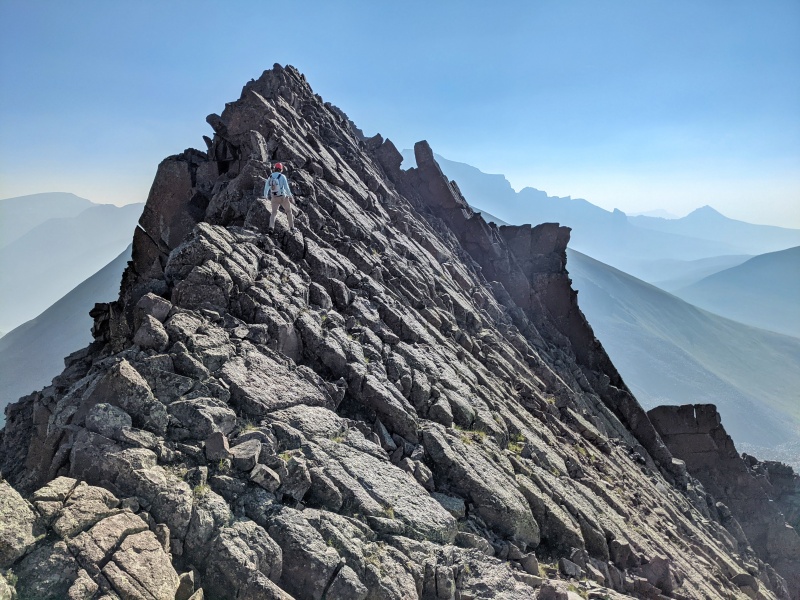
The remaining route up to the summit of the Matterhorn was, you guessed it, more talus. The rest of the climb was pretty much a Class 3 talus scramble. There's no good way to do it, but we basically stayed on the left ridge to the summit. It looked like there may have been a a route that descended down into the bowl in the center of the West Face and then gained a ridge that appeared to have more solid rock. You can somewhat see this ridge in the photo; it starts from bottom-center at the top of a big rock feature and goes up and to the left and gains a false summit. We didn't feel like exploring much more though and just stuck with our talus ridge up and over Disappointment Mound - It looks like it's part of the ridge, but it it has a fair amount of elevation loss on the backside - and finally to the summit.
Remaining Route to the Top of the Matterhorn
From the top of the Matterhorn, it was an easy Class 2 descent off of the summit block to a wonder full trail that we gleefully plodded along to the summit of Uncompahgre and then back to the car at the Matterhorn creek Trailhead.
Caption Here
In total, we were on the trail 15 hours. The ridge took us about 4 hours. The total route was about 17 miles and 7300' of gain. Overall, this was an extremely challenging route that I generally wouldn't recommend because of the skills required and the objective hazards involved. We're glad we did the route, but we don't think we'll be doing it again! That being said, I hope someone finds this information helpful!
After Finishing the Ridge
Thumbnails for uploaded photos (click to open slideshow):
@bangerth Haha I was trying to walk the fine line of providing beta while making sure that not anyone who summitted Wetterhorn would decide to go out and try the traverse just because it IS dangerous with a highest level of objective hazard that I've experienced so far. That being said, if you have good route-finding/scrambling abilities (experience beyond the well-outlined 14er traverses and routes), know when to retreat, have experience with long, committing ridgelines, and are comfortable with loose routes w/ lots of exposure, then it's a fun, but challenging day :)
Created an account just to tell you folks how much I appreciated this trip report - this beta through the crux towers in particular was super helpful and prevented a whole lot of trial-and-error and frustration. I traversed in about 2.5 hours!
I feel like everywhere I read online discourages doing this traverse, but with a decent route in mind and the mental preparation for unstable rock and problem-solving, I actually found it to be almost entirely enjoyable (except for some sketchy moments on the towers and the subsequent choss pile).
@fteccher - been a while since I was one here, but glad you found the trip report helpful, particularly the beta for the towers! Couldn't remember it exactly so glad it was it least close enough to our actual route and provided safe passage with minimal frustration :). It's really not a BAD traverse, but I imagine the sketchy moments on the towers would throw almost anyone for a loop lol
There is no way in hell I'd do this traverse in reverse >.
Caution: The information contained in this report may not be accurate and should not be the only resource used in preparation for your climb. Failure to have the necessary experience, physical conditioning, supplies or equipment can result in injury or death. 14ers.com and the author(s) of this report provide no warranties, either express or implied, that the information provided is accurate or reliable. By using the information provided, you agree to indemnify and hold harmless 14ers.com and the report author(s) with respect to any claims and demands against them, including any attorney fees and expenses. Please read the 14ers.com Safety and Disclaimer pages for more information.
Please respect private property: 14ers.com supports the rights of private landowners to determine how and by whom their land will be used. In Colorado, it is your responsibility to determine if land is private and to obtain the appropriate permission before entering the property.


")
")
")
")
")
")
")
")
")
")
")
")
")
")
")
")
")
")
")
")
")
")
")
")
")
")
")
")
")
")
")
")
")
")
")


