Download Agreement, Release, and Acknowledgement of Risk:
You (the person requesting this file download) fully understand mountain climbing ("Activity") involves risks and dangers of serious bodily injury, including permanent disability, paralysis, and death ("Risks") and you fully accept and assume all such risks and all responsibility for losses, costs, and damages you incur as a result of your participation in this Activity.
You acknowledge that information in the file you have chosen to download may not be accurate and may contain errors. You agree to assume all risks when using this information and agree to release and discharge 14ers.com, 14ers Inc. and the author(s) of such information (collectively, the "Released Parties").
You hereby discharge the Released Parties from all damages, actions, claims and liabilities of any nature, specifically including, but not limited to, damages, actions, claims and liabilities arising from or related to the negligence of the Released Parties. You further agree to indemnify, hold harmless and defend 14ers.com, 14ers Inc. and each of the other Released Parties from and against any loss, damage, liability and expense, including costs and attorney fees, incurred by 14ers.com, 14ers Inc. or any of the other Released Parties as a result of you using information provided on the 14ers.com or 14ers Inc. websites.
You have read this agreement, fully understand its terms and intend it to be a complete and unconditional release of all liability to the greatest extent allowed by law and agree that if any portion of this agreement is held to be invalid the balance, notwithstanding, shall continue in full force and effect.
By clicking "OK" you agree to these terms. If you DO NOT agree, click "Cancel"...
Road to TH: good, mostly smooth well maintained 2wd
Route: Brewery Creek trail to South Ridge
Mileage: 12 miles
Elevation gain: 3900 ft
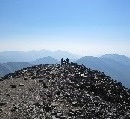
Time: about 8 hrs
Class 1 with a bout of class 2 on the summit pitch.
I think cows use this trail more than people. You’ll meet them enroute but they’re nice.
The information I found regarding this trail to Antora seems lacking now that I’ve done it. Hopefully I can provide some detail that will keep you from the bushwhacking that is sure to result without it.
I’ll start off by saying, if you can stay on trail, you can avoid bushwhacking. That said, the trail is not well marked especially in places where you need it the most.
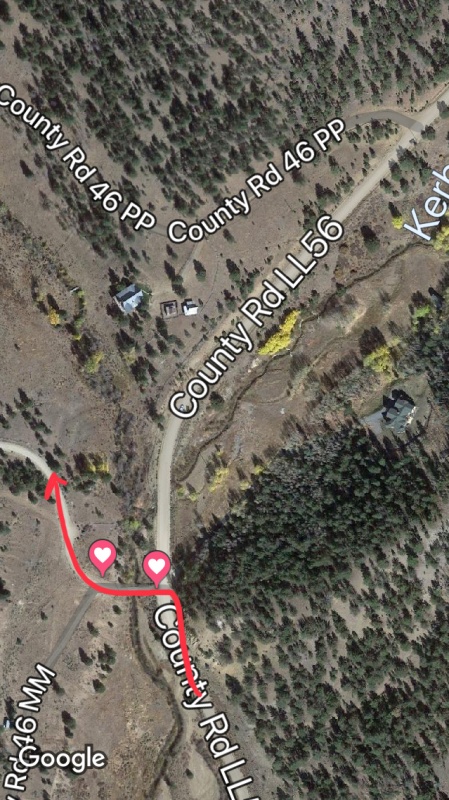
First, the google map will not bring you to the Brewery Creek Guard Station but up CR46PP. I suppose you could start there but I don’t know the parking situation. If coming up LL56 from 285, look closely at the map, the proper turn is just before CR46PP (Pic1). It has a sign for the Brewery Creek trail. Make a left, Cross the bridge then go right to a gate at 1.5mi. (Pic1). The road is private so stay on the road till the gate. Park inside the first gate and close it behind you. Unless you have a reservation for the Brewery Creek Guard Station, you won’t have the key to open the second gate. That’s ok because you can hike through.
Pic1. Follow sign to Brewery Creek Trail 1.5mi up this road from LL56.
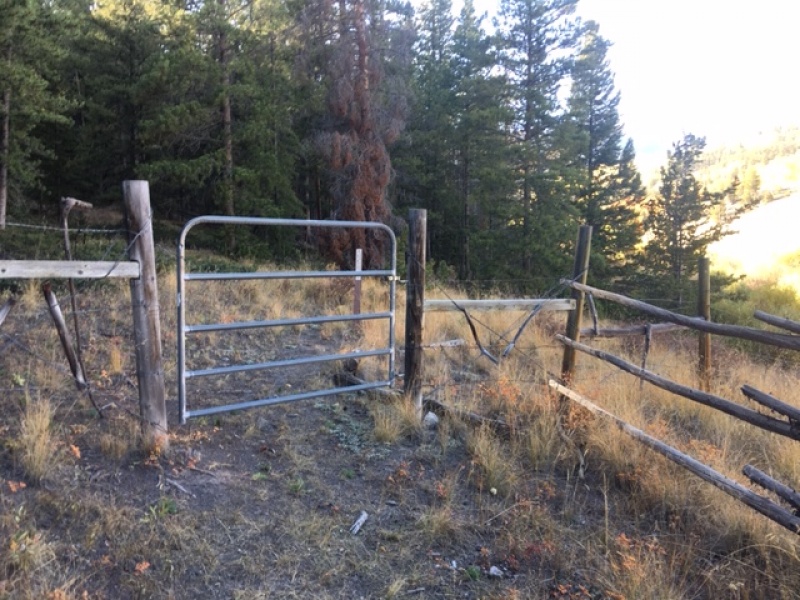
Go past the Guard station (toilet here) and pass through a small gate (close it behind you) (pic2).
Pic2. Gate just past the Guard Station. Please close it behind you.
Follow trail bits for a few hundred feet or so and make your way across the creek to your right. Choose your own adventure, I waited till I passed the big log cabin across the way. The Brewery Creek trail runs parallel to the creek on the opposite side and no matter where you cross, you should be able to hit it.
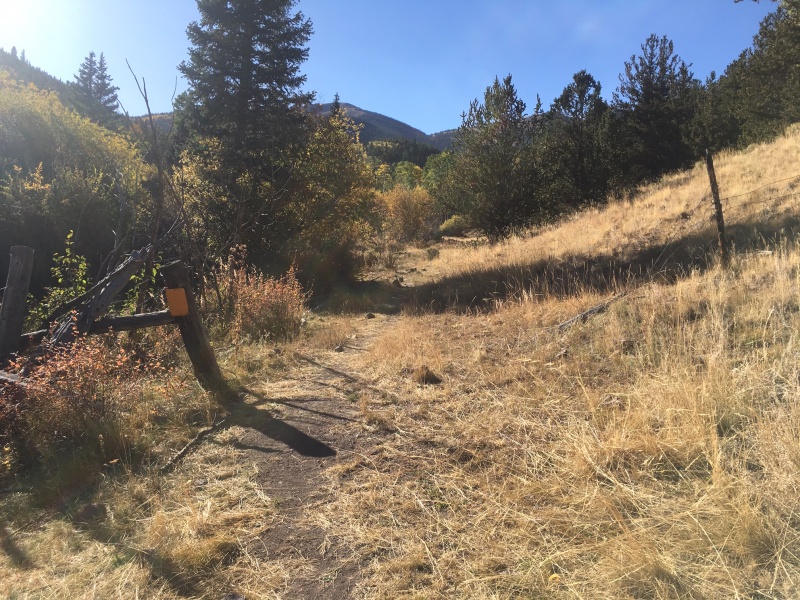
Follow the trail left past a yellow sign and log fence marking the forest service land. (Pic3)
Pic3. Yellow forest service sign.
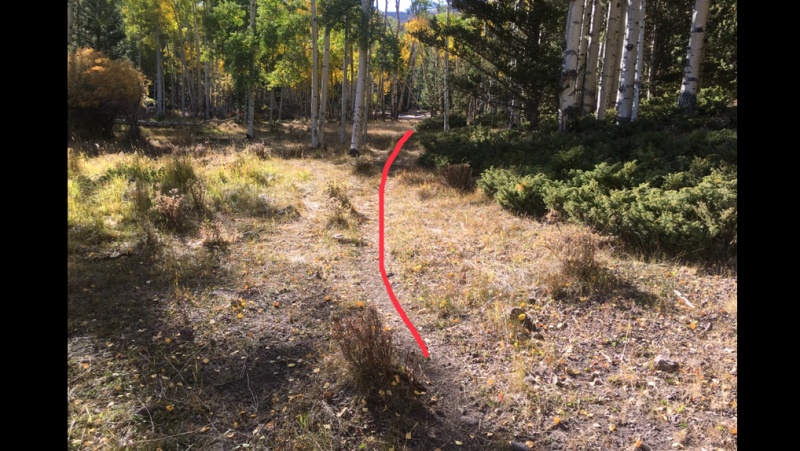
Now, be careful because within about 0.2-0.3mi the trail will split. It’s not obvious or marked but keeping a keen eye you should notice the grass trampled going left (possibly the Flagstaff Creek trail) and right. There may be a few of these forks here, but just stay right at all of them. The trail should be more worn to the right (Pic4).
Pic4. Stay right. The faint trail left is likely the Flagstaff Creek trail.
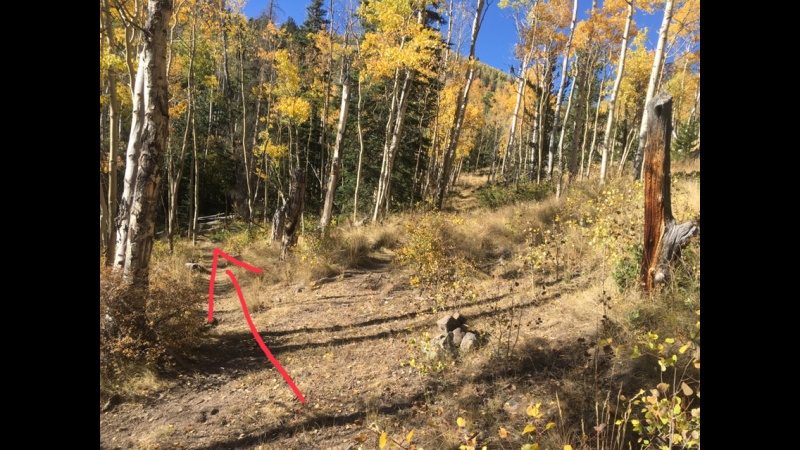
Next is the trail fork for the Antora Creek trail. There’s a larger cairn near a tall brown stump on the right (Pic5). For the Brewery Creek trail, you go left and down slightly to cross the creek. The trail is obvious on hikers left after crossing.
Pic5. The intersection of Brewery Creek trail and Antora Creek trail. Go left here. Note the cairn and tall brown stump on the right.
Next, you’ll come to an open flat grassy area where the trail just disappears. Try to stay straight, on the opposite side you should be able to pick up the trail again. There may be a cairn in the middle of the field and two cairns where the trail continues on the opposite side. (Pic6)
Pic6. The trail is somewhat obvious on the opposite side, look for two small cairns there.
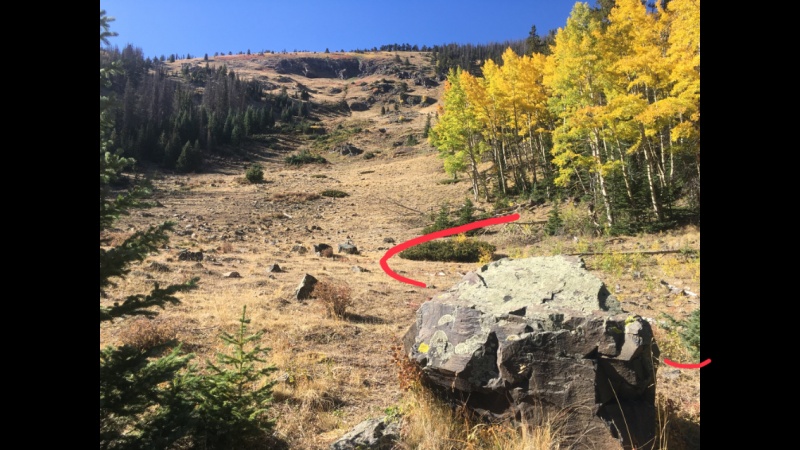
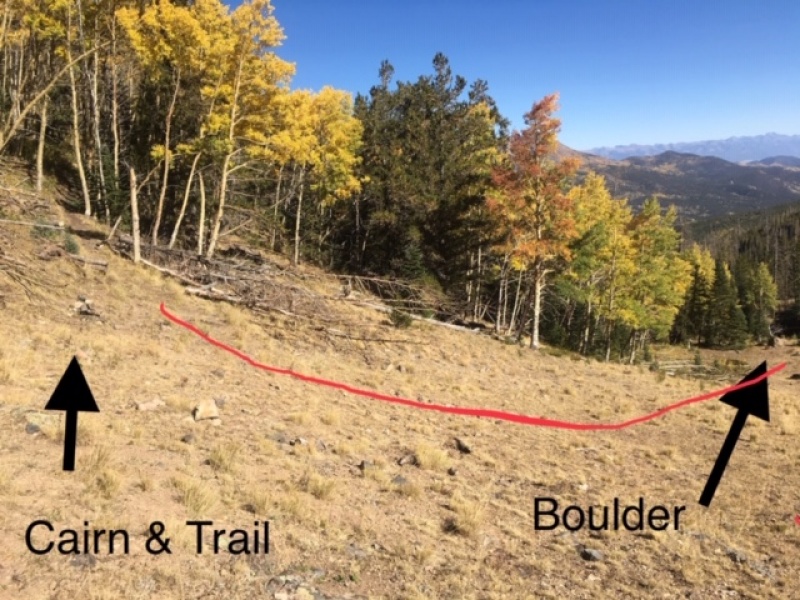
From the cairns, the trail through the next section is not marked but very obvious and passes through a beautiful aspen grove. I think it went about 1-2mi (not sure) until it abruptly ended at a clearing at the edge of the forest and is notably marked by a large boulder ~11,100ft. (Pic7) Stop!
Pic7. Obvious boulder. Stop here!
If you cross the open area you’ll surely end up bushwhacking. This is the ascent crux of the route finding. Here the trail begins some switchbacking and it’s not obvious where it starts. Do not go across the open area but turn hard right and head up the edge of the forest. About 100ft+ up there’s a cairn that marks the trail going back into the forest to the right! (Pic8). The trail is obvious from the cairn but well hidden till you get to it. I built a few intermediate cairns as the main cairn is somewhat hidden by deadfall. Looking back at the boulder (Pic9).
Pic8. Another look. You won’t see the cairn or trail until you’re very close to them. They can’t be seen in this picture and the line isn’t exactly right. See pic9.
Pic9 looking back. The cairn and trail as it enters the trees here are very obvious; but not at all from below.
The trail is obvious now and will cut back left across the open area above and head toward the trees. But, there’s a point crossing the open area Where the trail inexplicably disappears again. Just keep heading across to the left, I built a few cairns but you’re looking for a well used looking ramp on the left, that heads into the trees. You should be able to spot the trail running beneath a rocky area (Pic10). Sorry for the poor picture.
Pic10. The trail heads up into the trees.
Once on this part of the trail it will switchback through the forest, just stay on the most worn trail and don’t get sucked into steep stuff. There are a ton of little herd paths coming up through here and if you didn’t make the proper turn at the boulder, you’d be coming up through those steep paths on your bushwhacking quest to get back on trail. It’s not fun, believe me.
There are places along this switchback where the trail is in forest and then it breaks out onto the open grassy slope. Look carefully for the trail in the grassy parts because it can be hard to follow in the tall grass. Again I built some small cairns that hopefully will be visible.
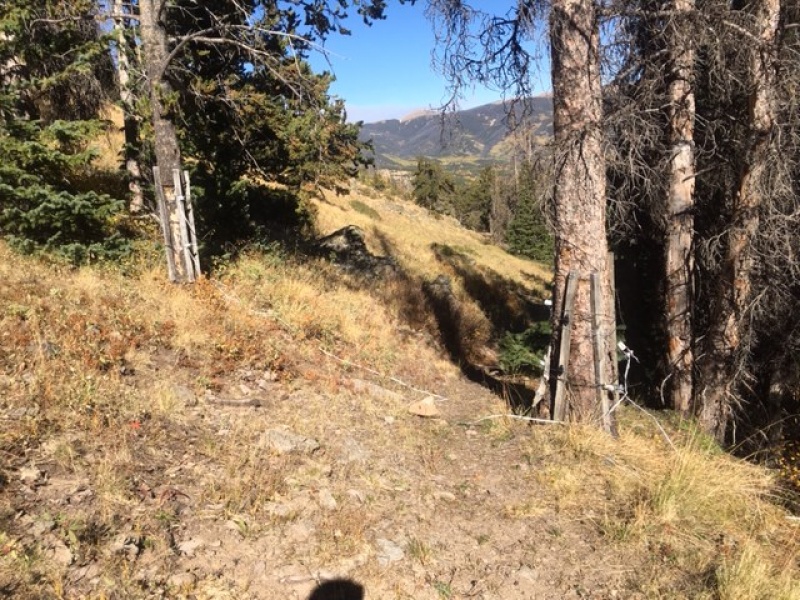
When you finally exit the forest for the last time, (~11300) you pass through a fence-line of sorts. Trees on both sides of the trial will have old electrodes strapped to them. Stop. (Pic11).
Remember this spot or mark it as a waypoint as this is the descent crux. This spot is the key to your easy return down the otherwise horrible slope; You don’t want to bushwhack. Stop here and familiarize yourself. Look to your left along the “fence line” towards the creek which is just a line of 4ft green metal posts with white tops crossing your likely descent line, this should stop you from continuing down the creek into bushwhack land and help you get back on-trail during descent.
Pic11. Stop. Remember this spot. Mark it as a waypoint. The photo is looking back at the trees, the creek is to the right. The trail passes through these trees.
The remainder of the trail follows the creek up and is not marked but at this point, you don’t need it to be as you’re mostly on treeless tundra. Follow the creek to its end and continue straight on till you hit the 880-2B road.
Turn right and follow road 880-2B to its end at a fence line. (Pic12) There are two old cabins here. The rest of the route is obvious.
Pic12. The Jeep road to the saddle starts at the end of 880-2B
Turn hard right up an old Jeep road to the saddle of Windy Point and Antora and follow the ridge left to the summit. The summit and remaining route are visible from the saddle (pic13).
Pic13. Remaining ridge to the summit as seen from Windy Point.
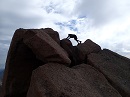
I skirted an intermediate point characterized by east-facing black cliffs. Pass them on the right which keeps you mostly on-level with the saddle beyond (Pic14).
Pic14. Closeup of intermediate point with black cliffs. Bypass them on the right. The terrain is pretty flat through this area.
Climb the final bump before the summit pitch despite a trail that breaks left under the bump and leads left under the main face that appears to end at a low saddle on the west ridge. You can probably go that way, it looks lower angle but will likely just double your distance and talus shuffling. You choose. I chose to head straight up. The last 300-400ft is ominous-looking but it’s all there and class 2. There are good trail segments that you can’t see from below. Basically there are ruts in the talus that switchback up the main slope that provide a way through. I stayed mostly in the center and center-right of the ridge. I didn’t have to improvise and stayed in a main rut/trail the whole way; It wasn’t that terrible by 13r standards and very easy to pick an easy-ish way. The summit is marked by 2 white posts.
Reverse your route back.
Like I said before, The descent crux is finding those two trees with the electrodes (pic12). Be sure you find that trail. If you’re too close to the creek, Look for and don’t pass the line of metal fence posts but follow them left to get you to the electrode trees; if in the creek, you’re only about 25-50ft from the trail and if you looked up to your left you’d likely spot it. There’s also a cairn before the electrode trees.
Pic12. Electroded trees.
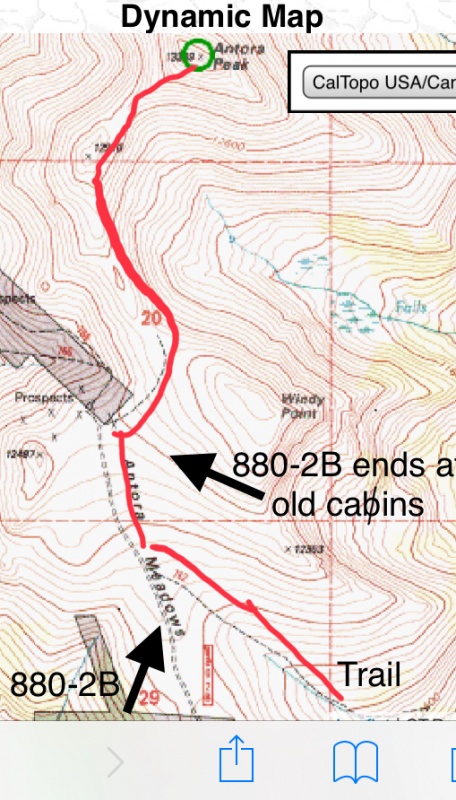
Cal Topo shows the whole Brewery Creek trail from the Guard House and ending at the 880-2B road.
Good luck. This route is a tricky one that really didn’t have to be if only there was a description and a few key cairns! Feel free to add to these key cairns as you see fit. Safe adventuring.
Thumbnails for uploaded photos (click to open slideshow):
Aside from driving up the 880 road essentially to the saddle, there's really not much in terms of trail descriptions for the whole area. This route seemed to be the most straight forward.
For those reading this in 2025, there are now some potential private property issues if you follow the trail behind the cabin. I found a rather aggressive sign basically saying that the landowner is a Army vet who's really good at gunfights and isn't good at listening... lol.
I would advise against following that trail as described here. I found a signed trail if you follow the 880 4x4 road a tenth of a mile up indicating access to the Brewery Creek trail, but then found odd no trespassing signs on that trail when it was obviously on public land. I've reached out to the USFS/BLM (who actually owns the Brewery Creek cabin parcel) to see what they say.
Otherwise this is an incredible way to do Antora, high recommend!
Caution: The information contained in this report may not be accurate and should not be the only resource used in preparation for your climb. Failure to have the necessary experience, physical conditioning, supplies or equipment can result in injury or death. 14ers.com and the author(s) of this report provide no warranties, either express or implied, that the information provided is accurate or reliable. By using the information provided, you agree to indemnify and hold harmless 14ers.com and the report author(s) with respect to any claims and demands against them, including any attorney fees and expenses. Please read the 14ers.com Safety and Disclaimer pages for more information.
Please respect private property: 14ers.com supports the rights of private landowners to determine how and by whom their land will be used. In Colorado, it is your responsibility to determine if land is private and to obtain the appropriate permission before entering the property.


")
")
")
")
")
")
")
")
")
")
")
")
")
")
")