Download Agreement, Release, and Acknowledgement of Risk:
You (the person requesting this file download) fully understand mountain climbing ("Activity") involves risks and dangers of serious bodily injury, including permanent disability, paralysis, and death ("Risks") and you fully accept and assume all such risks and all responsibility for losses, costs, and damages you incur as a result of your participation in this Activity.
You acknowledge that information in the file you have chosen to download may not be accurate and may contain errors. You agree to assume all risks when using this information and agree to release and discharge 14ers.com, 14ers Inc. and the author(s) of such information (collectively, the "Released Parties").
You hereby discharge the Released Parties from all damages, actions, claims and liabilities of any nature, specifically including, but not limited to, damages, actions, claims and liabilities arising from or related to the negligence of the Released Parties. You further agree to indemnify, hold harmless and defend 14ers.com, 14ers Inc. and each of the other Released Parties from and against any loss, damage, liability and expense, including costs and attorney fees, incurred by 14ers.com, 14ers Inc. or any of the other Released Parties as a result of you using information provided on the 14ers.com or 14ers Inc. websites.
You have read this agreement, fully understand its terms and intend it to be a complete and unconditional release of all liability to the greatest extent allowed by law and agree that if any portion of this agreement is held to be invalid the balance, notwithstanding, shall continue in full force and effect.
By clicking "OK" you agree to these terms. If you DO NOT agree, click "Cancel"...
Thundering, blundering, leaping and glissading: Chicago Basin
“The adventure begins with a train” so says the sign at the Durango & Silverton Narrow Gauge Railroad and this was indeed an adventure filled with being chased by storms, making some significant blunders, leaping off the famous Sunlight summit block, lots of glissading, and meeting some interesting folks while getting all four 14ers done.
Itinerary was Tuesday: ride in on train, setup camp. Wednesday: Sunlight and Windom. Thursday: North Eolus, Eolus, hike out to train.
This trip report will cover, among other things, the following:
Detailed description/analysis of the Sunlight summit block
Descriptions of how the long lasting spring conditions this year effected these routes
Analyzing blunders (including an error that turned Windom from boring to very spicy)
Discussion on glissading/self-arrest* with microspikes/trekking poles vs. crampons/ice axe
Hiking times
*see section below for clarification of terms
Train in DurangoMe jumping off the Sunlight summit block
The two main options for getting to the Chicago Basin 14ers are to either ride the train from Durango or go to Hell and back (oh wait, it’s actually Purgatory I think). But if you’re hiking that far with a full pack I think either name would be apt. Some people like to expound upon the virtues of doing that long hike but I’m more inclined to expound upon the virtues of finishing a hike by hopping on a train with a concessions car and then spending the night in a hotel with a large hot tub before taking the 7 hour drive home.
I’ll break down the report into sections with headers in case anyone wants to quickly skip down to a section of interest.
Chicago Basin Approach:
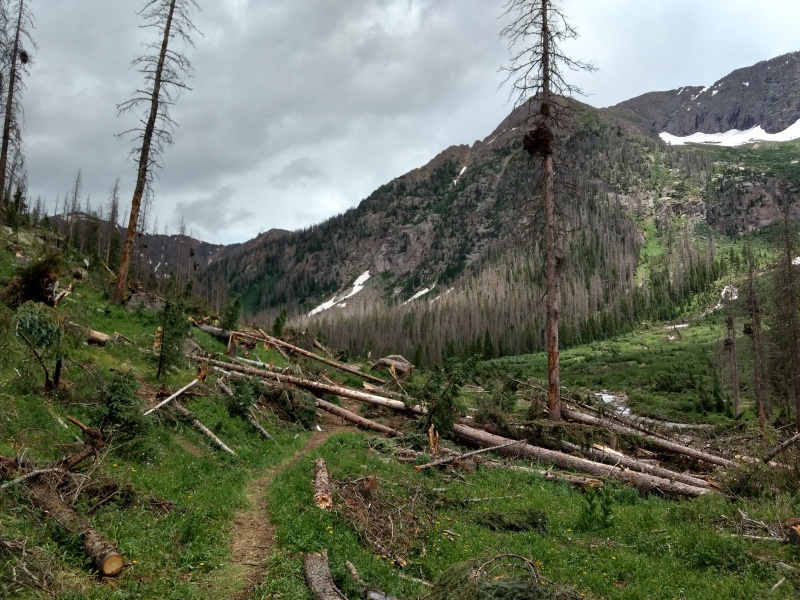
Once the train drops you off at Needleton and you cross the suspension bridge over the Animas River, the trail is initially pretty flat which makes it easy to start with a good pace. It gradually steepens but with ~3k gain over the course of roughly 6 miles (depending on where you camp) it never did get all that steep. The remaining avalanche debris was mostly trivial to go over or around. I think there was one large trunk that I knelt down to go under. Beyond that there was no issue with avalanche debris.
Example of remaining avalanche debris on approach to Chicago Basin
I had done a practice hike below Mt. Evans starting at Echo Lake and going up to Summit Lake with a full pack on my back since it has similar specs on distance and elevation gain as the Chicago Basin approach, but that Echo to Summit Lake route had much steeper sections than anything encountered on the Chicago Basin approach (but if you’re worried about the hike in that is a good conditioning hike to do especially since it’s easy to bail at any time and in a pinch you’d have the option to hitch a ride down Evans).
One thing I was thrown off by in the route description is that it sounded like the camping was only available from ~10,800ft to 11,100ft and since a storm was coming in at the same time I was I set up camp at about 11,000ft only to learn that the true end of the camping area (based on the broken sign) was up closer to 11,500ft. But a nasty thunderstorm with significant hail broke loose just as I got my tent halfway up so I ducked inside and finished assembling from the inside and left my tent there the 2 nights I spent.
Broken No camping beyond this point sign (at ~11,500ft)
Weather
Everything I’ve seen, heard and experienced says that in summer time you can almost set your watch by the thunderstorms in the basin. I was there Tuesday through Thursday and talked with some folks who had been there since Sunday and it seems every day at around 1:30pm – 2:00pm a thunderstorm rolls in and lasts typically a couple hours. Many others who have been there at different times have said the same thing.
The people next to me reported getting caught in a storm the day before I arrived and held a tarp over 3 of them for protection from the hail. They showed me the tarp – it was full of holes. So starting before sunrise is a very good idea if you’re there during monsoon season.
Blunder #1: Food fumble
Occasionally people on this site have been berated for lack of honesty or at least the suspicion thereof. So in the interest of full transparency I offer this simple tip to others camping in the basin: if you hang your food in a tree to keep it safe from critters make sure to take down what you need before you start your hike!
On Wednesday morning I started my hike at about a quarter after 4 in the morning, thinking maybe I might try for all 4 peaks that day. A good 35 minutes into the hike I realized that 100% of my food was still hanging in the tree at the campsite! I once hiked Mount Lady Washington with no food (after a similar brain lapse) but this was no Lady Washington I was going after so I was forced to turn back
No sooner had I turned around than I encountered 2 ladies going up who asked “Did you summit already?” Deeply embarrassed I explained, “No, I left all my food in the tree…” But it would turn out to be a providential blunder because I later encountered these two ladies again at just the perfect time for us to each help each other out.
Approach
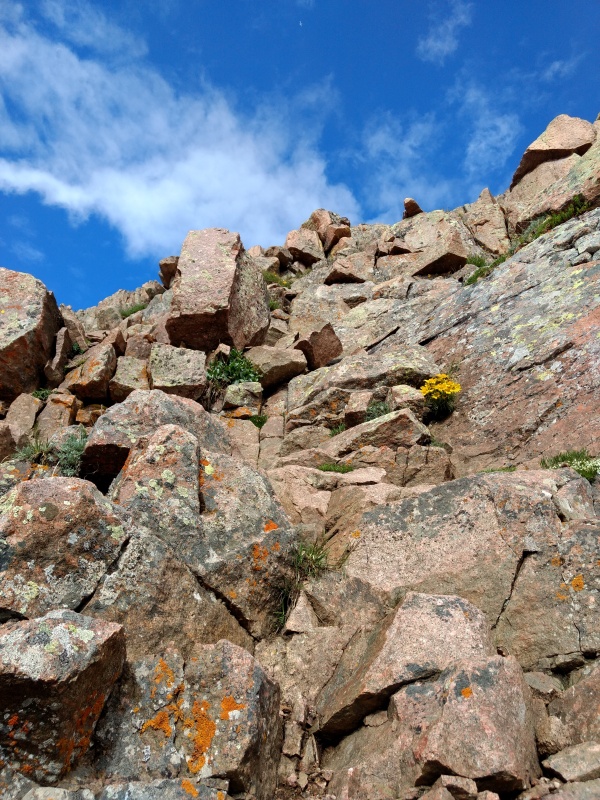
One quick note on the approach going to Sunlight and Windom: the tracks loaded on the route page show that after going past the lakes the route cut sharply south then back up north, while GAIA shows a path that avoids that jog and matches up with an established trail. On the way up I tried to follow the GPX track only I went a little too far south and then didn't turn north sharp enough so almost got stuck going up a nasty looking scree field as shown below (point 1 on GPX snapshot towards end of report). Just ignore that little jog south on the GPX tracks - no reason to go there.
Scree field from needless jog to south (see point 1 on GPX snapshot towards end of report)
Sunlight Peak
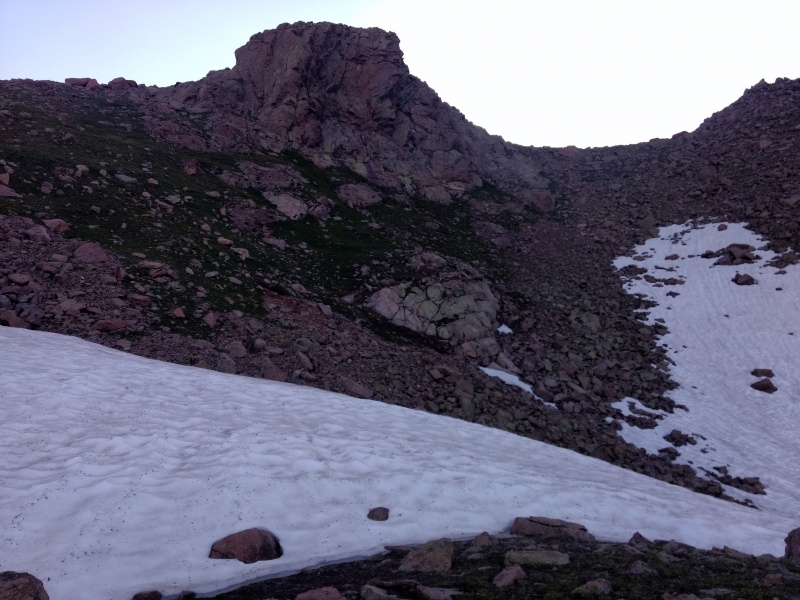
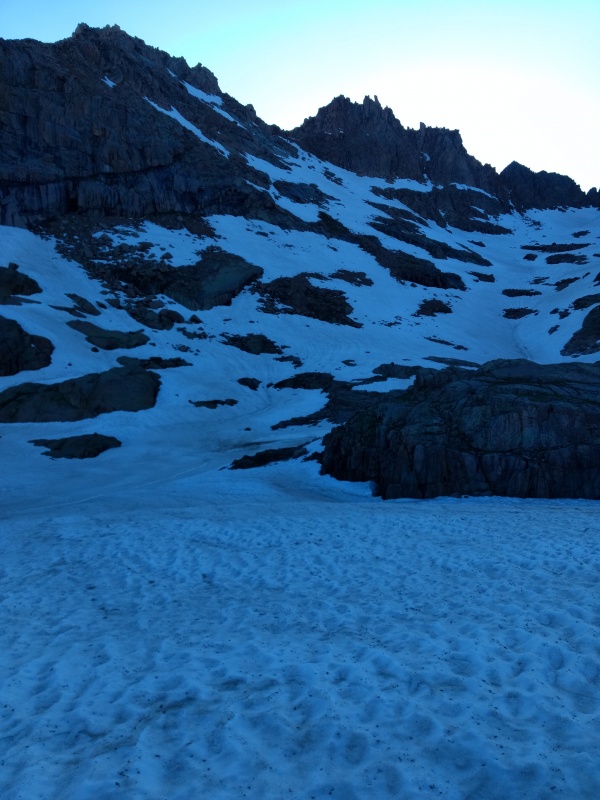
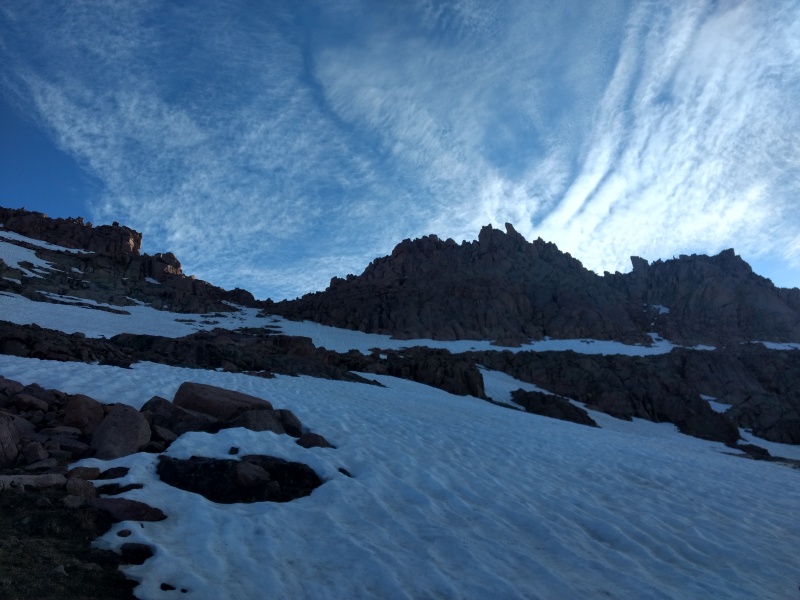
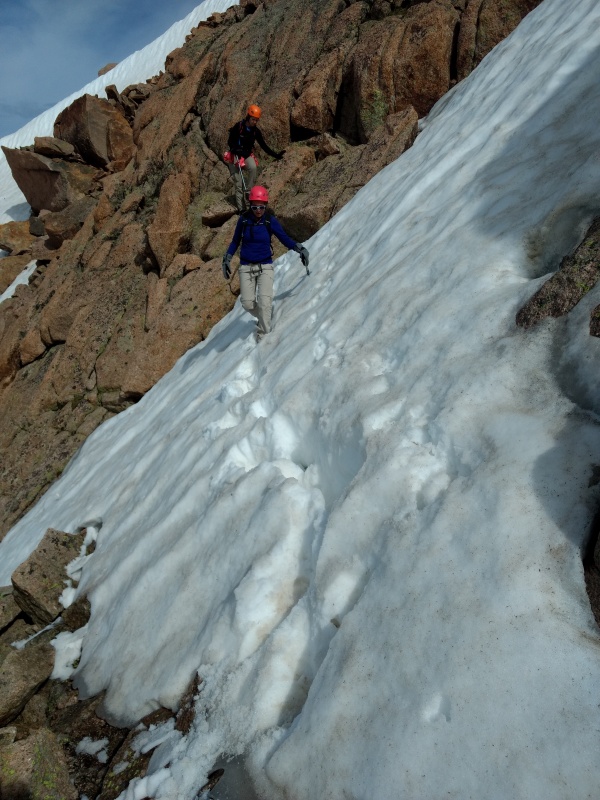
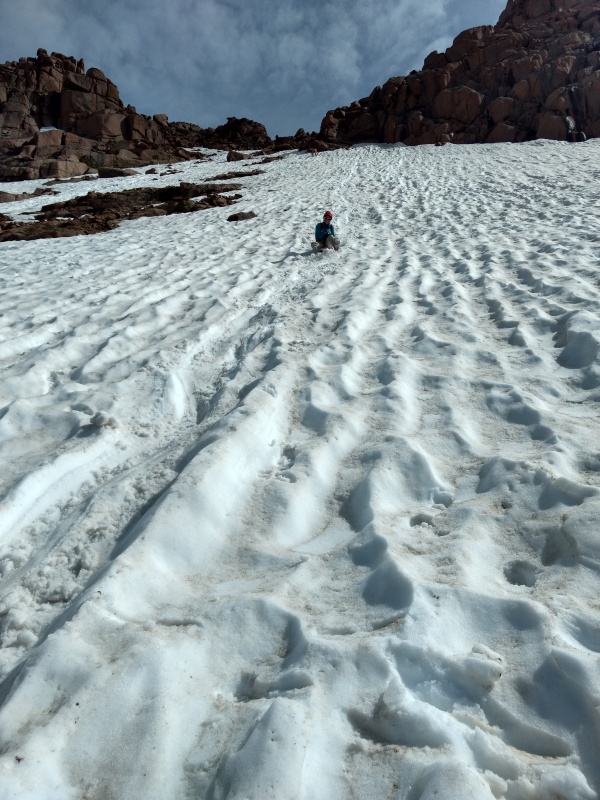
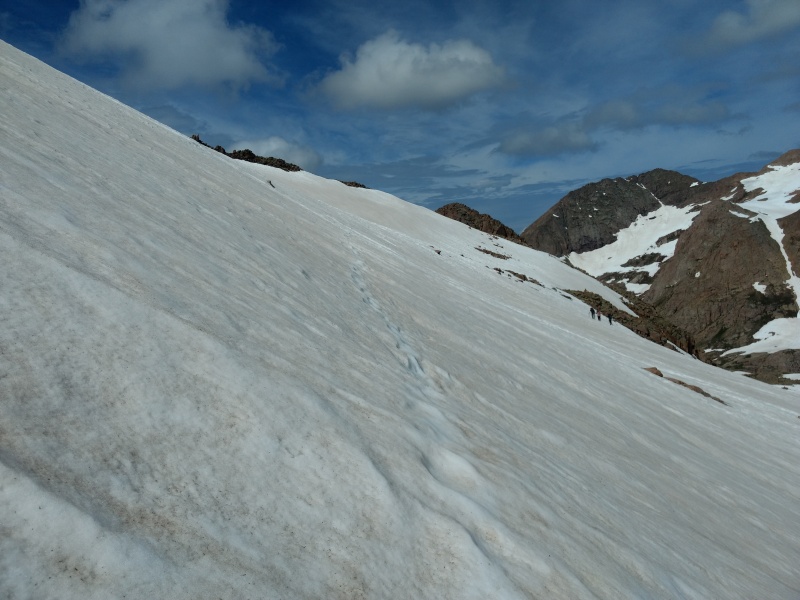
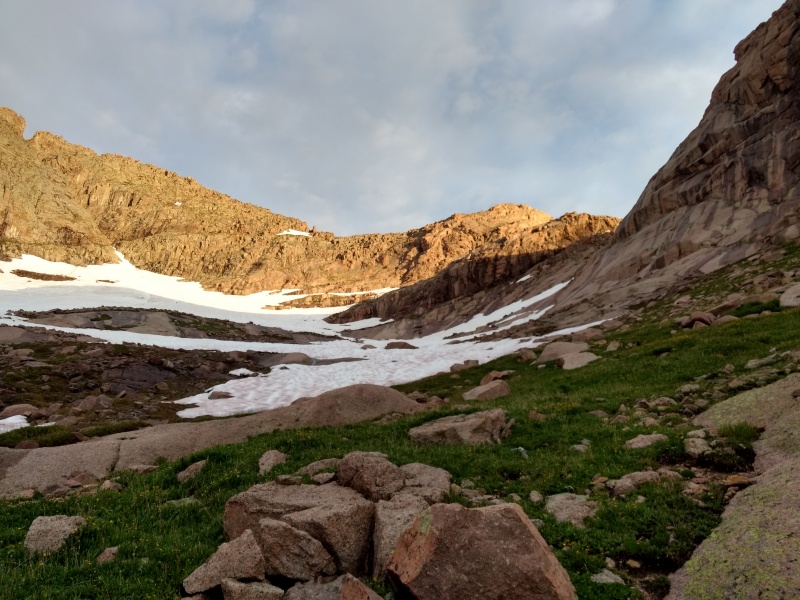
Sunlight Peak, under the current conditions with the snow lingering unusually long, had the most difficult approach of any of the 4 peaks because there were such steep snowfields to deal with and they would randomly switch from being very firm to sinking past your knees and then to sections of exposed rock. With this kind of mixture the microspikes and trekking poles I carried were just the right combo for me.
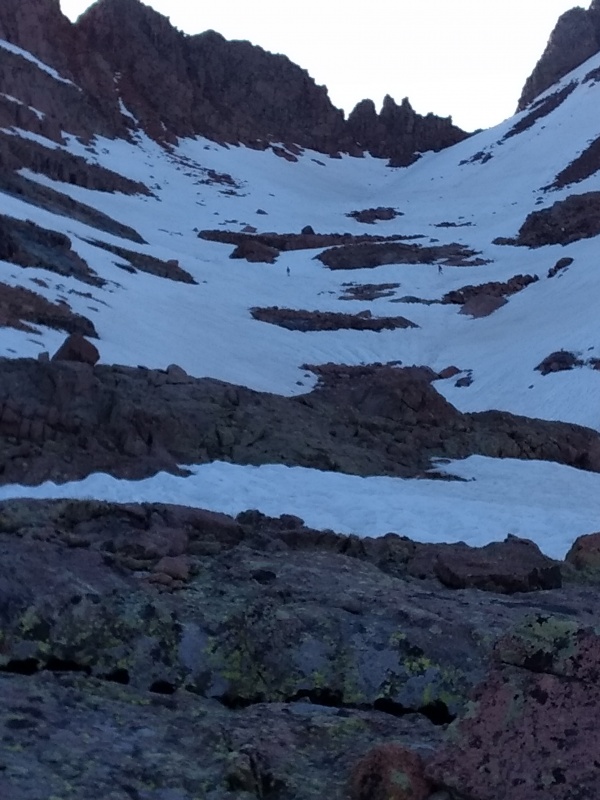
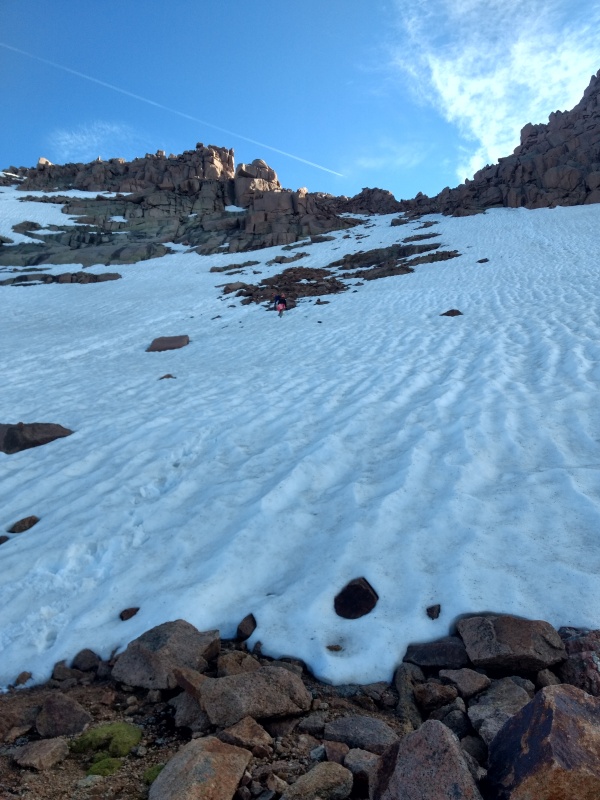
I initially started out trying to somewhat follow the GPX tracks I had downloaded from the standard route page but that wasn't proving too good of a route with the current snow conditions. That's when I spotted 2 small figures sweeping across from the right side of the valley and heading up Sunlight. I abandoned the course I was on and set course to intercept them instead (point 2 on the GPX snapshot towards the bottom). Turns out it was Chrystal and Allison - the two ladies I had met when I turned back for my food. My delay had allowed them to helpfully forge out a path up Sunlight for me! We then traded back and forth with route finding in the upper section.
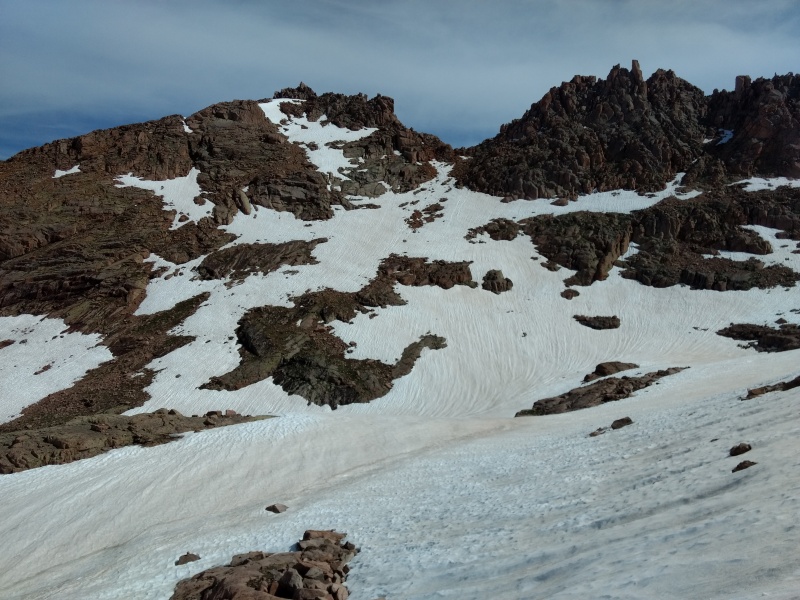
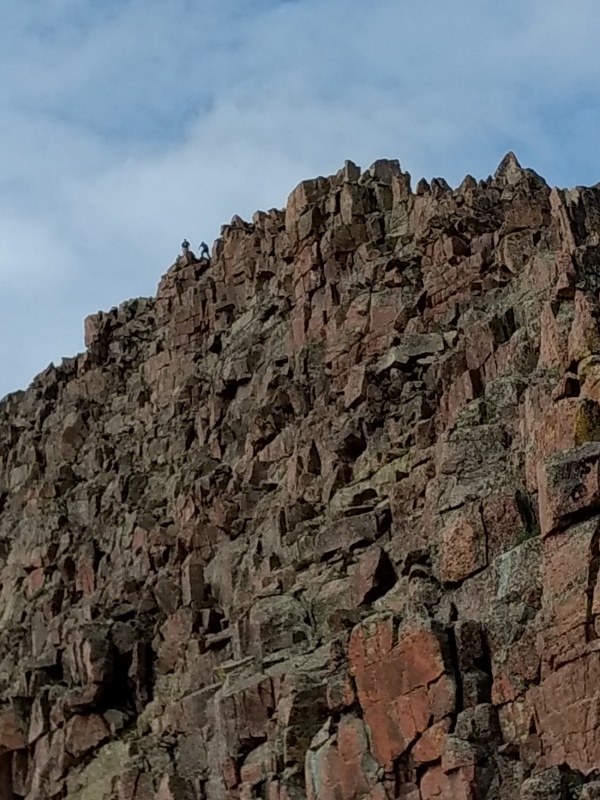
I crossed over and went up the left side of the drainage then tried to go up the first continuous snow fieldChrystal and Allison cutting across from the far side near the Windom trail.
Going up steep section to SunlightCatching up to Chrystal and Allison going up Sunlight (they're in center just below the rocks)
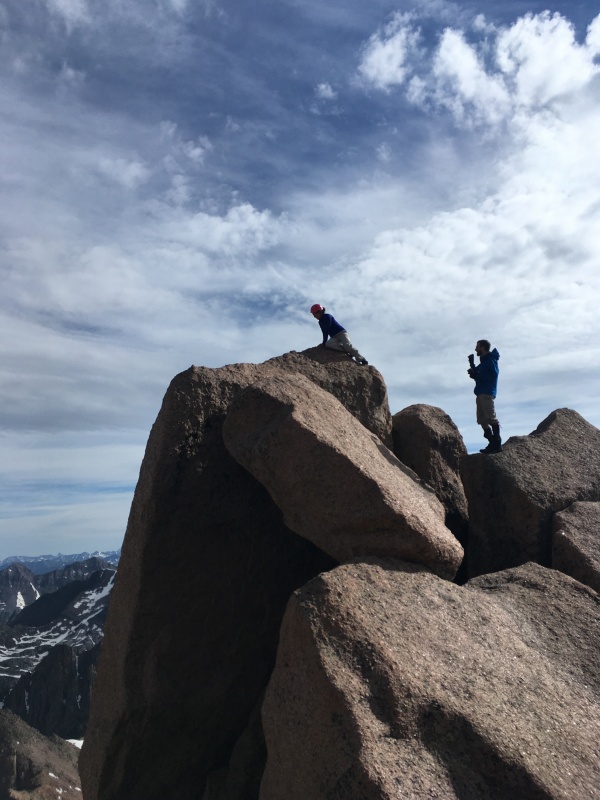
Sunlight Summit Block
Now for the fun part - the infamous summit block at the top of Sunlight that makes many tremble with fear and others cackle with delight. Here's a detailed breakout with multiple photos of people on it for scale.
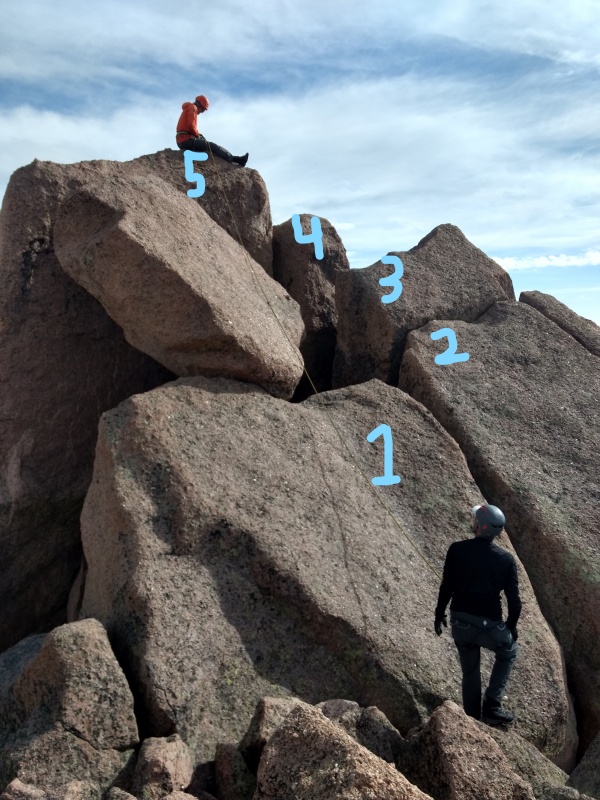
It's actually not as bad as it seems - you can in fact gain the summit in five easy steps as illustrated and explained below:
Five step process to get on the top - see explanation below.Howard modeling the most difficult step 3 to 4 stretch
Step 1: walk up the very grippy slab - the first picture makes it look pretty steep but it's not bad at all - no exposure yet at this point either.
Step 2: step over and place your foot in the gap on the adjacent rock. Just a minor tumble onto nearby rocks if you fall here, but the rock is grippy and the gap is large and solid.
Step 3: Step up on top of the rock. There is a flat-ish spot around the size of the average bathroom rug here. Trivial to step up on. You'll now have a drop in front of you but rocks in the gap. Don't look to the right if you're afraid of heights.
Step 4: This is where you really weed people out. Howard (pictured above) has long legs (as do I). We both had to stretch a bit to get up on point 4. Not hard, just stay steady when you step up - on the far side is a plummet to certain death.
Step 5: If you made it to step 4 then it's a pretty trivial maneuver to simply lean over onto point 5 and pull yourself up. Then you're on the true summit! A plummet off the far side would be certain death, so just stay steady.
You may note that Howard is tied in on a rope here. For the record, Howard is 67 years old and is getting close to being a 14er Finisher. He's also getting close to reaching his goal of doing 100 marathons/ultramarathons by age 70. So I don't fault him in the least for being roped up to a guide. I'm very impressed that he made it up there!
Me standing on the true summitMe jumping down from point 4 to point 3.
One note on coming down: I tried to stretch back from point 4 to point 3 (the reverse of what I did going up) but was having trouble reaching my leg across from that direction. So, as the route description says, the easy way is just jump! Like I said above, point 3 has about a bathroom rug size area that is flat-ish to land on.
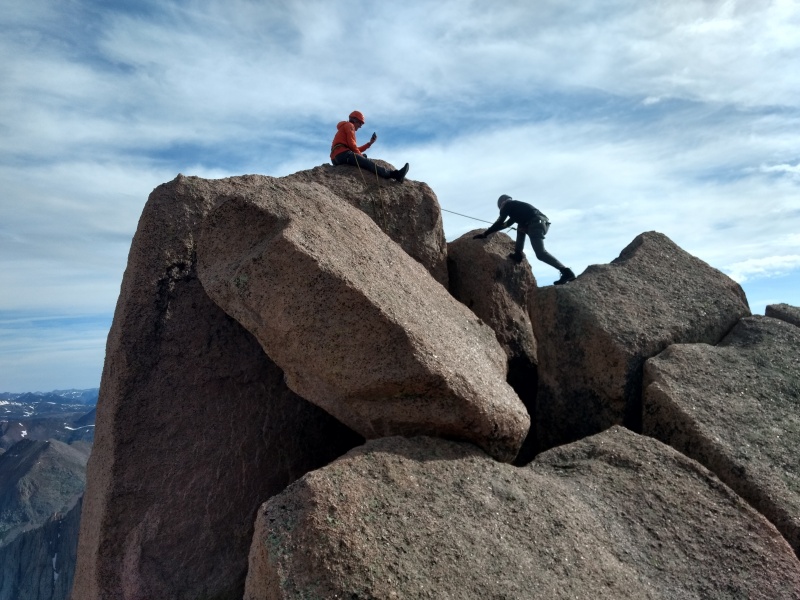
Me coaching Chrystal up onto the summit.
Chrystal (also close to being a 14er Finisher, as am I) was wanting to get on the true top but was nervous so I climbed back up and coached her through each move. On the descent I planted my feet in the gap (point 2, which allows for a very firm bracing point) and had her jump from point 4 to point 3. Then, after catching her breath, it was a simple matter of reversing the remaining process to get back down.
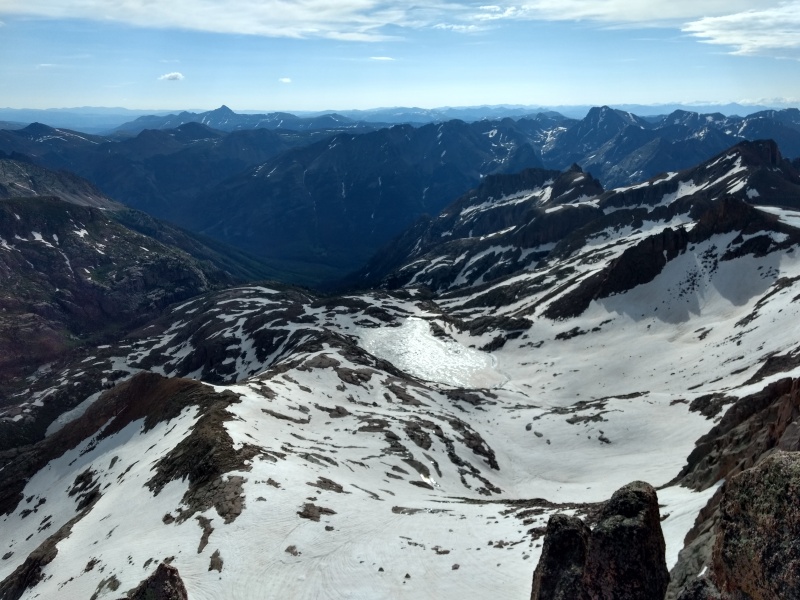
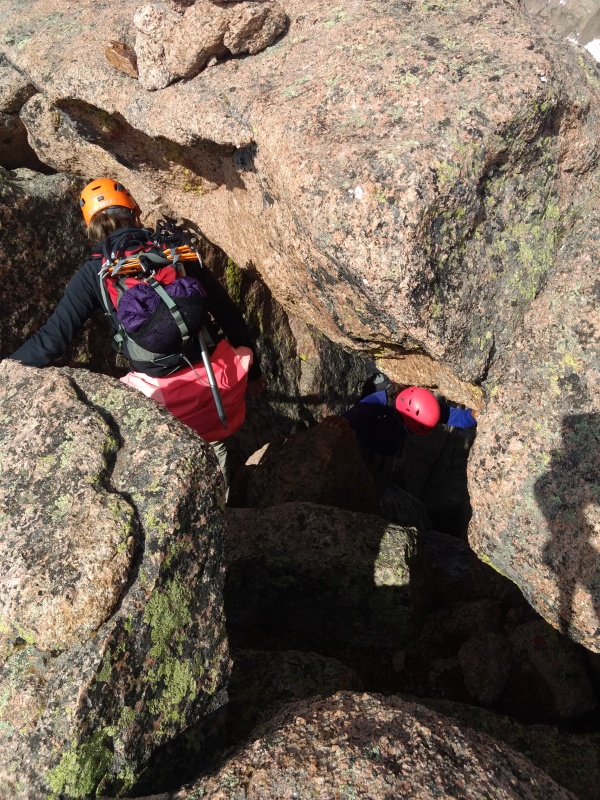
View from SunlightAllison and Chrystal going down the chimney on Sunlight (hard to recognize as such from below since it's angled)
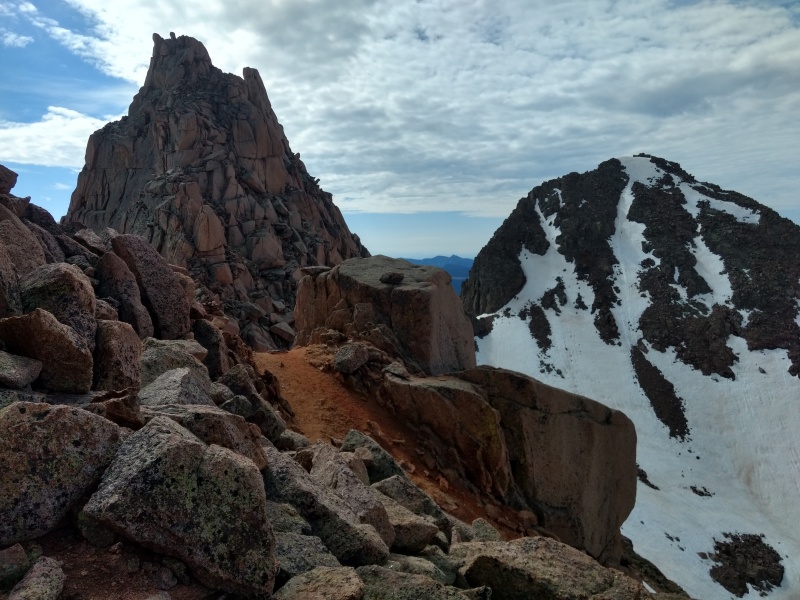
Coming back down Sunlight. There were still several small snowfields to deal with but nothing major.View over to Sunlight Spire - did not attempt.
Glissading/self-arrest*: Crampons/ice axe vs Microspikes/trekking poles
NOTE: Due to extensive negative feedback from experienced climbers this section has been rewritten for the benefit of any who may came across it. I’ll still present the details of the technique I used but will be far more explicit about the limitations and risks of the technique and will also cover why the general consensus of experienced climbers on this site seems to be to always use an ice axe even for the conditions described.
It was never my intent to say that trekking poles could do everything an ice axe could but I can see how some poorly worded lines in the original could make some think I was saying that. This technique was not some theory I was proposing or a one-time event where I happened to get lucky but is something I have used repeatedly with great success. But the consensus out there is that it’s just a matter of time until a technique like this would get someone into trouble.
It’s also important to note that what I describe here apparently does not really fit the true definition of self-arrest or at a minimum certainly does not cover the full range of situations that term is typically used in. I am no longer calling this a technique for self-arrest but I do think this technique still has potential value for preventing uncontrolled slides on low-moderate angle, low risk snow slopes if you understand the risks and limitations. Others strongly disagree. I’ll present the data with abundant cautions and allow the reader to decide what to do with it.
First some cautions:
This technique is NOT something that would work at all on ICE.
This technique is NOT something that would be even remotely safe on a couloir.
This technique is NOT something that should be used on a steep slope.
This technique should never be used without testing the condition of the snow first.
In fact, most users on this site seem to believe this technique should never be used at all.
But since I’m sure I’m not the only one out there who has ever set foot on snow without an ice axe I do think it’s still valuable for people to hear something that could be used as a fall back option even while I’ll join the bandwagon and say go get an ice axe if there’s a chance you’ll need to self-arrest on snow.
So back to the story…
For much of the journey climbing Sunlight and Windom I ended up hiking along with Allison and Chrystal. Allison had crampons and ice axe, Crystal had microspikes and ice axe and I had microspikes and trekking poles. We all 3 managed these routes just fine and in some cases Allison was at a disadvantage because crampons aren't as well suited to scrambling over rocks.
The key to trekking poles is knowing how to use them. They're a very versatile tool which many people treat as no different than a stick you pick up in the woods. But a good pair of adjustable poles can be an extremely beneficial tool if you know what to do with them. But if you try to brace yourself while gripping the handles with them fully extended they snap in half like a twig and will leave you plunging down the slopes.
The key is to shrink the poles down to the minimum length, take your hands out of the straps and grab them just above the snow basket above the points so that you now have a sharp point in both hands (don’t forget, trekking poles won’t bite into ice, you need an ice axe for that). Or when walking along a slope, have the pole on your downhill side extended enough to provide balance while the uphill pole is fully retracted and gripped just above the snow basket, held up and ready to slam into the snow – this way the moment you slip the point of the trekking pole automatically ends up planted in the snow, stopping your slide.
I've built up proficiency using trekking poles and microspikes this way with great success on these and other challenging snow routes. Note that is absolutely essential to adjust the length of the poles and position of your grip BEFORE you get onto steep terrain - otherwise you'll end up with broken poles and maybe broken bones...
Now, having explained how I’ve safely used this on numerous occasions, let me balance that out with why so many experienced climbers, despite hearing of my success with this technique, are still very passionate that it should never be used.
Some of the arguments against using this even for low-moderate angle, low risk snow slopes include:
Snow conditions change from day to day and even hour to hour – snow that was soft on your way up might be icy on your way down after it ends up in the shade.
Snow conditions can vary greatly even just a few feet apart and ice can be hidden just beneath the surface of the snow.
Speed builds up shockingly fast if you don’t stop your slide immediately. The faster you get going the less likely you will be able to stop even jamming both trekking poles in full force from just above the points.
All of these are entirely valid points and are something to be taken very seriously. Although I’ve not yet been convinced to totally abandon this technique for low-moderate angle, low risk snow slopes I will definitely be far more cautious in determining if/when to use it and will be searching for a good ice axe as well as studying techniques for proper use.
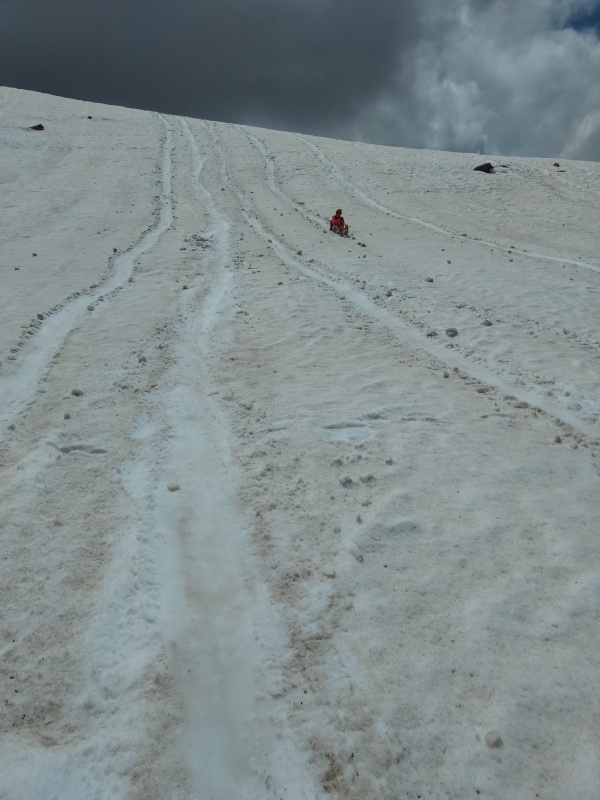
Glissading down Sunlight.Looking back at Sunlight - we went up the rocks in the center of the photo below the saddle and glissaded down to the right.
Windom Peak
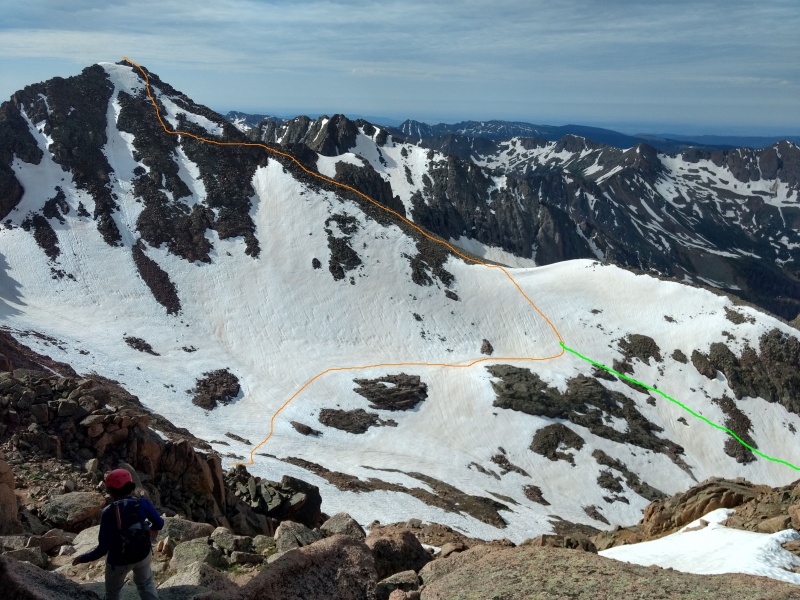
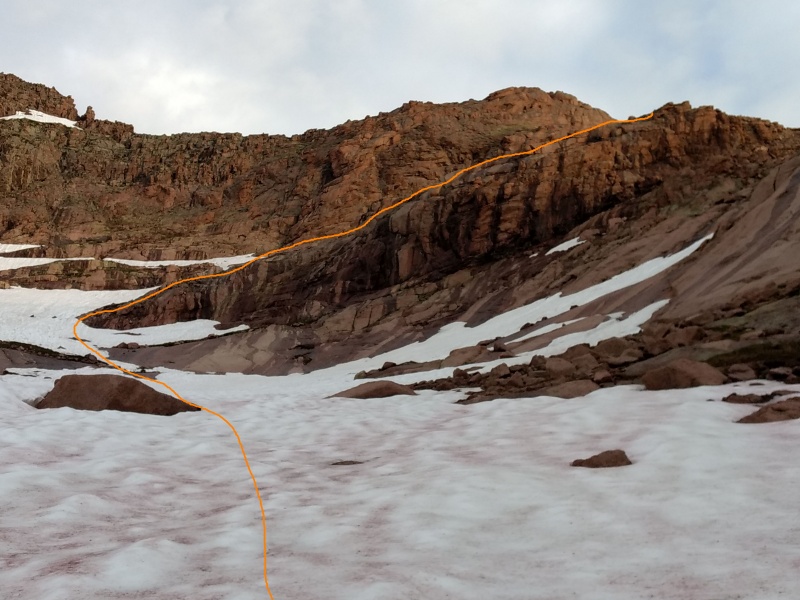
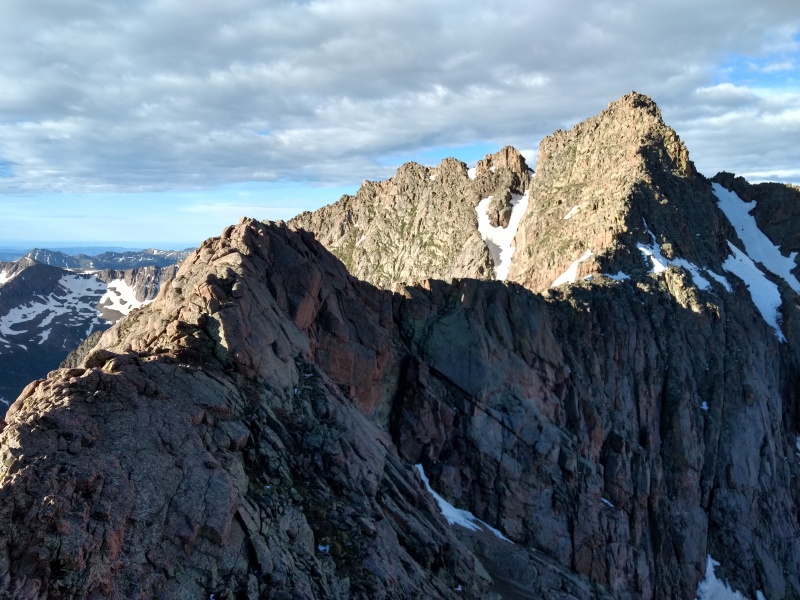
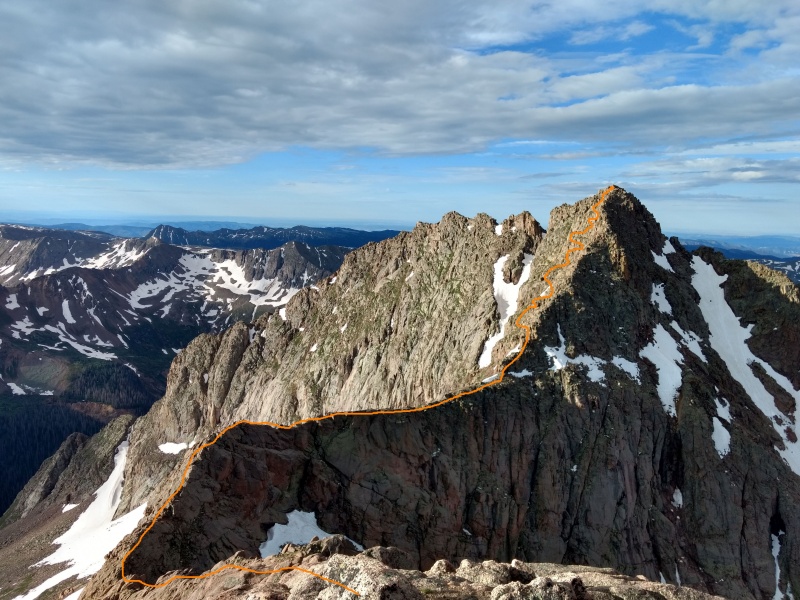
The GPS tracks on 14ers.com just show tracks for each of the peaks done separately but it’s totally unnecessary to go back to Twin Lakes to get between Sunlight and Windom. The image below shows the approximate path taken from Sunlight to Windom - also see GPX tracks towards the end.
Orange line shows our route over to Windom (w/ my deviation near summit). Green line from right is where another group came up.Center right is the group coming up the green line - we cut along the ridge then used their line up.
There were some spots where the snow fields we went across got a bot steep. There I kept my left foot parallel to the ridge while kick stepping my right heel into the snow with toes pointed away from the ridge. Right trekking pole was extended for balance, left trekking pole was fully retracted and gripped above snow basket ready for self-arrest (yes, I did slip a couple times and proved my self-arrest technique worked quite well).
Blunder #2: Windom navigational error (= SAR close call)
Windom is supposed to be an easy peak with a pretty straightforward route – just a long slug up a rocky hill, more or less. But I had made it over to the saddle a little later than anticipated and the clouds were making me wonder if the storms might arrive early that day plus there were a couple other guys there (the ones who came up the green line) talking about dropping their packs and rushing to the top so I got to feeling like I needed to move fast so as to be sure not to get turned back.
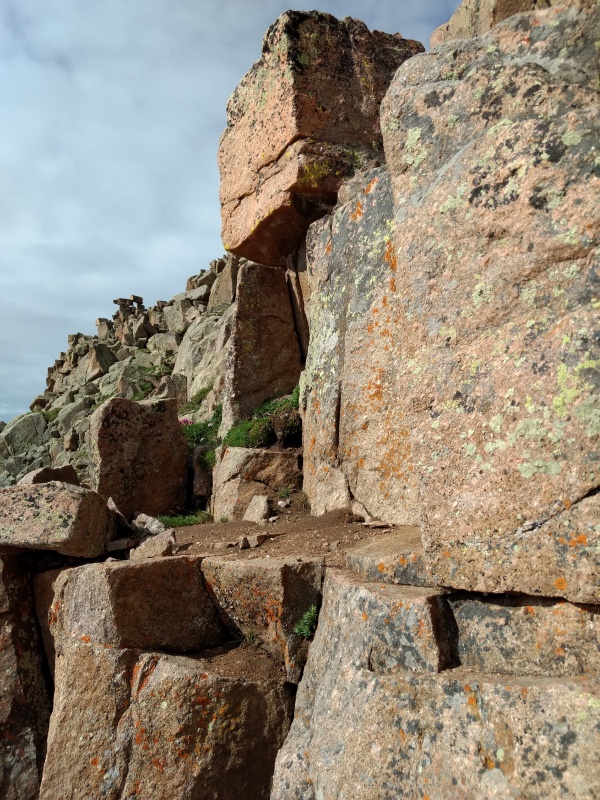
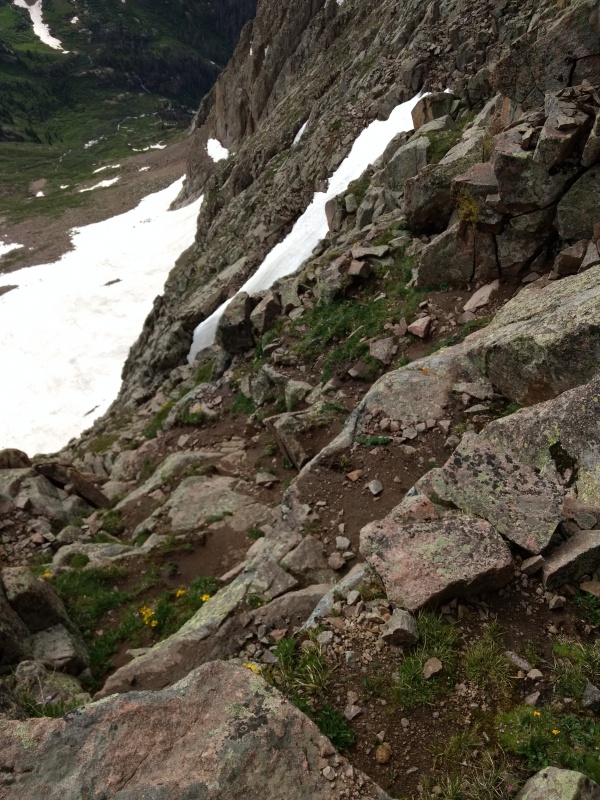
This was fine up until about 13,800ft (see point 3 on GPX snapshot near the end) where I made my blunder (and where I think I led astray the two guys who rushed up ahead of me but whom I overtook). I got to the notch shown in photo 17 of the route description and even pulled up that photo but, being in too much of a hurry, I only took note of the phrase “continue along the left side.” So I looked and saw what looked like a well beaten path down to the left that went around some large rocks. That must be it, I concluded, without noticing the arrows on photo 17 and without stopping to check the GPX tracks I had loaded – either of which would have led me to stay pretty much on the ridge.
Down to the left is a well beaten path - DON'T GO THIS WAY!!!Instead you want to basically stay on the ridge the whole way up/down.
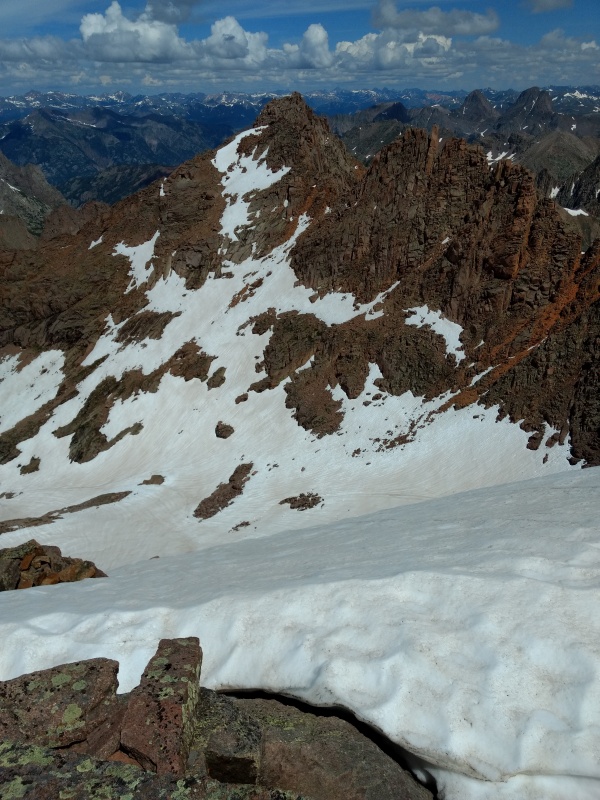
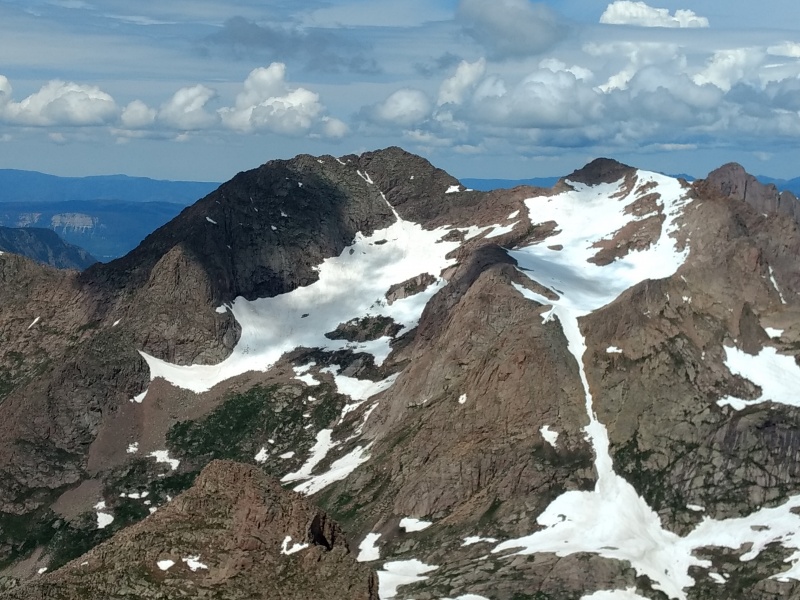
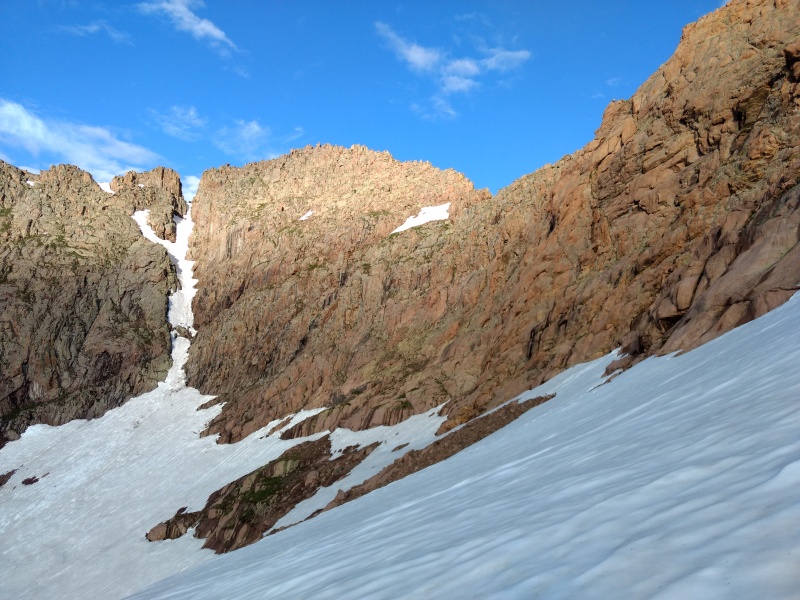
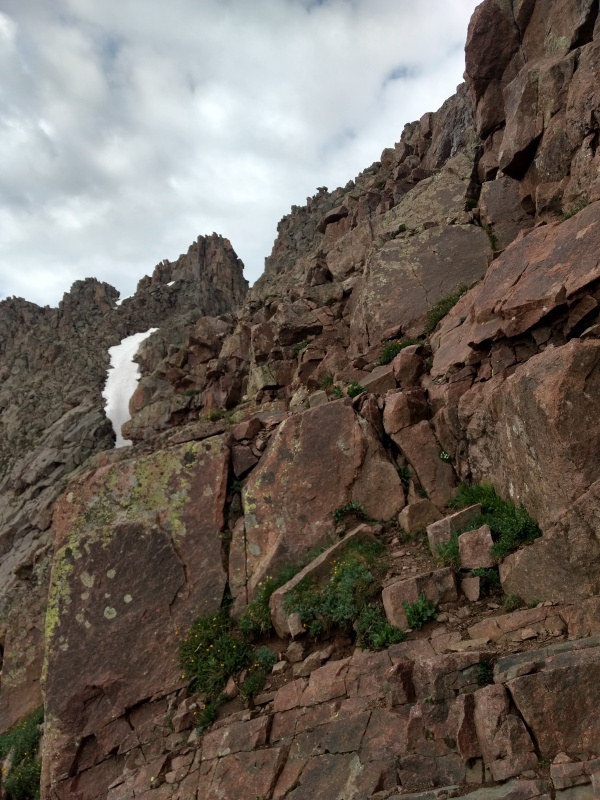
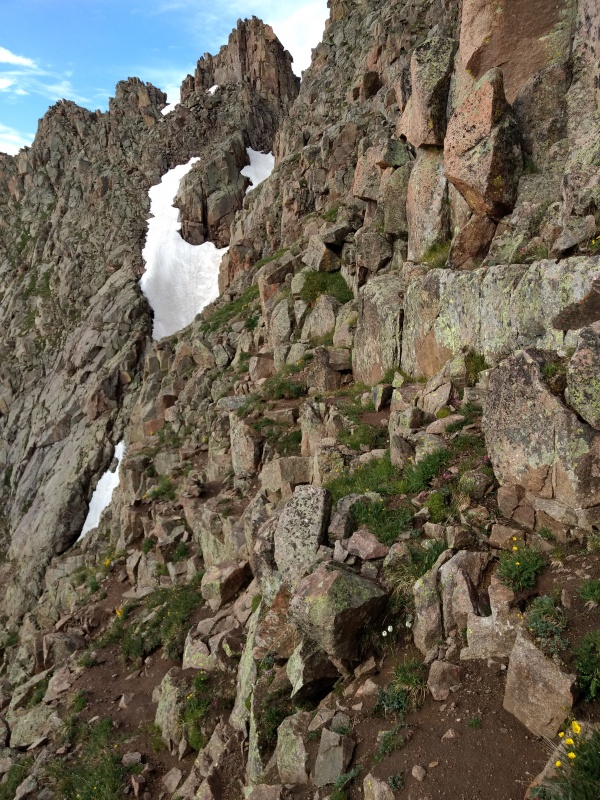
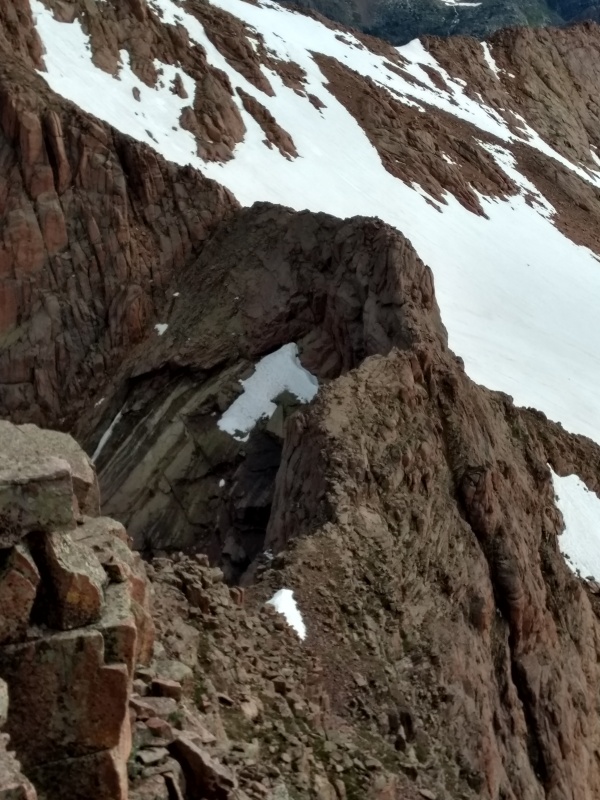
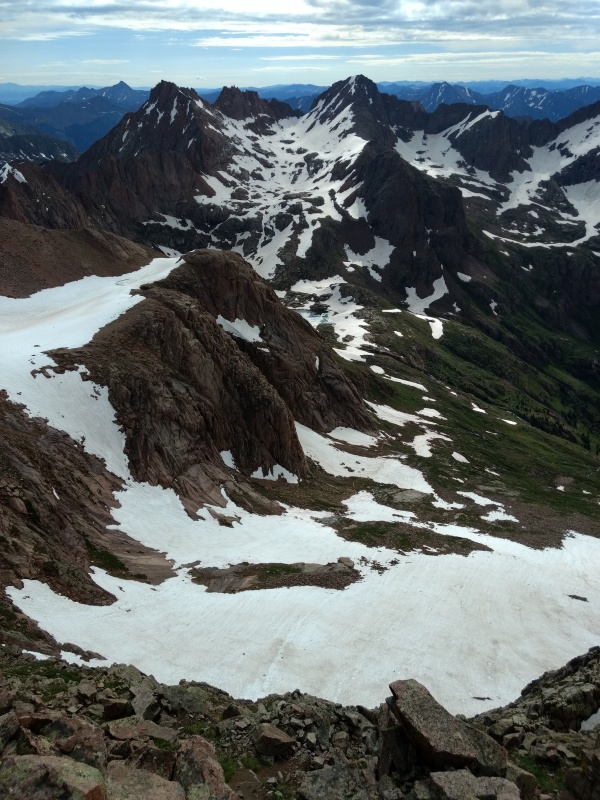
The path I took down to the left seemed fairly reasonable at first but then, just like in every SAR report, it got progressively worse. I had a bad case of summit fever and a strong desire not to have to take more time off work to schedule another trip way down to this part of the state so I made the poor decision to press on even after it became pretty clear I must not be on route any more. I started getting squeezed in by insanely steep snowfields which there was no hope of traversing, especially not just with microspikes and trekking poles (see overview photo from Sunlight up above). But I could see what looked like a potential path up. When all was said and done I squeezed up in between snow fields over some spicy terrain before finally topping out just below the summit where I could easily walk over to the actual summit.
Looking back down at one of the snowfields I maneuvered between.
Most of the time when I’m going up a 14er I’m fully prepared to turn back (and have done so a few times) but due to the time/effort needed to get to and schedule things for these peaks I was in a position of feeling more strongly compelled to make it work the first time – something I knew going in would be a potential danger. Also my growing experience probably led to some overconfidence (I can do this...). In the end it worked out ok but in retrospect I was getting close to becoming a statistic. I need to be extra vigilant about avoiding that kind of off route free form on the last few difficult peaks I have on my list...
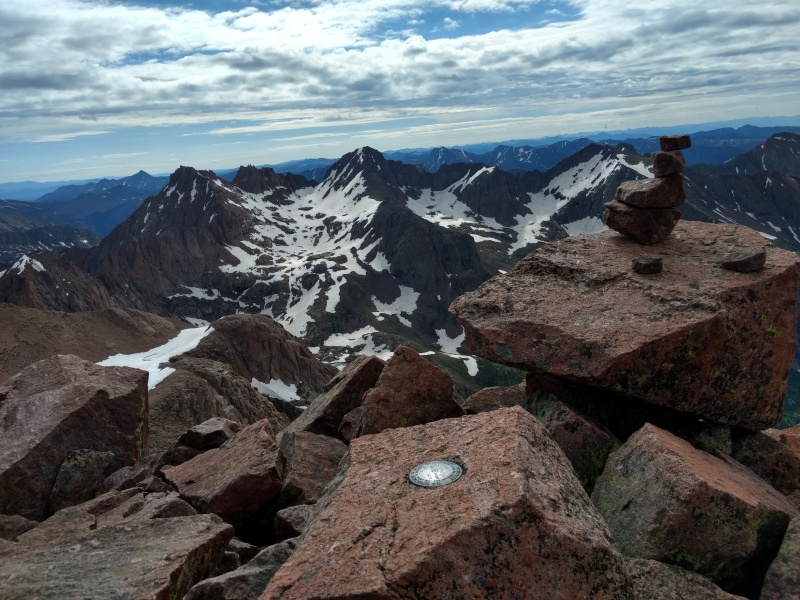
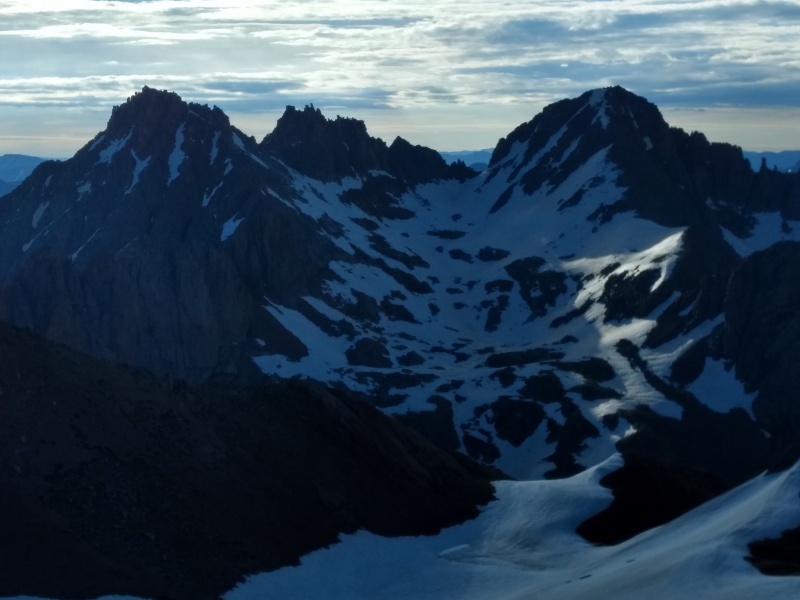
Looking over at Eolus (left of center) and North Eolus (right of center) from somewhere on Windom
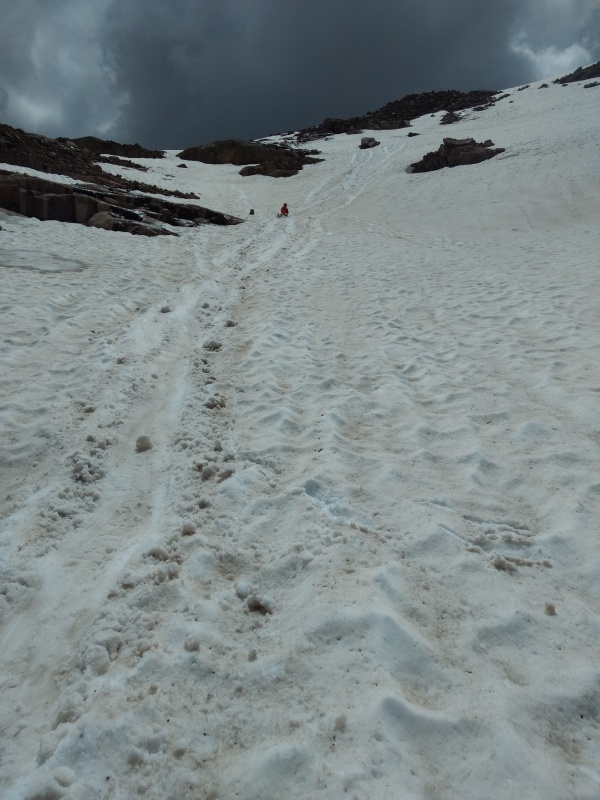
After my escapade on Windom I reconnected with Chrystal and Allison at the saddle (because of my detour they weren't really all that far behind me). We enjoyed some excellent glissading back down into the gully. See point 4 on the GPX snapshot - the circled region shows the 2 stretches of glissading we did off Windom.
1st stretch of glissading2nd stretch of glissading
North Eolus
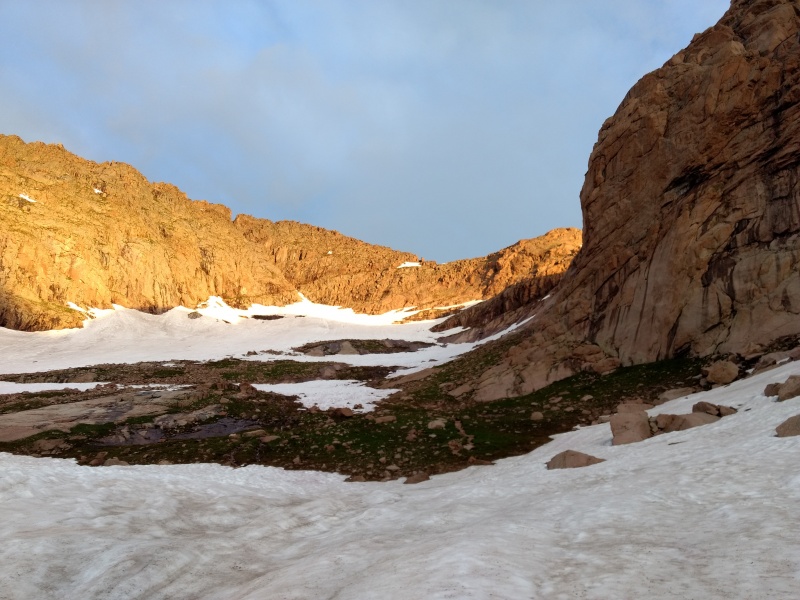
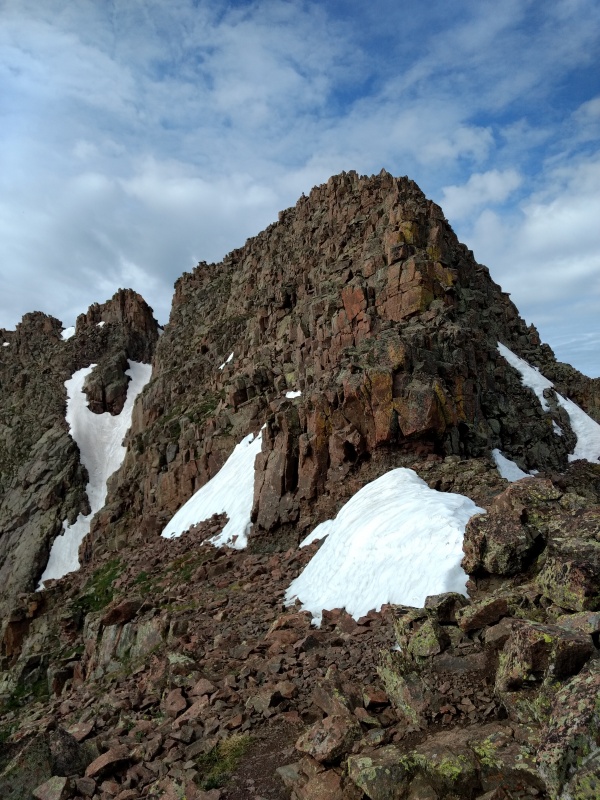
The route up to Eolus/North Eolus is pretty straightforward. The one thing which can make it easier is to be sure to turn up the "ramp" at the right spot. In the photos below the turn for the ramp is right where the sunlight and shadow meet.
Heading up to Eolus/North Eolus the ramp is where the sunlight and shadow meet.Slightly closer view under changing early morning light. Ramp still at sun/shadow boundary.
Closer view marking out the ramp.
View over at Eolus while going up - it looks nothing like the views from above - almost doesn't look like a peak from here.
North Eolus is so easy as to not need further comment except that I'll note that the rock on North Eolus is totally different than the nearby rock on Eolus. North Eolus has super grippy (and sharp!) rock. The rock on Eolus is not grippy and tends to have loose dirt and damp plants all over but there are plenty of good hand and footholds.
Going up to the notch between Eolus and North Eolus - must go way past the end of the ramp. GPX tracks can be useful to find this from below.
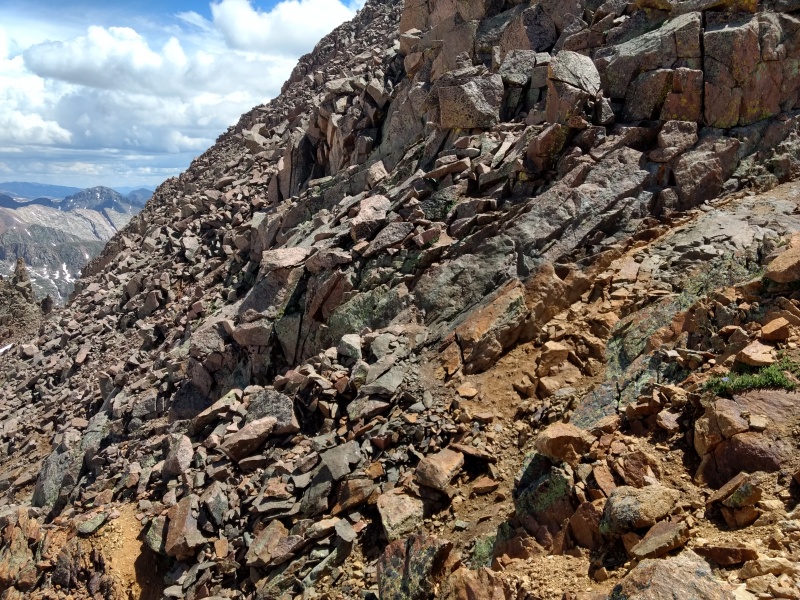
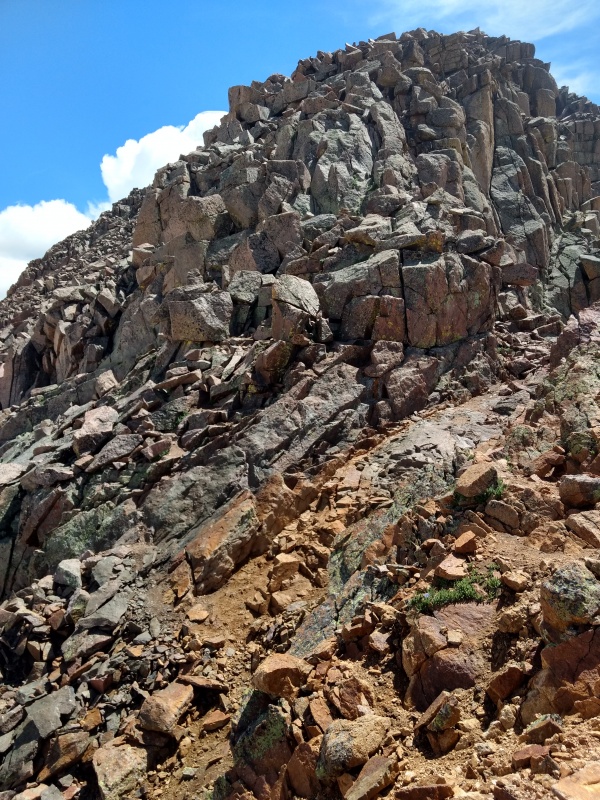
Eolus
The face going up Eolus was, I thought, one of the ugliest route finding spots I've done out 55 peaks so far (just the Bells and Little Bear left). Maybe it was in part because there was no one else on the mountain in front of me (some others started coming up as I neared the summit). Maybe the loose dirt, damp plants, occasionally suspicious looking clouds, extended hiking and limited sleep thus far on the trip contributed to it, along with the fact that GPS was worthless and even the route description didn't seem to match too well (the starting point shown I'm thinking must have been covered by snow from the nearby couloir?).
Or maybe it's just because most of the standard routes on 14er's allow you to more or less just walk up to the summit (exceptions being peaks like Crestone Needle, the final pitch on Pyramid, etc and other routes where there's a short scramble near the top). But Eolus seemed to have one of the most continuously steep pitches up to the top and, unlike Crestone Needle where you basically shoot straight up a gully with remarkably solid handholds, on Eolus you're constantly looking up, down, left and right to try to wind and weave your way up to the top without getting stuck.
Catwalk viewed from down lowCatwalk and rough path up Eolus as viewed from partway up North Eolus
The catwalk was nothing compared to the Knife Edge on Capitol - this was much wider with only a fraction of the drop on either side (though you would still die if you somehow plunged off). If you're worried about doing the Knife Edge on Capitol someday, this is a great place to come for a warm-up. If you can't handle this you'll want to strike Capitol off your list - or just force yourself to go back and forth on this until you're ready for the next level...
I believe this is where I ended up starting the climb up the face.Example of some of what you encounter going up.
Example of some of the ledges with dirt/plants all over.Another example of the face of Eolus
One more example near the summitAt the summit at last!
Looking back down at the catwalkLooking back down at the route up from Twin Lakes with Sunlight and Windom in the distance.
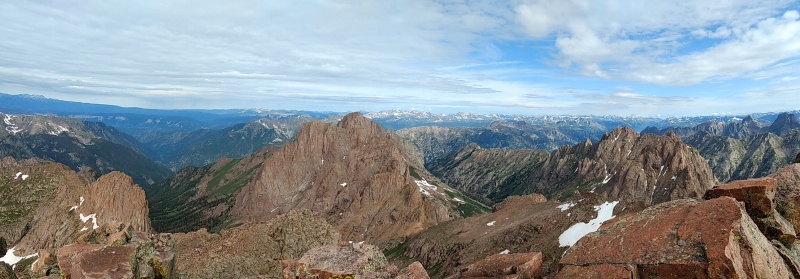
Panoramic view off the backside of Eolus
Going down Eolus was generally easier because you could typically see the places where it made sense to go (unlike a couple spots coming down Pyramid where the ridge bulged out to where you couldn't really see what was below you).
Going back down Eolus
Looking back up at EolusZoomed in photo of folks who got up Eolus after me.
Photo looking back at Sunlight (left) and Windom (right) with Sunlight Spire in between.
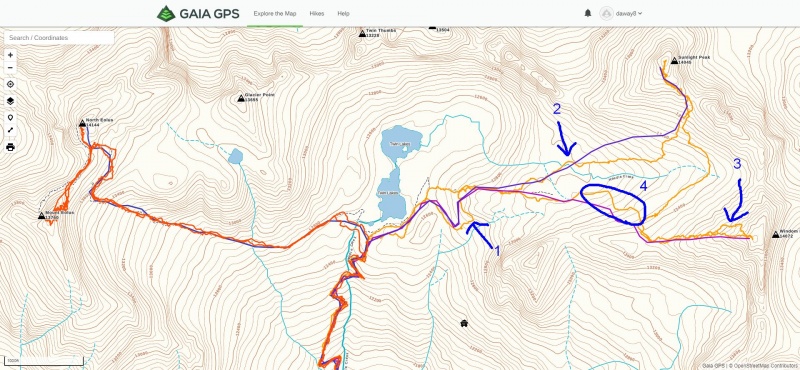
The snapshot below shows the standard GPX routes from 14ers.com in purple (except the red line going up the ridge of Eolus) and my tracks in the other colors. Point 1 is where I needlessly followed the downloaded tracks, overshot and got stuck below the scree field shown earlier. Point 2 is where I course corrected to follow Chrystal and Allison up an easier route to the Sunlight saddle. Point 3 was my blunder at the notch at 13,800ft on Windom that led me into some spicy dodging of crazy steep snowfields on ugly terrain. Point 4 circles the two spots where we glissaded down Windom.
If you open the full GPX file attached you'll see how crazy the approach up the face of Eolus was...
Reminder: you can camp as high as ~11,500ft - the GPX attached shows the extra distance I had to hike by camping lower. But good sites do get scarcer above ~11,100ft...
Caption Here
Times:
Tuesday
11:27am start from Needleton dropoff
11:46am leave trail register after signing in
12:26pm reach bridge (~halfway)
1:41pm 1st open views, some avy debris and thunder starting!
2pm spot viable camping spot near another group at ~11k. Put up tent just as hail begins
~4pm storm ends
Fix dinner, scout trail, go to bed.
Wednesday
4:18am start from campsite
4:53am LEFT ALL MY FOOD HANGING IN THE TREE!!!
5:18am back at campsite loading up trail food
5:26am start from campsite (again!)
5:54am back at where turned around
6:31am reach top of slope below Twin Lakes
8:55am reach Sunlight summit block – waiting for turn to get on top
~9:30am descend Sunlight
10:50am Windom saddle
11:23am Windom summit (after spicy detour)
12:26pm descend from Windom saddle after waiting for Chrystal and Allison
1:07pm reach top of slope below Twin Lakes
1:40pm unzip tent at same moment storm lets loose
~4:45pm storm finally stops
Thursday
3:50am start from campsite (with food!)
5:36am reach top of slope below Twin Lakes (after 20 minute stop)
5:55am after waiting for a little more light, head towards Eolus
7:07am at the ramp
~7:54am North Eolus summit
7:58am descend to notch
8:07am at notch
8:20am at base of the far edge of Eolus face
8:29am start up after scouting back and forth for best route up
9:14am Eolus summit
9:18am descend
9:51am at catwalk
10:32am back at Twin Lakes
11:18am back at tent
12:07am packed up and head back to train
1:09pm bridge at halfway mark
1:56pm at Needleton stop
My GPS Tracks on Google Maps (made from a .GPX file upload):
There is no way that a trekking pole is as effective for self-arrest as an ice axe even using the pole in the configuration as you describe. Period. And to suggest to others to use a trekking pole in place of an ice axe for self-arrest is irresponsible.
Going up a couloir or on ice I would agree 100% and would never suggest such implements for those circumstances. But on snow fields such as encountered in Chicago Basin right now I proved more than once that I could self-arrest just as well as those who had an ice axe. I've seen people doing far worse (such as not having any traction, etc) and I know some folks will never bother to get an ice axe. So giving people an option that can be used if they don't have the fancier gear is something I figure could improve the overall safety over people going out with nothing and no experience (like too many do). The technique does work when done properly so long as you're not on ice or something steeper than Sunlight. Don't believe me? Name your peak - let's have a self-arrest show down...
I wanted to like this report but as rijaca says a trekking pole even shortened and "knowing how to use it" is NO WHERE NEAR as effective for self arrest as an ice axe and I would never NEVER tell anyone otherwise. My ice axe has saved my life as well as a few teammates several times and to try to stop with a ski pole instead would have resulted in all of our deaths. Its not fancy gear for snow travel its a very useful piece of equipment for all types of snow travel. With all fatalities and rescues so far this year many due to slips on snow and ice we don't need anymore people getting themselves in bad situations because of bad advice. A self arrest showdown? Thats a new one.
Thanks for your insightful post! I'm constantly looking for alternative techniques, and I appreciate your taking time to elaborate on these peaks. Alas, someone's going to do it. It seems you were within your personal limits, or at least recognize potential issues to work on. Glad you're safe.
I think it possible that people get more pleasure out of relating to you (online not outside, either positively or negatively), than by following their own path...I prefer the latter, in my own style of course.
If I was without an ice axe, or had traction problems...I might try your techniques to add safety to my ventures. I might also whittle a stick or otherwise improvise.
On those notes I commend your positive spirit, happy trails everyone!
@Whoomie - Glad you caught that this simply adds another tool to the toolbox for people to have in their pocket if they need to use it.
@kushrocks - "steep snow and ice" is not what this technique is for - perhaps I need to edit the report to make that more obvious and also (based on a forum entry) I might be misapplying the term self-arrest. To be clear, I would never try this technique on ice - trekking poles just won't bite into the ice like an ice axe. I also wouldn't do it on anything much steeper than the path I took up Sunlight. That's why I said in the report "standard routes on 14ers - not couloirs."
I know many people will in fact go out onto these peaks without an ice axe regardless of what others say. Since many of them will likely at least have trekking poles, the technique described gives them a way to improve their safety using what they do have. If they go off route and try this on couloirs or ice or crazy steep stuff - that's on them. I specifically warned that people who don't do this as directed can "end up with broken poles and maybe broken bones..."
Despite the negative feedback, I appreciate the report. Heading up in a week or so for a backpacking trip and the photos are a great indicator of how much snow and ice we'll see. Definitely taking the micro-spikes and POLES. Could you say how icy Twin Thumbs is? I doubt we'll go through Chi Basin at all. But it would be an indicator of some of the other passes we may see.
And I understood your post just fine. I didn't take it as saying that a trekking pole could do everything an ice axe could. And if anyone read that and then threw away their ice axe in favor of poles would be an idiot anyway. Thanks again.
Doesn't seem to be a way to easily upload photos into comments so I threw a few pics up on Google which you should hopefully be able to access with the link. Didn't have many of that region but I think there's a couple in there that should give you some idea of Twin Thumbs and the surrounding region. Good luck! https://photos.app.goo.gl/y89dgDHnsJxXjGoBA Photos
Thank you so much. We were considering coming up Ruby through Twin Thumbs. But with that much snow on the South side, I imagine the North side is going to be covered still and rather treacherous. And I'm not bringing crampons and an Ice Ax so I'll err on the side of caution. Too bad. Looks beautiful.
I appreciate that you went back and updated this TR - trying to put myself in the shoes of someone who is trying to decide how to prepare for a similar trip, I think you did a nice job presenting your idea of using poles but providing the caveat that an ice axe is a far safer method when there is a chance of needing to self arrest.
Ultimately, each climber needs to decide for themselves how much risk they are willing to take - thanks for clarifying!
All that aside - nice work getting those four peaks and great pictures!
I for one appreciate your willingness to listen and to make changes to your report. I think you have done a pretty solid job of representing the critiques that you received.
Caution: The information contained in this report may not be accurate and should not be the only resource used in preparation for your climb. Failure to have the necessary experience, physical conditioning, supplies or equipment can result in injury or death. 14ers.com and the author(s) of this report provide no warranties, either express or implied, that the information provided is accurate or reliable. By using the information provided, you agree to indemnify and hold harmless 14ers.com and the report author(s) with respect to any claims and demands against them, including any attorney fees and expenses. Please read the 14ers.com Safety and Disclaimer pages for more information.
Please respect private property: 14ers.com supports the rights of private landowners to determine how and by whom their land will be used. In Colorado, it is your responsibility to determine if land is private and to obtain the appropriate permission before entering the property.


")
")
")
")
")
")
")
")
")
")
")
")
")
")
")
")
")
")
")
")
")
")
")
")
")
")
")
")
")
")
")
")
")
")
")
")
")
")
")
")
")
")
")
")
")
")
")
")


