Download Agreement, Release, and Acknowledgement of Risk:
You (the person requesting this file download) fully understand mountain climbing ("Activity") involves risks and dangers of serious bodily injury, including permanent disability, paralysis, and death ("Risks") and you fully accept and assume all such risks and all responsibility for losses, costs, and damages you incur as a result of your participation in this Activity.
You acknowledge that information in the file you have chosen to download may not be accurate and may contain errors. You agree to assume all risks when using this information and agree to release and discharge 14ers.com, 14ers Inc. and the author(s) of such information (collectively, the "Released Parties").
You hereby discharge the Released Parties from all damages, actions, claims and liabilities of any nature, specifically including, but not limited to, damages, actions, claims and liabilities arising from or related to the negligence of the Released Parties. You further agree to indemnify, hold harmless and defend 14ers.com, 14ers Inc. and each of the other Released Parties from and against any loss, damage, liability and expense, including costs and attorney fees, incurred by 14ers.com, 14ers Inc. or any of the other Released Parties as a result of you using information provided on the 14ers.com or 14ers Inc. websites.
You have read this agreement, fully understand its terms and intend it to be a complete and unconditional release of all liability to the greatest extent allowed by law and agree that if any portion of this agreement is held to be invalid the balance, notwithstanding, shall continue in full force and effect.
By clicking "OK" you agree to these terms. If you DO NOT agree, click "Cancel"...
Due to a variety of reasons, I wasn’t able to get into the mountains yet this year and this was my first time at altitude since August 2017 and was long overdue, I’ve been having mountain withdrawal.
As such, I was fairly unacclimatized, didn’t yet have my “mountain legs” and was not what I considered to be in alpine shape. Nonetheless, I wanted to and was itching to get after some nice mountains and breathe in some thin air. If I needed to take it slower than that’s what I’d do.
Mount Ouray was my first choice. A crisp Centennial in the heart of the southern Sawatch, it didn’t look like getting there would cause too much stress in a rental vehicle, unfortunately, always a concern.
A mere 29 feet shy of Fourteener status, Mount Ouray holds its pride well standing tall in the southern Sawatch, anchoring her own basin forming a breathtaking alpine backdrop.
After a fairly lengthy drive on a dirt road, you’ll reach and unmarked parking area, which effectively acts as the trailhead for the climbing from the east. The road is not too hard to drive aside from the normal washboarding and is very scenic making for a nice approach ride in.
If you’re driving in the daylight you can actually see Ouray from the dirt road as you approach. I didn’t know this until I was driving out since I arrived in the dark.
The trail begins right from the parking area, to the western edge of the “lot”, which is really just an open patch of dirt and gravel that looks like a pull off on the main dirt road and easy to drive past if you’re not paying attention. Strapping my pack and locking the belt, I was ready to go. The cool air felt so nice to breathe in. The thermometer read a brisk 36 degrees.
The beginning approach hike through the forest is nice and peaceful, filled with Aspen to start then later as you climb higher, stands of fir and spruce. The only sound you hear is the light wind through the tops of the aspen trees and the water running in the creek nearby. You gain elevation gently as you hike up. Just enough to perspire if you’re moving quickly, and enough so two layers work perfectly in the morning temperature. Surprisingly, the trail is pretty easy to follow in most spots and early on is in great shape.
You’ll need to make a few creek crossings, which at least in summer conditions, were not very high. Maybe in Spring snowmelt they’d be higher. Occasionally, the trail disappears around these crossings and you’ll need to scout it out, but generally the trail in the beginning is straightforward.
The trail does disappear on and off in spots as you get higher, especially once you exit the initial forest and start ascending the ravine, so you’ll need to pay attention again. You’ll pass a small boulderfield/rockslide on climbers left where you’ll hear pika chirping in the still morning air, undoubtedly alerting the raptors circling above that a potential meal lies below. There is really only one way up, so just make sure you stay in the open and keep ascending up the ravine funnel and you should be fine.
Looking back at the ravine you are hiking up. There were a lot of raspberries along this sunny section, that were just starting to ripen, which I liberally helped myself to. I was assuming that while I was picking them, a local bear would be getting territorial and appear from the brush to warn me otherwise.
As you move higher, you’ll see some aspen and more fir and spruce. The remaining trees here become stunted with many growing in a Krummholz fashion due to the harsh environment and prevailing winds
Once you top out of the ravine, keep walking up another 1/8 of a mile or so and you’ll start seeing Bristlecone Pines which grow right up until the talus fields start on the lower slopes of the mountain. There aren’t too many places on earth where you can see these ancient trees so take some time to admire them. These trees have witnessed a lot in life and they’re likely more than 50 times your age. Pay your respect. This is a good place for a break while you can contemplate the rest of the route, most of which is unmarked.
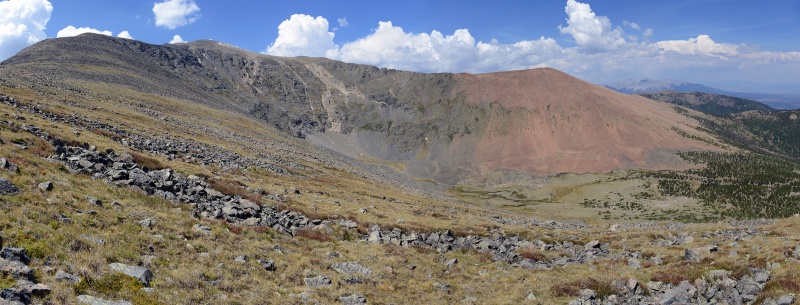
The basin here is a stunning place and is a nice spot to sit and take it all in, also to check how the sky and weather is. This morning saw bluebird skies
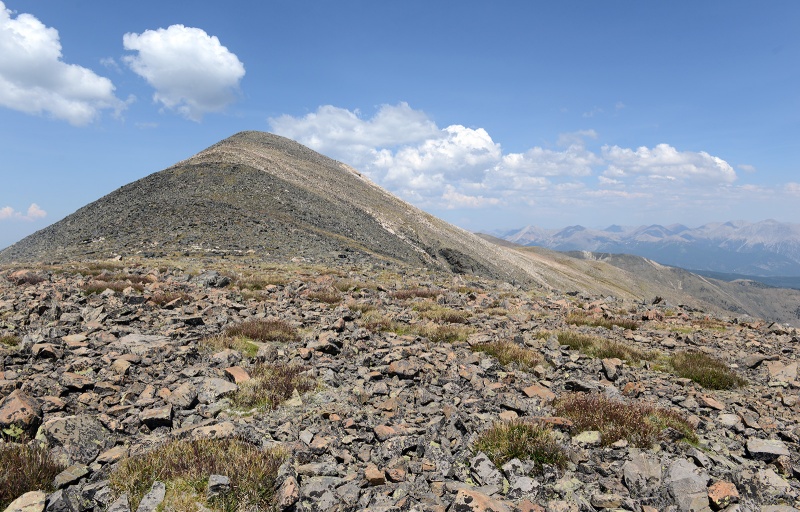
When I first saw the mountain from this vantage point, I made the mistake of thinking the far right pyramidal reddish peak above towards the right in the image was the summit, since from this perspective it appears taller than the real summit of Ouray to the left (west) and further away (hence the distortion of height perception). Had I seen the mountain driving in, it would have been more clear straight away where the summit was.
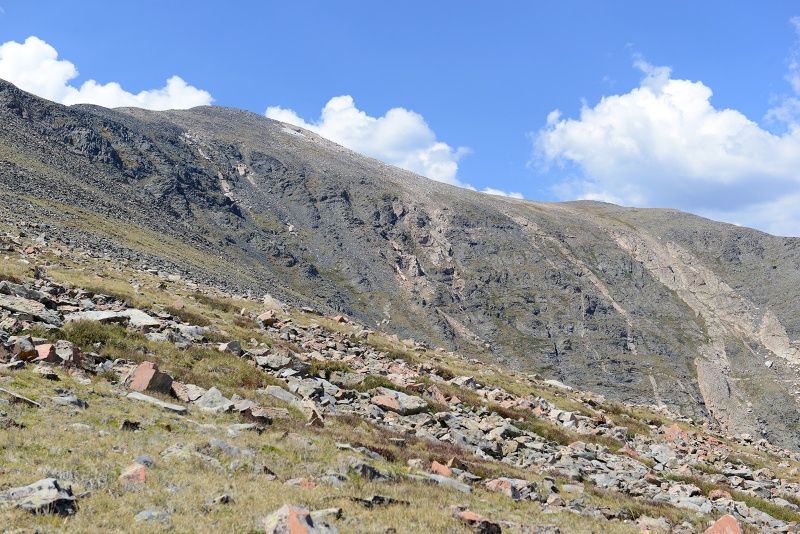
Looking back from where you came, let the talus begin
The remaining route comes into view now. You’ll cross over mixed talus and grassy slopes. The angle of the slope the talus is here is pretty mellow, and there doesn’t seem to be one correct route, so pick a line and go for it.
Do note though where you start and top out, since when you come down, your perception may put you too far South or too far North which could put you offroute or too close to the summit cliffs and steep scree which will put you in a more precarious situation.
You might see a cairn here and there. There is no defined route from here to the ridge and as is often the case with cairns, some will lead you in different directions, so take care should you decide to follow any.
Once you start your ascent, while there is no defined route, aim West/Southwest and pick your way across the slope. There is no single way up and you’ll have to just pick a route that suites you.
Shots from the ascent towards the saddle-like plateau or false summit.
Looking North
Getting closer to the first goal, the plateau before the false summits start to climbers right (North/Northwest)
Closer look at the rubble you’ll be climbing over. Angle to the left in this photo, more westerly. Taking dead aim at the summit from this spot would result in nightmare scree and steep cliffs, Take the longer route up more gentle slopes.
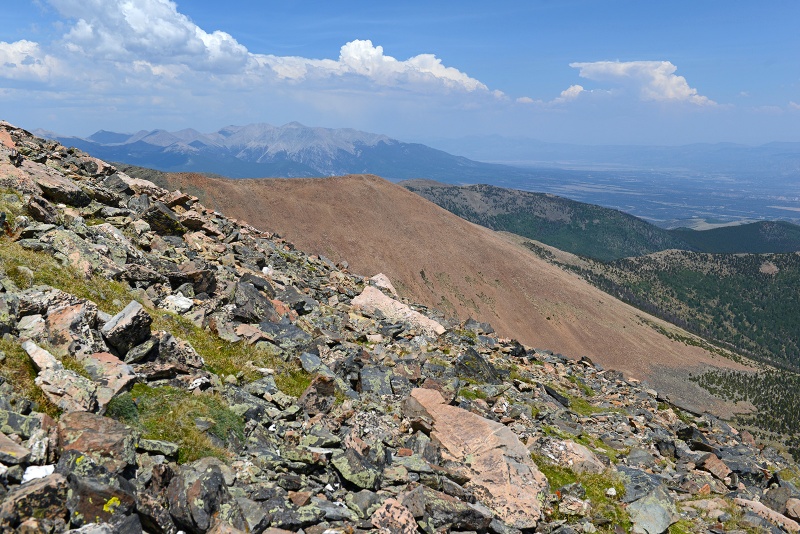
Looking North/Northeast, other peaks in the southern Sawatch Range are clearly visible as you climb higher. You could see some haze in the air from the fires in the distance, but as you can see the visibility was not too bad. I could smell some smoke as I was on the mountain all day, but the smell was not very strong.
As you gain the plateau you can see the remaining route towards the top
From here, (on the descent) I discovered there is actually a trail of sorts that first winds around the mountain and makes it way to the false summit and finally to the top. This makes it quite a bit easier than picking your way up and down the granite talus.
As my first ascent above 10,000ft in a year, my lungs and body were feeling it and working overtime, but it was manageable. Slow and steady wins the race. As I usually feel, it’s not only the terrain and route that makes a mountain hard, it’s your fitness and condition. I’ve had physically much harder days on easy Class 1 peaks than I’ve had on some more difficult Class 4 peaks based solely on my acclimatization and fitness at the time.
Looking back at the plateau and false summit-like area, the route to climb up is down to the left (East) in the photo – from this angle, it looks like the sloping back of a giant dinosaur (use your imagination here).
Almost to the top. More talus
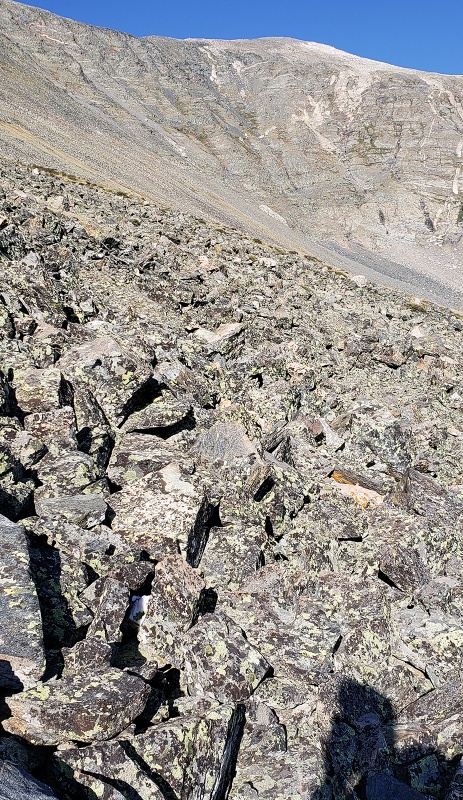
Closeup of the wonderful talus you’ll be dealing with
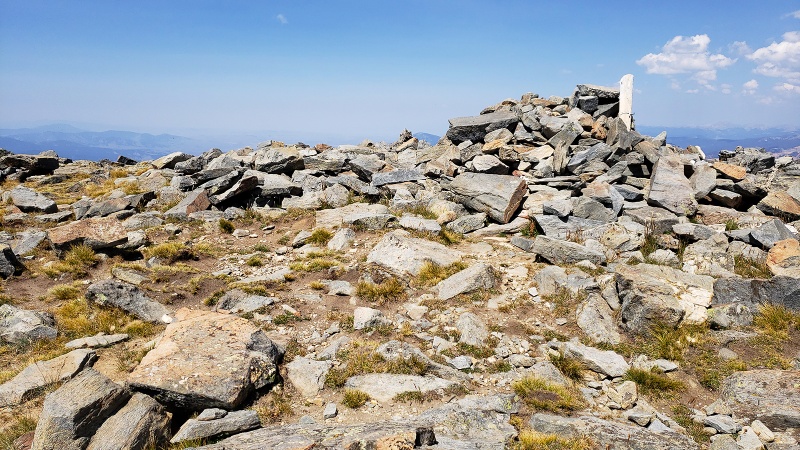
After a bit more hiking up, you’ll be standing on the summit where there is the summit cairn!
Summit views and summit shelter
Summit Pano with views of the Sawatch in the Background
The descent was pretty straightforward, now that I found and followed the light trail back to the plateau. Descending from that plateau back to Bristlecone pine area wasn’t too hard just make sure you pick a good line and don’t go too far North or too far South coming off that plateau. There is some sketchy terrain to North you should stay away from and going too far South will put you in the wrong basin should you wander too far off coming down.
I imagine assuming you can get there on that road, this would make a nice snow climb and would make finding that line to the summit easier.
Parting shot of Mount Ouray driving out
If you’re looking for a nice 13er to spend the day on, consider Mount Ouray, it makes for a nice outing. I ended up not seeing a single person climbing this mountain and along with the marmots and pika, had the place to myself.
Thumbnails for uploaded photos (click to open slideshow):
My son and I took his cross country teammates up to the summit of Ouray a few years ago from Grays Creek. We had a blast. I love the prominence Ouray has when you see it from the road just north of Salida. I'd gladly do the hike again, but on a bluebird sky day. It was considerably hazy the day we went and I really was disappointed that we didn't get to fully enjoy the views that Ouray is known for.
Caution: The information contained in this report may not be accurate and should not be the only resource used in preparation for your climb. Failure to have the necessary experience, physical conditioning, supplies or equipment can result in injury or death. 14ers.com and the author(s) of this report provide no warranties, either express or implied, that the information provided is accurate or reliable. By using the information provided, you agree to indemnify and hold harmless 14ers.com and the report author(s) with respect to any claims and demands against them, including any attorney fees and expenses. Please read the 14ers.com Safety and Disclaimer pages for more information.
Please respect private property: 14ers.com supports the rights of private landowners to determine how and by whom their land will be used. In Colorado, it is your responsibility to determine if land is private and to obtain the appropriate permission before entering the property.


")
")
")
")
")
")
")
")
")
")
")
")
")
")
")
")
")
")
")
")
")
")
")
")
")


