| Report Type | Full |
| Peak(s) |
Crestone Peak - 14,299 feet Crestone Needle - 14,196 feet |
| Date Posted | 06/30/2018 |
| Date Climbed | 06/27/2018 |
| Author | Curve |
| Just another traverse... |
|---|
|
Yep, you heard it right, here's ANOTHER Crestones Traverse Trip Report. However, my intention with this report isn't to show off the traverse, (or my rad photos,) but to give information on parts of the entire route that I thought was vacant in my research. So, without further stalling, here is my two cents on the route. Day 1: My Journey started off like every story does, sitting in Denver Traffic with my climbing partner Pip. As usual, I-25 was backed up all the way through Colorado Springs and I was just happy to be on my way back to the Cristos. After Crawling through the springs we hit the Vietnam Veterans Highway and flew down to Westcliffe. The drive down to Westcliffe is always fun for me, I personally enjoy it far more than I-70 or 285, so the drive went quickly. After 3 1/2 hours we had finally pulled up to the long, bumpy, and HOT road that winds to the South Colony Lakes Trailhead. We made short work of the 4-wheeling and were quickly forced out of my truck by the sweltering heat at the Trailhead. I quickly choked down my 3 hour old Qdoba and slung on my heavy pack. This is where my first word of advice comes into play, the old 4-wheel drive Trailhead sucks! It is 2.25 miles of flies, heat, and rocks. Maybe it's just me, but I hike a lot slower on roads, so we opted to take the Spur Trail instead of the usual way. I have heard from recent threads that the Spur Trail is harder for route finding, so here is some beta. (Note: I don't bother to track my mileage on any of my trips, so I cannot give precise directions.) Follow the trail through the forest until you begin to reach tree line. If you come across any forks, take the more worn trail. Once at tree line, start to look at the left side of the trail. You will come across a distinct "Y" looking rock sticking out of the grass next to a social trail. This is your turn off. To be more precise, If you are still in the trees, you haven't gone far enough. If you are passing the lower lake, you have gone too far. The way I describe it makes it sound difficult, but trust me, it is not. Just find the rock and turn left onto the social trail. 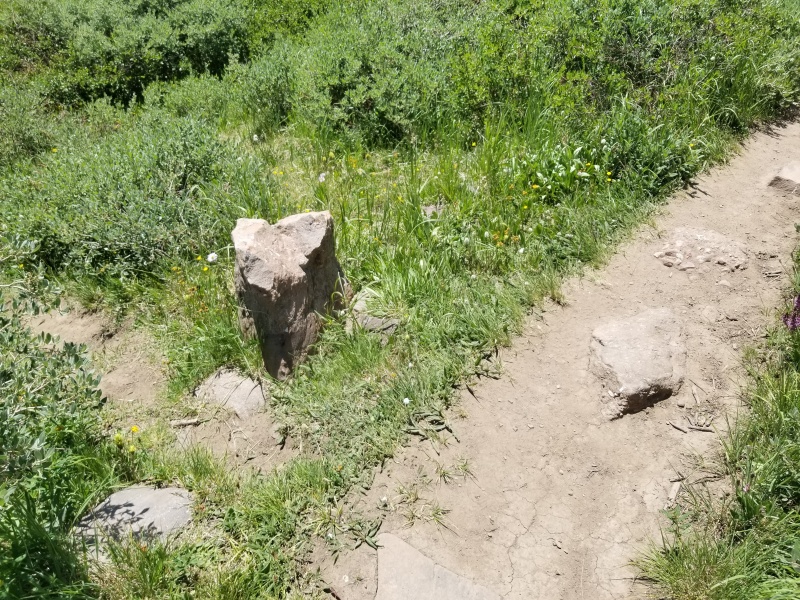 The trail will take you through thick willows until you hit a stream. Cross the stream via 4-5 large boulders and pick up the trail going left (South-East) on the other side. You only want to follow this trail for around 200 feet if you aren't camping. The cutoff for Broken Hand Pass will sneak up on you and it is easy to pass. So, look for the sign on you're right side. If your are camping, like us, then continue for around 20 feet after the sign and you will find 5-6 campsites on the left and right sides of the trail. When we arrived to camp at around 7:00pm the spot on the left side of trail was taken, so we took one deeper in the trees on the right side. It was deeper in the woods than the spot on the left side of the trail, but it had far more solitude so we didn't mind. Also, it had a great view of Humboldt. 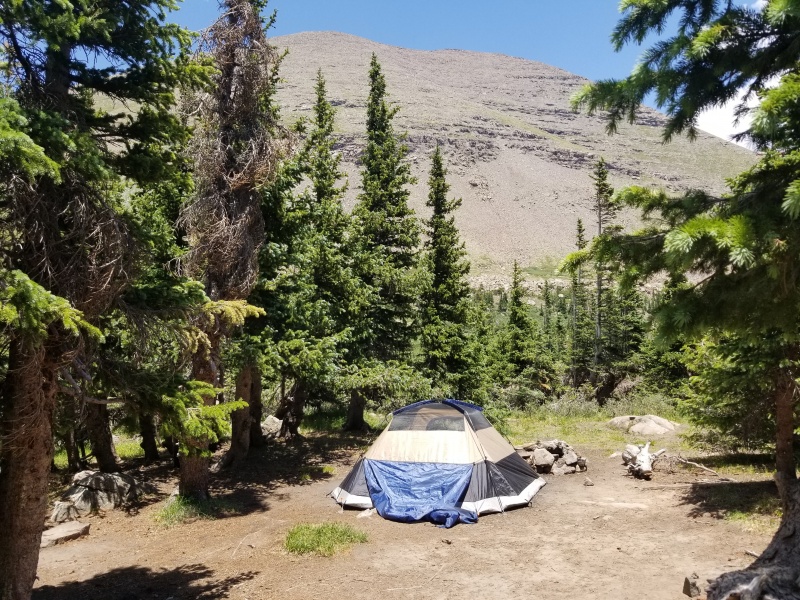 After setting up my giant 4-man tent, we quickly ate dinner and went to bed. We had quite the ambitious plan ahead of us, we had to be back in Thornton by 6:30 PM on Wednesday to catch a 7:00 PM meeting. Because of this, we opted to take no chances and wake up at 2:30AM to hit the trail by 3:00. Not to mention, the heat from the hike up the road had really taken it out of me, so I was beyond ready to go to bed. We set our alarms and quickly fell asleep. Day 2: I awoke in complete shock the next morning as my phone blasted "I Want You Back" by the Jackson 5. I hopped out of bed singing the lyrics to the funky beat as Pip groaned and slowly woke up. (Can you tell who the morning person is?) Although he took more time, I eventually got him up and we both emerged from the tent ready for the long day ahead of us. We slammed down some pop tarts and quickly started up to broken hand pass. Our official start time was 2:52 am. (Side note: if you are purely interested in our climb times then scroll to the bottom, I have listed them down there.) The Trail to Broken Hand Pass wasn't nearly as bad as I was anticipating to be. We started off by stumbling through the many campsites around us, all the while trying not to shine our headlamps their direction. Unfortunately, as we got the true trail to Broken Hand Pass, we nearly blinded a person sleeping without a rainfly on their tent. So if that was you, I'm super sorry. Nevertheless, we began the steep trail up to Broken Hand. Its not all that difficult to follow in the dark, just follow the giant cairns lining the route. If you do get off route, just aim for the saddle and don't go too terribly far left. As we approached the steep switchbacks leading up to the class 3 section we put our helmets on. Of course, their was no one above us so rockfall danger was limited, but hey, what the heck right? There was, however, two headlamps far down in the valley hiking up the spur trail. These two headlamps would end up becoming great friends later on. The class three up broken hand wasn't too bad and was easily taken down by our pop tart fueled hiking power. We quickly scrambled over the crux and made it to the top of the pass. at around 3:55. After a short break on the saddle we flew down into the valley and reached Cottonwood Lake. Upon reaching the lake we dropped packs and filtered water to make sure we would be full for the traverse. After filtering water and taking a couple of sweet long exposure photos, we continued through the valley. Nothing in the valley is particularly hard, but if you lose the trail near to entrance to the red gully, just follow cairns to get you back on track. We entered into the red gulley at 4:55 am. Keep in mind, this was with a 10 minute stop at Cottonwood lake, so it can be improved. Personally, I feel the Red Gulley is pretty overrated. I found that any class three in it was pretty easy. It was far more challenging on the legs than anything. Pip and I cruised through the 1st half of the traverse before dramatically slowing down. As many other trip reports state, don't underestimate the time that can be spent in the gulley. It took us an entire hour to get from 13,550ft up to the summit. Progress is slow and rough. But, we did see part of the sunrise as we climbed. 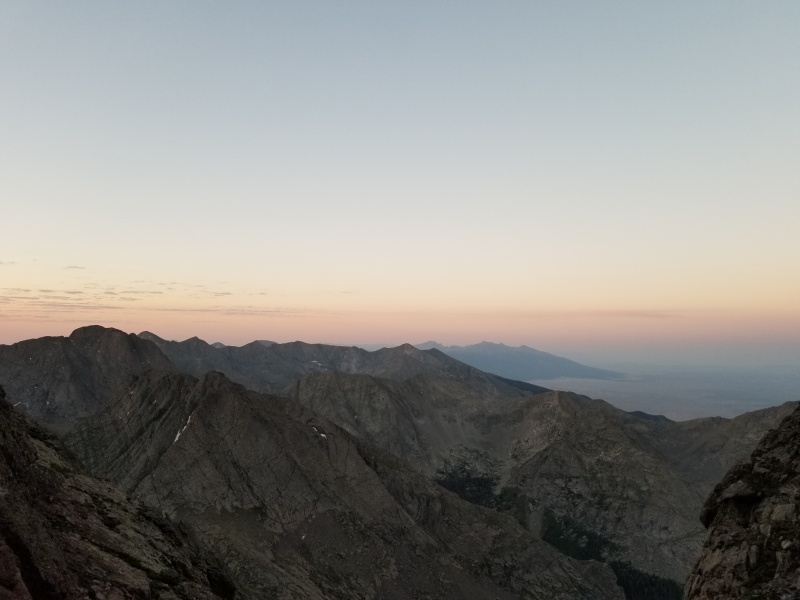 The sunrise made us feel far better as we climbed, so much so that we actually started moving at a reasonable pace again. Nevertheless, if you want a quick summary of the Red Gulley, it is steep, rocky, and its red. Nothing special. We made the summit at 6:20am and sent some text messages home along with an Inreach ping to prove we made it. We propped my phone up on a timer to get our summit photo. but the timer was so long it caught my in the act of angrily questioning if it had gone off or not. So, enjoy our janky summit photo. 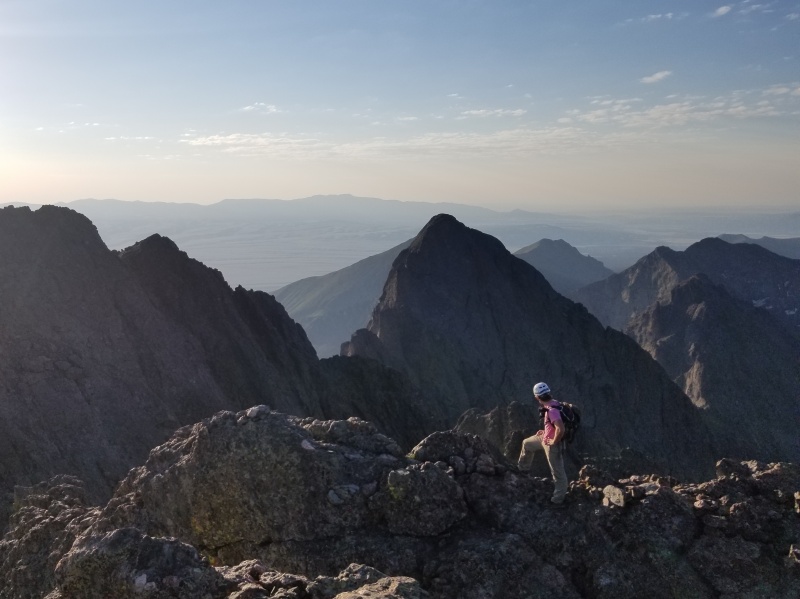 And of course, here's the worst summit picture of all time.  After our photos were taken we descended off the summit only to be greeted by two other climbers. We would find out later that these were the same people we saw making their way up the Spur Trail earlier this morning. The descent off the Gulley is far worse than going up it. It is super slow and dangerous. Be careful and don't underestimate it. If I had to comment on one thing to gain the entrance to the traverse, it's that it's farther down than you may thing. I would suggest getting the gps coordinates because you don't want to miss it. The traverse has plenty of information on it so I won't cover it much. It's fun, awesome, and feels remote. Ok, I'll shut up now, here's some pics of the traverse. 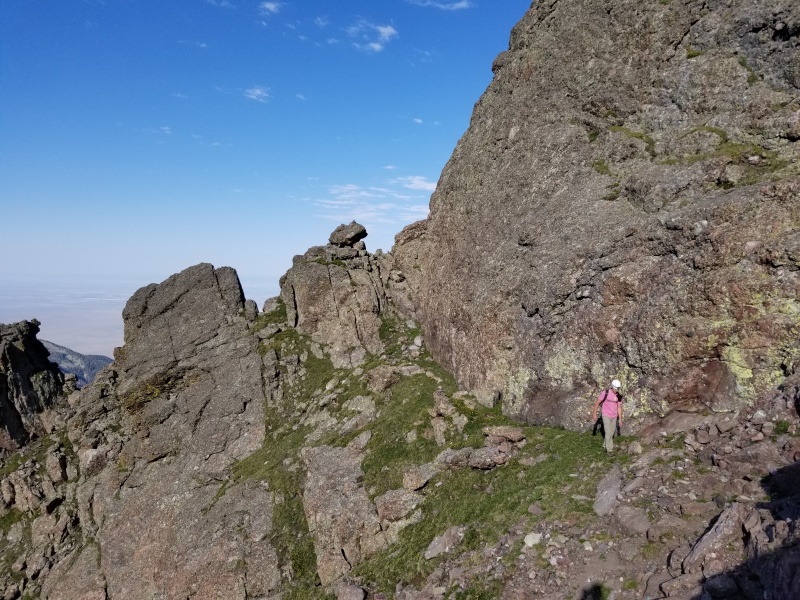 Ok, I lied, I won't shut up. The first major obstacle that no one talks about is the gulley that leads out of the second "red gulley" to the Black gendarme. This gulley has the loosest rocks of the entire traverse and it's easy to dislodge huge rocks. Take your time and climb careful. 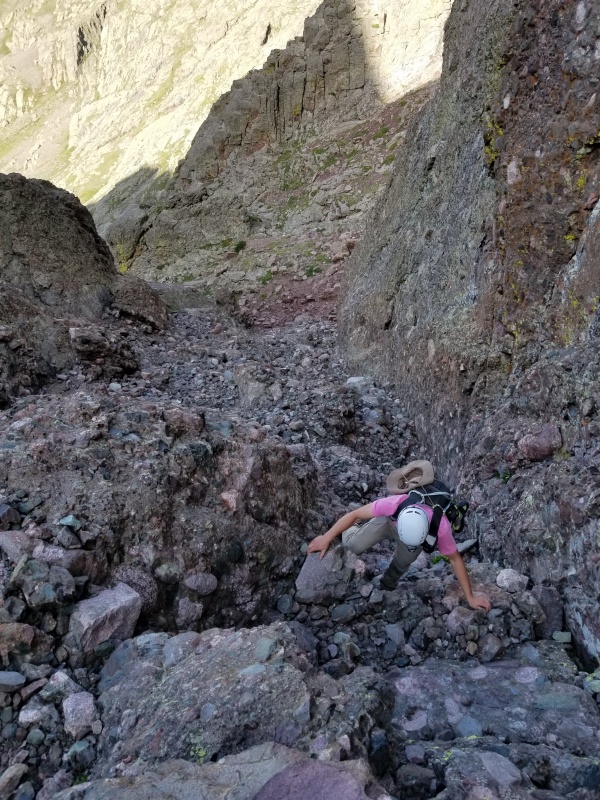 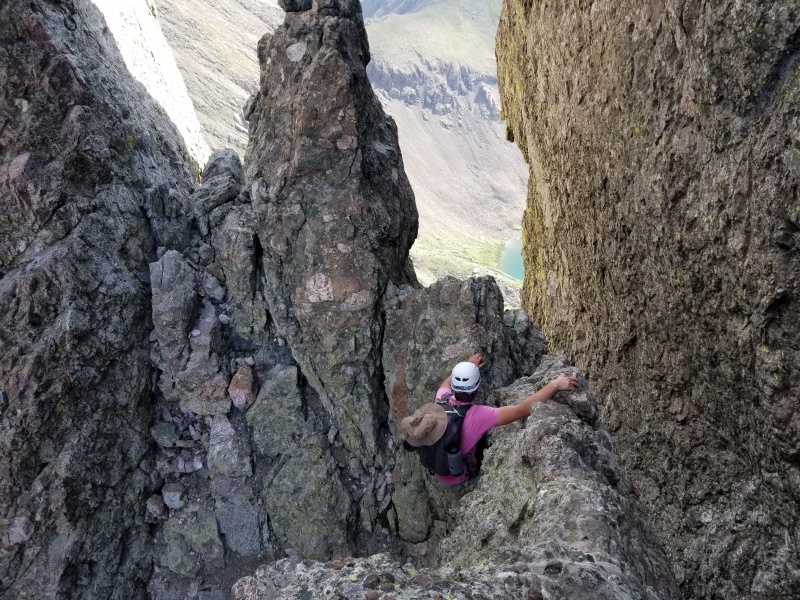 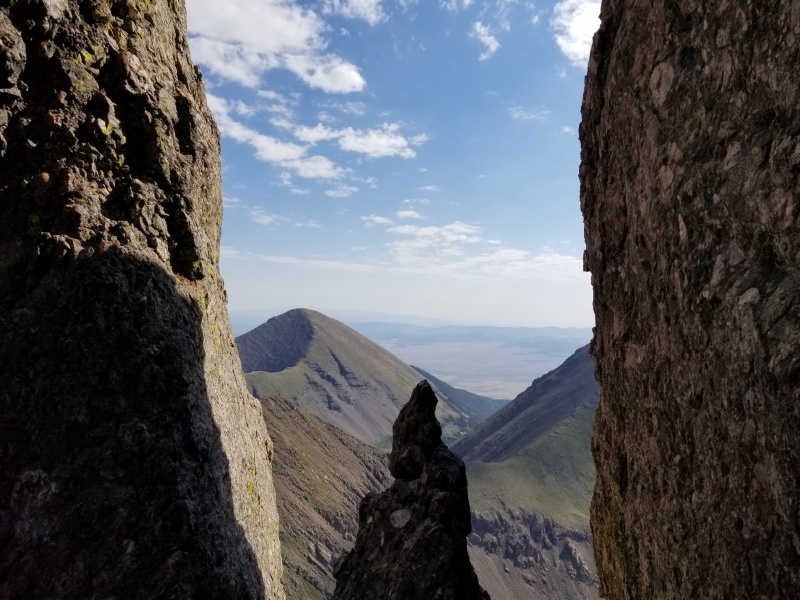 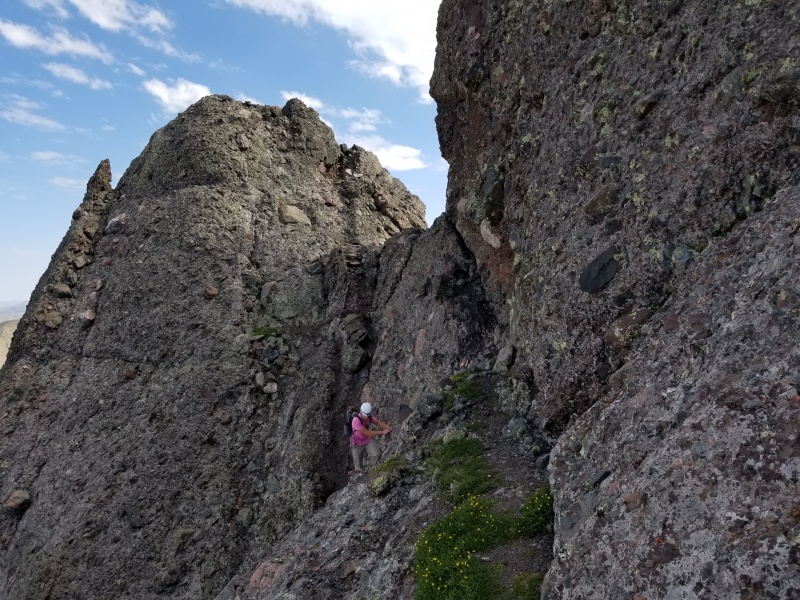 After a crazy climb we reached the Summit of the needle at 9:30. In terms of the crux wall, it is really exposed but not as steep as I thought it would be. The holds are great and its not as long as I anticipated. We sat at the summit and ate some food. After hearing some noise from the crux wall, we watched as the two climbers we had seen earlier came up the wall. We met them and talked with them at the summit. After talking for a couple of minutes we decided it would be best to descend together. I unfortunately never got either of their names but they made some awesome partners. Plus, they were able to take a summit photo.  Now, for the main reason I write this report, the descent off the needle. In my hours of research on this route I couldn't find the exact right photos and information I wanted, so here is my detailed description on the descent off the Needle. From the summit of the needle, follow the cairns down from the summit. You will walk the ridge for about 50-100 feet before being confronted with this view of an open basin. 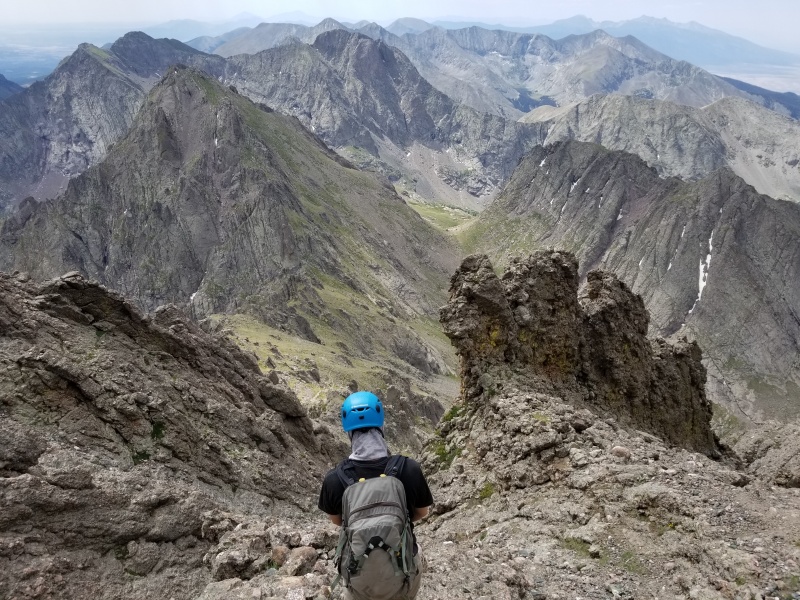 In this Basin you will see a large gulley and a huge, jagged rib in the middle. Your goal is to go right of the huge rib seen above. If you go left it will put you in the East Gulley. If you go right you enter the West Gulley. After entering the West Gulley continue straight down. We found it easiest to stick to down climbers left. As you go down this gulley the two ribs that make up the gulley will slowly converge making the gulley steeper and skinnier. When this begins to be obvious start looking for the crossover. It is earlier than you might think. It is marked with three small cairns. 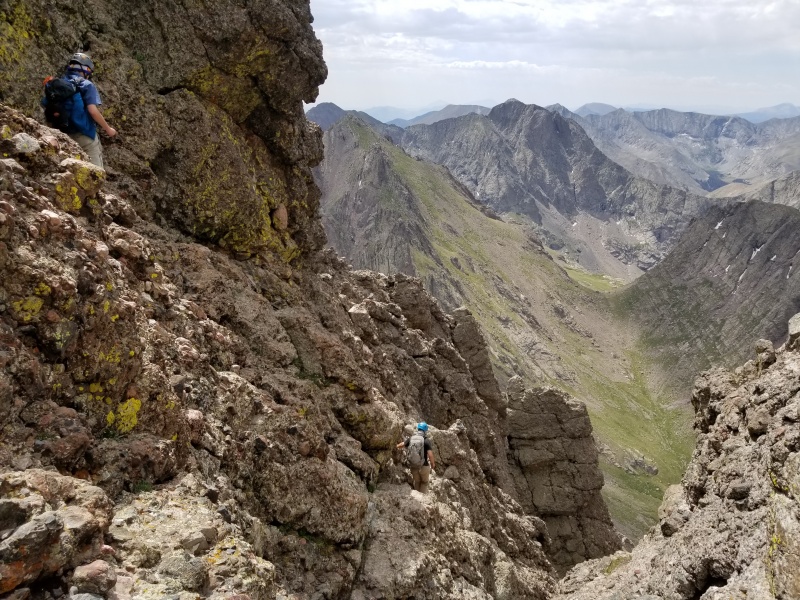 As said before, it's easy to miss, if the climbing gets loose and steep you've gone too far. Just watch to your left and when the giant wall breaks, turn left onto the crossover. As I said before, this was my main purpose in writing this report , just to show off the gulley when looking down at it. So, I will kind of glance over the rest of the descent. Except for one thing, the crux. The crux is awkward and the Gulley that makes up the crossover is far deeper than you think, about five feet deep. Here are some pics of the awkward move and the gulley's depth. 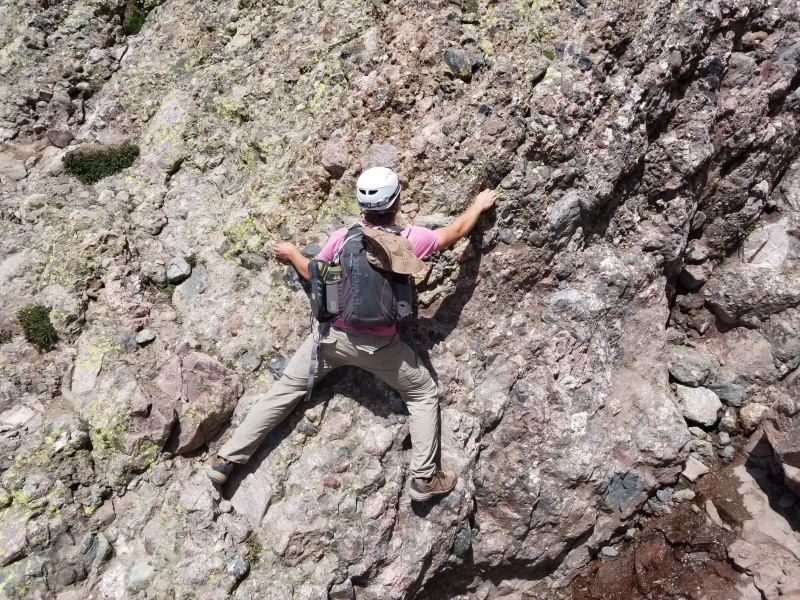 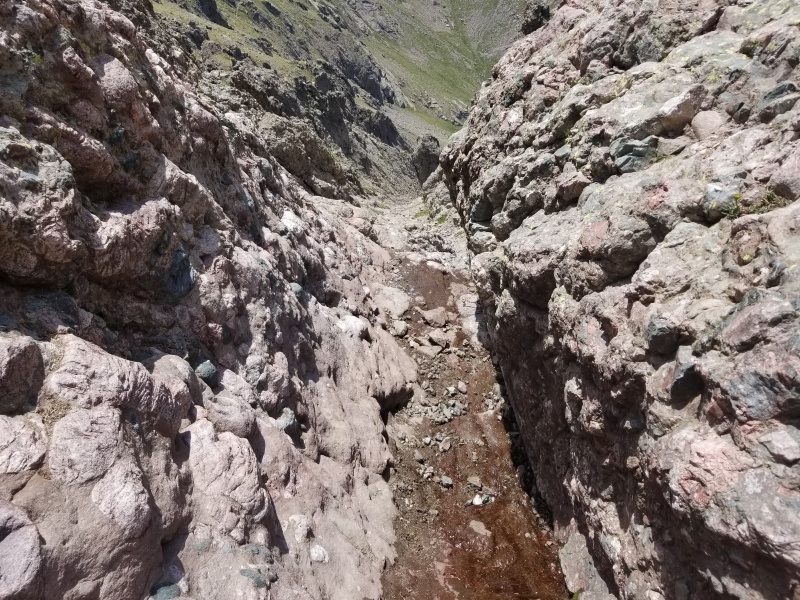 The rest of the decent can be completed by easily following cairns. Don't underestimate the needle, it has some very difficult sections. The descent off of the needle was relatively fast and only took us 2 hours from summit to camp. All in all, The Crestones live up to their infamous name. The Crux Wall of the Traverse can be defeated by going slowly and picking the right holds. The crux of the needle is more difficult than much of the stuff on the traverse in my opinion. If you are shorter it can be difficult to reach many holds. This forces you to do the weird move that Pip is displaying above. This route is awesome and I highly recommend it, go get those mountains! Times Awake at Camp: 2:30am Top of Broken Hand Pass: 3:55am Reaching the Red Gully: 4:55am Summit of Crestone Peak: 6:20am Leaving the Summit of Crestone Peak: 6:43am Entering the Traverse: 7:05am Summit of Crestone Needle: 9:30am Leaving the Summit of the Needle: 10:18am Reaching the Crossover: 10:40am Back down to Camp: 1:05pm Car:3:00pm Thumbnails for uploaded photos (click to open slideshow): ")
")
")
")
")
")
")
")
")
")
")
")
")
")
")
")
")
")
")
")
")
")
")
")
|
| Comments or Questions |
|---|
|
|
Caution: The information contained in this report may not be accurate and should not be the only resource used in preparation for your climb. Failure to have the necessary experience, physical conditioning, supplies or equipment can result in injury or death. 14ers.com and the author(s) of this report provide no warranties, either express or implied, that the information provided is accurate or reliable. By using the information provided, you agree to indemnify and hold harmless 14ers.com and the report author(s) with respect to any claims and demands against them, including any attorney fees and expenses. Please read the 14ers.com Safety and Disclaimer pages for more information.
Please respect private property: 14ers.com supports the rights of private landowners to determine how and by whom their land will be used. In Colorado, it is your responsibility to determine if land is private and to obtain the appropriate permission before entering the property.

