Download Agreement, Release, and Acknowledgement of Risk:
You (the person requesting this file download) fully understand mountain climbing ("Activity") involves risks and dangers of serious bodily injury, including permanent disability, paralysis, and death ("Risks") and you fully accept and assume all such risks and all responsibility for losses, costs, and damages you incur as a result of your participation in this Activity.
You acknowledge that information in the file you have chosen to download may not be accurate and may contain errors. You agree to assume all risks when using this information and agree to release and discharge 14ers.com, 14ers Inc. and the author(s) of such information (collectively, the "Released Parties").
You hereby discharge the Released Parties from all damages, actions, claims and liabilities of any nature, specifically including, but not limited to, damages, actions, claims and liabilities arising from or related to the negligence of the Released Parties. You further agree to indemnify, hold harmless and defend 14ers.com, 14ers Inc. and each of the other Released Parties from and against any loss, damage, liability and expense, including costs and attorney fees, incurred by 14ers.com, 14ers Inc. or any of the other Released Parties as a result of you using information provided on the 14ers.com or 14ers Inc. websites.
You have read this agreement, fully understand its terms and intend it to be a complete and unconditional release of all liability to the greatest extent allowed by law and agree that if any portion of this agreement is held to be invalid the balance, notwithstanding, shall continue in full force and effect.
By clicking "OK" you agree to these terms. If you DO NOT agree, click "Cancel"...
Report Type
Full
Peak(s)
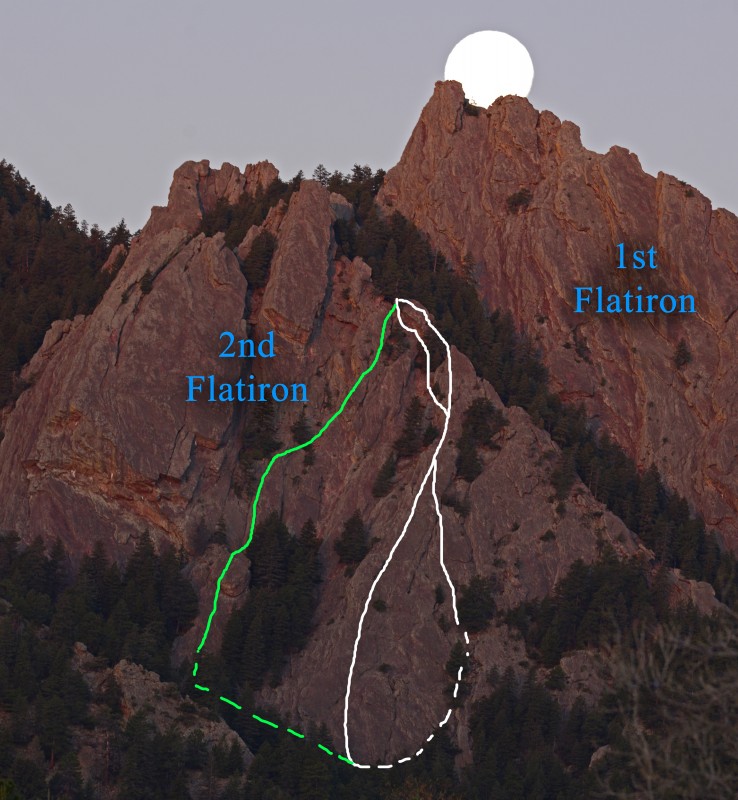
First Flatiron - 7280
Second Flatiron - 7120
Nebel Horn - 7560
Royal Arch - 6960
The Regency - 6840
Front Porch - 6820
Lost Porch - 6840
Anomaly - 7080
Amoeboid - 7120
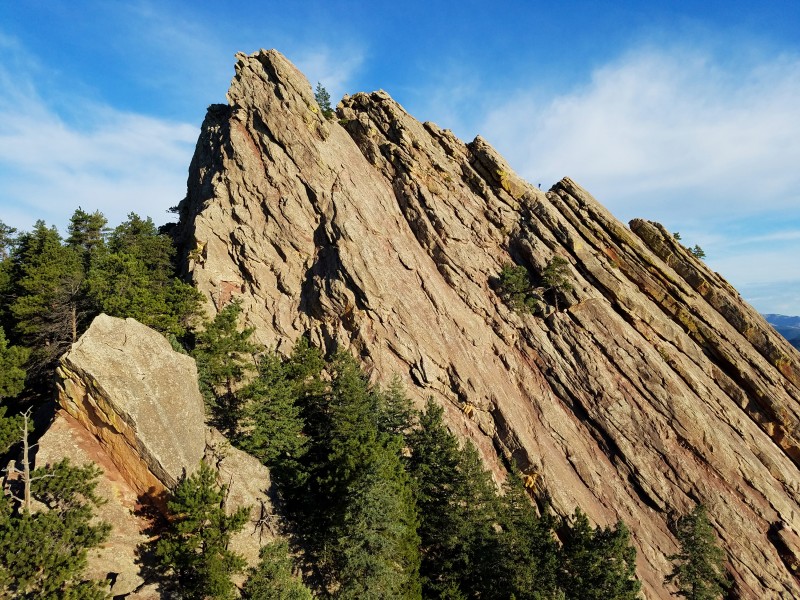
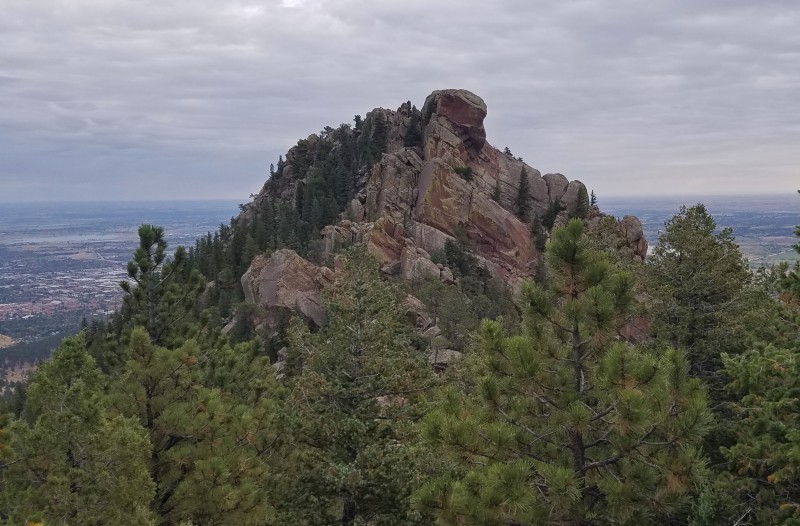
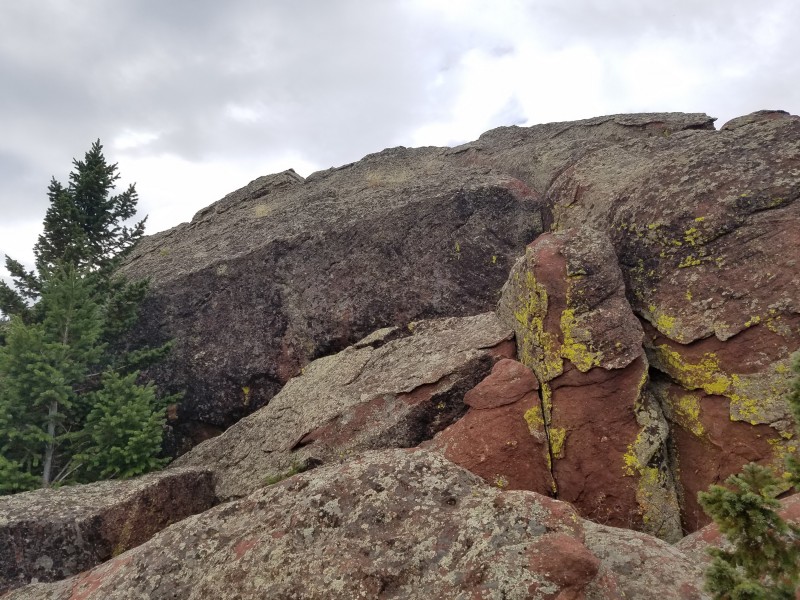
The Flatirons are made up of hundreds of sandstone slabs tilted somewhere around 45 degrees on the slopes of Green Mountain, Bear Peak, and Eldorado Mountain above Boulder. While most of the Flatirons have only 5th class routes, there are quite a few reasonable class 3 to 4 scrambles hidden on these rocks. This trip report, the first of two, will document my reviews of several comparatively easy routes on the Flatirons. It is going to be quite long, but I wanted to provide detailed information and pictures for those that are interested.
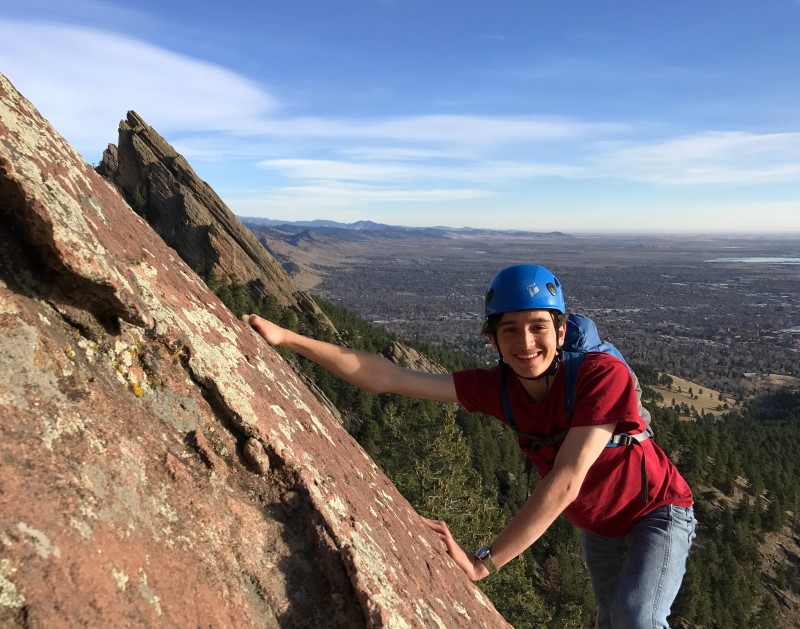
Gear: I like to use rock climbing shoes for most of these routes, but lots of people do fine with approach shoes or the like. I always use a helmet, but lots of people don't, as the rock is fairly solid. I did all of these routes as scrambles (unroped), but some may desire a rope, harness, and rack for some routes. Beyond that, you'll of course need the usual hiking gear.
Approaches / More Beta: Mountain Project and the OSMP website have rock climbing and trail information, respectively. OSMP also has a closure map with the names of the rocks to assist in finding them. Note that some rocks (Amoeboid / Anomaly) are in Habitat Conservation Areas, so you need to print a free permit on the OSMP website.
Important Note on Beta and Ratings: This report, like every trip report, is subjective and does not attempt to provide detailed route information or judgement on when to use a rope. As Gerry Roach says, some people could (and routinely do) solo up and down every route on the Flatirons, while others couldn't do any route with or without a rope. Also, difficulty ratings in this trip report are subjective but based mostly on the NCCS ratings in Gerry Roach's guidebook. On Mountain Project, some of these routes are rated harder. Smooth Class 5 rock is usually only a few feet from the easiest route. The number one rule when scrambling is don't fall. The number two rule when scrambling is DO NOT climb up what you don't feel comfortable climbing down. I learned this the hard way on a sketchy 5.5 crack downclimb when I accidentally got on Mohling Arete instead of Angel's Way. Climbing down is always harder than climbing up. And remember, it's always steeper, smoother, more lichen covered, and farther away than you thought. Ok, enough with the warnings, let's review some Flatiron routes!
I will discuss 12 routes in this trip report. Here they are arranged in approximate order of difficulty. In deciding relative difficulty, I considered ratings, length, commitment, mandatory downclimbing, lichen, and routefinding. Keep in mind that "slab style" climbing can feel a lot different than much of what we encounter in the alpine. The number on the left indicates my personal thoughts on the route, from 1=favorite to 12=least favorite.
11. Standard Route, Nebel Horn, Class 3
10. Northeast Ridge, Front Porch, Class 3+
12. East Face, Anomaly, Class 4
2. Freeway, Second Flatiron, Class 4
5. Dodge Block, Second Flatiron, Class 4
6. Buckets Line, Amoeboid, Class 4
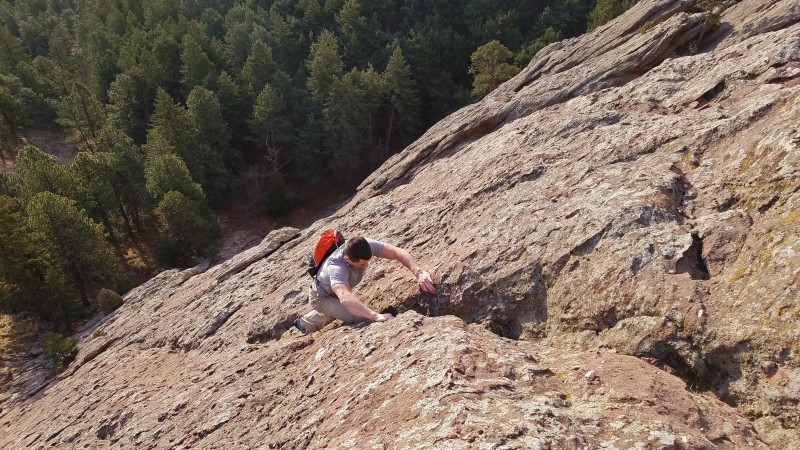
1. East Face, Royal Arch, Class 4
4. Northeast Rib, The Regency, Class 4
3. East Face Center, Front Porch, Class 4+
8. East Face, Lost Porch, Class 5.0
9. West Face, Second Flatiron, Class 5.2
7. Southwest Face, First Flatiron, Class 5.2
The Second Flatiron: Freeway: Class 4
Personal Fun Rating: #2. Freeway is one of the most popular scrambling routes in the Flatirons, and it is one of the few places that you are likely to see other scramblers. A hilarious satirical climbing video was made featuring the Freeway route (the last pitch is the west face, described below). https://www.youtube.com/watch?v=K9Lr62amiJQ
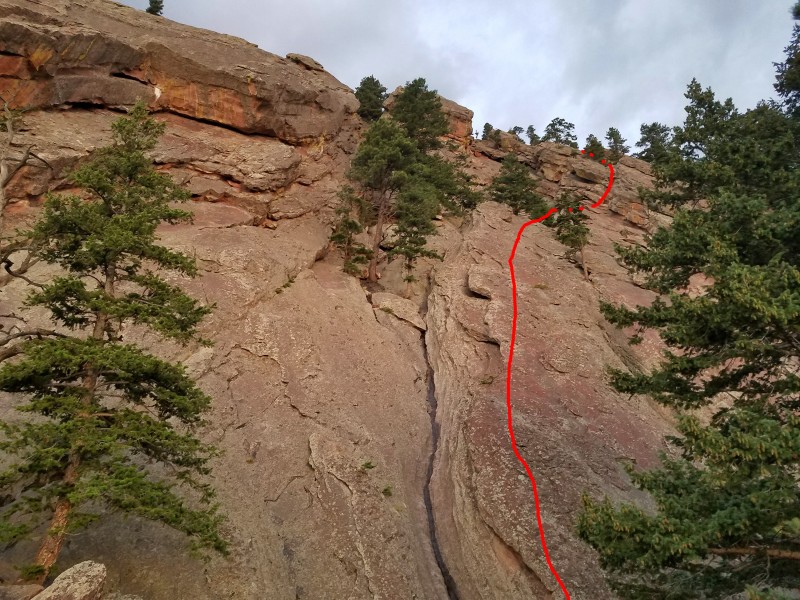
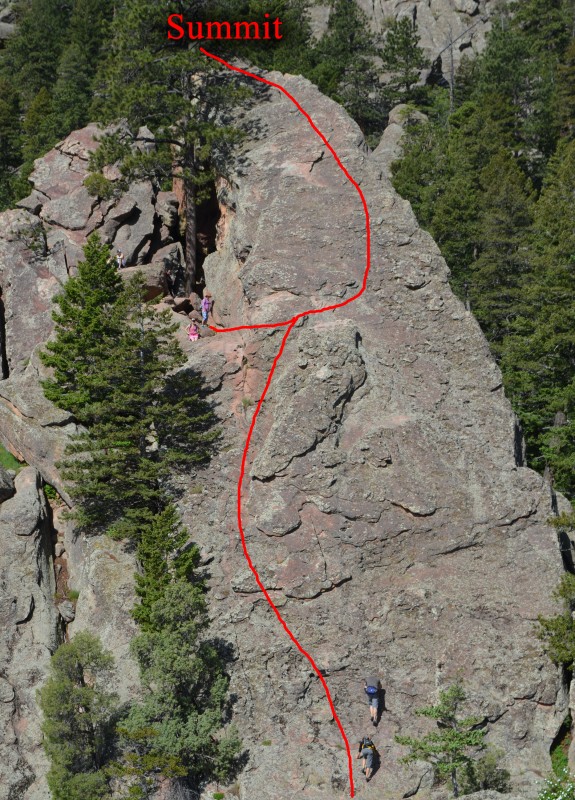
Here is a rudimentary topo of the east face of the 2nd Flatiron. Two popular variations of Freeway are shown in white, and the next route, Dodge Block, is approximated in green.
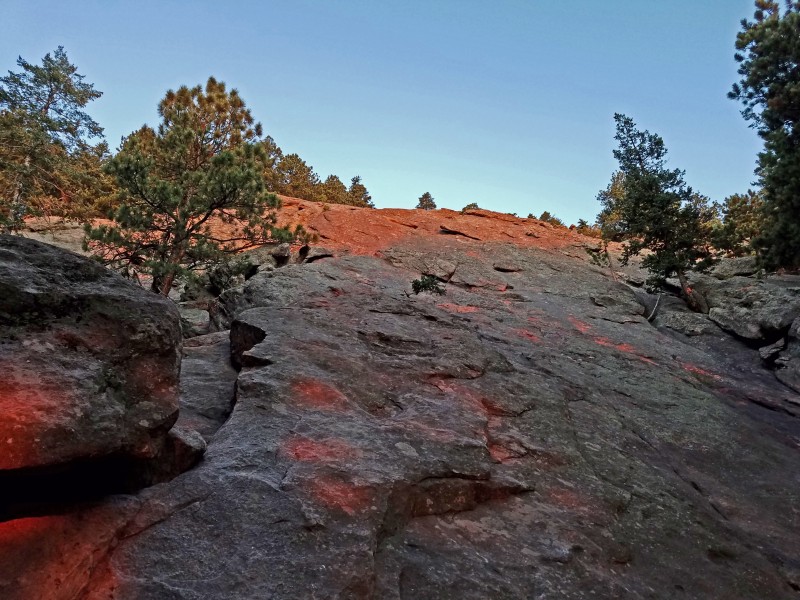
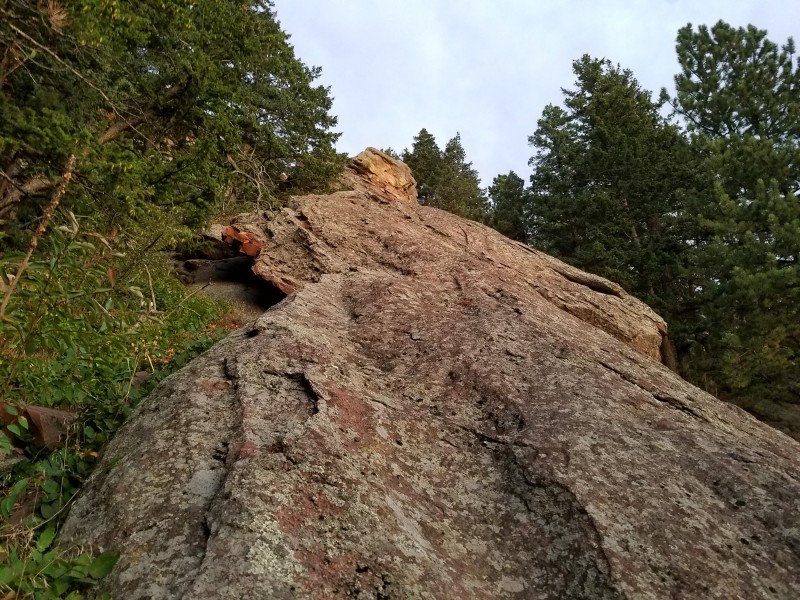
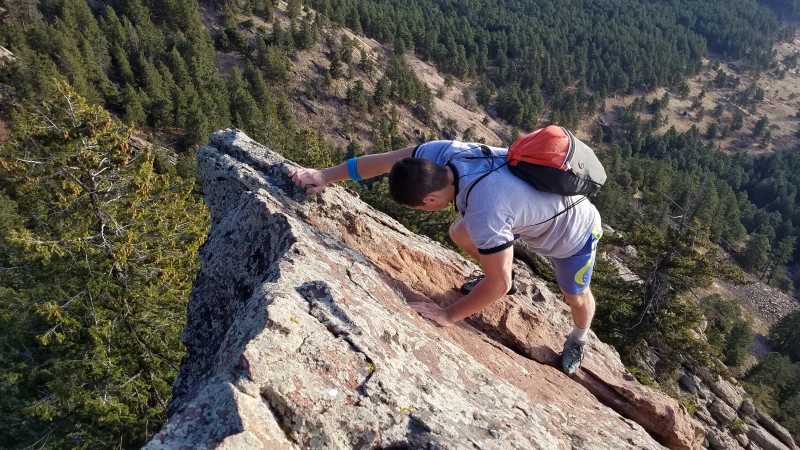
From where the trail meets the base of the 2nd Flatiron, the first pitch of Freeway is the hardest and steepest. This view looks up the start of Freeway at sunrise.
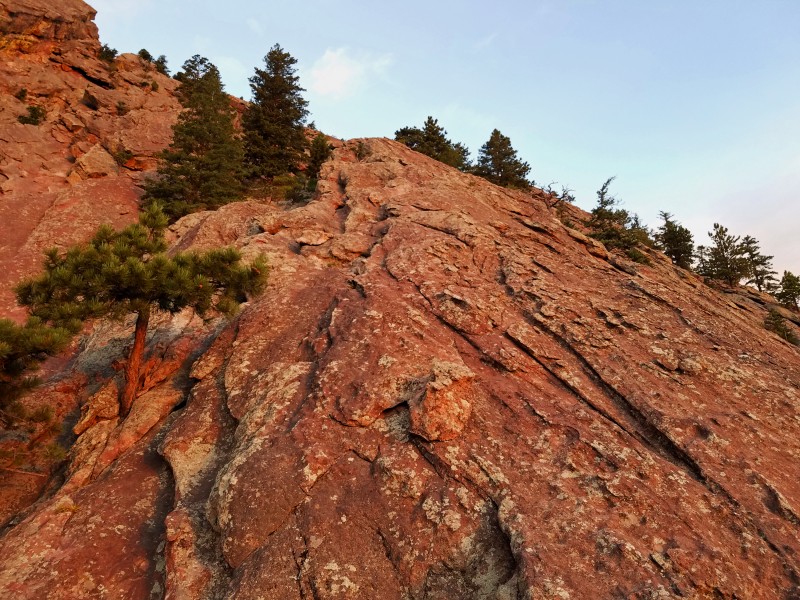
It then levels out a little, allowing for easy and very enjoyable scrambling.
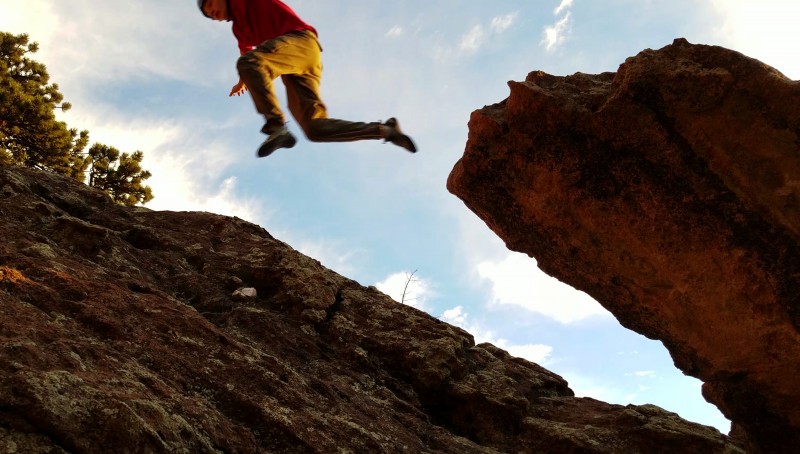
If you stay on the central rib, you will climb out onto a small pinnacle. The easiest way to continue is to jump.
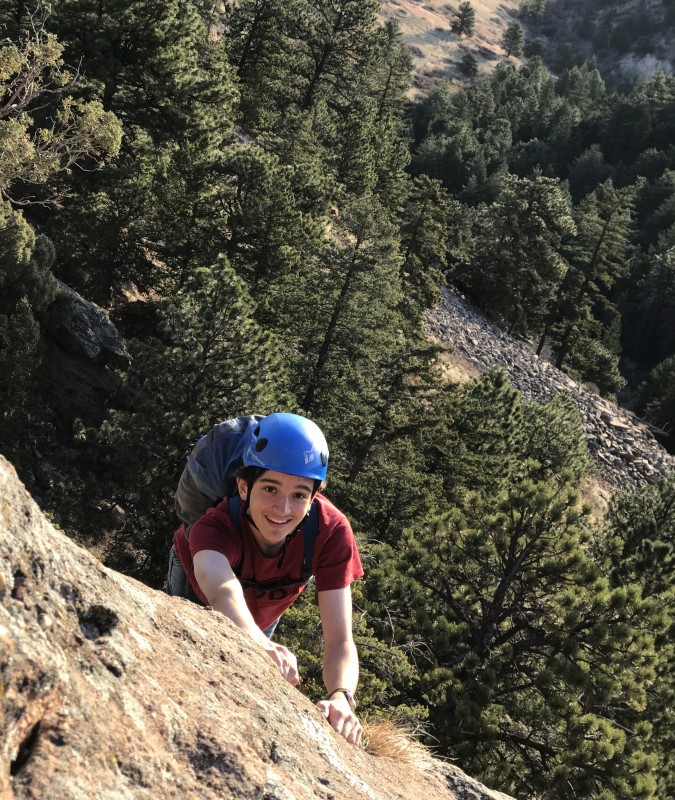
Shortly after the jump, you have to make a route decision. One variation goes straight up the slab until you cliff out above the trail, and then you climb left until the cliff diminishes and ends. The other variation climbs left immediately into a small hanging garden with some trees before finishing with a crack/slab combo to the same exit point as option 1. This photo shows me finishing the second route. From the top of the route, you can step off onto the trail between the 1st and 2nd Flatirons and hike back to Chautauqua.
The Second Flatiron: Dodge Block: Class 4
Personal Fun Rating: #5. Dodge Block is a less-frequented line to the south of Freeway. It provides a different view and some interesting climbing.
The start of Dodge Block is this small rib, called the 2nd Flatironette. It can be found a few hundred feet south of the start of Freeway. Note the small step near the top; this is easier to overcome than it looks.
From the top of the Second Flatironette, you can see the rest of the route. This line shows a relatively easy variation, but many are possible.
From halfway up the previous picture, this view looks north, with Freeway forming the skyline.
When it looks easy, traverse to "dodge the block" looming above you. Then, climb a slab and exit at the same spot as Freeway. In this view, the Pullman Car (summit block of the 2nd) looms above. This is the correct spot to start traversing right.
The Second Flatiron: West Face: Class 5.2
Personal Fun Rating: #9. The west face is the easiest route to the summit of the Second Flatiron. However, the slightly overhanging blocks at the top can be scary to downclimb. This is the type of climb I am glad to have done but that I don't feel the need to repeat.
This is the west face. It only requires a dozen or so "hard" moves to surmount, but the top out is very airy, and the downclimb is mentally much harder. Imagine lowering yourself off a lip over a fair amount of air and feeling for the "overhanging stair steps" below you.
The redeeming feature of the west face route is that it takes you to a proper Flatiron summit. This is the view of the 1st Flatiron from the top of the 2nd. The southwest face (left edge) is the easiest route to the top.
The First Flatiron: Southwest Face: Class 5.2
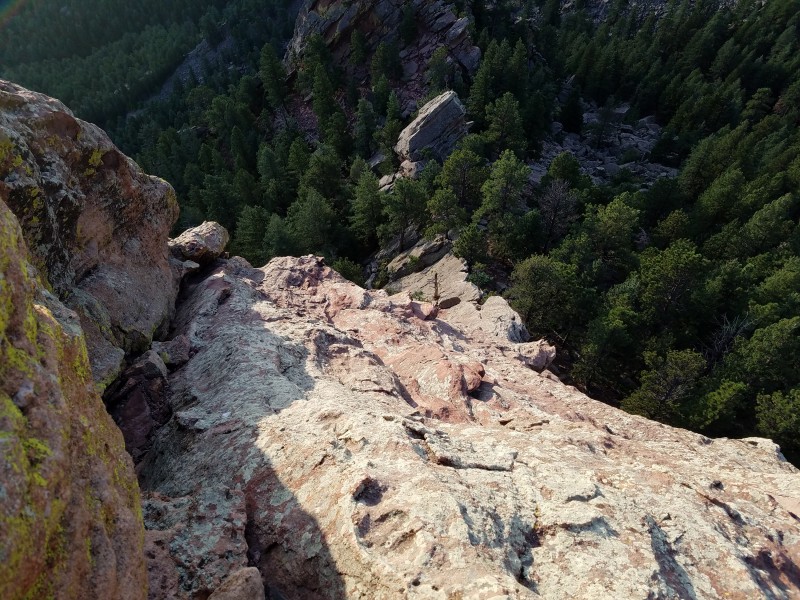
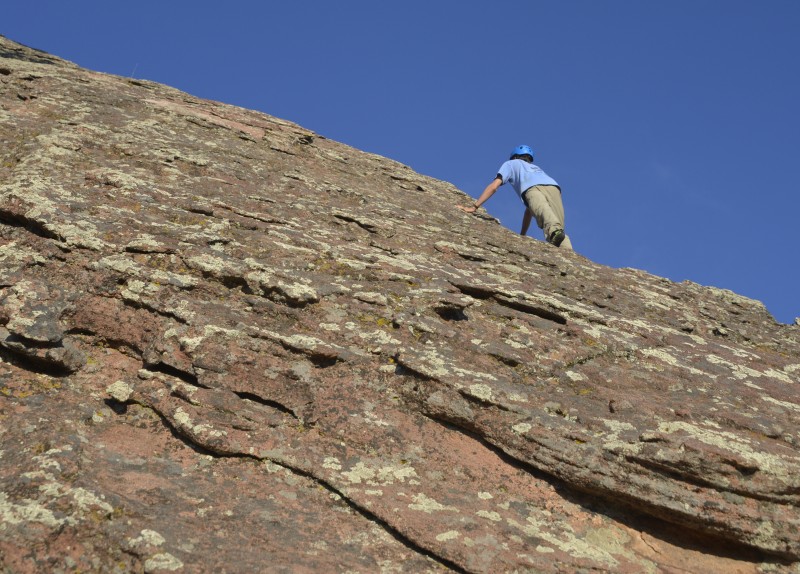
Personal Fun Rating: #7. The southwest face is the easiest route to the summit of the First Flatiron. It offers some uniquely steep slab scrambling to a very nice, relatively prominent Flatiron summit. This is the usual descent route for people soloing routes on the east face.
The route climbs steep jugs and ramps straight up the left edge of the formation in the previous picture. The summit is rewarding, with a commanding view of the Continental Divide and a register. This view looks down the upper part of the route from the top.
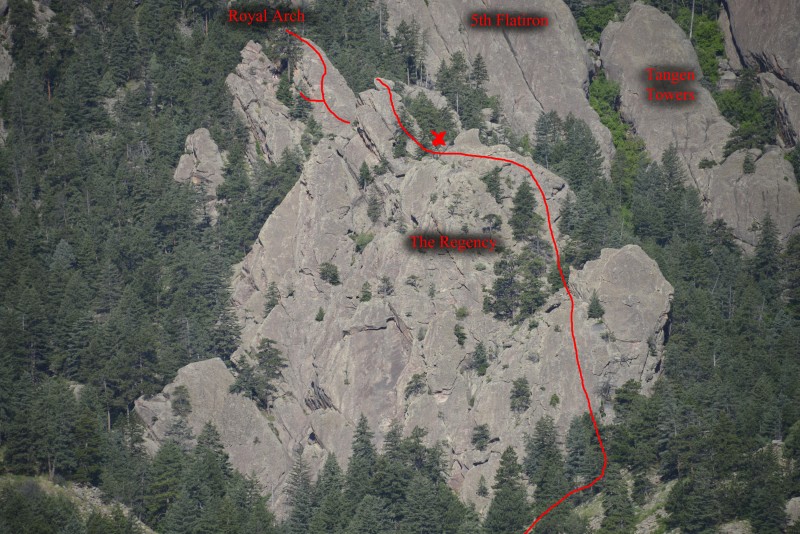
The Regency: Northeast Rib: Class 4
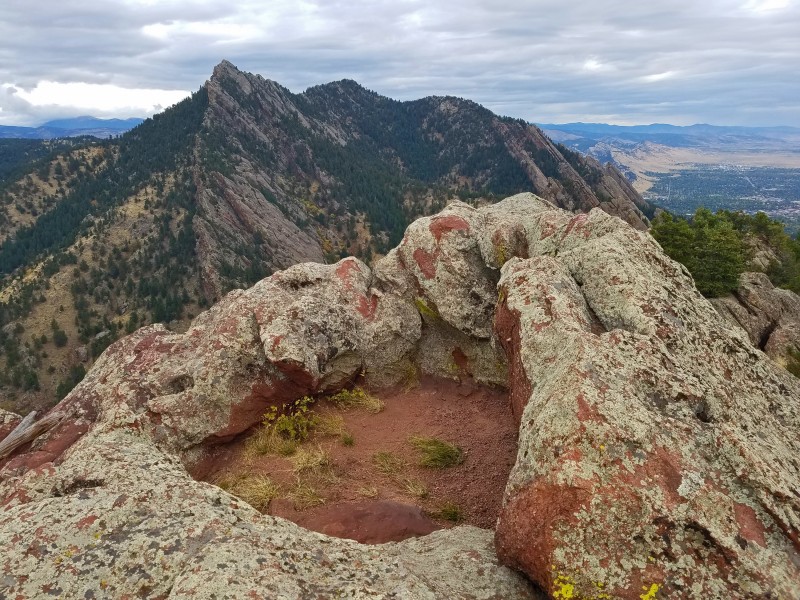
Personal Fun Rating: #4. The Regency is an large, broken slab from the east and an imposing pinnacle from the west. The northeast rib is a fun line to a cool, spear-shaped, overhanging summit. However, you have to downclimb 4th class route to escape.
There are two main routes on the Regency. The Camino Royale climbs in the center; I have not done this route. The northeast rib is more or less the red line in this image. The upper red line shows the route on Royal Arch. The red x shows one spot that you can easily escape to the north into hiking territory. The easiest approach is to follow the seasonal creek uphill from the Mesa Trail (see map).
The climbing is steep and fun, but especially near the base, there are lots of pine needles.
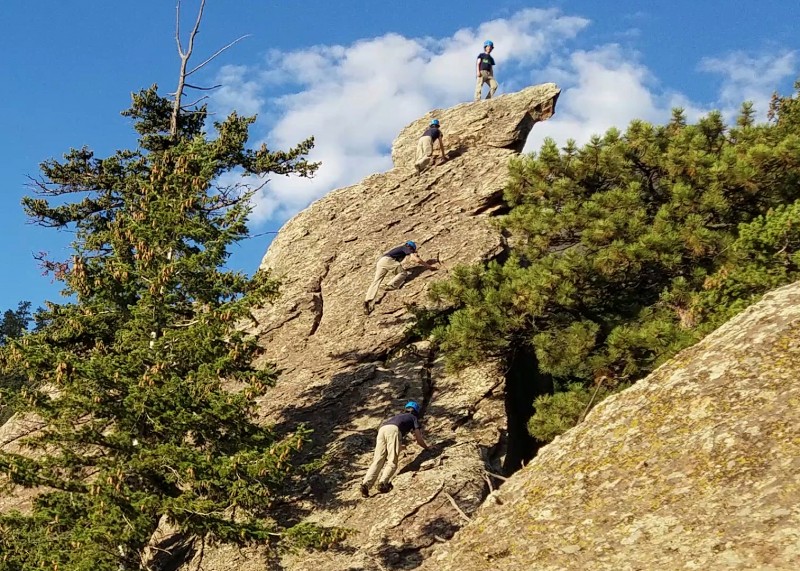
This photo shows a friend doing some of the upper climbing.
This view shows the classic summit pinnacle of the Regency. The simplest downclimb from the summit is to reverse this pitch and escape north to the red x.
The view of the 4th Flatiron from the summit is beautiful.
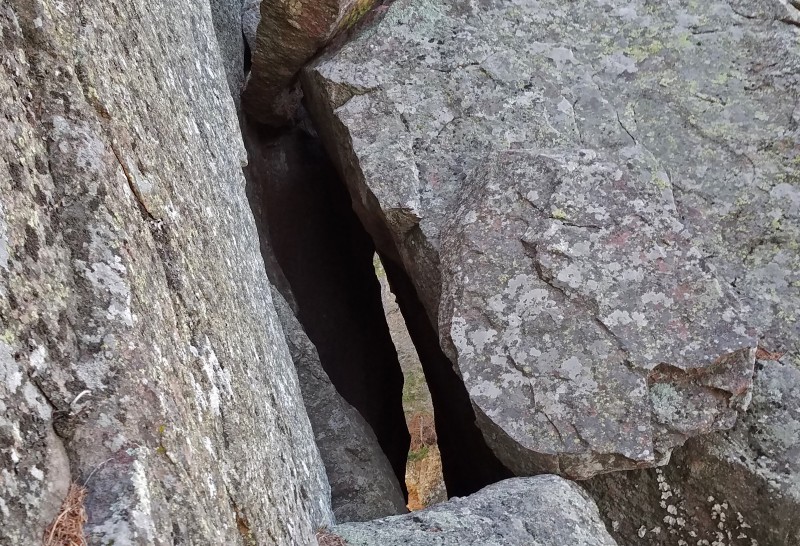
To continue to the Royal Arch, either downclimb the top part and escape at the red x, or find an easy but complicated downclimb to the west. For the second option, downclimb a dozen feet on the south side of the summit block and step south to a spacious ledge. Walk west on this ledge a few feet and downclimb a west-facing slab (class 4) before overcoming an awkward series of boulders at the bottom. Escape north through a tiny tunnel, and immediately turn west and look for this large slot. Go through it, and you will be at the base of the Royal Arch.
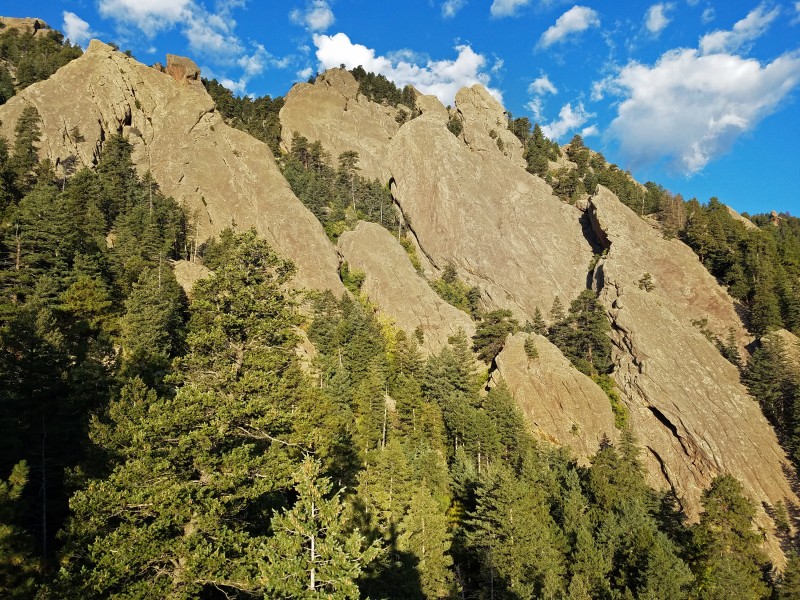
The Regency looks very impressive from the base of Royal Arch.
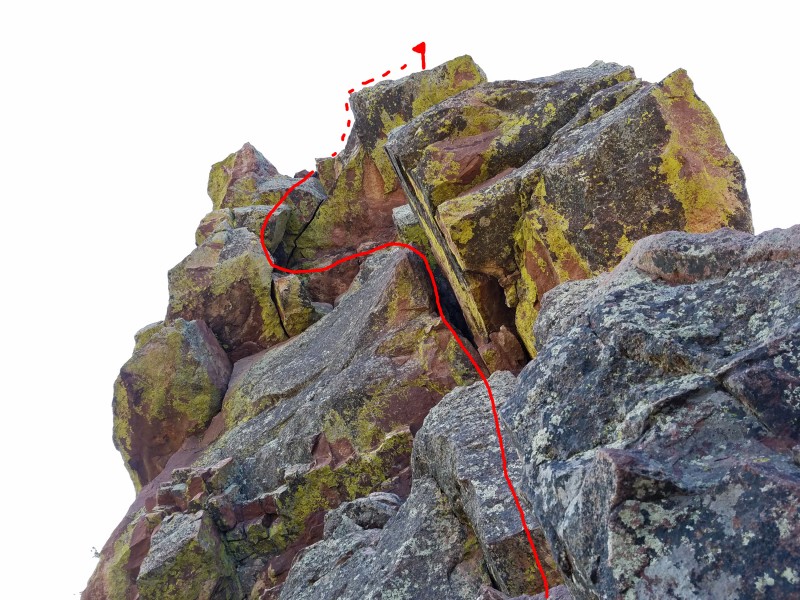
Royal Arch: East Face: Class 4
Personal Fun Rating: #1. Royal Arch is perhaps the crown jewel of Flatiron scrambles with tons of huge bucket holds, an airy ridge to a sharp summit, and the added fun of bagging an arch.
This is the view of Royal Arch's east face from the summit of the Regency. Many lines can be climbed; the red line shows the route that I use.
If the easiest line is found, you can climb on an abundance of large jug holds and pockets. While the climbing is easy, the sense of exposure is very real.
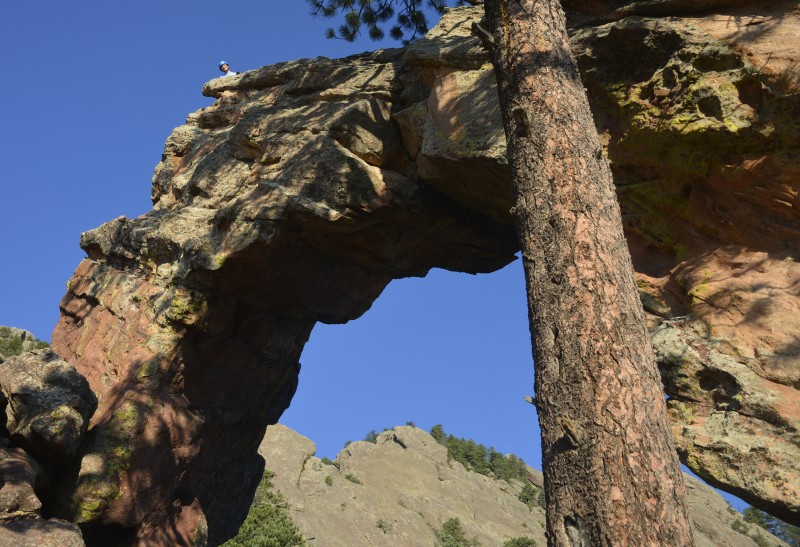
Royal Arch is a cool landmark, and it is fun to sit on top and look down at the hikers far below. I can barely be seen peeking over the summit in this photo. The easiest way off is to downclimb the east face until you can step south to the popular tourist area at the end of the Royal Arch Trail. To return to NCAR, bushwhack down the north side of the Regency to the Mesa Trail, or to return to Chautauqua, take the Royal Arch Trail.
Anomaly: East Face: Class 4
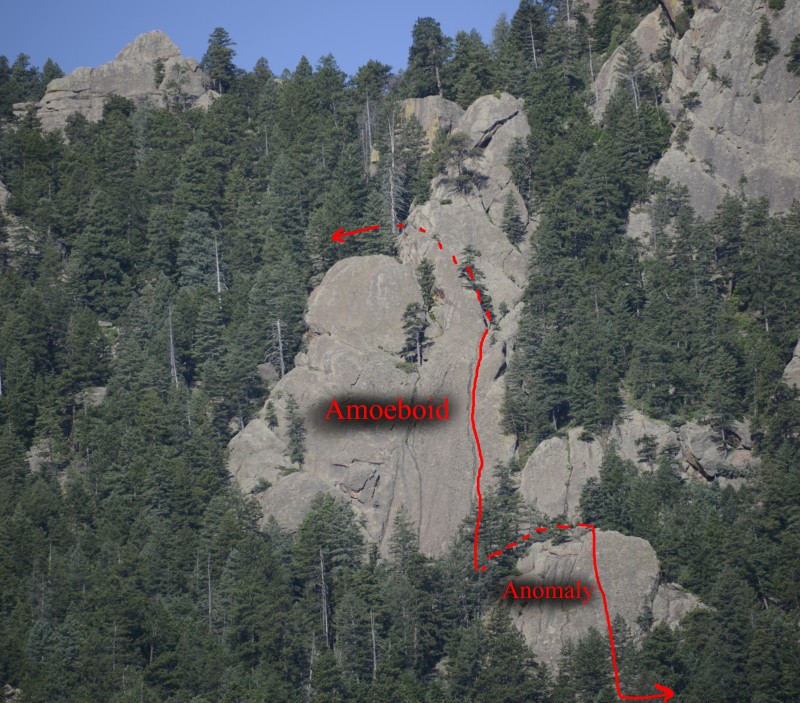
Personal Fun Rating: #12. The Anomaly is an obscure flatironette to the south of the Royal Arch. It requires serious bushwhacking to reach, and it only offers a short climb to a walk-off summit. To reach the Anomaly, bushwhack south from the end of the Royal Arch Trail. A nice linkup can be done from NCAR that goes: Mesa Trail --> Regency --> Royal Arch --> Anomaly --> Amoeboid --> Mesa Trail. This loop was my first experience scrambling in the Flatirons.
This picture shows the general lines that I followed on the Anomaly and Amoeboid.
Amoeboid: Buckets Line: Class 4
Personal Fun Rating: #6. The Amoeboid is a larger flatironette above the Anomaly. Its defining feature is a water groove running up the east face with huge bucket holds.
The "buckets" route follows a water groove and uses the buckets near that water groove to climb the lower, continuous part of the formation. There are multiple bucket lines on the face, but the one I climbed is shown below. My route topped out in a small slot with lots of ferns, and the easiest escape was to the south.
Front Porch: East Face Center: Class 4+
Personal Fun Rating: #3. The Front Porch is the large, roundish Flatiron on the lower right of Dinosaur Mountain. Its east face offers a direct, aesthetic, steep, sustained scrambling route to a summit with beautiful views. Some downclimbing is required to escape the summit.
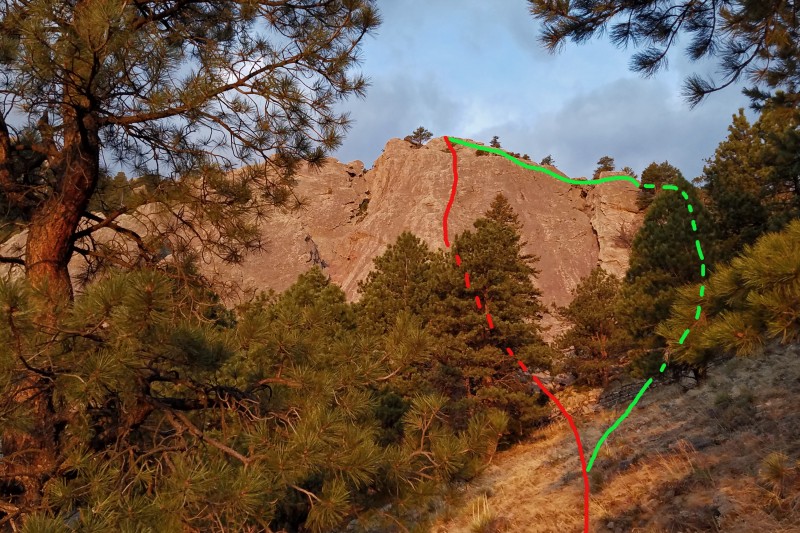
This photo shows the view that you encounter when hiking west on the trail from NCAR. Reach the base of the Front Porch by following the Mallory Cave Trail a short distance and then bushwhacking steeply to the west.
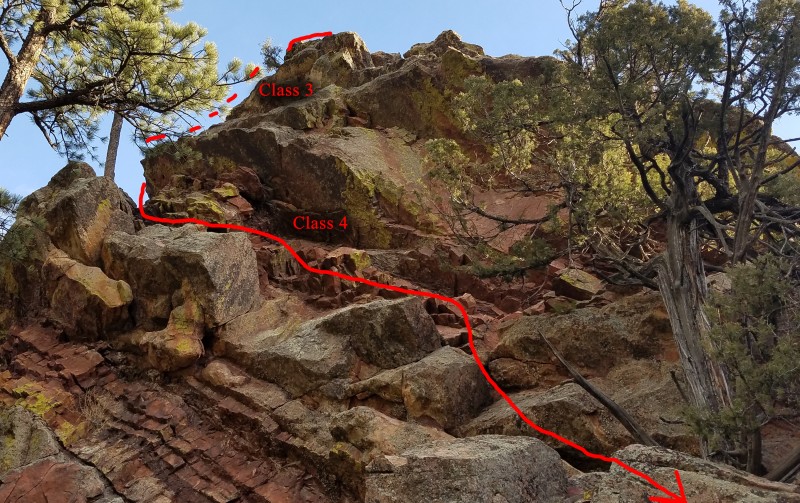
The east face center route goes right up the middle in the vicinity of the red line. The green line shows the general location of the northeast ridge.
This picture shows a friend following up the top part of the east face of the Front Porch. The groove does not continue all the way down the face.
The summit comes abruptly, and scramblers on this route are rewarded with a sudden view of the Skunk Canyon Ridges.
To get off the summit, you have several options. Some people rappel to the north or west, but this isn't necessary. You can downclimb the northeast ridge (Class 3+) or the west face (Class 4). To downclimb the west face, scramble down some easy rock for a dozen or so feet directly west from the summit to a prominent tree. This is where people rappel from. To continue downclimbing, locate and get on a small south-trending ledge that leads down under the overhanging summit block. Midway down, this ledge has a rotten-looking block in it that must be stepped around over some nice exposure. After the block, scoot down the ledge (which is more of a cavity in the rock) until it becomes easy to scramble west to the ground. Despite the complex description, this is the fastest way to downclimb the Front Porch. From the bottom, join the Porch Alley use trail just to the south and hike east to the Mallory Cave Trail. This photo gives an overview.
Front Porch: Northeast Ridge: Class 3+
Personal Fun Rating: #10. This ridge is mainly used as a descent from the summit of the Front Porch, but it offers an easy route that could make a good introduction to the Flatirons.
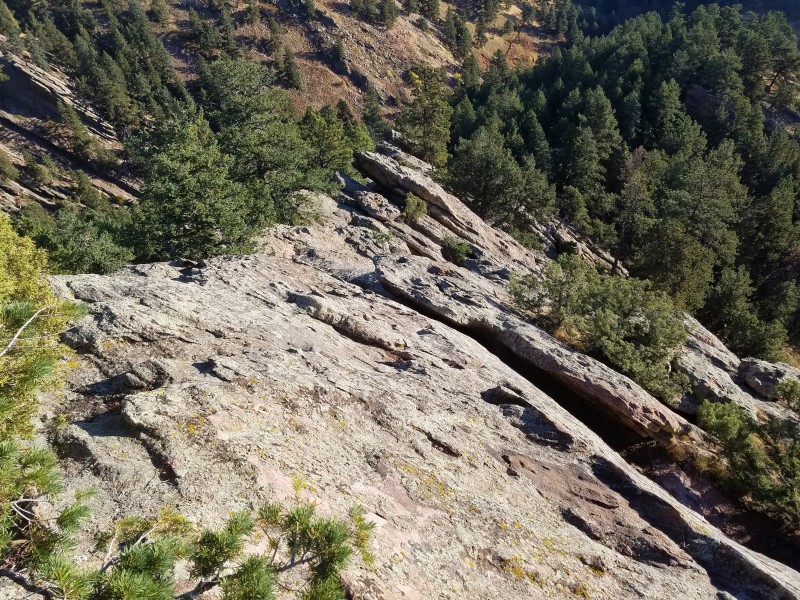
This view looks down the northeast ridge from near the summit of the Front Porch. It takes a while to downclimb. A faster descent can be had to the west; see above.
I attempted climbing the ridge as a mixed climb when there was a lot of snow on it. I made it past this section, but a blank slab stopped me 50 feet below the top. An attempted climb of this ridge with snow required overcoming steep gullies with slippery snow, sharp ridges, off-width cracks, and ice axe aid on overhanging flakes. It is only recommended for the very adventurous and/or the very dumb. Slab climbing with crampons instead of rock shoes is not something I wish to repeat.
However, the views of the Skunk Canyon ridges are sublime from the northeast ridge of the Front Porch.
Lost Porch: East Face: Class 5.0
Personal Fun Rating: #8. This hidden flatironette has a mediocre face climb, a fun summit, and a tricky downclimb.
This is the view west from the summit of the Front Porch. I climbed the left edge of the Lost Porch. The face climb is fine, but once you're on the summit you have to get down. The east face is rather steep to reverse, so I downclimbed a vertical chimney on the west face a few feet north of the summit. It felt about 5.2. Other downclimbs may be possible, but I would rather explore more routes on the earlier, better rocks.
Nebel Horn: Standard Route: Class 3
Personal Fun Rating: #11. The Nebel Horn is the northern satellite peak of Bear Peak. Its summit is a huge overhanging block. The easiest route is a bushwhack / scramble combo to a surprisingly interesting summit.
The Nebel Horn looks its most impressive from the north ridge of Bear Peak. The easiest, standard route goes up through the trees on the left (west) and then circles back to gain the summit with a tiny east facing pitch of 3rd-class difficulty.
After a lot of bushwhacking and steep, loose gully climbing, you will arrive at this small east-facing rock; climbing it is the easiest way through the summit cliff.
Your reward for a dirty, loose climb is a very cool summit. The highest point is on the right, and the depression is large enough to set up a small tent in (if it were legal). Green Mountain looms in the background.
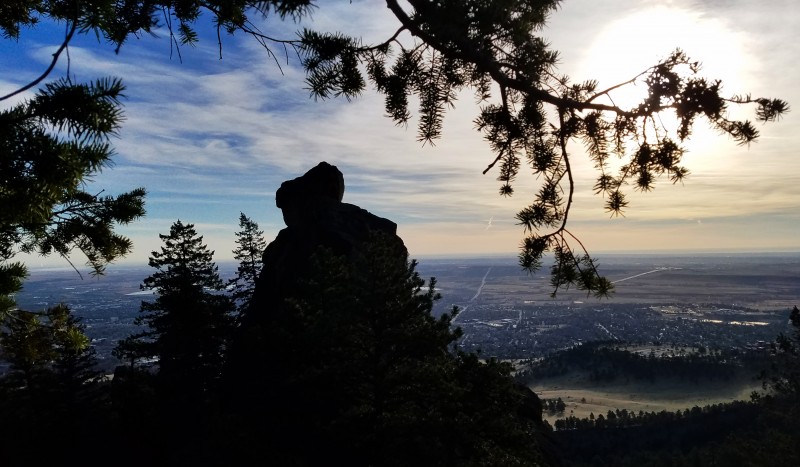
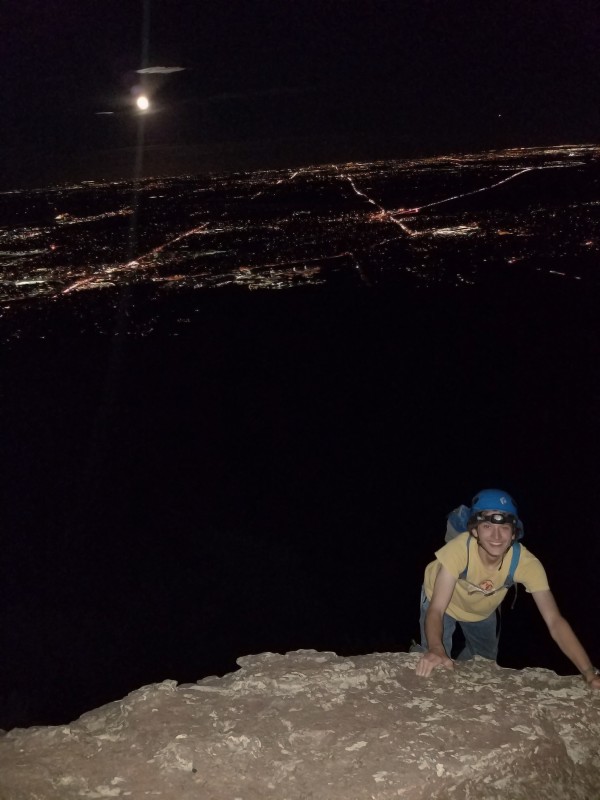
Night Climbing: A Crazy Tradition
It seems to be somewhat of a crazy Boulder tradition to climb the Flatirons at night by the light of a full moon. I climbed Freeway under a full super moon last autumn, and while I'm proud to have taken part in the tradition, I don't feel inclined to do it again. Watch out for falling cans from climbers ahead of you (I passed at least a dozen), and turn off your headlamp once the moon is up--moonlight really is bright enough for climbing. Also, it almost goes without saying, you should know the route very well ahead of time.
That's all for now, folks. I plan to make a part 2 after climbing more rocks, so if you have something you recommend or would like to see in the trip report, let me know below. Stay safe, and remember, the rock doesn't care about you, and it will be there long after you're not. Respect the danger, and you can have fun. And of course the ultimate word of advice: don't fall.
Thumbnails for uploaded photos (click to open slideshow):
cool report. so much to this playground, only thing stopping you is your head and imagination :)
Based on your comfort level I gather from this, I'd check out Hillbilly or stairway to heaven. I would say the crux on both is probably the downclimb. its not insane just a little awkward. Bring a rope to rap the 1st time if unsure altho don't know if Hillbilly is easily rap-able. Also, after ameboid, I'm quite fond of continuing north and heading up Hourglass to Fist (but both those aren't super trivial esp the downclimb again) to Green Summit!
Definitely worth checking this out from the Crim-ster: http://www.brianinthewild.com/flatirons.html
Stay safe, no rush (dont get in over your head) and keep exploring man!
Awesome flatiron TR! Nice job documenting some fun scrambles! Given the stuff you've liked so far, I recommend:
-N ridge on the first via the first flatironette
-Sunset flatiron
-third flatiron, obviously
-east face on shanahan
-angels, as ali suggested above is great
-EF dinosaur to Der Frischutz
Looks like there are a couple more routes I need to check out. I appreciate the work since finding some of the lesser travelled lines can tough to find. I love the fact that there are so many other routes to cover too. Go boulder and happy climbing.
I'm also glad I'm not the only one that really likes the exposure of royal arch. :D
Flatiron scrambling is the best. So many linkup options and possibilities it's amazing. My favorite linkup when I was just getting started was Freeway to Baker's Way. Also, check out the First Spyronette.
If you ever want company for Flatiron scrambles shoot me a PM. I'm always up for Flatiron jaunts.
Here are some of the routes I am looking forward to checking out:
Hillbilly Rock, east face center
Hobo, east face
The Sphinx, upper east face
The Keel, east face
Center Shanahan Crag, southeast ridge
Dinosaur Mountain via Fum
Angel's Way (pending end of closure)
Sunset Flatiron, Chase the Sun
Der Freischutz, Free Shot
I would try some of the harder ones (Baker's Way, Stairway, 3rd), but the two 5.2 routes I described in the TR felt like pushing it for soloing for me. If someone wants to teach me to follow trad, I'm in. :wink:
Does anyone know if the east face right of the Seal is really F3 (Class 4) like Roach says, or F5 (Class 5.4) like Mountain Project says? I really want to climb that rock, and I just am curious about the rating because I would have to downclimb a lot of the upper face, and "somewhere between 4th and 5.4" seems a little vague.
First time up EFR on Seal, I thought Roach was smoking ganja and it was closer to 5.4 near the bottom. Subsequent times, I thought it a bit easier but the crux was figuring out path of least resistance on the lower part.
In addition to the above, Hammerhead is pretty neat. Angel's Way is better than Stairway IMO. Stairway does have a low crux many might find interesting to scramble. Sunnyside et al and thereabout have lots of short linkup potentials.
I'm down to teach trad after work near Golden if you make it around here.
East Face right side is 4th Class with sort of complex route finding. Left side is 5.4. Both are excellent, but it's hard to get to the Seal right now due to closure of Mesa between Bear Creek and Fern.
I was surprised you didn't include the Third. It's fantastic 4th Class until the final short pitch, which you can skip by just walking off at Kiddie Kar ledge.
Nice list of routes you want to check out. Just be sure to be careful of ratings as things are generally biased in various guidebooks and on MP. For example, the SW Face of the First is rated 5.2 but that route is much easier than some other routes that are rated class 4 like South Sneak on the 2nd. Flatirons are fun, but it would be easy to get on the news for having to be rescued (or worse) if you jump in too fast. If you think that Freeway is class 4, here is what I'd say about your routes you mentioned above...
Hillbilly Rock, east face center - Not 4th class. Lichen.
Hobo, east face - 4th class. Cool but short and nasty approach unless combined with something else.
The Sphinx, upper east face - Not 4th class. Lichen city. Terrible approach.
The Keel, east face - Generally class 4 is on route. Few chossy spots and weird route-finding. Descent can be a nightmare.
Center Shanahan Crag, southeast ridge - Sweet and class 4.
Dinosaur Mountain via Fum - Fum is hard, don't solo it. Dum has cool class 4 summit block on Dino Mtn.
Angel's Way (pending end of closure) - Awesome scramble. Not all 4th class though, but alot is.
Sunset Flatiron, Chase the Sun - Another goodie but not 4th class. 5.4 crux.
Der Freischutz, Free Shot - Cool route to a neat summit. Downclimb is not class 4 and many opportunities on the climb to get off route into harder scrambling.
Seal, EF North - If your route-finding is perfect it's not terrible but it's a stretch to call it 4th class. And it's exposed and you have to downclimb it.
Check out Sunny Side II on Der Zerkle. Short fun and class 4.
Thanks for the great post. I wish I'd had this beta (the routes drawn on pictures help) before "solo free-soloing" some of these :)
Good to know about the north side of The Regency, I may check it out, because I've explored farther south to the right of the gully, and was not confident in my ability to back out if needed. As it is, I've done a few uncomfortable downclimbs there.
Starting farther left/downhill on Front Porch can get you another 100 feet of 3rd/easy 4th class climbing on East Face Center
Caution: The information contained in this report may not be accurate and should not be the only resource used in preparation for your climb. Failure to have the necessary experience, physical conditioning, supplies or equipment can result in injury or death. 14ers.com and the author(s) of this report provide no warranties, either express or implied, that the information provided is accurate or reliable. By using the information provided, you agree to indemnify and hold harmless 14ers.com and the report author(s) with respect to any claims and demands against them, including any attorney fees and expenses. Please read the 14ers.com Safety and Disclaimer pages for more information.
Please respect private property: 14ers.com supports the rights of private landowners to determine how and by whom their land will be used. In Colorado, it is your responsibility to determine if land is private and to obtain the appropriate permission before entering the property.