| Report Type | Full |
| Peak(s) |
Crestone Peak - 14,299 feet Crestone Needle - 14,196 feet |
| Date Posted | 08/08/2011 |
| Modified | 08/09/2011 |
| Date Climbed | 07/17/2010 |
| Author | mtnkub |
| Peak to Needle traverse route finding info |
|---|
|
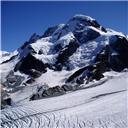
This is a belated report of a 2010 trip (with the mighty Vincent, see "rope discussion" below). The main purpose is to facilitate route finding on the final ascent to the Needle when traversing from the Peak (see pictures 1-6). Start the traverse from the Red (Southwest) Couloir of Crestone Peak, ~300ft below the saddle between Crestone Peak and East Crestone. Look for cairns and suitable terrain. If you were comfortable on the Crestone, you should be very comfortable also on the first part of the traverse (i.e. until the ascent to the Needle starts). If you are not, you are off route (backtrack and find something else, likely lower down). Pictures 1-5 are different versions of the same photograph taken somewhere in the middle of this first part of the traverse, and illustrate the route of our ascent to the Needle. Most of the rest of the route (i.e. the ascent to the Needle; see pictures 1-6) can be surprisingly easy (closer to hard class 2 than 3) with surprisingly modest exposure, at least when employing good route finding (see below). However, at least two of the three harder spots are also very exposed, and a fall here would likely be deadly (see "rope discussion" below; I couldn't/wouldn't have done it without one). There are two keys to route finding on this final part: (a) Find the correct "entrance" (see Picture 6), (b) make sure to look carefully for the right "zags" in the zig-zag route above (see Picture 2). (a)From the traverse, you will likely enter the gully below the Black Gendarm somewhat higher than the "entrance". The "entrance" is ~180 ft below the base of the Black Gendarm, and once you are close to it, it looks and starts out like a trail (where Vincent stands in Picture 6)... but only for a couple of yards. Around the corner is a short ugly spot, then getting easier for a short stretch, immediately followed by what could be considered the crux: a short but all of the sudden very exposed class 4-5.2 stretch around a corner. Thus, you cannot see the entire stretch before already being committed to it. (I demanded the rope at this point; if you use a rope here, make sure that you a have your communication sorted out, as you will not have visual contact with the person belaying you... of course you can hear them, but the acoustics around the corner are not exactly optimal either). Once above this first crux, look back and study the area carefully: It may be your only feasible way of retreat in case of bad weather or other trouble. (b) Until the last very exposed 100ft (see Picture 2 and the last picture), climbing should be very comfortable from here on, mostly class 2 to 2+, maximally class 3 (if it is beyond that, you are likely off route). Follow an obvious gully... but make sure that you don't climb too high and miss the traverse to the next gully to your right. The ledge for the traverse is not too hard to find (likely even with some small cairns in the area)... but you will likely miss it if you look only straight up and ahead. The entrance to this ledge is easiest to spot from just barely above it; so look to your right -and down- every now and then. The exit from this traverse and entrance to the next gully is very obvious. Follow this second gully almost (but not quite) to its end. Traverse again to your right (before the terrain gets tough), below the last gendarme, in order to reach the highest notch. From here, climb straight up, for an airy, steep and exposed 100ft of pretty solid 4th class knob climbing (see last picture for a view from above). This stretch has been described frequently. It is indeed an awesome spot with very pleasurable climbing. Nevertheless, I concentrated more on the rock than on the views... even though I was following tied into a rope... . Topping out, you may feel exhilarated, a bit of relief, and a bit like a hero (I know I did). Enjoy the feeling(s), but don't start ponding your chest too hard: Most likely more than half of the people you'll meet on the summit have just climbed the Ellingwood Arete... Picture 1: shows the Needle from somewhere in the middle of the first part of the traverse. 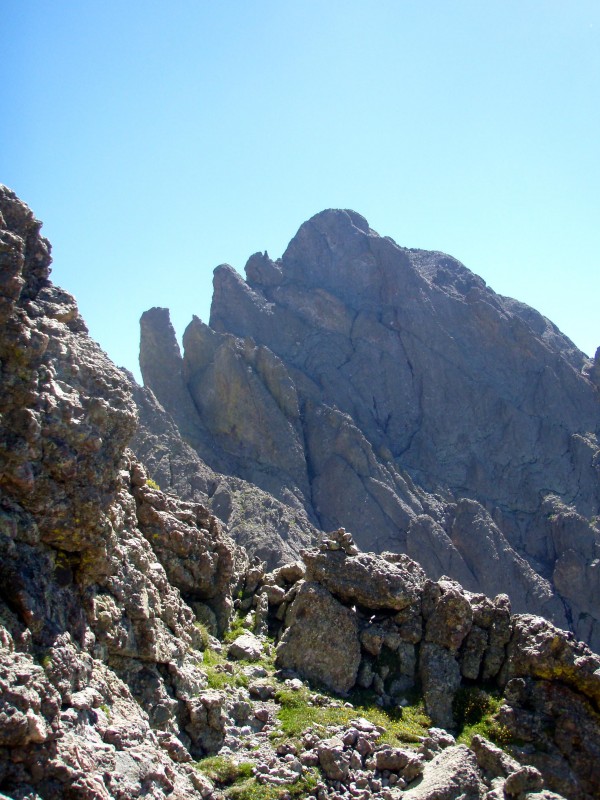 Picture 2: marks up our route, with the harder spots indicated (the second "4th class" spot may correspond to the spot described by Gerry Roach as a 5.2 ... it is probably the hardest spot on the route. It is not very long, but very exposed... and the harder part starts just before rounding a corner and continues beyond it, so you don't get to study most of this hard stretch until you are already committed to it).  Picture 3: marks up some land marks, like the Black Gendarme, and indicates the "entrance" region magnified in the next two pictures.  Picture 4: the "entrance" to the ascent of the Needle. 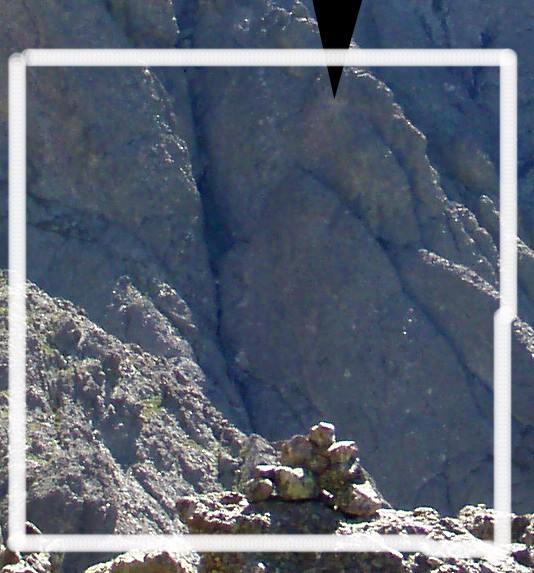 Picture 5: same picture with the route marked.  Picture 6: same region from closer by; note Vincent at the very entrance (~180 ft below the base of the Black Gendarme). 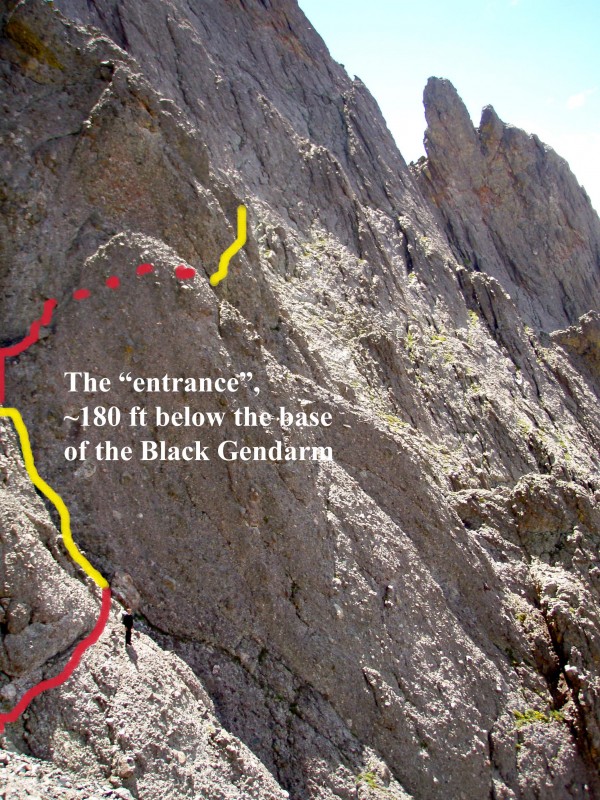 Ok, there is one more thing about route finding, on the descent (a route you did not climb yet if you did the traverse). Make sure that you down climb the West Gully, not the East Gully (see Picture 7)! Carefully study the terrain and compare it to Picture 7. Otherwise, the East Gully will seem like the much more likely route. (You will eventually traverse from the West Gully into the East Gully during your descent, but much lower down; see standard route to the Needle on 14ers.com for a good description). Of course, we mistakenly took the East Gully from the top. The difficulty in this "wrong" gully should not exceed 4th class (compared to 3rd class for the actual route), so you will be ok... but I was not much of a happy camper.  Rope discussion (and other considerations of traverse direction and equipment) As said earlier, personally, I couldn't/wouldn't have done this traverse without a rope. Of course, there are plenty of people in Colorado who wouldn't need one. But if you think that there might be a slight chance that YOU maybe possibly might be better off with a rope for this route: bring one! That's where the trouble starts, though. A full rope gets pretty darn heavy, especially on a really long hike/climb, and even more so when you will use it for only 1.5 pitches. Moreover, on the final 100ft pitch, there is not really anything where the leader could place any protection for herself (at least as far as I could tell... pretty much conglomerate knobs, no cracks). This could be a reason why to consider the traverse in the opposite direction, as it enables a rappel instead. If you decide to do this rappel with a 60 m rope (better a 70 m rope!), put your anchor as low as possible, in order to ensure that it actually reaches the notch... which you won't be able to see from your anchor (see below and last picture; if in doubt -and maybe even if not- have a plan for what to do if running out of rope before you start the rappel; maybe a big enough knot in the end of the rope and having a Prusik or two handy?). Using a light 70 m half-rope might be a good idea... but before hands, maybe get a feel for rappelling on this thin thing with your device on safer grounds. In any case, going from Needle to Peak will deprive you of some very nice climbing. Here is my preferred solution to the rope problem: Step 1: Bring the 30 m 8 mm half-rope that I got from REI for glacier travel in the Alps, as it is really light and packs pretty tight. Make sure that it really is at least 30 m long, and not an inch shorter (see below). This rope won't hold much of a leader fall on rock... but then, there is no protection for the leader on the final 100ft pitch anyway (see above). For the person following (in this case, me), this cord should do just fine. Step 2: Additionally, bring a Vincent (see picture 6 and some of the later ones), who comfortably leads 5.10s and has sport climbed plenty of 5.12s (sorry, Vincent: where those 5.12 leads and 5.13c sport climbs? A 5.14 or two mixed in there?), and who finds it much safer to solo the Bear to Blanca traverse, b/c rope-work just slows you down too much and thus gives an unfair advantage to the incoming weather to get you... and who has done Peak, Needle and Humboldt in one day before. Now, your rope really needs to be at least 30 m: In order to tie into the end of my rope, I needed to get onto the very high point of the notch. I wasn't tied into the rope while Vincent soloed it, b/c you really don't want to hold the leader back (in case the rope is too short) while they are still climbing the pitch... . Ok, admittedly, it is much easier to find a 30+ m half rope than a Vincent... but Colorado is just the place where you might be lucky enough to stumble across both. In such lucky event, this awesome route is feasible and enjoyable even for mortals like me. (Thank you, Vincent!) Other considerations: Bring a helmet, as extended parts of the climb are in couloirs/gullies (and in much traveled ones for that matter, on the two standard routes for the Peak and Needle). Bring rock shoes, as they help a great deal on the final pitch (even the mighty Vincent brought his, if I remember correctly). Consider bringing an ice axe (in 2010, after July 15, there were only minimal snow patches in the Red Couloir left, and we did not need our axes), certainly when going early in the year. If you are considering this route, you already know that it is going to be a long day... but I'll say it anyway: Get an early alpine start in the dark from a high camp, even on a day that seems reasonably safe from afternoon thunderstorms (whatever that means during a Colorado summer; I have experienced "afternoon" lightning on a 13er peak before 11 am, even in early June). Ok, and here some of the typical and ever enjoyable Crestone pictures: Picture 8: Crestone Needle from our camp site  Picture 9: Vincent on Crestone Peak 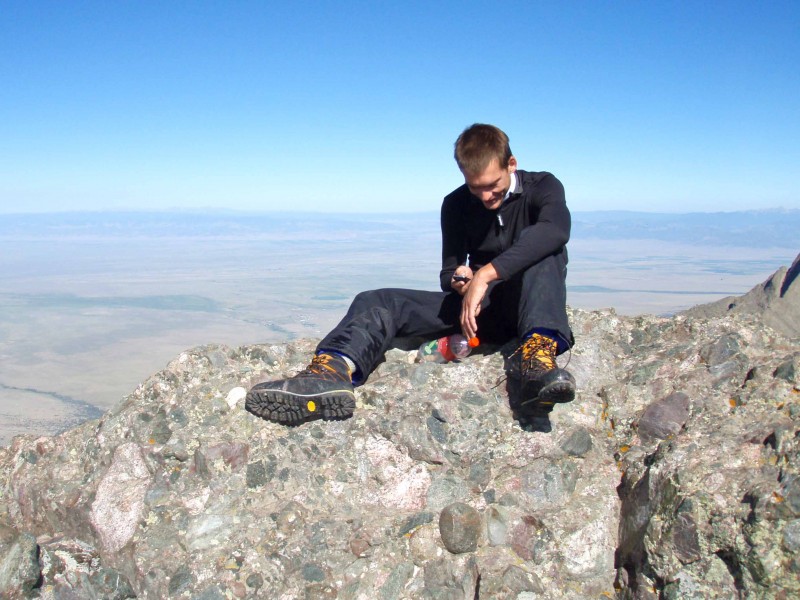 Picture 10: Me on Crestone Peak (with Kit Carson in the background)  Picture 11: East Crestone from Crestone Peak 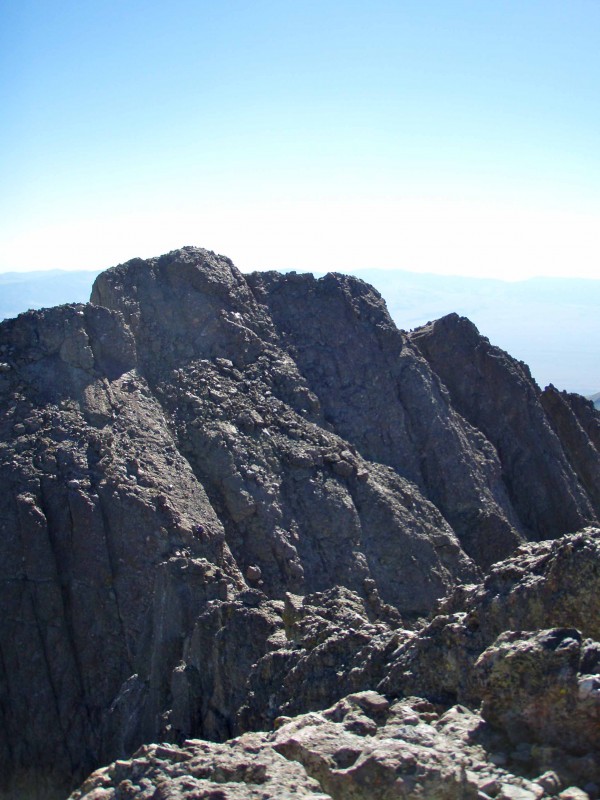 Picture 12: Crestone Peak from East Crestone 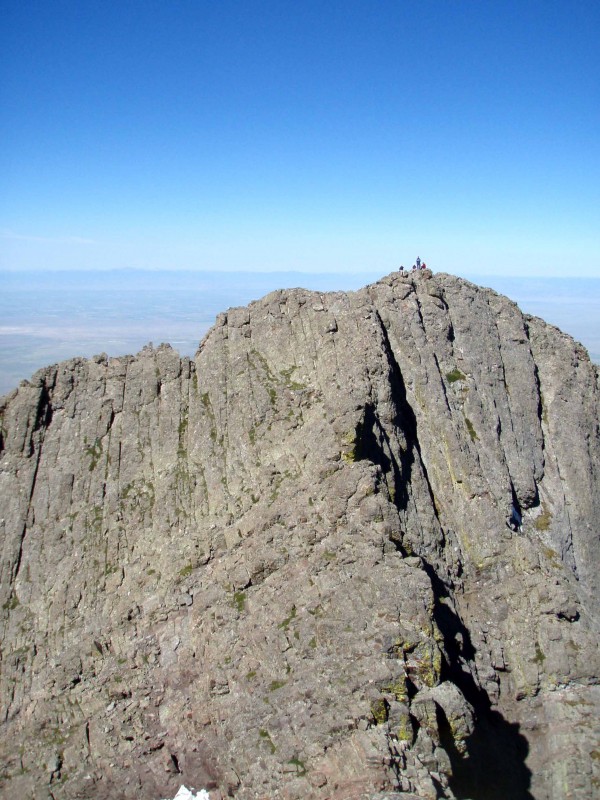 Picture 13: Crestone Needle from East Crestone  Picture 14: Vincent and me on the Needle, with Peak in the background.  Picture 15: Vincent at the final belay station on the Needle, looking down towards the high notch (note that the notch itself is not visible from here...) 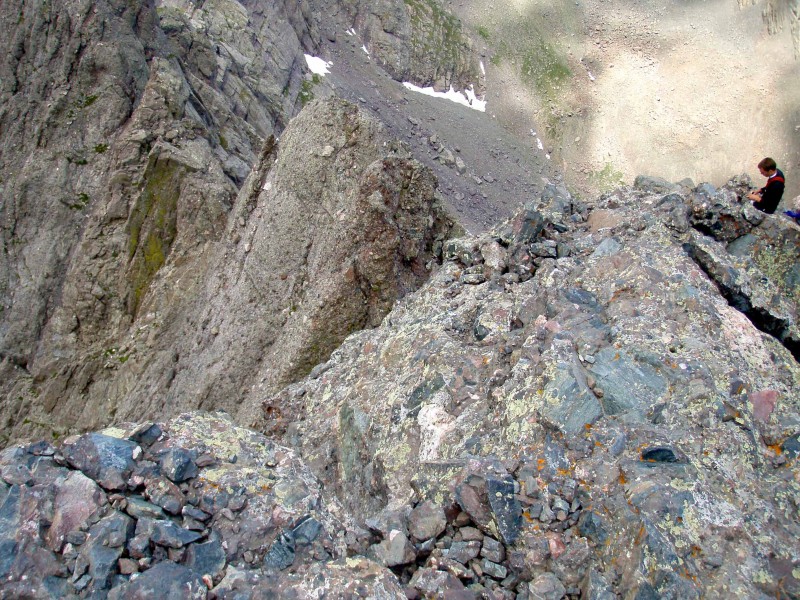 Have fun and be safe! -u Thumbnails for uploaded photos (click to open slideshow):
|
| Comments or Questions | |||||||||
|---|---|---|---|---|---|---|---|---|---|
|
Caution: The information contained in this report may not be accurate and should not be the only resource used in preparation for your climb. Failure to have the necessary experience, physical conditioning, supplies or equipment can result in injury or death. 14ers.com and the author(s) of this report provide no warranties, either express or implied, that the information provided is accurate or reliable. By using the information provided, you agree to indemnify and hold harmless 14ers.com and the report author(s) with respect to any claims and demands against them, including any attorney fees and expenses. Please read the 14ers.com Safety and Disclaimer pages for more information.
Please respect private property: 14ers.com supports the rights of private landowners to determine how and by whom their land will be used. In Colorado, it is your responsibility to determine if land is private and to obtain the appropriate permission before entering the property.