Download Agreement, Release, and Acknowledgement of Risk:
You (the person requesting this file download) fully understand mountain climbing ("Activity") involves risks and dangers of serious bodily injury, including permanent disability, paralysis, and death ("Risks") and you fully accept and assume all such risks and all responsibility for losses, costs, and damages you incur as a result of your participation in this Activity.
You acknowledge that information in the file you have chosen to download may not be accurate and may contain errors. You agree to assume all risks when using this information and agree to release and discharge 14ers.com, 14ers Inc. and the author(s) of such information (collectively, the "Released Parties").
You hereby discharge the Released Parties from all damages, actions, claims and liabilities of any nature, specifically including, but not limited to, damages, actions, claims and liabilities arising from or related to the negligence of the Released Parties. You further agree to indemnify, hold harmless and defend 14ers.com, 14ers Inc. and each of the other Released Parties from and against any loss, damage, liability and expense, including costs and attorney fees, incurred by 14ers.com, 14ers Inc. or any of the other Released Parties as a result of you using information provided on the 14ers.com or 14ers Inc. websites.
You have read this agreement, fully understand its terms and intend it to be a complete and unconditional release of all liability to the greatest extent allowed by law and agree that if any portion of this agreement is held to be invalid the balance, notwithstanding, shall continue in full force and effect.
By clicking "OK" you agree to these terms. If you DO NOT agree, click "Cancel"...
(Much of the crux of the route is seen in the main photo on the 14ers.com page for Chief's Head. I have no photos to add at this time and will look through my archive to see if I can dredge some up... In the mean time, I have "borrowed" Bill's photo and marked the approximate line of the route in red. My partner and I had planned to climb the snow gully that diagonals under the NE face but after reaching the gulley, didn't like the conditions and thus improvised what seemed to be a highly unlikely route on the N ridge...)
From the Glacier Gorge TH, follow signs for Mills Lake / Jewell Lake and proceed up to Black Lake, which is at about 10,600'. Turn east and walk up into the cirque that sits below the west face of Long's Peak, Pagoda, etc. Follow the trail in the drainage, attempting to do minimal damage to the tundra by stepping on boulders whenever possible. This cirque is one of the most beautiful places in Rocky Mountain National Park but it's also very fragile, so walk softly.
Trend towards the NE face of Chief's Head as the tundra turns into talus. When we did the route, there was quite a bit of snow in the cirque and the area above the top of the talus cone (marked as "1") was ~45 degree snow/ice but since the difficult section was short, we did not bother with crampons and just hacked some steps with our axes. We trended towards the west while climbing slabs and corners towards the north ridge. Once the ridge is reached, for the next 500' of vertical, stay on the left side of the ridge when difficult sections are encountered. The exposure in this section is incredible but for the most part, this is solid 3rd class with an occasional spot that can be more contemplative.
At about 12,400' (marked as "2" on Bill's photo) the ridge steepens. An exposed series of slabs, ramps and corners leads to the climber's left, then a ledge leads back right to the ridge. A short, steep crack then climbs up about 30' to a ledge. We climbed this as 4th class since we had only minimal lead gear and wanted to preserve it for the belay. Follow the ledge as it leads up and left under a clean headwall to a more broken area that can be taken directly up on chossy rock to a narrow ledge. The ledge is followed west and it eventually turns the corner. On the photo, the red line becomes dashed, indicating that you are now following the ledge on the west side of the north ridge, out of view in the photo. This section is spectacular since you are traversing a narrow ledge above the sheer NW face. The ledge leads to broken terrain that is scrambled to the summit. We descended to Stoneman Pass and then followed the standard route back to Glacier Gorge.
Maps
JPG Image
Interactive Map & 3D Flythrough
Photos
Weather
Caution: The information contained in this route may not be accurate and should not be the only resource used in preparation for your climb. Failure to have the necessary experience, physical conditioning, supplies or equipment can result in injury or death. 14ers.com and the author(s) of this route provide no warranties, either express or implied, that the information provided is accurate or reliable. By using the information provided, you agree to indemnify and hold harmless 14ers.com and the route author(s) with respect to any claims and demands against them, including any attorney fees and expenses. Please read the 14ers.com Safety and Disclaimer pages for more information.
Please respect private property: 14ers.com supports the rights of private landowners to determine how and by whom their land will be used. In Colorado, it is your responsibility to determine if land is private and to obtain the appropriate permission before entering the property.
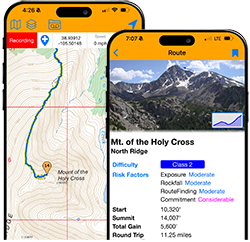
Heading to a 14er soon? Don't forget the 14ers.com mobile app.