Download Agreement, Release, and Acknowledgement of Risk:
You (the person requesting this file download) fully understand mountain climbing ("Activity") involves risks and dangers of serious bodily injury, including permanent disability, paralysis, and death ("Risks") and you fully accept and assume all such risks and all responsibility for losses, costs, and damages you incur as a result of your participation in this Activity.
You acknowledge that information in the file you have chosen to download may not be accurate and may contain errors. You agree to assume all risks when using this information and agree to release and discharge 14ers.com, 14ers Inc. and the author(s) of such information (collectively, the "Released Parties").
You hereby discharge the Released Parties from all damages, actions, claims and liabilities of any nature, specifically including, but not limited to, damages, actions, claims and liabilities arising from or related to the negligence of the Released Parties. You further agree to indemnify, hold harmless and defend 14ers.com, 14ers Inc. and each of the other Released Parties from and against any loss, damage, liability and expense, including costs and attorney fees, incurred by 14ers.com, 14ers Inc. or any of the other Released Parties as a result of you using information provided on the 14ers.com or 14ers Inc. websites.
You have read this agreement, fully understand its terms and intend it to be a complete and unconditional release of all liability to the greatest extent allowed by law and agree that if any portion of this agreement is held to be invalid the balance, notwithstanding, shall continue in full force and effect.
By clicking "OK" you agree to these terms. If you DO NOT agree, click "Cancel"...
This is an update to the West Ridge Indirect route first pioneered by CaptainSuburbia. Why the update? After doing the route several times and getting feedback from multiple sources, some new and better landmarks have been identified. This trip report will attempt to compile all the best beta on this route and make a case for why this should be considered as an official route, and possibly someday even the new standard route.
Due to the length of the report, I'm using internal hyperlinks and large bolded section headers to make it easier to navigate to sections of interest. Included in this report will be:
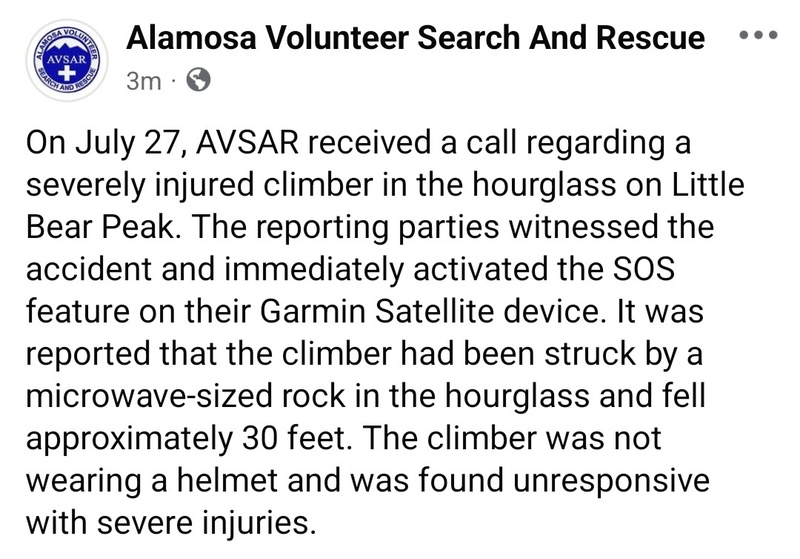
Why publish it now? My latest time on the mountain was July 26, 2025 where the group I was with heard significant rockfall coming down the Hourglass several times as we approached the adjacent gully this alternate route goes up. The very next day a climber was critically injured by rockfall in the Hourglass and it was necessary to send a National Guard Helicopter to extract the injured climber.
This is not an isolated incident. Close calls are becoming commonplace on the Hourglass route, which is currently considered the standard route for this peak. I had my own close call in August 2019 when I went up Little Bear for my Finisher. I have since been on the summit 4 additional times (and counting) but do not plan to ever do the Hourglass again due to the unpredictable nature of the rockfall.
Some people do make it up without experiencing rockfall, but many people have heard the resounding echo of rocks of various sizes thundering down through the narrow pinch-point that all climbers must go up on class 4 rock. There is an immense amount of loose rock spanning the entire upper portion of the Hourglass. Unlike some routes which effectively get "cleaned" of loose rock by the amount of traffic on them, this will realistically never happen for the Hourglass route.
I propose it's time to reconsider the Hourglass as the standard route and West Ridge Indirect is a viable contender as a new route - having almost identical specs as the Hourglass route. The primary trade-off is you can avoid the worst of the rockfall of the Hourglass at the expense of having brief but intense exposure on the ridge.
Beginning of SAR report for the recent rockfall incident in the Hourglass.
I would be remiss to not thank upfront all the people who have contributed to the development of this route - it has truly been a community effort to try to piece together a viable alternative to the Hourglass route that is feasible for the average hiker.
First and foremost, thanks to Judd (CaptainSuburbia) for first calling attention to this option. It was his excellent reports that caught my attention and allowed me to go back and enjoy a peak I thought I would never revisit due to the Hourglass.
Additionally a very special thanks goes to sean23, masonzastrow, and mcannavo (Sean, Mason, and Maja) who put up a mini TR with the critical piece of beta of calling out the white rock that serves as such a perfect marker for one of the most important turns on the upper portion of the route,
Also, many thanks to mindfolded and Joey_parm (Jay and Joey) who accompanied me on one of my early trips up this route and contributed some of the photos and beta used in this report.
More recently, madmattd went up the route with me and provided tremendous help in testing out the crux bypass route. He serves as a scale model in several photos.
Even more recent still, on yet another trip up this route, MaryInColorado, greenonion, and Bob (Mary, Stu, and Bob) went with me up to just beyond where this route splits from the Hourglass and, while our group had to bail that day, that trip helped firm up some of the details related to the turn.
Many others have climbed this route and provided various forms of feedback - thanks to everyone else not listed here who has contributed to making people aware of this alternative to the Hourglass route.
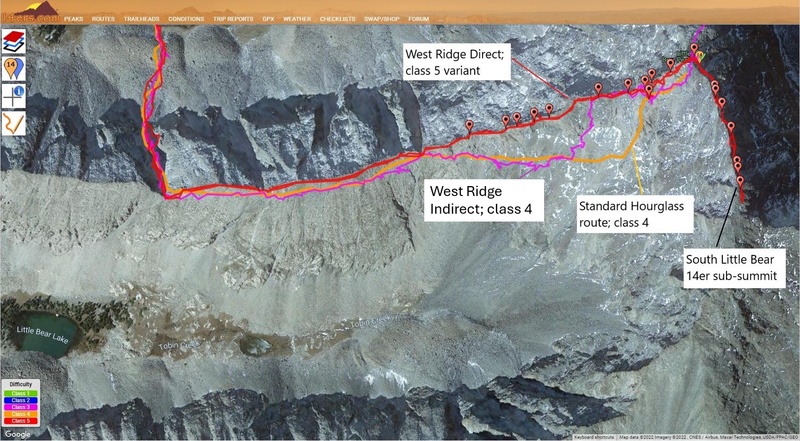
The map below illustrates the fairly minor adjustment made between West Ridge Indirect and the Hourglass route, as well as the more significant departure for the class 5 West Ridge Direct.
Comparison of some of the options for getting to the summit of Little Bear.
Trailhead: Lake Como (Blanca Peak) Trailhead
Route: West Ridge Indirect (as pioneered by CaptainSuburbia)
Difficulty: Class 4*
Exposure: Extreme (Think of a really short version of the Knife Edge on Capitol but tilted up, though with large, chunky, very solid holds, albeit with a potential move or two of class 4 to get up. Some may consider it class 3 - see *note below. Fatal exposure on both sides. Easy climbing but potentially intimidating for those bothered by exposure)
Rockfall: Moderate (The number one advantage of this route vs the Hourglass - the rock funnel above the Hourglass is perhaps the single most treacherous feature on any 14er** - anyone knocking a large enough rock into it can take you out in the blink of an eye)
Route-Finding: High(er) (it seems overkill to rank the route-finding as extreme, but the Hourglass route is ranked as "high" and it's a little harder to navigate this route than the Hourglass, plus you risk wandering into highly exposed class 5 terrain if you get too far off)
Commitment: High (basically comparable to the Hourglass route in this category except perhaps that it might be slightly more challenging to quickly bail near the top due to route-finding with the above mentioned risk of nearby class 5 terrain)
(*In regards to class 4 ranking: this has been a point of discussion/debate on this route. Even CaptainSuburbia at different times has called it class 3 and elsewhere said there were "occasional (maybe 2 or 3) class 4 moves." Likewise, I have in other reports referred to some of the sections here as class 3 but based on re-evaluating and consulting with my partners this time have instead settled on class 4. All this is to say that ranking difficulty is slightly subjective and the actual difficulty encountered can vary if you take a slightly different line and certain moves can seem harder based on how tall/short you are. But there have now been multiple voices chiming in on various trip reports, condition reports, etc and the general consensus seems to be settling in on there being at least a move or two of class 4 you will need to do on this route. Since routes are ranked by their hardest move, that makes this a class 4 route)
** I am endeavoring to strike that delicate balance between neither overly dramatizing nor downplaying the possible dangers - some people have died on this mountain. So my descriptions will be blunt where danger is possible. At the time of this writing I have done 418 summits (counting repeats) on Colorado's 13ers/14ers, including doing most of the 14ers at least twice. Among that is included several class 5 peaks/routes (including CoffeePot and Teakettle) along with the ridge direct variation of the El Diente - Wilson Traverse (including PinPoint), mostly ridge direct Bells Traverse - and immediately after this summit, the Little Bear - Blanca Traverse (more to come on that in another TR...). Out of all of those climbs, the Hourglass on Little Bear remains the single most freaky portion of any mountain I've been on for the one solitary reason of the huge funnel of loose rocks lurking over the Hourglass which funnel down into it. Anybody who did not experience rockfall in the Hourglass will likely think that route is pretty tame and easy. Anyone who had large rocks rip past their heads near that small funnel point will remember it for the rest of their life. The climbing in the Hourglass is overhyped, in my opinion. The rockfall danger will be considered overhyped... by anyone who has not experienced it).
Follow the standard route up the first gully until you're getting within view of the lower sections below the Hourglass
Take a sharp left at the first black wall
Cross the talus field
Enter the swoosh gully
Slowly veer right towards the large hump on the ridge
Gain the ridge at or just beyond the catwalk
Carefully make a couple class 4 moves up the exposed crux on the ridge or similar moves just off the right side of the ridge
Turn right on the class 2 ledge just above the flat faced white rock
Veer left as you round the corner into the extreme top left of the Hourglass (note landmarks for your return)
Follow the path of least resistance on the short stretch to the summit, being careful not to knock rocks down into the Hourglass (rocks are generally more stable if you stay higher)
Return by the route you came up in order to avoid the rockfall hazards inherent to the Hourglass
I would be remiss to not give proper credit to CaptainSuburbia for scoping out this route and writing up a couple trip reports about it. I'll give brief blurbs about his reports and a couple other Little Bear reports worth mentioning.
So CaptainSuburbia first detailed this route in his TR Little Bear West Ridge to Blanca and Hamilton where he gave just enough tantalizing detail to float the idea but didn't really flesh out the details in great depth.
Later he wrote another TR called Little Bear - Circumnavigating The Hourglass This TR has a lot of good photos with some useful landmarks to navigate by and offers a bit more in the way of specifics but still wasn't quite up to the neurotic level of detail I like to provide, lol.
Another major contribution came in the form of a mini trip report written by sean23 where the realization that there's a large flat faced white rock that stands out from everything around it that marks where to find the easy class 2 ledge to walk off the ridge. Taking the Easy Way on the West Ridge Indirect
West Ridge and Hourglass (standard route) - This is the easiest route to follow. It is the least exposed route. It's also much easier to get hit by serious rockfall since there is a huge funnel of loose rocks above the Hourglass and anything knocked loose will inevitably funnel down through the one tiny spot you have to climb up through (that shape is why it's called the Hourglass). The climbing is class 4. Experienced climbers find it pretty easy. Many folks without climbing experience find it intimidating. Some use a rope to rappel down.
West Ridge Direct - This is the most fun route of the 3 (I haven't done the NW Face yet, to compare to...). It is wickedly exposed on both sides much of the way. Largely class 2 and 3 but some class 4 and probably at least a sprinkling of class 5 depending on your exact line. Almost no rockfall danger (well not for you at least - but be careful about people below you on the standard trail - the rock is mostly solid but there are always loose ones lurking here and there). This is a great warm-up for the Little Bear - Blanca Traverse (I'll be making a separate report for that...)
West Ridge Indirect - This follows the standard route 90% of the way and veers off just before the Hourglass. Trades the rockfall hazard of the Hourglass for brief but extreme exposure on the ridge. Mostly steep loose class 2 to the ridge with some occasional class 3 but will likely hit a move or two of class 4 on the ridge, depending on your exact line. Crux is a bit awkward to downclimb, but you can bypass it with some also awkward moves on the side of the ridge which limits exposure to just one side. Or you could easily go down the Hourglass if you decide not to backtrack. Shorter than the SW Ridge which is the other main option to the Hourglass route for those wanting to avoid rockfall and serious climbing.
Can't quite decide which route to take? Here are some of my slightly tongue-in-cheek recommendations:
Experienced climbers: take the West Ridge Direct - it's much more fun than the other two!
Those wanting a warm-up for the LB-B Traverse: take West Ridge Direct - if you can't handle the exposure and moves on this section, then turn around at the summit! See LB-B Traverse via West Ridge Indirect for my Traverse write-up.
Those wanting to conserve energy (physical and mental) for the LB-B Traverse: take West Ridge Indirect - it bypasses some of the hardest scrambling and shortens the exposure time, giving a foretaste of the Traverse without expending too much energy.
Those who don't want class 5 or significant rockfall risk: take West Ridge Indirect - there's only a move or two of class 4 and comparatively minimal rockfall danger (but still bring a helmet just in case!).
Those who want an iconic14er experience despite the risks: take the standard Hourglass route - the rockfall potential is horrifying (especially on a crowded weekend) but it's a rather unique feature where some much rockfall can funnel down into one tiny spot you're trying to climb up and so it has its own special place in 14er lore.
Those who don't care about dying due to risks outside their control: take the standard Hourglass route on a busy holiday weekend - you'll think I'm way overdoing the rockfall hype, but check out my earlier TR, Little Bear, Big Finish, for the backstory on why Hourglass rockfall has left such a permanent impression on my mind (but thankfully not my skull...). Look for the large bold section about halfway down titled "Rockfall in the Hourglass." If you were lucky enough to have done the Hourglass without experiencing rockfall then you're likely rolling your eyes by now, if you're even still reading at this point. But if you too have heard the sound rocks make in mid-air - yes, they make sound in mid-air when they're going fast enough - then you'll be nodding your head.
This route starts on and follows the Hourglass route the majority of the way, only veering sharply to the left just before reaching the Hourglass. I won't repeat the route information up to that point - see the current route description listed on 14ers under "Little Bear Peak - West Ridge and Hourglass." This trip report picks up with where the West Ridge Indirect route diverges from the Hourglass route.
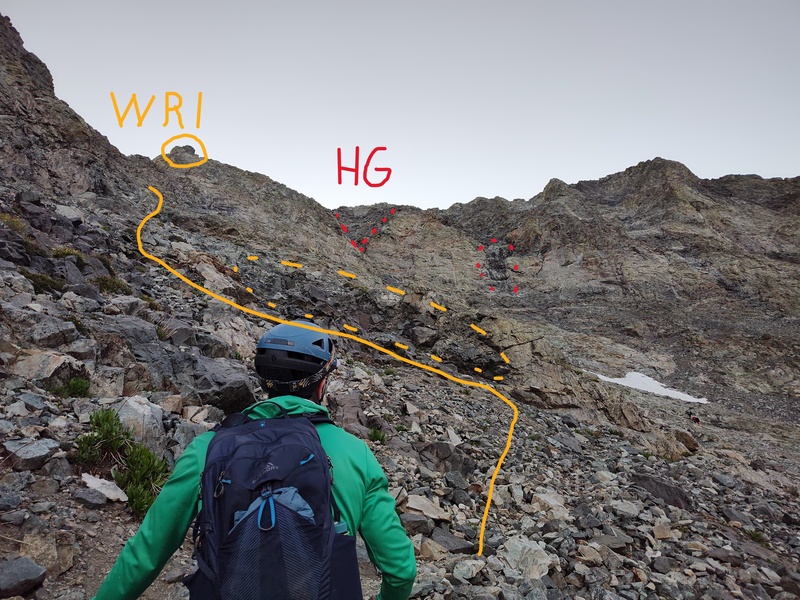
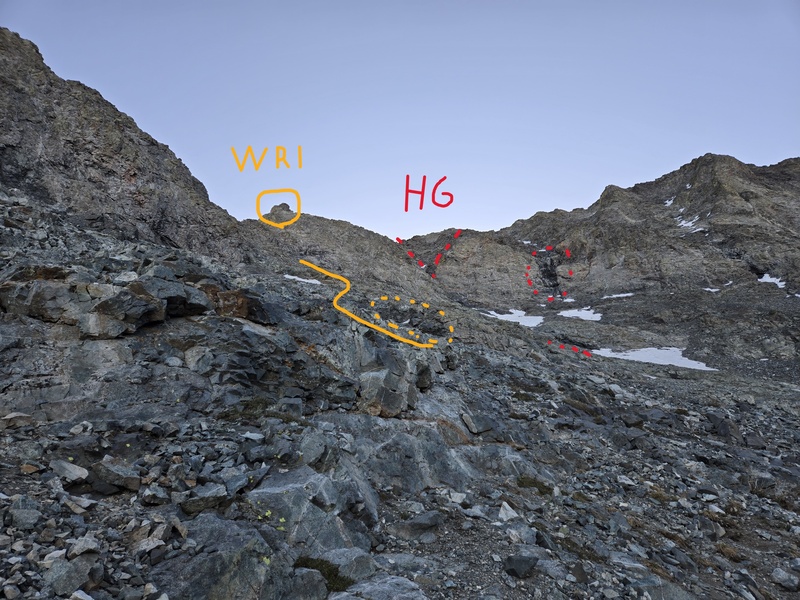
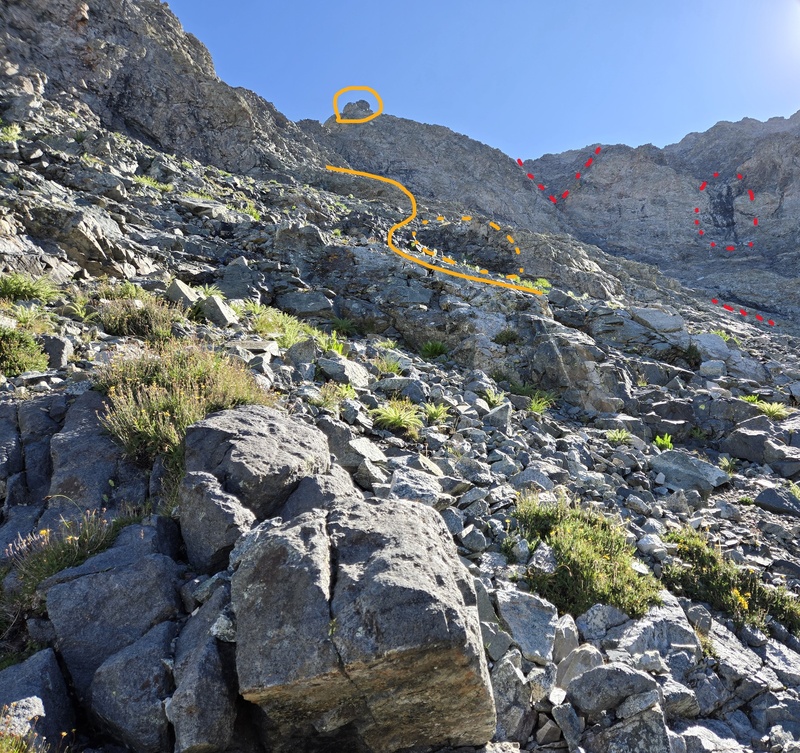
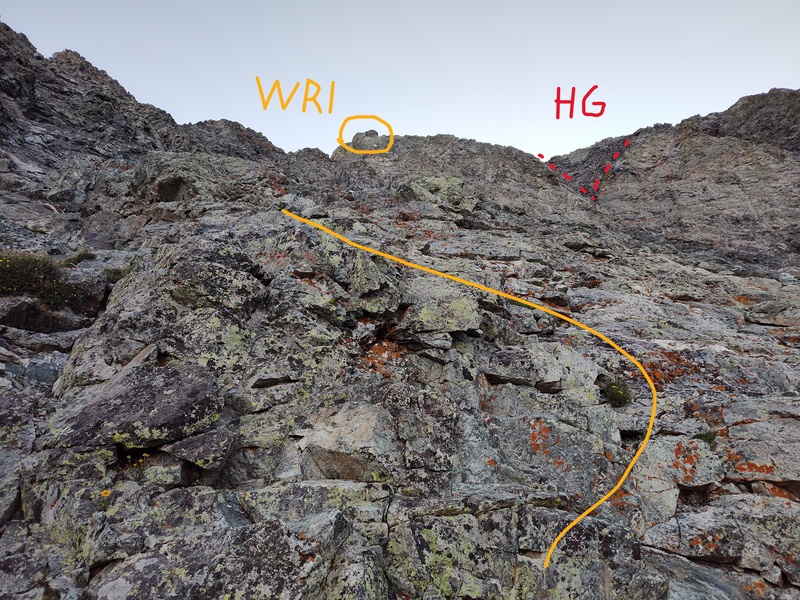
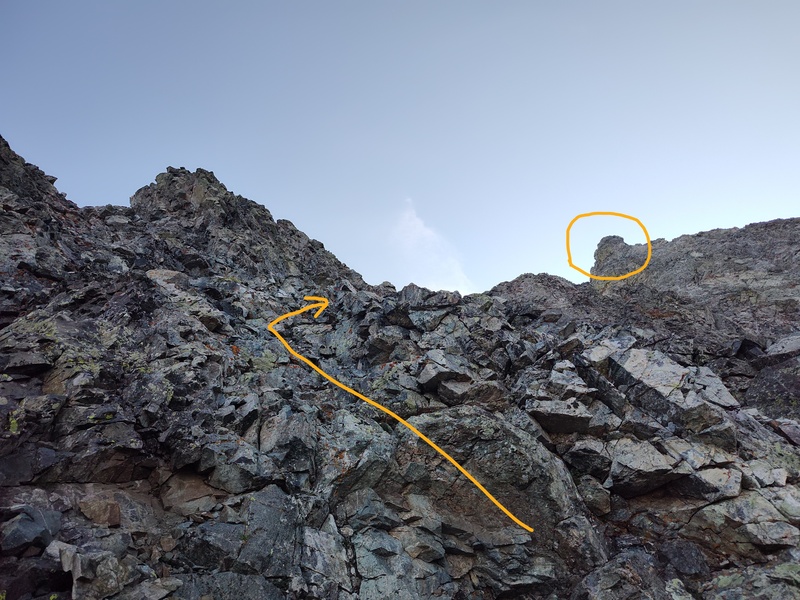
You'll know you're getting close to the Hourglass as you see the Black Claw on the side of the mountain in front of you (red dashed circle in the photo) and you'll also see a V-shaped gap between ridges. But for West Ridge Indirect, you'll want to turn sharp left at a small black wall (orange dashed circle) and aim in the direction of a large hump on the ridge (orange circle).
But one key thing to note: the standard Hourglass route has developed 2 or 3 different parallel paths between the 1st gully and the Hourglass - over the years people have erected cairns at at least a couple different altitudes down below the ridge. Depending on which of these lines you follow, you might find this black wall right next to where you're walking or a ways above.
The black wall marking a good point to turn hard left off the Hourglass trail.
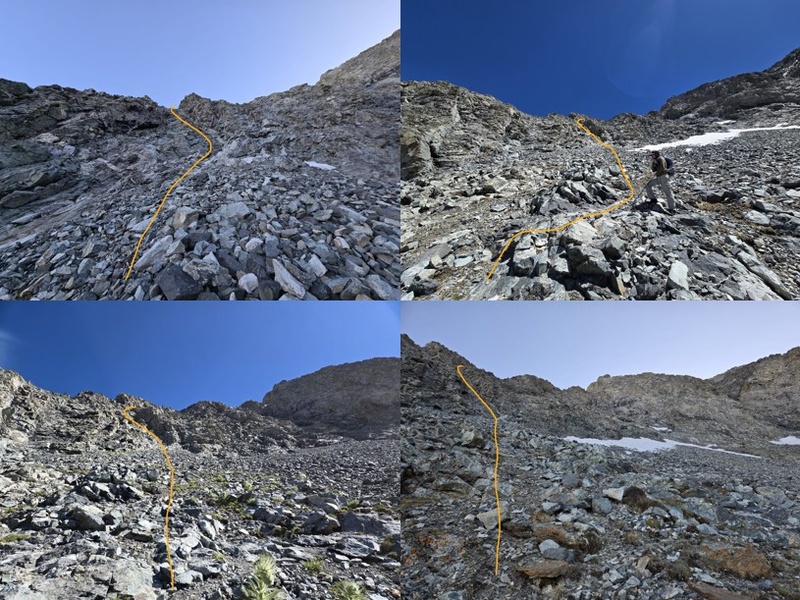
So I'm adding several photos of this feature taken from different vantage points and under different lighting so that you know what to look for.
But even if you manage to miss this black wall (at some times of day it looks a little more brown than black...) don't worry too much. The key thing that matters more than the black wall is to turn left and aim for the large hump on the ridge once you start getting close to the features that indicate the Hourglass is getting near. The black wall is merely a convenient marker for a good place to do so, but you can easily turn a bit before or after this point and still easily follow the rest of the route.
Same feature from a lower location you might hit if using the lower social trail going over from the 1st gully. Note there's another black wall in the distance (red dashes)
Just for overkill, here are some more slightly different angles and lighting conditions showing how these features stand out fairly easily.
Similar view in full sunlight.
A closer view with Matt at the bottom right for scale.
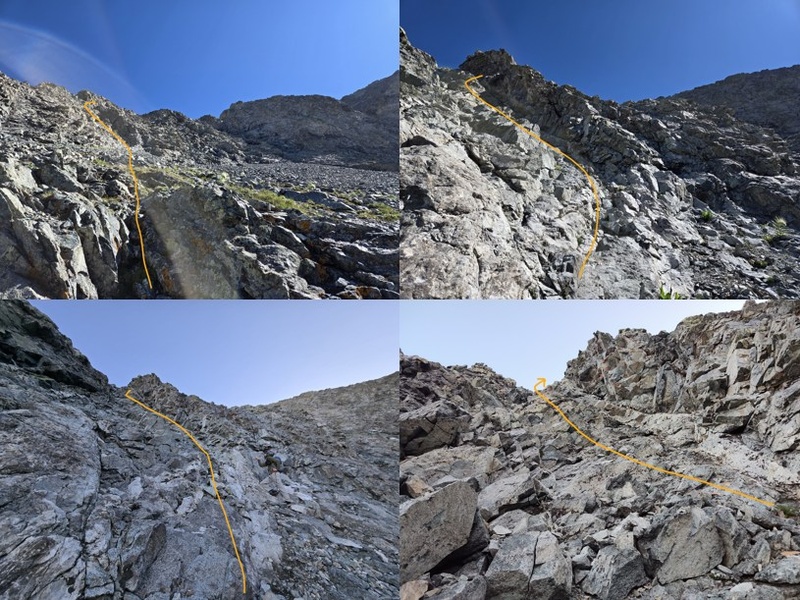
Above the black wall, as you aim generally for the hump on the distant ridge, you can again pick a few different lines. One of the easier and more solid ones is the rusty staircase (named for the rust colored lichen on the rocks) which you might see if you go slightly right above the black wall. But don't worry if you take a line where you don't see this - just keep moving in the direction of the hump on the ridge.
The rusty staircase going generally towards the hump on the ridge.
After this, unless you turned left well before the black wall, you'll come out onto a large talus field. The rocks are somewhat loose but it's not enough of an angle for them to generally move very far.
Your goal is to get up onto the rocks to line up for the approach to the ridge. The easiest landmark that stands out to navigate by is what I'll call the Swoosh Gully (for reasons that will be explained later).
Several different views of the Swoosh gully in the distance as you mount the hill above the black wall.
I've noticed over various trips at different times of the day that the gully is sometimes extremely obvious and other times less so. But there are also prominent humps above it which can make the location easy to spot even if you arrive under unfavorable lighting.
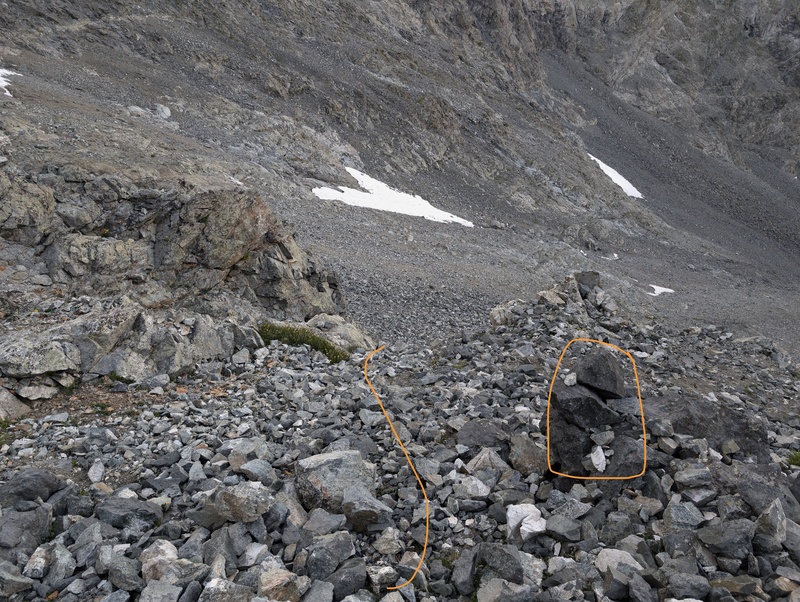
Once you get to the base of the gully there is a large rock cairn to help you know you've found it.
A few more views of the Swoosh gully as you get closer.
If by chance you really overshoot the black wall you can just veer back into the talus field and aim for about midway up it to find the swoosh gully.
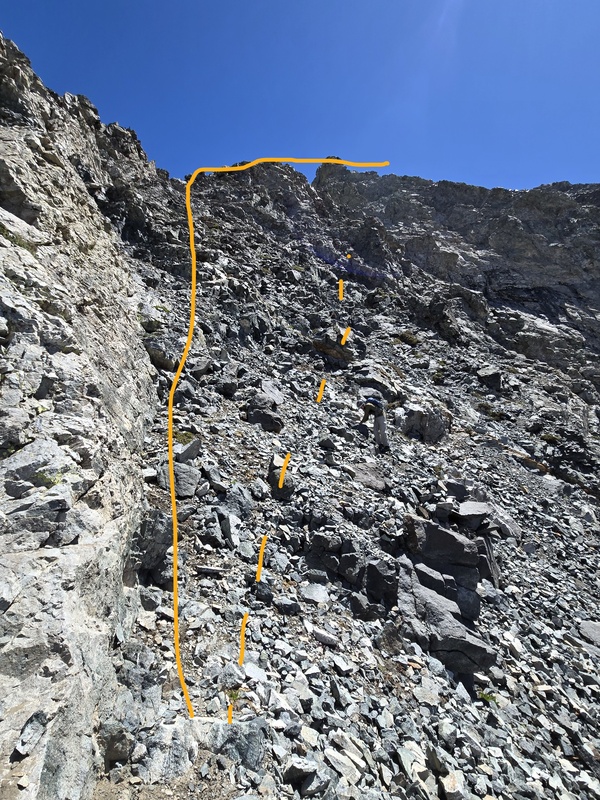
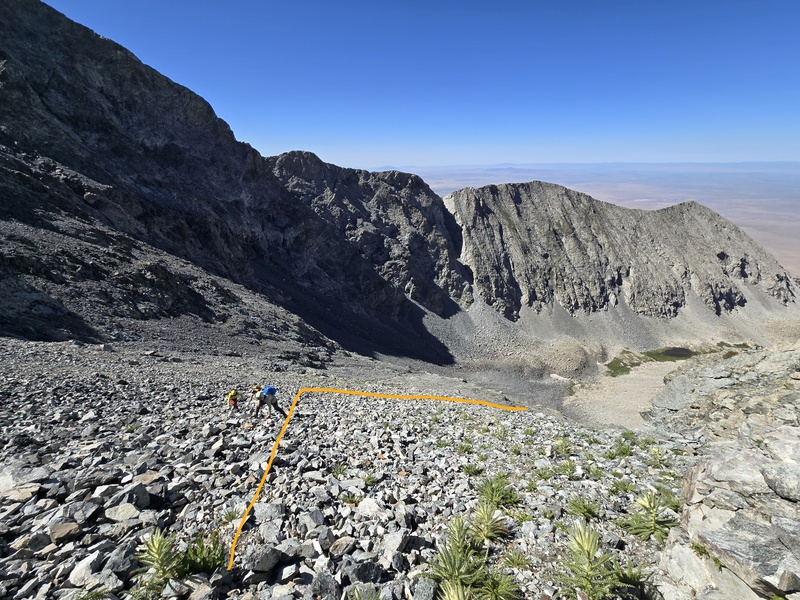
This photo was taken while leading Bob over to the base of the Hourglass for show and tell. Mary and Stu are following the orange line on the way back down WRI.
The photo below is where the swoosh gully gets it's name. It may take a little imagination to see the actual swoosh (it's upside-down with the curve at the bottom). As with some of the other subtle features mentioned, this one doesn't show up well in all lighting but the shape of the ridge above is very distinctive and should be easy to identify even if the swoosh itself eludes you.
The Swoosh Gully - you might detect an upsidedown white Nike Swoosh curling in the bottom right of the photo.
As you get to the top of the swoosh gully you'll start to gradually veer to the right, aiming for the large hump on the ridge which should be visible again after having briefly lost sight of it while coming up the gully.
That hump is your key guidepost for gaining the ridge. Most of the other landmarks are optional points of reference to help affirm you're on known territory.
Start veering to the right above the swoosh gully and aim roughly for the hump on the ridge.
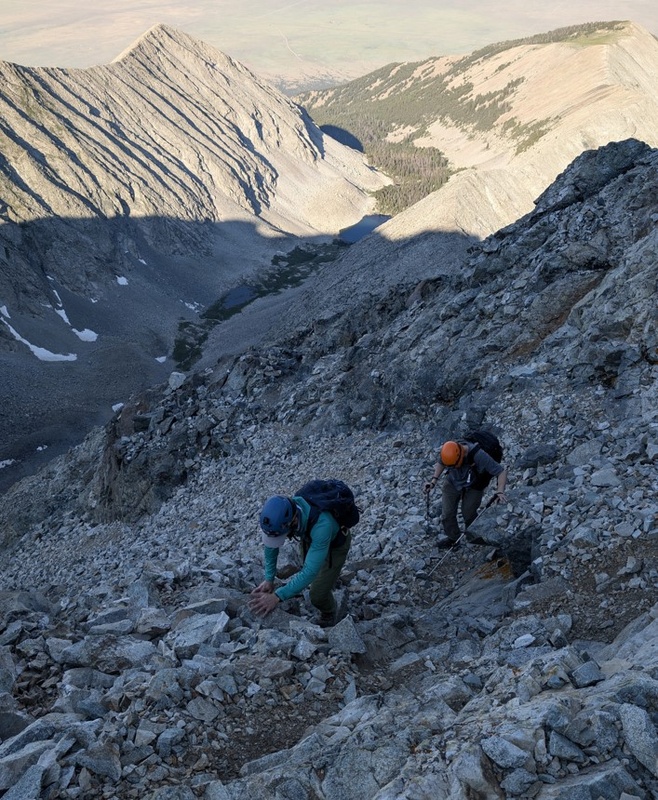
At this point, pause and look behind you to note where you'll want to descend on the way back.
Looking back from near the top of the swoosh gully.
As you go up towards the ridge you'll start to have a rock wall on your left which you can come up along using the path of least resistance.
Coming up above the swoosh gully.
As you get closer to the ridge you'll start to see a small pair of rocks on the ridge to the left of the large hump you've been tracking so far. The small pair of rocks marks the approximate point you'll want to hit the ridge.
Small pair of rocks starts to come into view to the left of the large hump.
The closer you get to the ridge, the more the rock wall will keep you from drifting too far left. Just stay along that wall and aim just left of the large hump.
Looking back down.
A couple more views of how this section looks.
The large hump beckons.
The smaller pair of rocks isn't always as visible as the large hump. But generally you're aiming to come uip a little left of the hump.
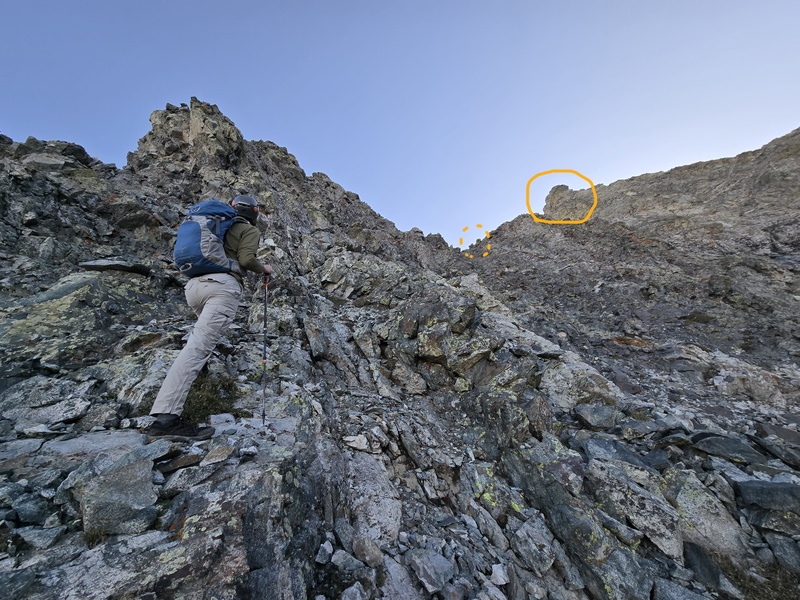
This is where you have to start making tradeoff decisions. The easiest spot to gain the ridge is to go straight up to the small pair of rocks sticking out near the low point of the ridge above you, but if you do so you'll be coming up onto the ridge right at the catwalk feature described in the West Ridge Direct route (class 5 route that stays entirely ridge proper the whole way).
If you'd rather minimize your exposure, just continue to the right as far as you're comfortable doing so. With some class 3 scrambling you can come up past the catwalk but eventually the difficulty of the scrambling below the ridge will likely force you to come up onto the ridge.
Easiest point to gain the ridge, but you'll hit the catwalk coming up here.
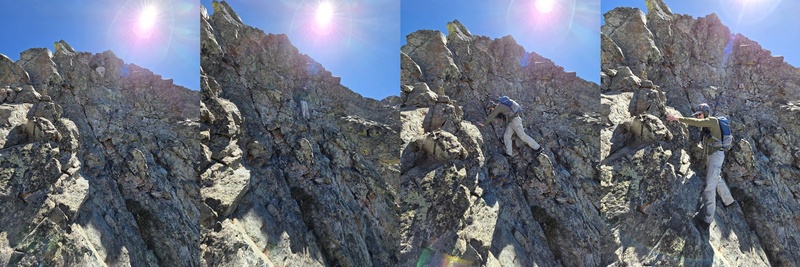
Zoomed out view of the same spot showing a dashed line where you can veer a little to the right to delay coming up onto the ridge.
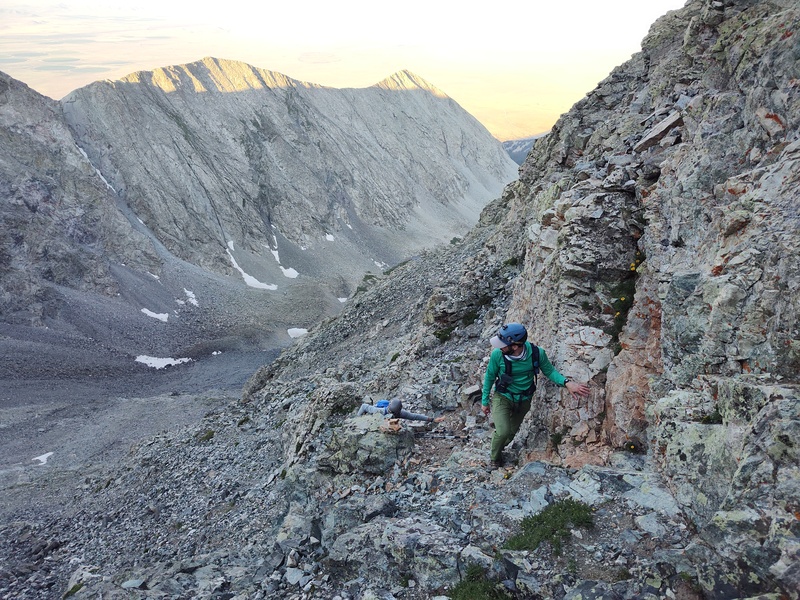
Below is Matt trying to delay the inevitable rise to the ridge - but eventually you have to come on up.
Matt delaying the rise up onto the ridge as long as possible.
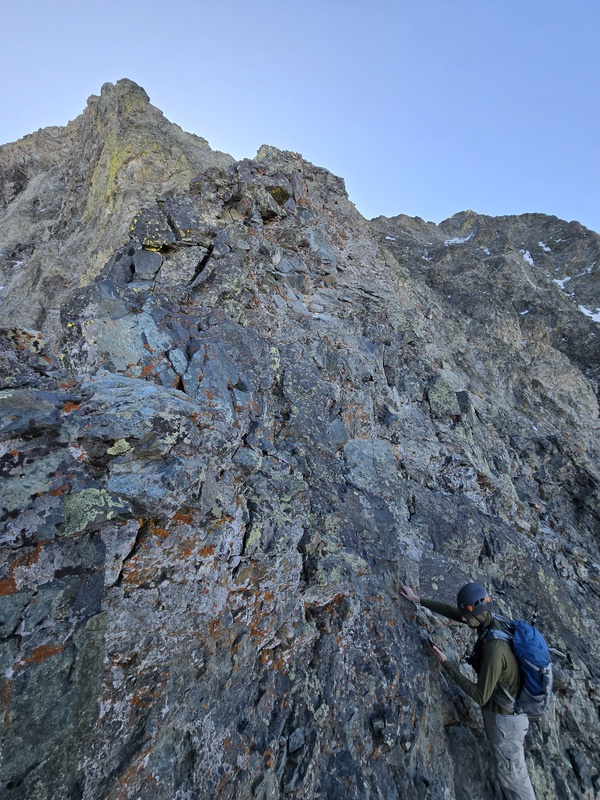
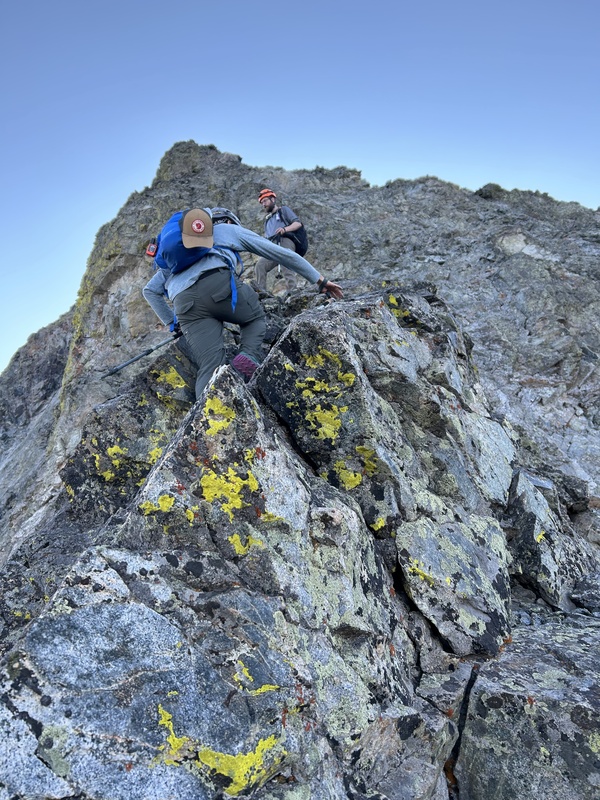
When you finally get up on the ridge, get ready. If you're spooked by exposure, start doing some breathing exercises before you take those last couple steps up. You'll only be exposed for a brief while, but the exposure on both sides is intense. You can avoid some of this by at times staying slightly down to the right of the ridge where possible, but you'll have to do some extra scrambling where that is even an option.
Matt finally gaining the ridge.
Slightly different position on the ridge on a different day with Jay and Joe. This gives some feel for the exposure.
Once on the ridge you'll be facing some class 3 scrambling and probably a move or two of class 4 regardless of whether you stick to the very top of the ridge or try to shimmy along the right side in places. Generally it tends to be slightly easier to stay on the very top but you'll have exposure on both sides then.
The crux is brief and only involves a move or two of class 4, depending on your exact line but you'll have extreme exposure on both sides (think Knife Edge on Capitol but with a little upward tilt, though only a tiny fraction of the length). The slant actually makes it more ladder-like in my opinion.
If you don't like the idea of exposure on both sides as you pull that move or two, there is a viable bypass on the right side. It's not any easier than being on top, but it does limit your exposure to just being on one side.
In the photos below madmattd will guide you through the bypass maneuver, both going up and down.
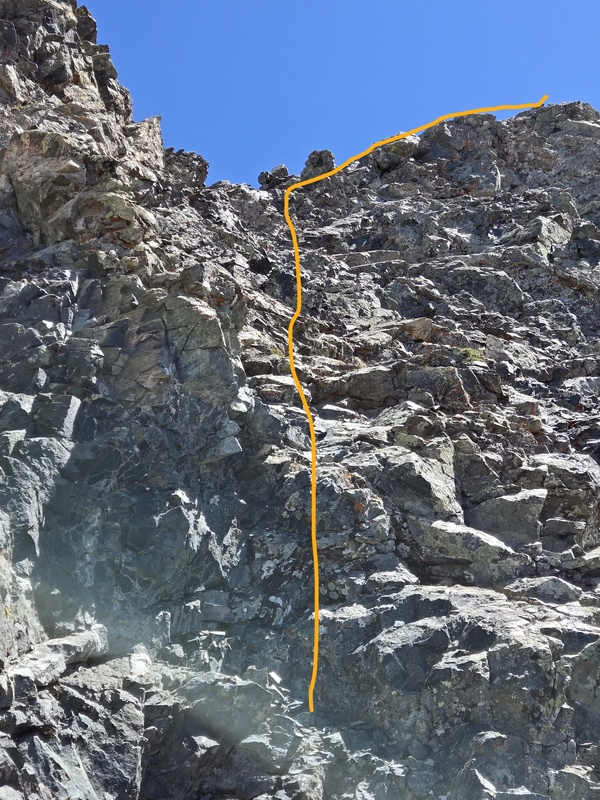
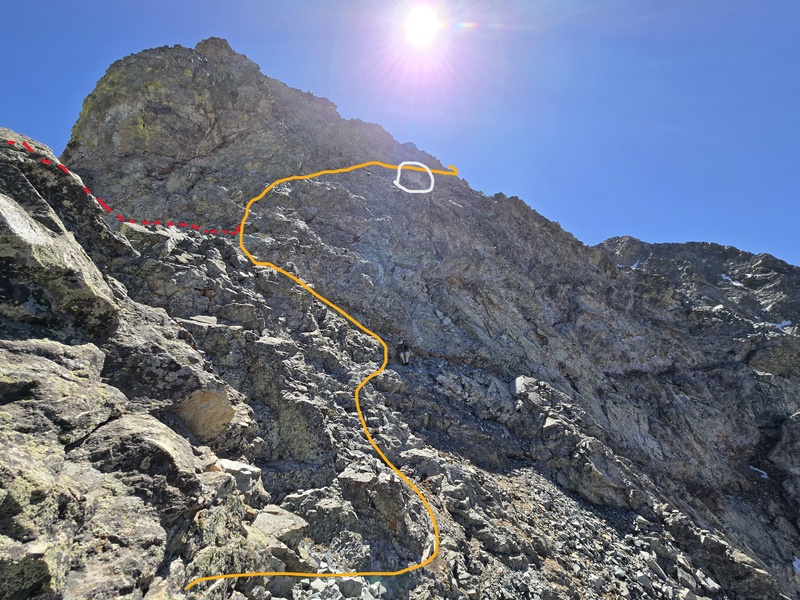
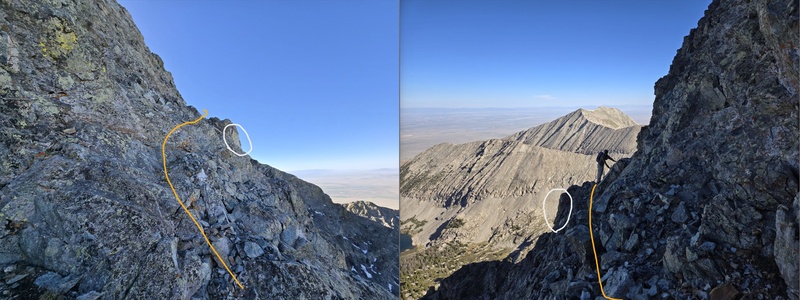
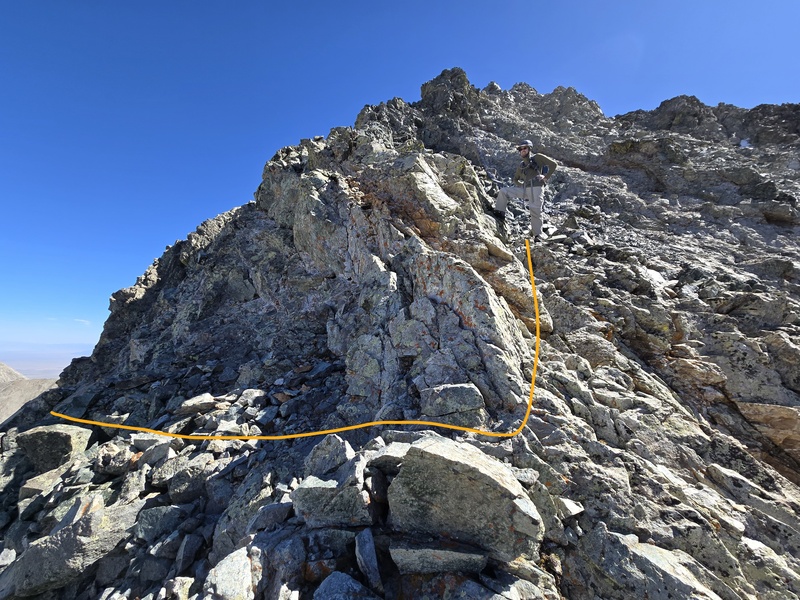
Crux is double exposed red dash line on the left. Bypass is solid orange line on the right with the exposure all off to one side.
Again, the emphasis is that the bypass doesn't make the climbing any easier - it just limits the exposure to one side instead of two as you deal with the scrambling.
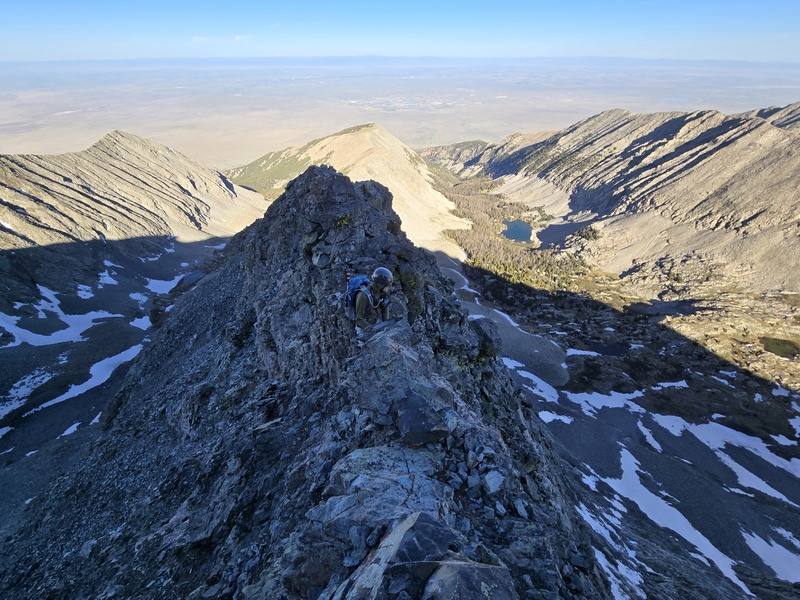
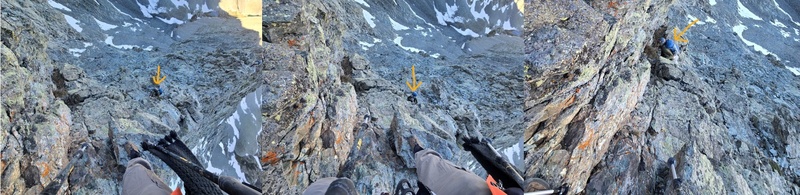
In this series of photos I'm standing at the top of the crux (with my black scarf visible) as madmattd crosses along the bypass then crawls straight up to me.
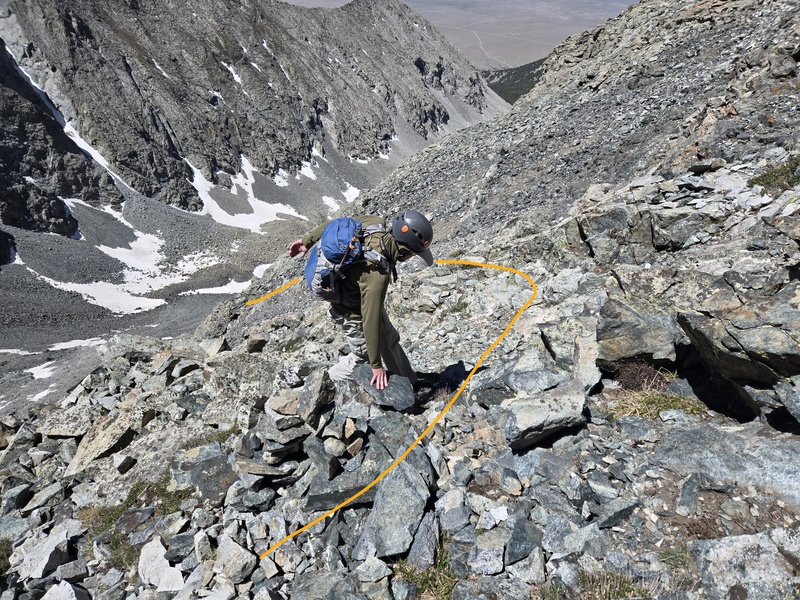
Here's the bypass on the way down with madmattd modeling how it's done. The last bit of ledge requires crawling under a slight lip, and getting back across requires a bit of a step over, or more scrambling action for short legs.
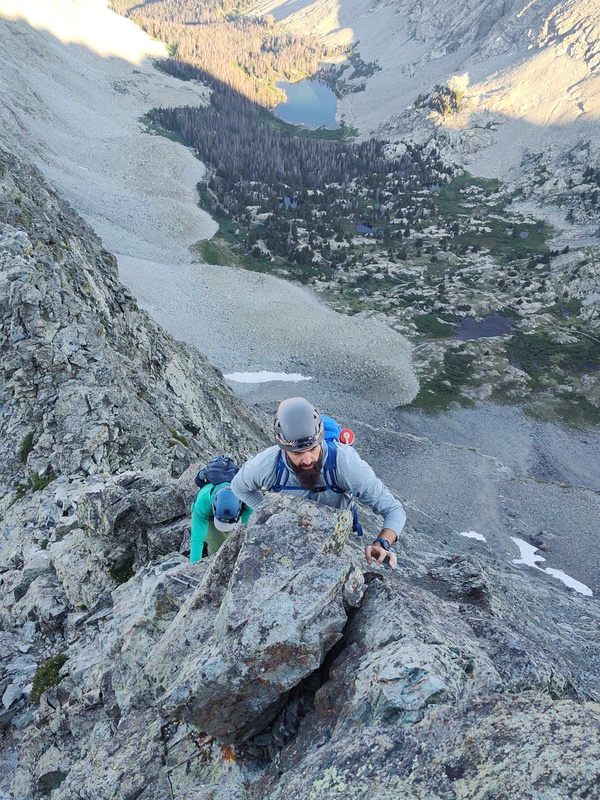
If you make it past this crux then there is nothing else beyond that which should give you any trouble by comparison. The exposure will soon ease up dramatically and the climbing shouldn't go beyond class 3 at the most. But don't underestimate this brief section if you're bothered by heights. This is a no-fall zone for sure.
A different angle of me on the crux to highlight the exposure - brief but intense!
The first time I came up this route I turned right too soon and ended up adding a little extra class 4 (or if you continue either straight up or around the left of the tower above, you'll hit some class 5).
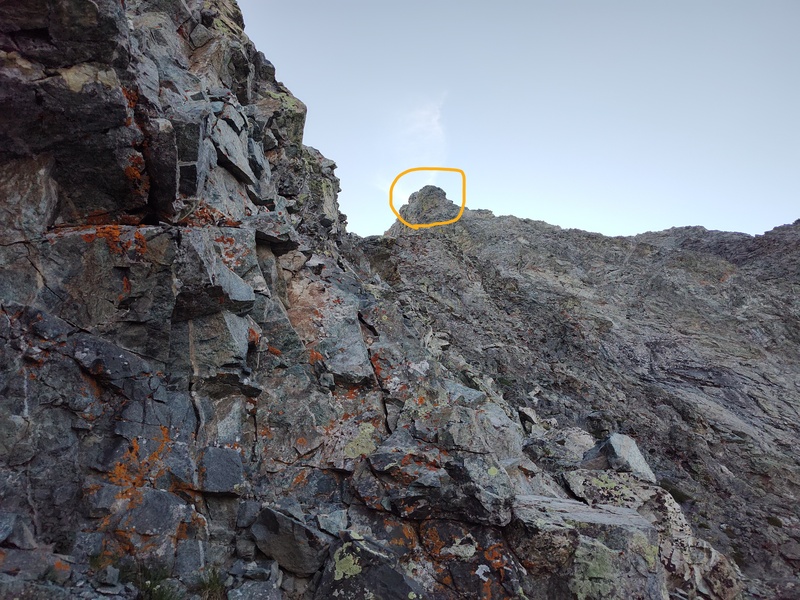
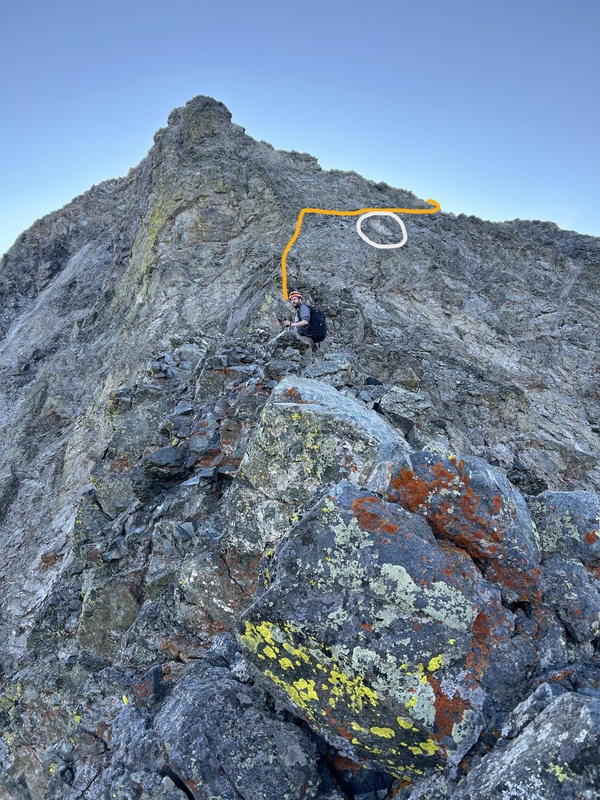
But there is an amazing landmark which is visible from a good ways off as you're coming up the ridge - a flat-faced white rock that stands out sharply from everything around it (thanks Sean and company for calling that out!). Your goal is to do a little class 3 scramble to get up to the class 2 ledge that runs just over top of the white rock. From there you simply walk around to the top left corner of the Hourglass.
Me closing in on the class 3 scramble up to the easy ledge just above the white rock.
Since that white rock is such a key landmark for finding the easy way off the ridge, I'm including a large number of photos of it taken from various positions on top of the ridge as well as from some of the right side bypasses and at different times of day. It seems to always be very easy to spot.
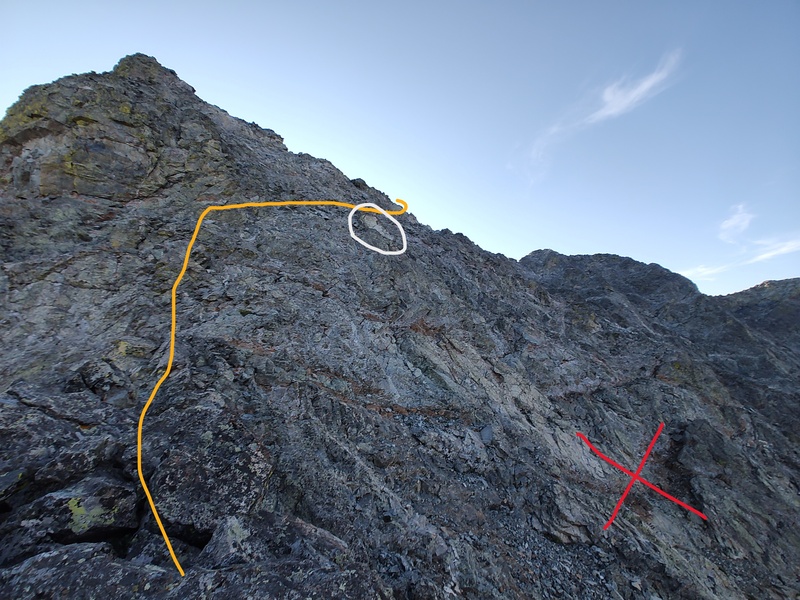
At the end of the ridge is another opportunity to minimize your exposure by staying a little to the right of the ridge top.
The red X shows a ledge system too low leading to a chockstone used on a previous climb but this adds unnecessary difficulty to the climb.
The good thing is that in all different levels of lighting this white rock tends to show up very well, making it an ideal route marker.
Different lighting at the end of the ridge.
Slightly different angle getting closer to the white rock.
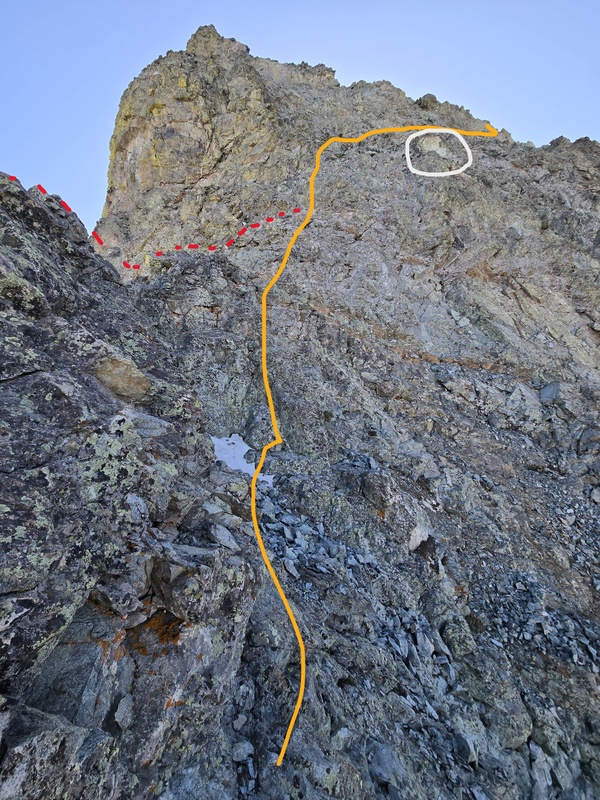
And another view.
At the risk of overkill - you can see the lower ledge in bottom right that is harder to deal with.
As you get up next to the white rock (on either ascent or descent) you'll no longer be able to see the white part of it but you'll notice how very flat faced it is.
View of the flat faced white rock on the way up (left) and me looking back at Matt standing in the shadows above it after walking the easy ledge.
Turning the Corner: Final Push to the Summit(back to top)
As you come around the corner make sure to carefully note your surroundings to make finding this spot easier on the way down. There are some cairns here but you might also find other stray cairns along the ridge. The flat faced rock is a key feature to help you know when you've found the correct spot and you should notice the easy ledge going over to the top of it.
If you're just seeing a steep drop as you return, then you probably tried to turn the corner too soon or too late - it will be obviously easy when you find it.
The turn point. Flat faced white rock circled at left with easy class 2 ledge just above it. Off to the right Matt has started up to the summit of Little Bear, staying a bit to the right of the ridge.
Once around the corner, just follow the path of least resistance, which will generally be a little to the right of the ridge top. But don't go too far to the right or the rock gets looser and you'll soon be lined up with the far top left corner of the Hourglass, from which point you can start kicking rocks down into the Hourglass if you're not careful. The more to the left you stay, the more difficult the climbing will be, but the less loose rock you'll tend to encounter (compared to the absolute garbage coming up out of the Hourglass).
Joe and Jay in about the same spot but in different lighting just after coming around the turn.
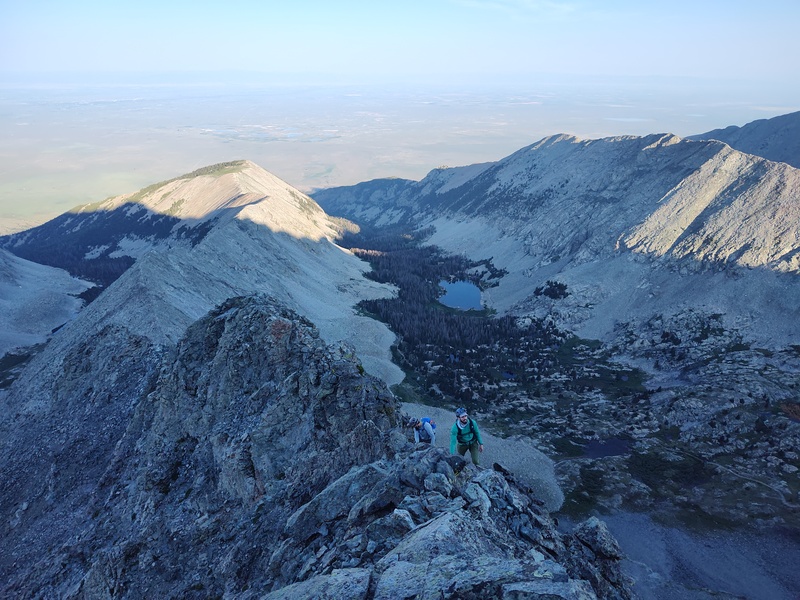
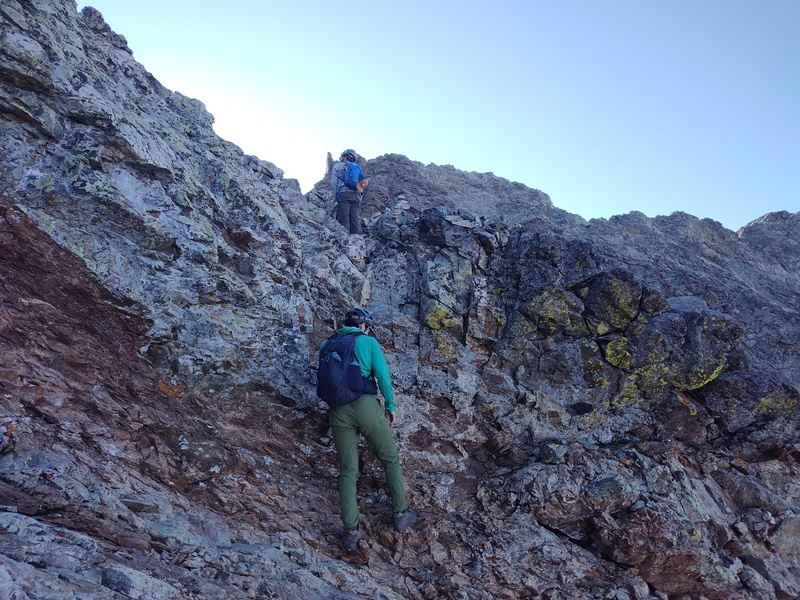
There will still be some class 3 scrambling here and there but you'll soon be merging with the final portion of the Hourglass and can follow gpx tracks and instructions from there.
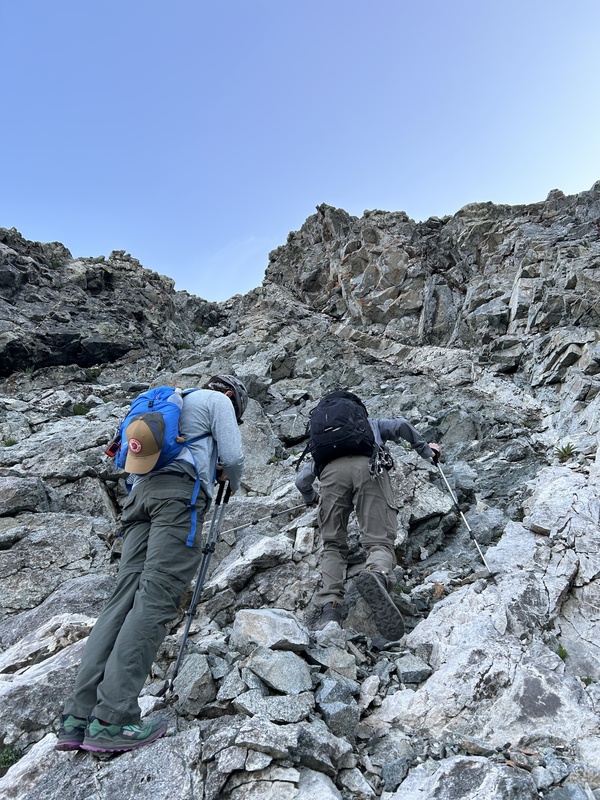
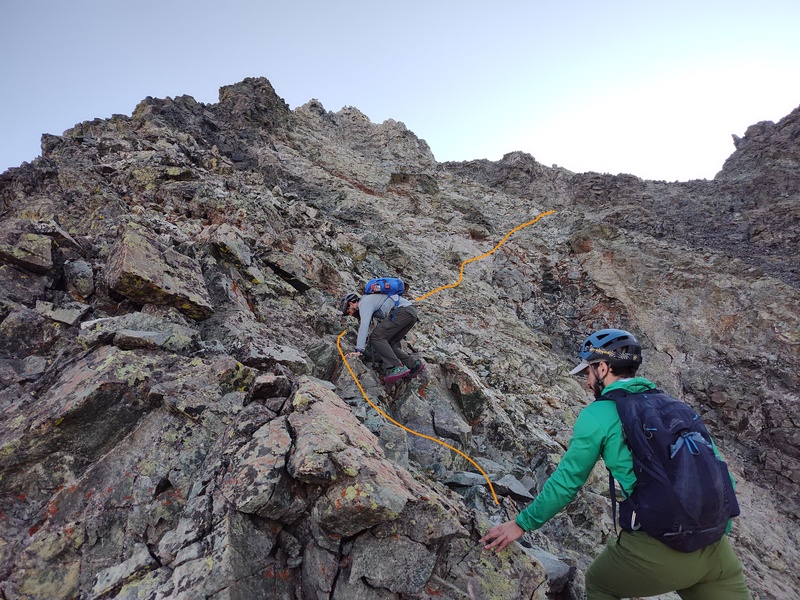
Joe and Jay dealing with a small wall.
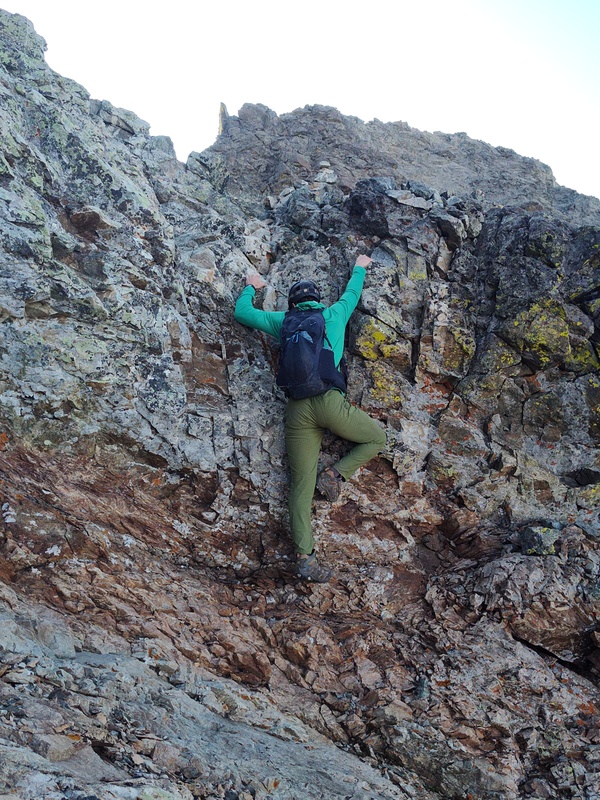
Joe busting out one of the harder moves in the upper section.
The last bit to the summit is covered in the standard route so I'm skipping to a few notes on the return. Hopefully you noted your surroundings as you rounded the corner above the flat faced white rock. Finding that spot to go around the ridge is the most challenging part of the descent. But the easy class 2 ledge will be pretty obvious when you go out to the correct part along the ridge.
Going back down to the turn point.
Matt just above the turn point - Little Bear summit up and to the right, flat faced white rock just out of view below to the left.
Same view panned a little left, the flat faced rock is visible just below and left of the edge of the orange line.
From the end of the ledge you'll have a short class 3 scramble to drop back down onto the ridge then just reverse your way up. See crux section above for how that looks in both directions. GPX tracks can be helpful to make sure you drop back off the ridge at the correct spot. Alternately, if you hit the catwalk again, it's time to drop down to your left.
Near the initial drop off of the ledge back down towards the talus.
Matt headed back down to the swoosh gully.
Coming back to the talus field.
Once you make it back down the swoosh gully (or whatever line to either side that looks best), you'll at first just be staring at a large mass of talus. But look for the rock lip below and head down and slightly to the right until you see the terrain ease you back to the black wall.
The terrain is fairly forgiving here - not too steep unless you go to the extreme right - and you'll see the angle ease even more and start to see evidence of the main trail standing out below you. If you don't see the exact line you took coming up, don't worry, just head downward and gradually right then follow the path of least resistance back to the main trail.
There is still room to do some fine tweaking of the precise best lines for some spots along the route but those are all in low consequence areas. All the most critical turns have clear landmarks to navigate by. With that said, I'm very interested in any feedback people have to fine tune this still relatively new route and offer up any other good landmarks or other tips, tricks etc. I may also fill in more detail at some point but wanted to get these current updates out now as there is strong and growing interest in this route as of the time of this writing.
GPX NOTE: You'll note there is a little slop in the tracks prior to the turnoff to leave the standard Hourglass route. This reflects the fact that there are at least a couple different social trails crossing along that terrain below the ridge and a little room to free-form the exact line. Also there is some slop just below the summit. I purposefully didn't clean these tracks up to show that you have some wiggle room in those areas - your exact lines taken in those areas aren't really too critical. There's a waypoint at the end of the class 2 ledge where you turn to head to the summit.
My GPS Tracks on Google Maps (made from a .GPX file upload):
Thank you so much for making a master document with all the resources available. I really think this route is promising and it's work like this that gets it established! If you ever put together an exploratory party to poke around up there, shoot me a DM!
@Bill, if you ever decide you want to go up there with someone who's familiar with the route, I'll gladly drop what I'm doing and go climb it with you!
@Mason - thanks, I'll keep that in mind since having another person who's already done it and is willing to do a little exploring to see if there's any fine-tuning we can still accomplish might be useful.
@John - thanks for the encouragement and thanks for uploading your version of the gpx to the library. At some point I may replace the one used here after I've had a chance to do a rigorous comparison of different people's lines.
Fantastic work on this. With regards to the crux area where I got stuck, you've provided as clear a description as possible for either of the two options.
I did consider taking the slightly off-ridge workaround you draw in with orange. Ultimately it felt like the exposure would be no less fatal (just restricted to one side), and required no less difficult moves, than the direct ridge (dashed red) option. I did not actually attempt the workaround though, so maybe the moves are easier than they look. My opinion is that this would be tied w/ Sunlight's summit block for the most extreme exposure on any standard 14er route, closely followed by Capitol and Needle. Similar to Sunlight, the exposure is very brief, just a couple of moves. I am not a rock climber at all, and if I were I imagine those moves would become easy enough to overcome the exposure concern. Before the crux area, I found routefinding from the turnoff w/ Hourglass fairly easy. I didn't end up following the earlier TR too closely and just followed the easiest way up, and ended up right at the crux area upon gaining the ridge proper.
I still support adding this as a new route after summiting via the Hourglass, and seeing the pretty insane rockfall danger it holds. Little Bear is just a brutal mountain no matter how you slice it, and at least this way climbers can pick their poison instead of being pinned to the rockfall bullseye.
Nice work on this David! It sure looks like there's plenty of info here for folks to follow along on. It's a good route - while LB isn't my favorite peak, I'd have no problems revisiting this route in the future. I think I would take the crux directly next time - as deepdarkseas posits, the bypass is just as exposed, it's just only on one side with similar difficulty but more such moves required - coming down I had to do a couple long leg stretches - something for those shorter than I (6') to be aware of. But either way works for sure! I enjoyed reading the report and remembering that day. I appreciate all the work everyone has put into this alternative route!
You are a 14er angel & Thank you!!! 8/1/2025 9:16pm
Thank you for all your hard work and details about this route!! I’m sure it is going to save lives, even among the experienced! I don’t have a fear of exposure if the climbing is class 4 and not loose crap with impending danger of rock fall. It definitely looks to have the kind of rock that I prefer in the exposed areas vs. smooth rock with possible water running on it. And of course the uncertainty of the rock fall in the hour glass. I think your new details will help with the route finding quite a bit With all those different photos. I hope you know that you are a hero to many of us! We of course will move slow & cautiously & turn around if weather, fear or some other danger keeps us from finishing our last fourteeners. We appreciate your hard work. Love from my team, MAGICMARMOTS.
Caution: The information contained in this report may not be accurate and should not be the only resource used in preparation for your climb. Failure to have the necessary experience, physical conditioning, supplies or equipment can result in injury or death. 14ers.com and the author(s) of this report provide no warranties, either express or implied, that the information provided is accurate or reliable. By using the information provided, you agree to indemnify and hold harmless 14ers.com and the report author(s) with respect to any claims and demands against them, including any attorney fees and expenses. Please read the 14ers.com Safety and Disclaimer pages for more information.
Please respect private property: 14ers.com supports the rights of private landowners to determine how and by whom their land will be used. In Colorado, it is your responsibility to determine if land is private and to obtain the appropriate permission before entering the property.


")
")
")
")
")
")
")
")
")
")
")
")
")
")
")
")
")
")
")
")
")
")
")
")
")
")
")
")
")
")
")
")
")
")
")
")
")
")
")
")
")
")
")
")
")
")
")
")
")


