Download Agreement, Release, and Acknowledgement of Risk:
You (the person requesting this file download) fully understand mountain climbing ("Activity") involves risks and dangers of serious bodily injury, including permanent disability, paralysis, and death ("Risks") and you fully accept and assume all such risks and all responsibility for losses, costs, and damages you incur as a result of your participation in this Activity.
You acknowledge that information in the file you have chosen to download may not be accurate and may contain errors. You agree to assume all risks when using this information and agree to release and discharge 14ers.com, 14ers Inc. and the author(s) of such information (collectively, the "Released Parties").
You hereby discharge the Released Parties from all damages, actions, claims and liabilities of any nature, specifically including, but not limited to, damages, actions, claims and liabilities arising from or related to the negligence of the Released Parties. You further agree to indemnify, hold harmless and defend 14ers.com, 14ers Inc. and each of the other Released Parties from and against any loss, damage, liability and expense, including costs and attorney fees, incurred by 14ers.com, 14ers Inc. or any of the other Released Parties as a result of you using information provided on the 14ers.com or 14ers Inc. websites.
You have read this agreement, fully understand its terms and intend it to be a complete and unconditional release of all liability to the greatest extent allowed by law and agree that if any portion of this agreement is held to be invalid the balance, notwithstanding, shall continue in full force and effect.
By clicking "OK" you agree to these terms. If you DO NOT agree, click "Cancel"...
The route between Cherokee and Achonee Mountain is a seldom-visited, but outstanding knife edge of a ridge that bounds the western edge of the Lone Eagle Cirque. Before our attempt, the only information I could find regarding this ridge was in a trip report submitted by @pbakwin, which can be found here. A bit of history behind my naming convention - In the Spring of 1914, Ellsworth, inspired by the recently established names of the Arapaho Peaks, proposed 11 tribal names for various summits along the continental divide in what is now known as the Indian Peaks Wilderness. Six of the proposed names were adopted by the United States Board on Geographic Names. While most of the peaks in the IPW were named after Native American tribes, Achonee Mountain was named after a Cheyenne Chief, Ochinee, who was significantly involved in peace talks between Native American tribes and white settlers leading up to the Sand Creek Massacre.
Ochinee helped negotiate a treaty between the government, Cheyenne, and Arapaho for a large group of Native Americans to safely camp along Sand Creek during the winter of 1864 - 1865. However, on November 29, 1864, the encampment at Sand Creek was attacked by approximately 600 soldiers of the Colorado Volunteer Cavalry, led by Colonel John Chivington. While numbers may fluctuate depending on which source of information you read, it's generally agreed that somewhere between 100 and 200 Native Americans, most of whom were unarmed women, children, or elderly, were massacred. Ochinee initially escaped from the camp, but upon seeing that his people were to be slaughtered, deliberately returned to the one-sided battle to die with them. It's my opinion that naming this traverse after Chief Ochinee pays homage to the attempts at peace made by the Cheyenne and Arapaho tribes leading up to the senseless slaughter led by Chivington. It also sticks to the naming convention established by Ellsworth Bethel.
Approach:
There's no good way to combine or approach these peaks as a duo. Either way, you're looking at a long approach from either Monarch Lake (West) or Brainard Lake (East). Either approach involves a significant number of miles and has its pros and cons. Approaching from the West involves much less elevation gain, but there's no easy way to bail off of the peaks that make up the Lone Eagle Cirque back down to Crater Lake, especially if there's a desire to combine the route with other peaks along the ridge. The easiest exit from the ridge would likely be the Hopi Glacier, a semi-permanent snowfield that would necessitate the use of crampons and/or an ice axe for most of the Spring and Summer. Once past Hopi, the next reasonable bail option into the Crater Lake Cirque would be via Fair Glacier.
Approaching from the East involves a long descent from Pawnee Pass down to Crater Lake before ascending to the summit of Cherokee. It's extremely committing and has a less-than-ideal descent from the summit of Apache via the East Slopes. Unfortunately, any bail options listed for the West Approach are even worse when approaching from the East because one would need to descend to the trail junction past Crater Lake and regain approximately 2500' of elevation to get back to the other side of the divide. A fast group could continue the ridge over to Navajo Peak and Niwot Ridge, then descend back to Brainard Lake via the Niwot Ridge Trail. The aesthetics of completing the ridge to the summit of Apache, along with the shorter drive, made the East approach the more desirable option.
Route Information (Brainard Lake Approach):
Mileage: Approximately 20 Miles Elevation: Approximately 8000' Class: 5.easy Time to Complete: 16.5 Hours
Exposure: Extreme Rockfall: High (Mostly Cherokee's South Gully) Route-Finding: High Commitment: Extreme
Cherokee Peak via Crater Lake
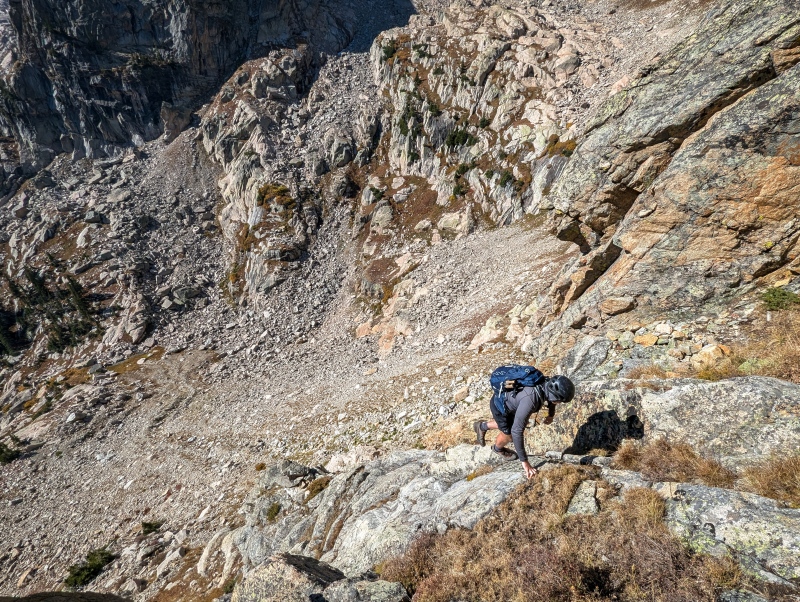
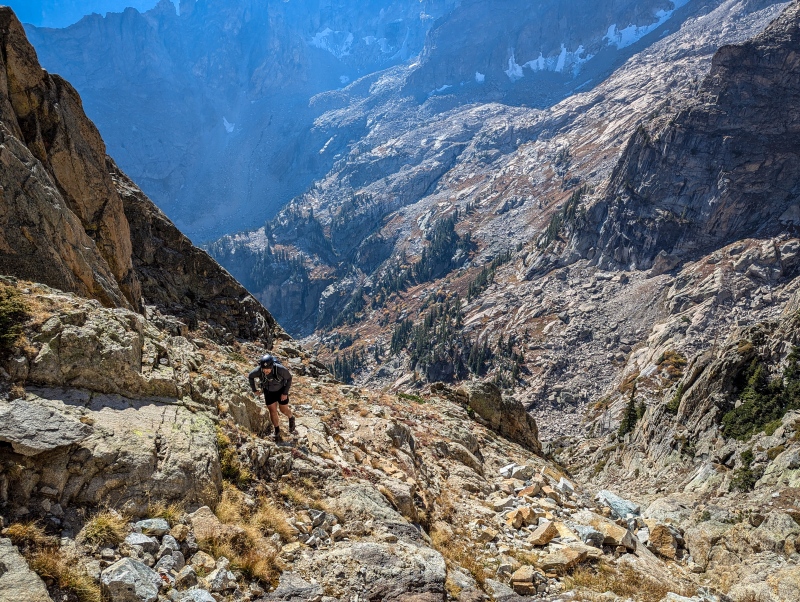
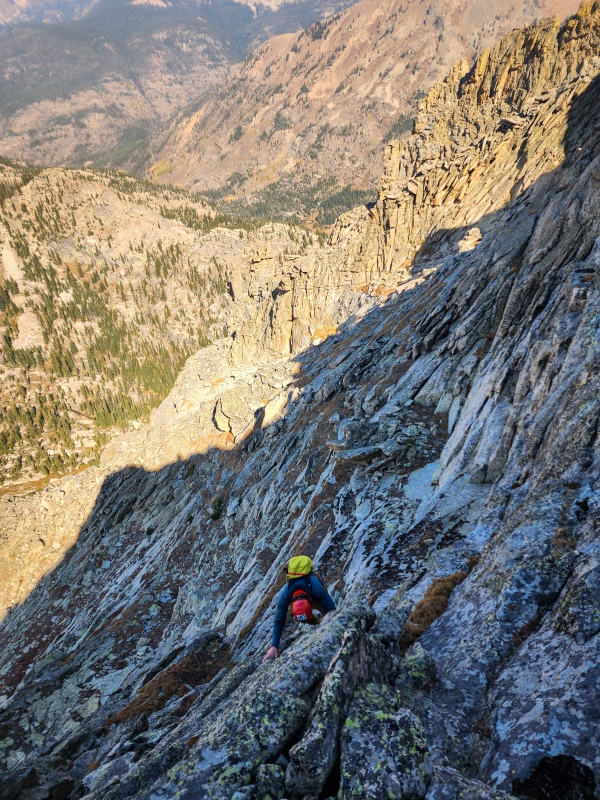
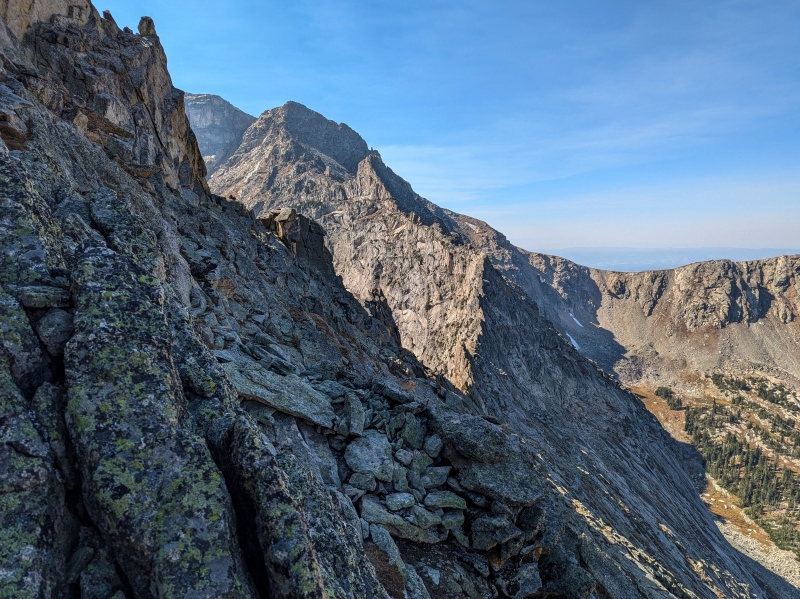
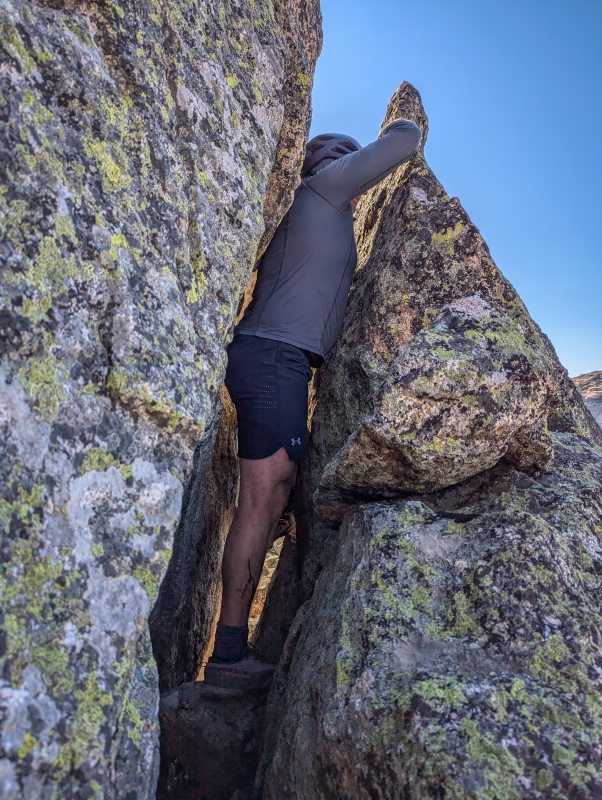
There are a couple of different ways to reach the summit of Cherokee Peak and several trip reports describe the various routes. Ultimately, due to simplicity, we chose to ascend the South Gully from Crater Lake. We followed a faint trail around the right side of Crater Lake and wove our way through several rock slabs to reach the base of the gully around 11,400'. We generally followed the path of least resistance and for the most part, we didn't encounter much bushwhacking. From the base of the gully, we took the right-hand entrance, which involved some class 4 moves, but soon relented to a combination of low-angle slabs, grass, and the occasional section of loose talus. It's not the best route, but it's easy enough.
Scrambling up the right-hand entrance into the South GullyThere's a bit of traversing involved to follow the path of least resistance, but route finding is fairly simple overallEasier terrain above the crux of the South Gully routeThis was probably the most annoying part of the gully around 12,000'. Loose and shifty talus, but luckily this section is short. Achonee can be seen in the background along with Hopi and the Hopi Glacier in the upper, left-hand corner.Moving on to some more solid, low-angle slabs near the summit of CherokeeThe smoke wasn't great, but the views were still well worth the effort! Lone Eagle Peak, Limbo, and Iroquois make up the ridge extending to the right above Crater Lake (AKA - The Mohling Traverse). Behind Lone Eagle Peak is Apache Peak... we've got a long way to go.
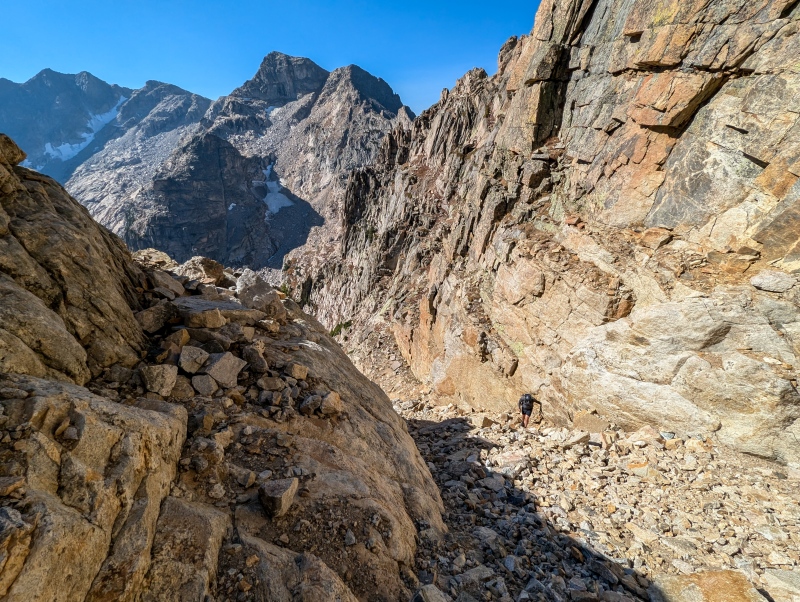
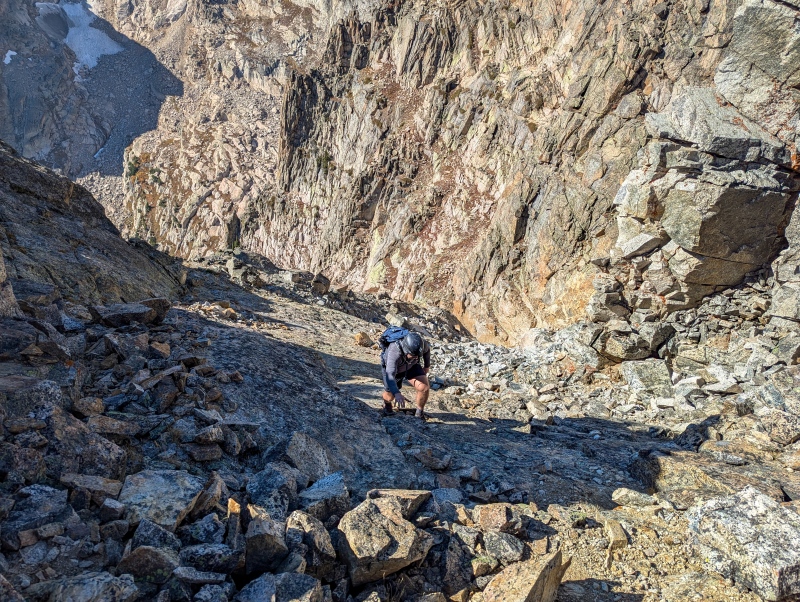
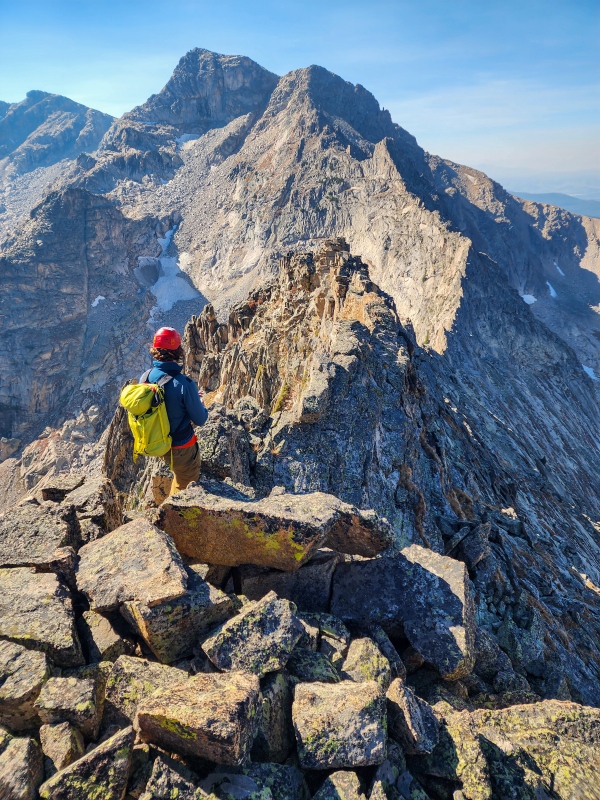
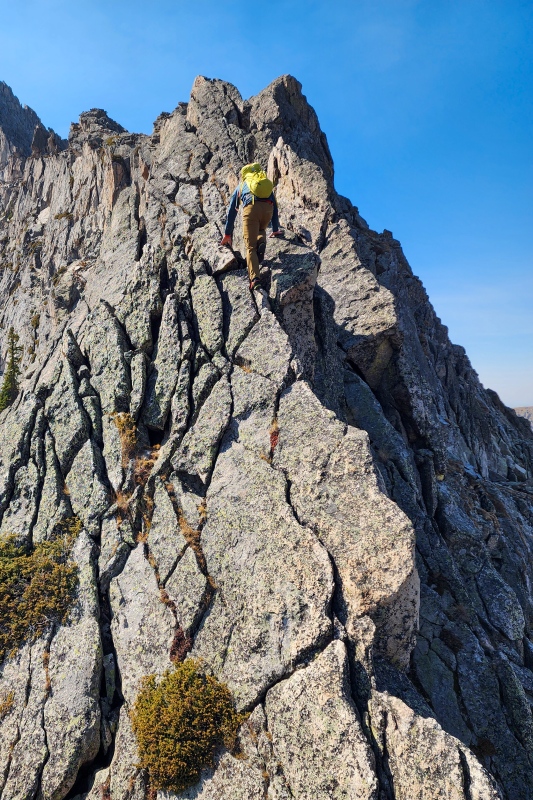
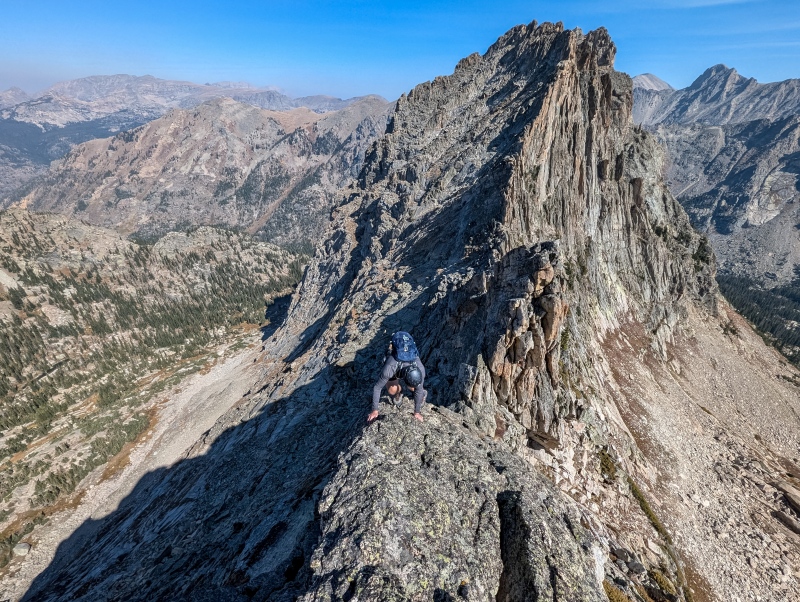
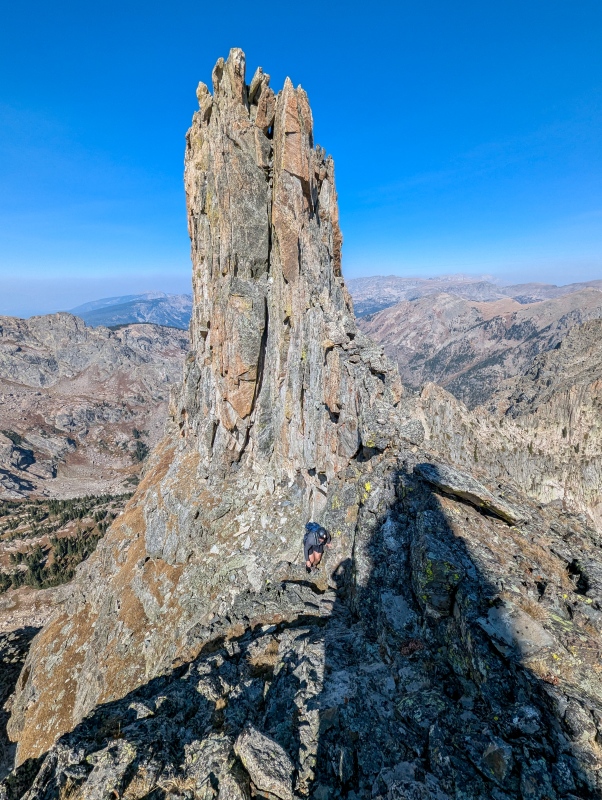
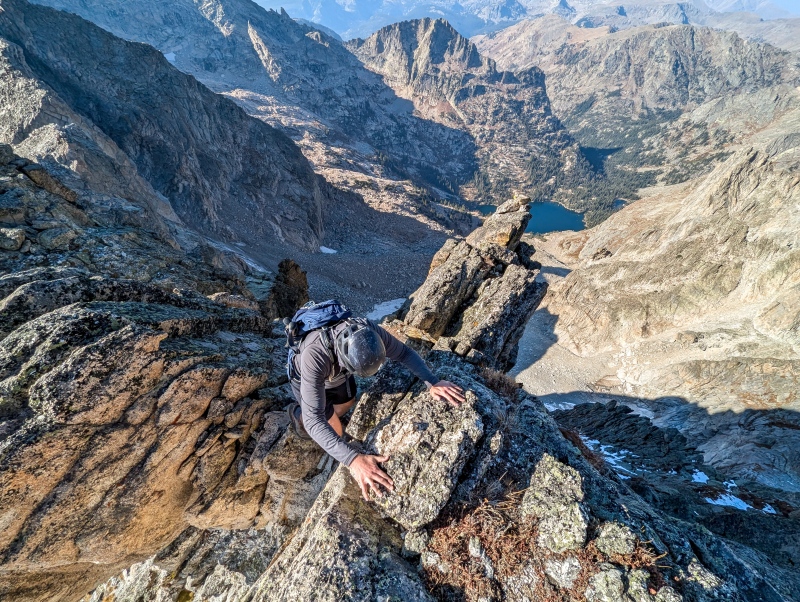
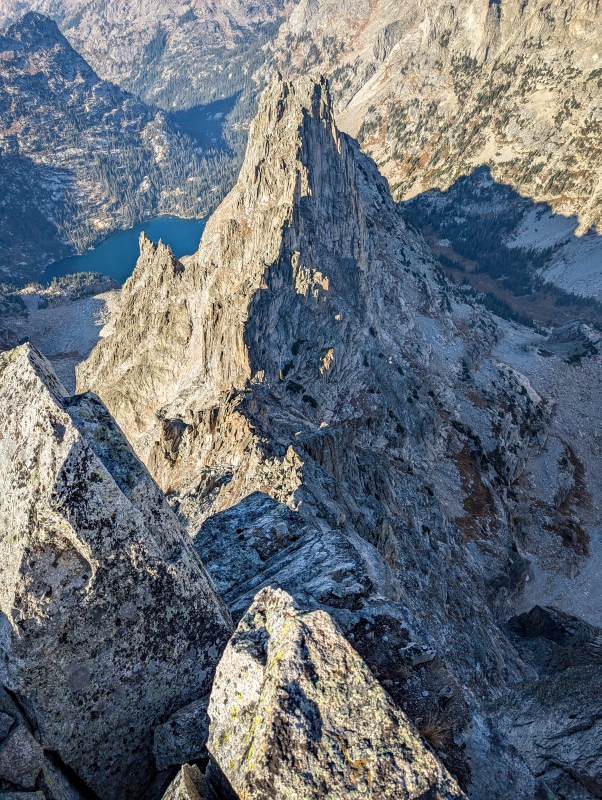
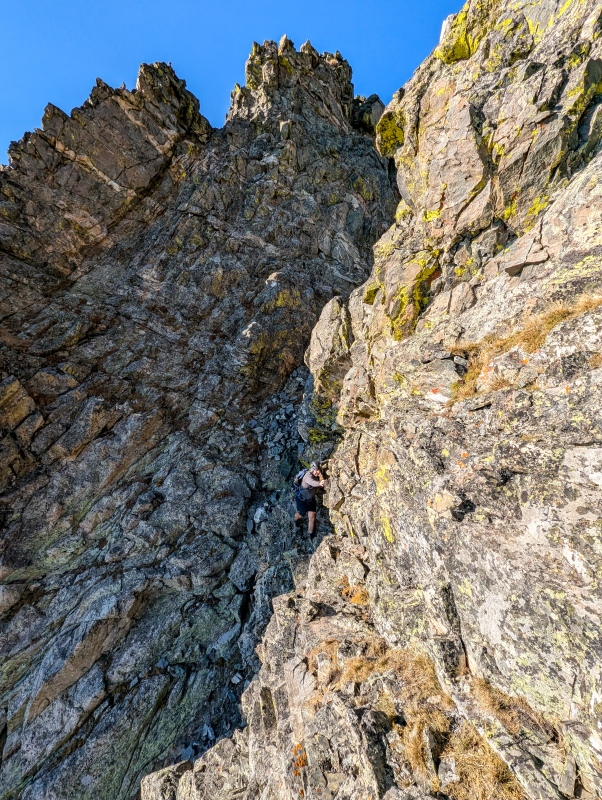
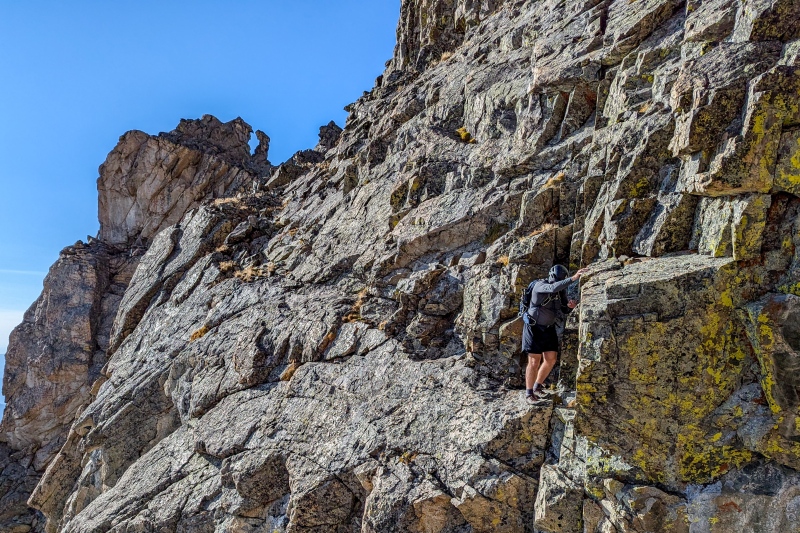
The Traverse to Achonee
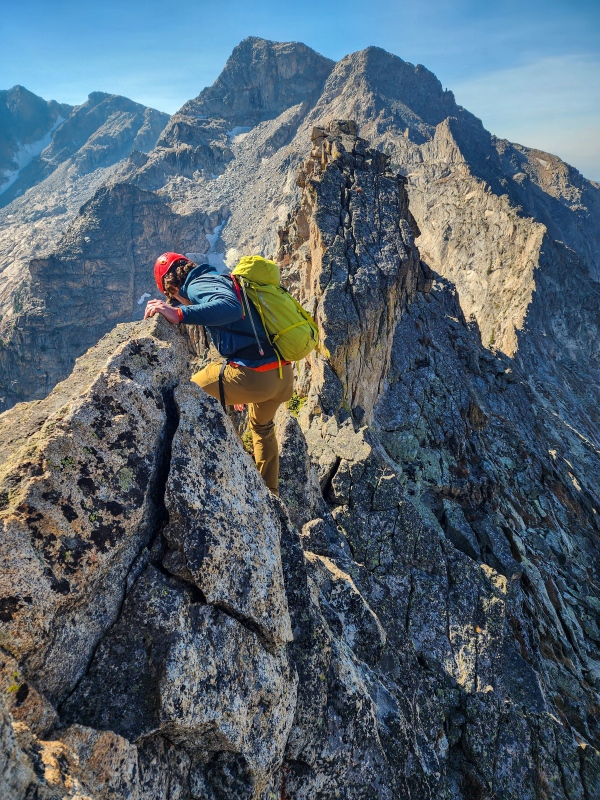
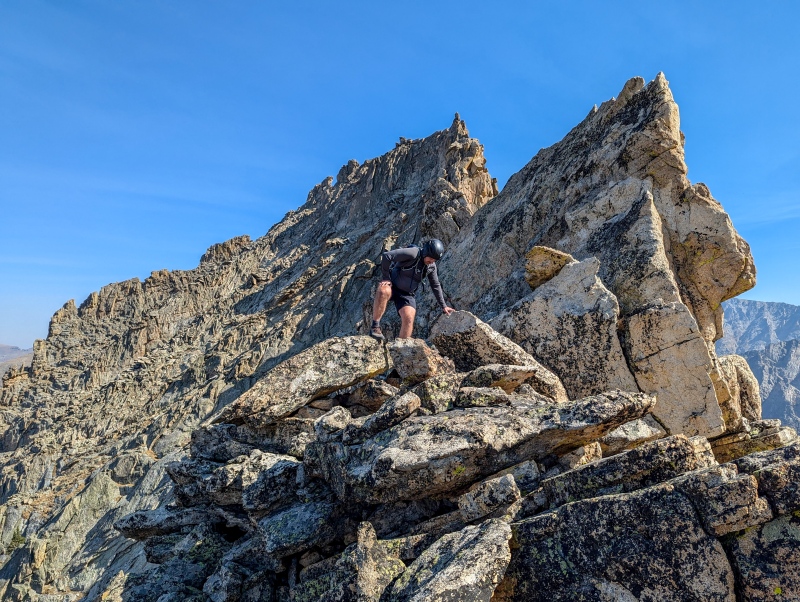
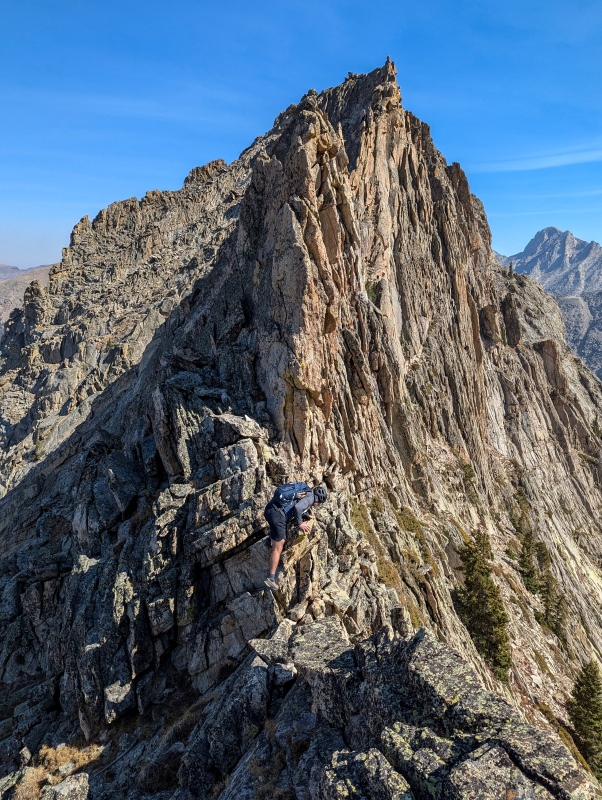
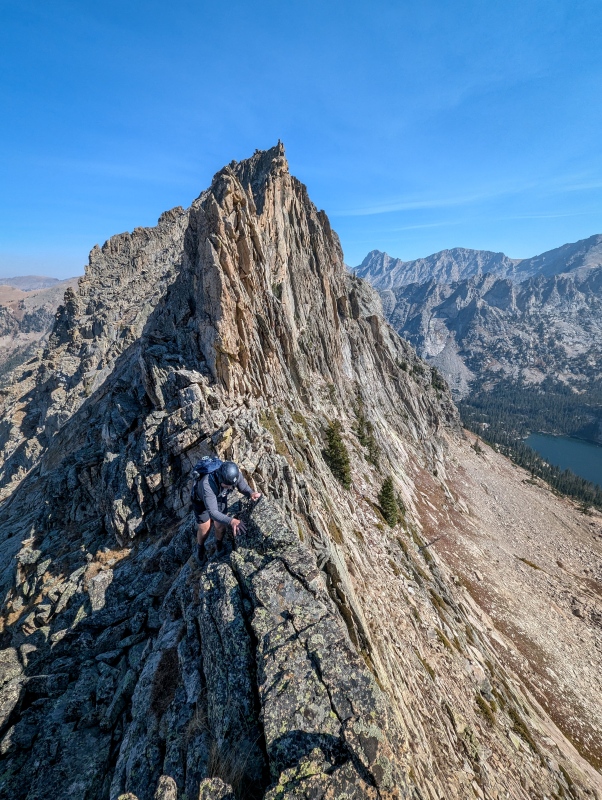
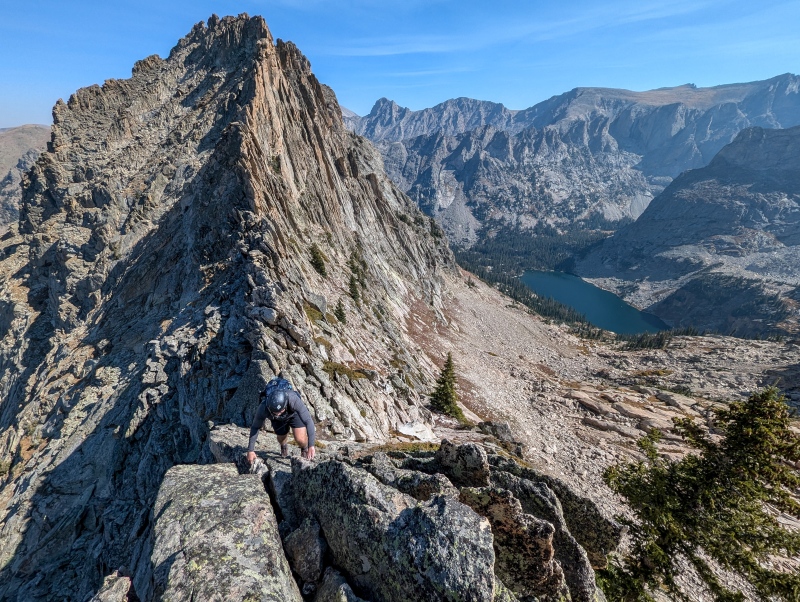
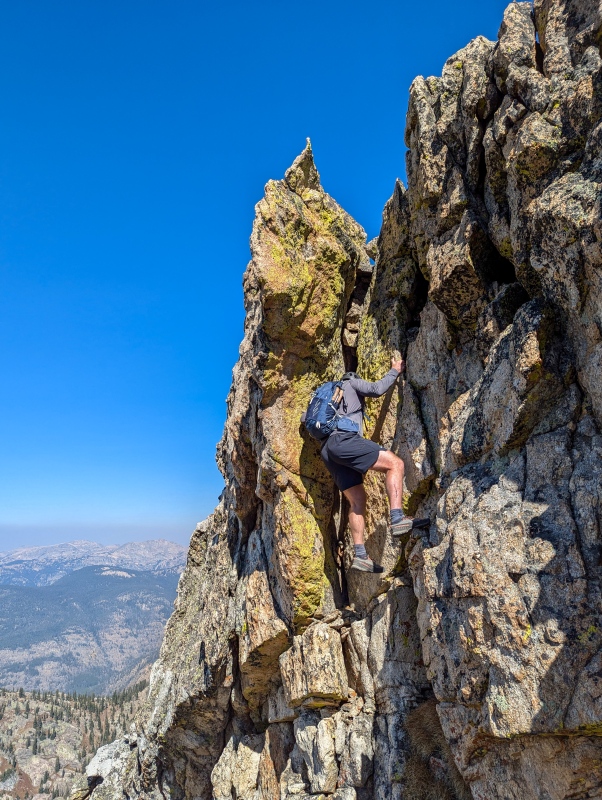
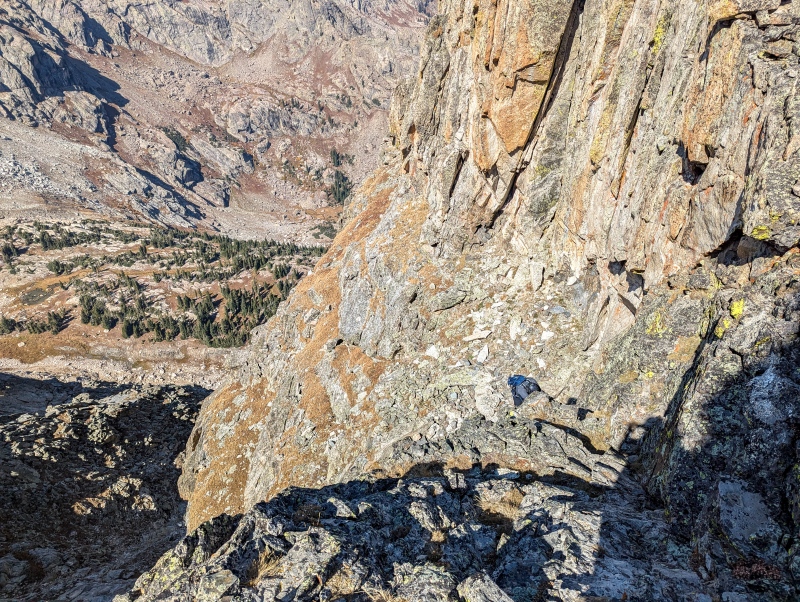
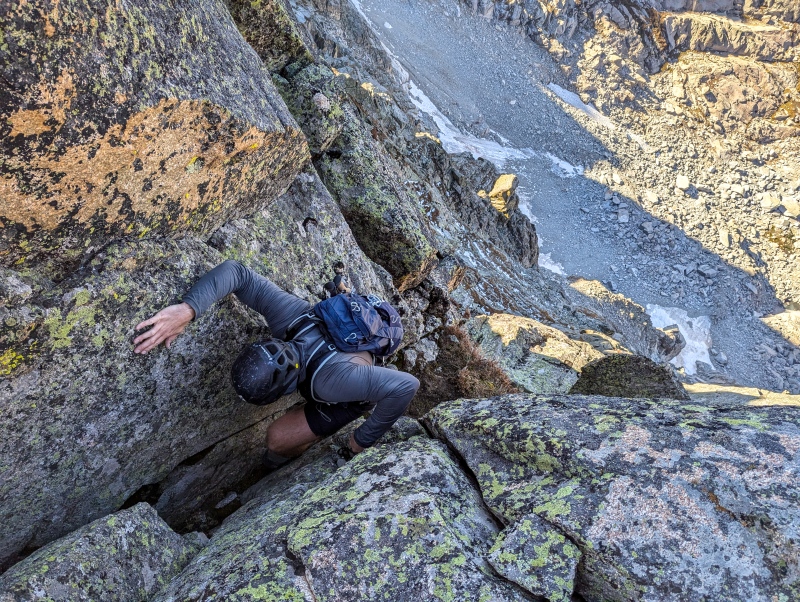
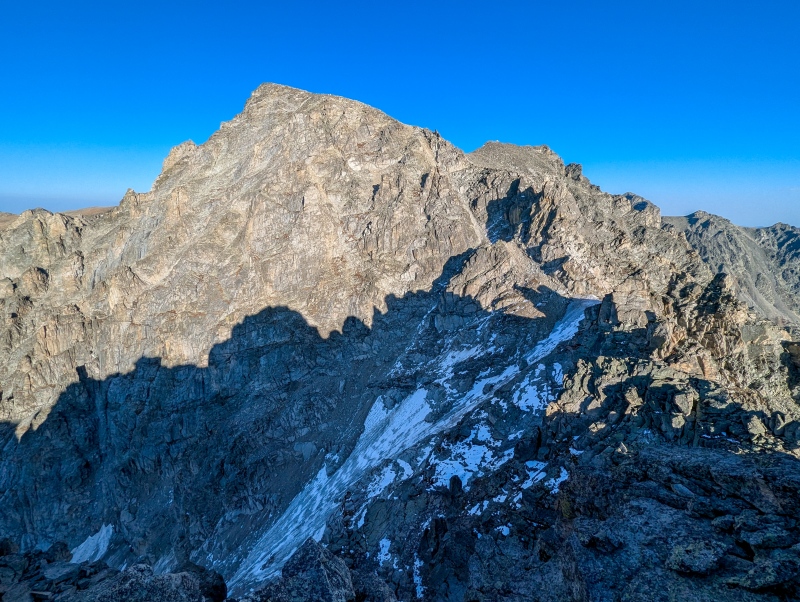
The Traverse from the summit of Cherokee to Achonee is by far the crux of the route and is truly one of the more spectacular ridgelines in Colorado. The ridge is essentially a sustained, granite, knife edge that seems to defy gravity with shear cliffs to the Southeast. The initial start of the ridge is fairly broad and has some loose talus, but the ridge soon narrows to a seemingly impossible, sustained knife of rock that is (for the most part) incredibly solid. Generally speaking, we weren't able to spend a lot of time on the ridge proper on our descent to the saddle except for a few spots due to vertical steps along the ridge. Whenever the ridgeline became too difficult, we used ledges on the West side to bypass difficulties and make our way back up to the ridge. Our route to the saddle felt like sustained 4th class with some easy 5th class movements, though dropping further below the ridge would have taken us to easier terrain.
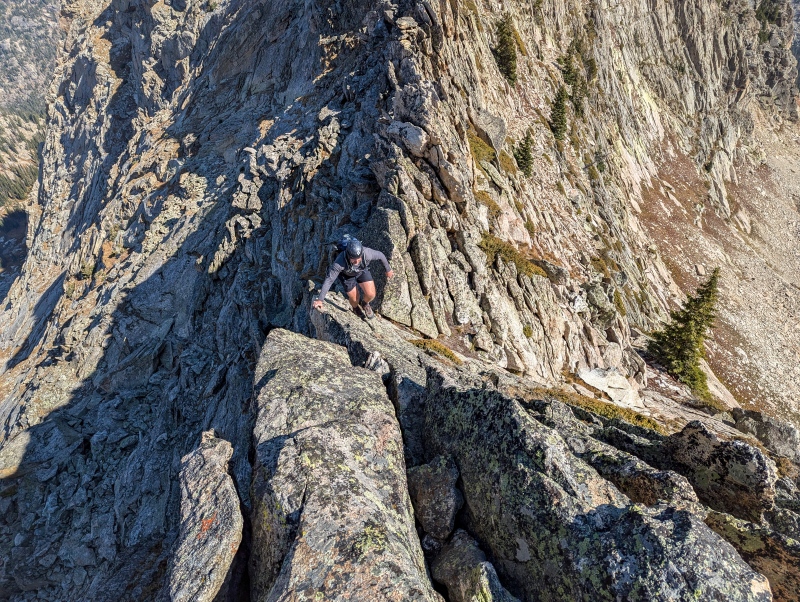
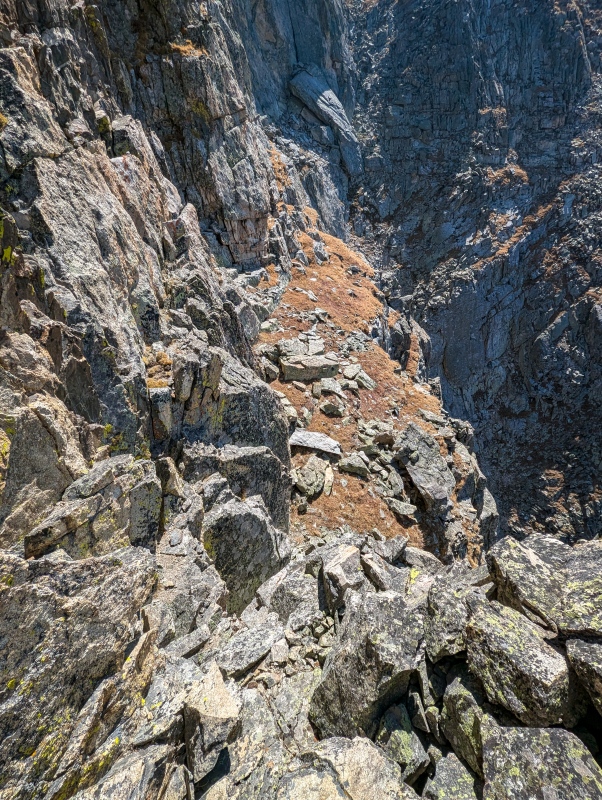
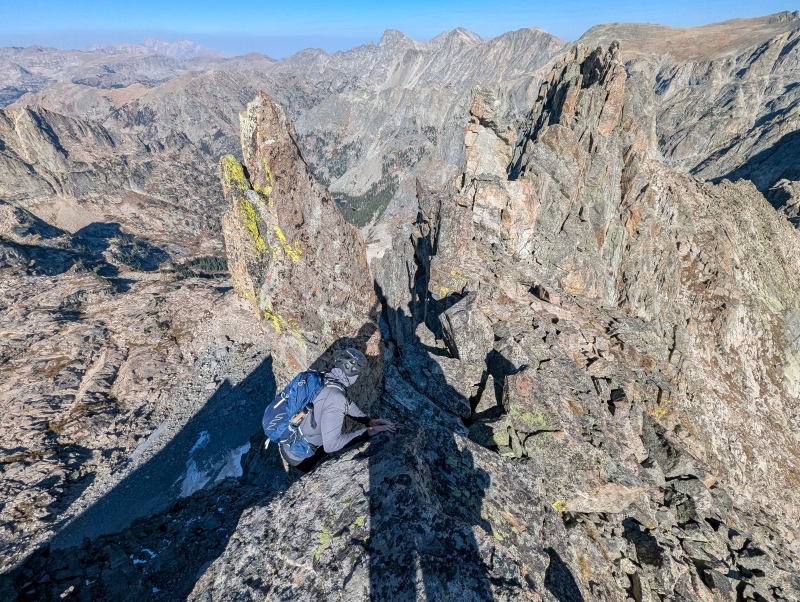
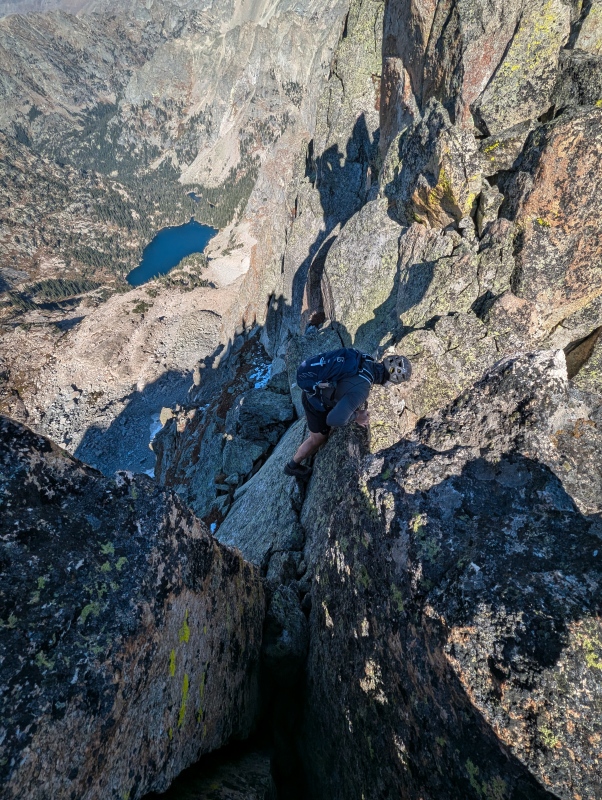
From the saddle, we were able to stay more ridge proper, though we needed to drop below for a spot or two. A tower about 3/4 of the way across the ridge blocks relatively simple ridge travel. Once you've reascended to 12,000' follow a series of ledges to a prominent notch on the West side of the tower. Once through the notch, downclimb an easy 5th-class chimney to a grassy ledge that wraps around the tower. We ascended back up to the ridge proper immediately and continued to follow the ridge to the summit of Achonee. This part of the traverse took us about 2.5 hours.
Some loose talus in the beginning - note the very obvious tower on the other side of the traverseGenerally speaking, it helps to follow your intuition on this portion of the ridge. If you see a steep, committing climb that you wouldn't want to come back down, it's best to go around. We dropped around this tower to the right.To be fair, we could have dropped before this downclimb, but oh well!Downclimbing on the West Side of the ridgeLooking back up at NateLooking forward to when we can start climbing up instead of down!This part looks tempting, but it ends in a cliff - see the small bit of sun low on the West side of the ridge? That was our clue to go ahead and drop around this portion. We're not quite at the saddle yet.Don't mind me, just running out of things to say that aren't monotonously repetitiveNow we're at the saddle! Yay!There are probably way too many photos of this part of the ridge, but can you blame me?At least from here you're climbing more than downclimbing, so that's a bonus. The East Face of Cherokee's Ridge is seriously impressive and cool looking and despite my best attempts, the photos don't do it justice. This slabby section was cool and I think is the first time since we started the traverse that it made sense to move onto the East side of the ridge. This slabby section is still pretty cool, but now it's in the opposite direction too!It would probably help if any of these photos had beneficial route beta to them as far as identifying characteristics go... Fortunately (Unfortunately?) My poor brain cells have been oxygen-starved in the alpine most weekends since February, which isn't good for recalling route beta.On the bright side, it IS great for dumbing myself down enough that I can somewhat tolerate working for a big, bureaucratic company on the weekdays. I'm not complaining too much because working for said company enables me to do stuff like this on the weekends. Yay. Also, we had to downclimb this section and go around due to a small cliffy. The ridge finally starts to relent...False alarm, the ridge is still hardI promise we're getting somewhere with all of this... eventually... sometime this week...A picture of something other than the ridge! This is that 5th-class chimney downclimb on the West side of the tower that you probably forgot about from earlier in the report because I threw in a bunch of drivel.Traverse the grassy ledge around the tower and then climb back up to the ridge via this very lovely-looking dihedral - You can't see it, but I'm doing my best Vanna White impressionLooking back at the tower and the grassy ledge around it. Are we there yet?
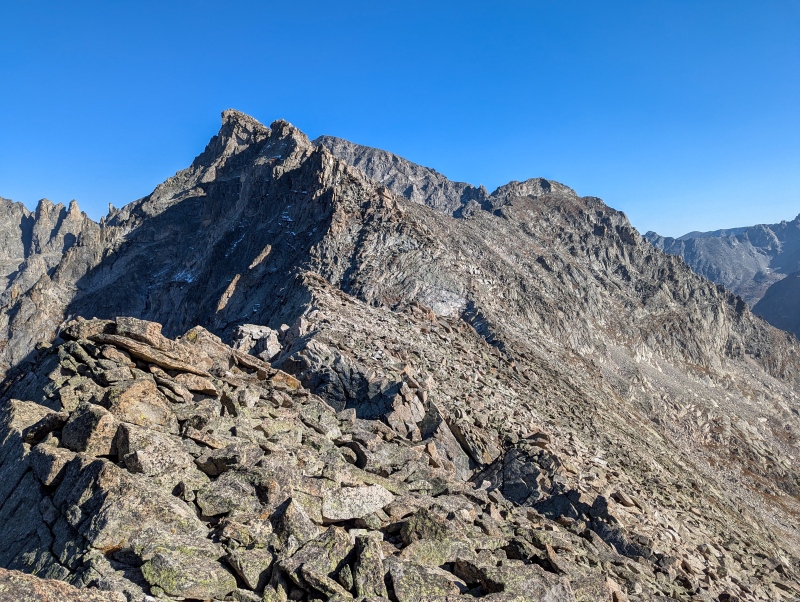
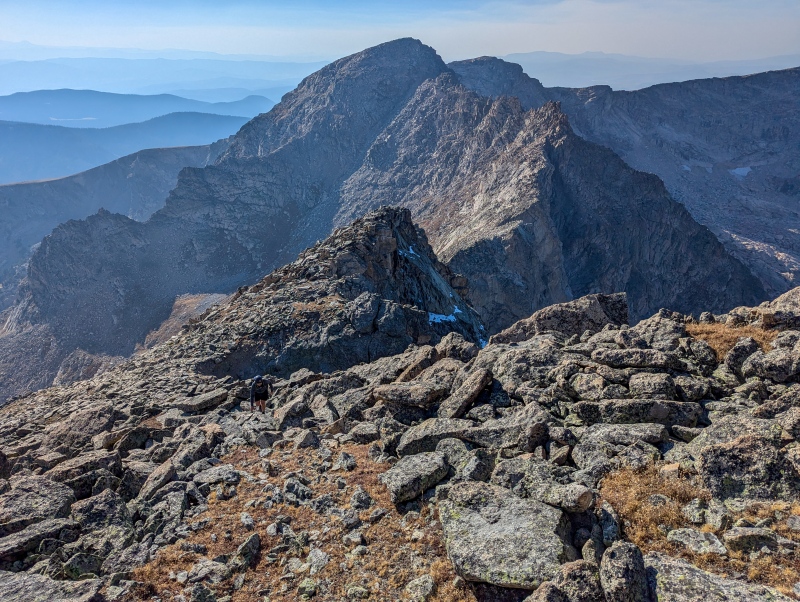
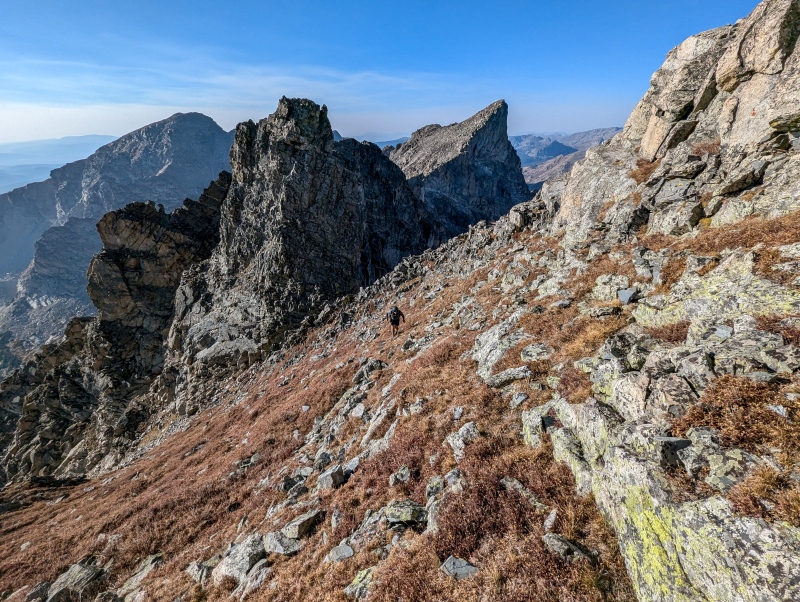
Achonee to Hopi to Iroquois
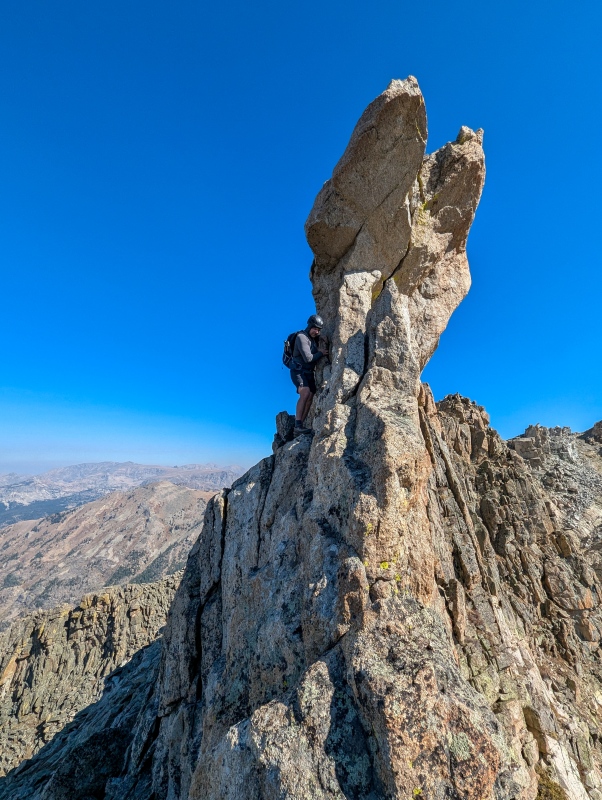
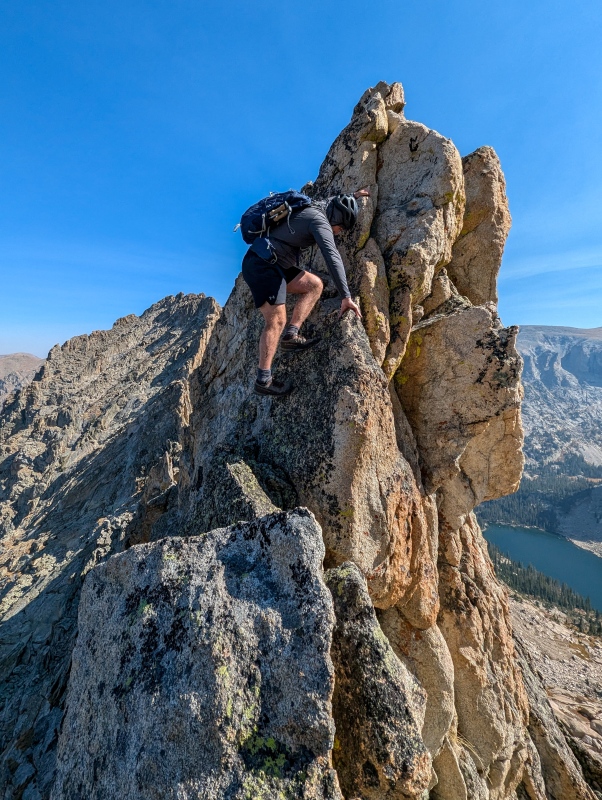
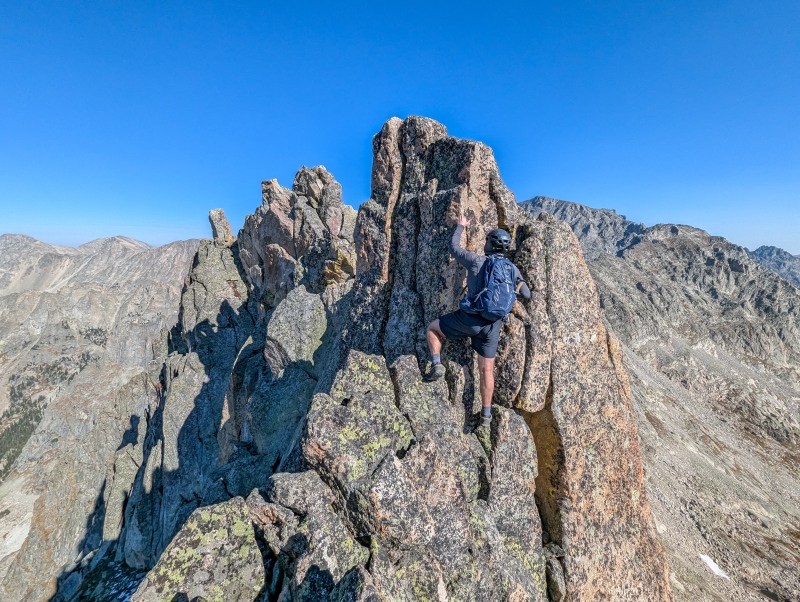
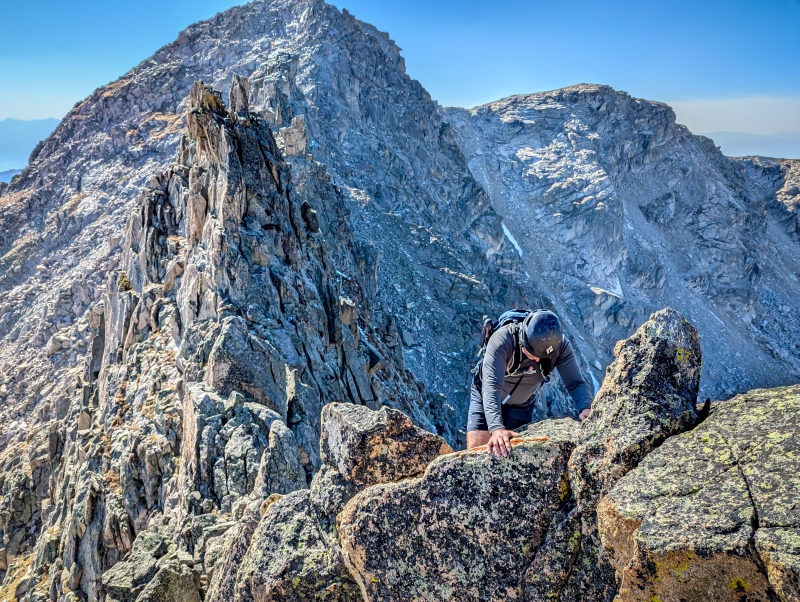
More or less! Once back on the ridge, it's a pretty simple route along the remainder of the ridge to the summit of Achonee. You can breathe a sigh of relief because the hardest part of the traverse is over! All that's left is the remaining half of the traverse! The Traverse from Achonee to Hopi is a quick, low-angle talus and grass slope. From Hopi, there are two options. One is to drop below a short spicy section of the ridge to the South via a series of ledges, then work your way back up to the saddle and continue the traverse to the summit of Iroquois. There is a path through the mess of sharp pointy rocks which is a very fun route-finding puzzle with some great exposure and solid rock... assuming you want to scramble more. After the spikey part of the ridge, the terrain eases significantly, though there is still some scrambling to be had en route to the summit of Iroquois.
Fun bit! Somewhat ironically, this portion of the ridge has the most significant exposure of the entire route. A fall to the left would result in a drop upwards of 800'.Climbing up to the top of this pointy thing... Most of the ridge proper here does NOT go, but you can stay close to the top with some semi-technical 4th and easy 5th-class movements by weaving through the gendarmes.Crater Lake is waaaaaaaaaay down thereSqueezing through a narrow path on the North side of the ridgeClimbing back up to the ridge proper - I swear I'm almost done providing pointless descriptions for actions that are depicted by the photos.Nearing the summit of the final tower with the summit of Hopi in the BackgroundThe remaining route to Iroquois - It's best to do a descending traverse here to the dark notches in the photo, then follow the ridge up to the summit. The summit of Iroquois is the thing that kind of looks like Mount Crumpit in Whoville.The ridge to the summit is fairly straightforward, but there's a class 4 move here and thereA slab - be cautious here, lots of small, loose, white rocks, but solid hands and feet can be foundLooking out from the summit of Iroquois towards the summit of HopiA look out at the Mohling Traverse. Limbo is the prominent point in the middle of the photo. Crater Lake is down and to the left.Fair Glacier finally looking somewhat close! Mount George is one of those bumps on the ridge. I can't even hazard a guess as to why there's a mountain named "George" in a sea of peaks named after Native American tribes.
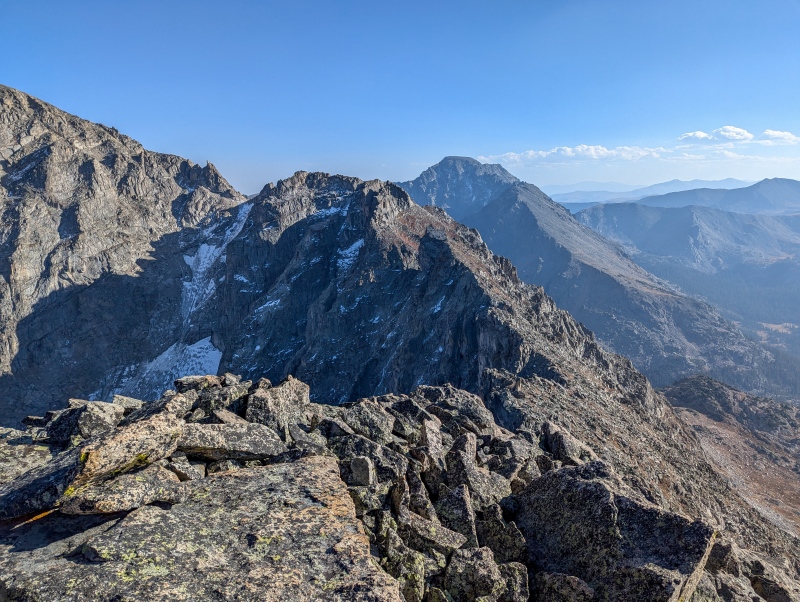
Iroquois to Mount George
The next section of the ridge has some interesting route-finding challenges, but it's fairly simple. You'll want to stay below the next two bumps along the ridge (they don't go anywhere) by traversing grass and talus between each notch. The flat piece of rock that makes up the summit of the tower roughly halfway across can't be down-climbed directly. From the bottom of the second notch, we did an ascending traverse to a prominent notch on the right side of the final tower (nothing harder than class 2). Once through the notch, there's a ledge system that will take you down into the gully. There are some committing, traversing, moves to get out of the gully, but it's a short section. It's not necessary to descend the gully. Take a narrowing ledge around a slabby face into the next gully. Follow the ledge to the very end where a short, easy 5th class downclimb will put you on a fairly gentle slope of grass and talus. Traverse under the first cliff face after climbing out of the gully and then follow the ridge from there. The summit of Mount George is a short scramble away!
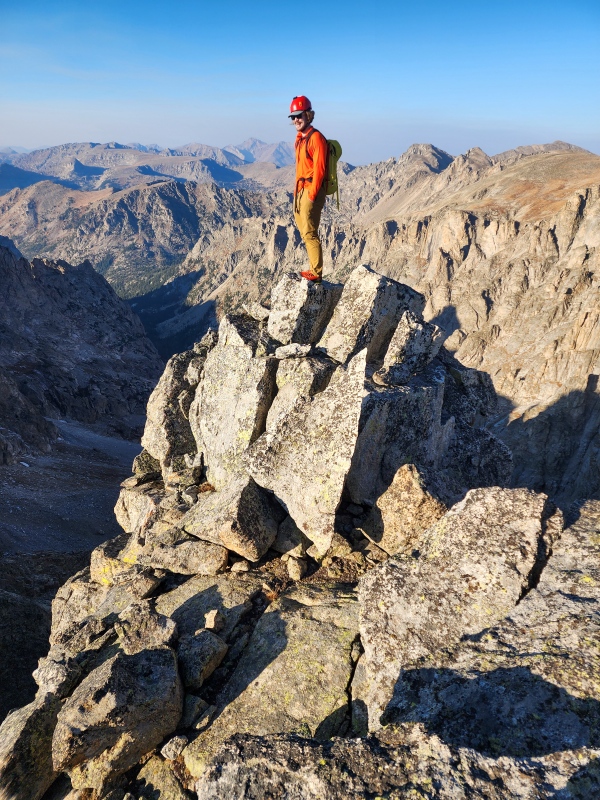
Nate traverses onto the ledge out of the first gully after descending from the notch below the summit of the prominent tower.It's weird, but you can be confident in the notch if you look back and it looks like a very small camel (right) kissing a rather large bird (left). Here's Nate nearing the end of the narrowing ledge with the short, 5th class downclimb directly below him.A look back at the tower while traversing under the next cliff band. You can descend the gully to easier grass if you don't like the ledge system or the idea of another 5th class downclimb.Regaining the ridge is unnecessary, but helps break up the grass and talus slopes.Don't mind me - just a photo of the NE Couloir West of Mount George's summit for next ski season's beta... also, nice to know that this is an option for a late-season alpine ice climb.Summit of Mount George! Honestly, I'm just happy Apache is our next summitLooking out from George to Apache... No, you're not done yet, unfortunately.
Mount George to Apache
The route from Mount George to Apache follows a series of ledges on the South side of the ridge to circumvent some particularly spicy-looking gendarmes. The nice thing is, you've been traversing ledges this entire time, so it's nothing new. Once at Fair Glacier, don't traverse onto the North side of the ridge. Continue traversing around the South side into a gully, which you'll ascend until you spot an easy exit to the right. This exit will plop you right on the South Face of Apache. Slog up the remaining 500' of talus to the summit of Apache, question your life choices, descend the East Slopes, cursing all of the dumb talus and boulders as you go, and pick up the trail on the left side of a tarn just above 11,400'. No, there is no good way to descend the East Face of Apache. Yes, it all sucks.
This truly is one of the more spectacular ridges in the IPW and I would highly recommend it for the experienced scrambler who enjoys a bit of suffering!
Sunset colors from the summit of Apache looking towards the Kasparov Traverse... All I want is a burger... Okay, maybe a margarita and a milkshake too.
My GPS Tracks on Google Maps (made from a .GPX file upload):
I forgot there are good 12ers. Maybe I missed it but do you think Cherokee-Achonee would be better in reverse? Say Lone Eagle to Cherokee?
Great report, thanks for posting!
Thanks! Most of the cliffy steps face towards Achonee, but there's definitely some things we went up that I wouldn't want to downclimb in reverse. There's some tricky aspects in either direction and it's unclear on how many of the rock step climbs would actually be a reasonable difficulty for scrambling. I think it could be a bit better in reverse overall.
Very cool that you did this, and documented it so well! I agree with your naming. I called it "Mohling 2", but your name is better (I want to high school with Mohling's grand-daughter). As far as Lone Eagle - Cherokee, that totally makes sense to me if you're coming from the west side. It's remarkable how little traffic these things get. Fun!
I'm glad you like the name! I agree. If you were to combine Mohling with the ridge from Achonee to Cherokee, that would make sense from the West Side. That was one idea for the route, but we were concerned about snow/ice in the ledges and gullies climbing up to the summit of Iroquois. Thanks for putting up the original TR! You've got some pretty cool routes described in the area and I can't wait to explore some more of those ridges. Seriously underrated area of CO for how good the rock quality and scenery are!
I enjoyed the history and reasons for why you chose the traverse name. That is a long time up there in some pretty technical terrain. I had to refer to your GPX to see the route you took up Cherokee as your pictures were different and much more slabby/scrambly than I'd recalled. I went from Crater up ledges/steep grass to the saddle between Cherokee and the unranked 11er bump to the east, many ways to get up these peaks a lot of times!
I recall reading about that route too - might have been in your TR. I have a feeling the South Gully is probably the most chossy of the various routes, but I was trying to avoid any potential snow/verglas on North Aspects. The unranked peaks and 12ers tend to harbor some pretty fun, 'choose your own adventure' type routes
Caution: The information contained in this report may not be accurate and should not be the only resource used in preparation for your climb. Failure to have the necessary experience, physical conditioning, supplies or equipment can result in injury or death. 14ers.com and the author(s) of this report provide no warranties, either express or implied, that the information provided is accurate or reliable. By using the information provided, you agree to indemnify and hold harmless 14ers.com and the report author(s) with respect to any claims and demands against them, including any attorney fees and expenses. Please read the 14ers.com Safety and Disclaimer pages for more information.
Please respect private property: 14ers.com supports the rights of private landowners to determine how and by whom their land will be used. In Colorado, it is your responsibility to determine if land is private and to obtain the appropriate permission before entering the property.


")
")
")
")
")
")
")
")
")
")
")
")
")
")
")
")
")
")
")
")
")
")
")
")
")
")
")
")
")
")
")
")
")
")
")
")
")
")
")
")
")
")
")
")
")
")
")
")
")
")


