Download Agreement, Release, and Acknowledgement of Risk:
You (the person requesting this file download) fully understand mountain climbing ("Activity") involves risks and dangers of serious bodily injury, including permanent disability, paralysis, and death ("Risks") and you fully accept and assume all such risks and all responsibility for losses, costs, and damages you incur as a result of your participation in this Activity.
You acknowledge that information in the file you have chosen to download may not be accurate and may contain errors. You agree to assume all risks when using this information and agree to release and discharge 14ers.com, 14ers Inc. and the author(s) of such information (collectively, the "Released Parties").
You hereby discharge the Released Parties from all damages, actions, claims and liabilities of any nature, specifically including, but not limited to, damages, actions, claims and liabilities arising from or related to the negligence of the Released Parties. You further agree to indemnify, hold harmless and defend 14ers.com, 14ers Inc. and each of the other Released Parties from and against any loss, damage, liability and expense, including costs and attorney fees, incurred by 14ers.com, 14ers Inc. or any of the other Released Parties as a result of you using information provided on the 14ers.com or 14ers Inc. websites.
You have read this agreement, fully understand its terms and intend it to be a complete and unconditional release of all liability to the greatest extent allowed by law and agree that if any portion of this agreement is held to be invalid the balance, notwithstanding, shall continue in full force and effect.
By clicking "OK" you agree to these terms. If you DO NOT agree, click "Cancel"...
The thing about Longs-Gerry Roach writes-is that though there are well over a hundred routes up the peak, only a few of them (with minor variations) are non-technical.
Ask a Longs Peak Ranger or experienced Longs climber what the easiest ways up Longs might be, and three Class 3 routes might be mentioned: Keyhole, Loft (Clark‘s Arrow), and maybe the Trough Direct. Ask the same person what the next easiest route would be after the three Class 3's, and the North Face Route will probably be the answer. The North Face Route is usually rated at 5.4.
There is another route, however, known by only a few. It is the Northwest Couloir Route. Richard Rossiter, in his book "Rock and Ice Climbing: Rocky Mountain National Park: The High Peaks" rates it as Class 4, harder than the three Class 3 routes but easier than the 5.4 North Face.
Rossiter writes: "Enos Mills climbed this route in 1896 but found evidence of a prior ascent. About midway between The Keyhole and the left edge of the west face (the northwest rib), a steep rocky gully climbs to the ridge crest. Work up the left side of the gully and pass through a hole. Above, easier terrain leads to the crest of the northwest ridge, which is followed without difficulty to the summit. Beware of loose rock."
I climbed the beginning of Rossiter's Northwest Couloir route in 2002. Because I was climbing solo, and because I was uneasy about the dramatic exposure I found on the northwest ridge, I felt safer finishing my own route across the North Face rather than using Rossiter's ridge finish. I had climbed the North Face Route the year before, in 2001, and knew the way to go. I did not take many photos of myself or my partner on the North Face Route. I was busy enough using my hands and feet to climb. But I did manage to take photographs of the Northwest Couloir Route, and my North Face finish. Here are those photographs.
On the portion of the standard Keyhole route known as the Ledges, past the place where the steel rods are driven into a prominent rock formation, but before the Trough, look for a big, ascending gully. It is the last big gully or couloir before the Trough itself. This is the Northwest Couloir. Here is what the Couloir looks like, from a little ways into it. A good landmark to recognize the gully for sure is the spire to the right of the bottom of the biggest V formed by the skyline in the photo. To me, the spire looks like a horse's neck and head, or the Knight chesspiece.
To the south of the Northwest Couloir rise a series of big spires or towers. To some they may resemble the musical pipes on an organ. To me they looked like mountain gods. When I ascended the couloir, I thought I was entering the throneroom of the mountain gods, to borrow a Galen Rowell phrase.
The spires appear to curve because I had to use a wide angle 28mm lens to take them all in. Here is a closer view. I ascended the Couloir by passing right in front of these mountain gods.
Thousands of people attempt to climb Longs each year. Through nearly a century and a half of climbing, nearly all the vegetation has been trampled off the standard Class 3 routes. One benefit of climbing non-standard routes is that you get to see what the mountain would look like, unspoiled, if it did not receive all that traffic. Here is a clump of Parry's Primrose I found blooming in beds of moss in the Northwest Couloir. A clump of Sky Pilot was blooming not far away.
Here is what the Couloir looks like as you approach the crux. The crux of the route, where Rossiter's "hole" is located, is that rock with a large shadow beneath it just below the sharp point of the skyline V. Note the Knight, or horse's head, peering down from the right. Because the Couloir faces north, it is nearly always in shadow. I would say that the bottom of the Couloir is Class 2+, while approaching the top it may go Class 3.
The Couloir funnels up to the crux as its narrowest point, then widens again. Really, the Couloir is shaped like a big hourglass with the crux at its center. As you approach the crux, the climbing becomes more difficult. I found that the left side (climber's left) did not go very easily, and that there were two alternatives that worked. You can climb back and forth up a series of ledges on an otherwise bald slope of rock through the center of the gully as one option. These ledges are somewhat frustrating in that they are not continuous, and you have to climb from one ledge to another. But they do go eventually. The other alternative is to climb the ridgeline, or a broken line just down from the ridgeline, on climber's right. (Beware, though, because I found lots of loose rock there, and any loose rock that is dislodged cascades down from the Couloir directly onto all the human traffic on the Ledges.) The crux of the route is formed by a stack of pancake rocks sandwiched above a chimney. Here is a photo of the chimney, the pancake rocks, and the crux.
For the next photo, I have moved to just about the position of the lighter colored boulder near the bottom of the prior photo. This photo provides the best view of Rossiter's "hole", which I think is more like a cave. The hole, or cave, is not any of the shadows bordering the spire on the climber's left side of the chimney. The entrance to the hole, or cave, is the shadow more towards the sloping brow of granite on climber's right. The entrance to this cave is just above and to climber's right of the boulder streaked with white. The entrance is below the pancake rock that is second from the top. And the exit to the cave is the slit between the topmost pancake rock and the second topmost one. In other words, you have to crawl under the second topmost pancake rock, move to the back of that "cave", then crawl up on TOP of the same, second topmost pancake rock to emerge from the cave below the smaller, top rock. Your course thus takes a U-turn. You climb back, make a U-turn up and over the rock you have just climbed under, then climb forward again. You cannot see the exit from the cave when you look into its entrance. The cave is a little eerie to enter for that reason.
Here is a close up of the crux. The entrance to the cave is just over the sloping, mossy rock--the same one that seems streaked with white in the prior photo. Note the Knight, or horse's neck and head, at a distance up the slope. Once you have reached the chimney (see the prior photo), you will see it is wedged full of small rocks that you can use as a kind of convenient staircase to climb partway up. Now comes the trickiest move. This is the move that makes this route Class 4, or maybe even low Class 5. It would be really good to protect this move, because falling here could prove deadly. I must confess that out of my ignorance in 2002 I did not protect this move myself, though I should have done so. If you will look closely at the photo, you will see an old rusty but solidly placed piton in the crack at the base of the pedestal holding the sloping, mossy rock. The piton has a ring through its eye. Minimally, I could have protected myself with a climbing harness clipped into a loop of rope passed through the eye of the piton. The rope would have had to be long enough not to hinder passage into the cave, where I could unclip, but short enough to minimize the distance of any fall. If you are familiar with protection, you might figure out a better way to protect this move. But here is what I did in 2002, unprotected. I am almost 6' tall. Stepping from the highest rock wedged into the chimney, I performed a friction stance as high as I could against the spire on climber's left. From my sideways stance against the pillar, I leaned as far as I could up the sloping brow of granite to climber's right and could just reach to hook the ring in the piton eye with one of my fingers. I did a pull-up to my finger, jack-knifed my feet up to my hand, then stood up with one foot on the little sloping platform of rock in front of the piton. (The slope is much steeper than the optical illusion in this photo.) I wedged my boot against the pillar of stone on the platform, and against the piton to keep from slipping off. A better climber than I am might find alternative ways to overcome the crux of this route.
It was precarious for me to be standing there, to be sure. I tried to repeat the climb a month later, in August 2002. I have said that because the Couloir faces north, it is nearly always in shadow. That August, in supposedly the hottest month of summer, I found the crux of the Couloir dripping icicles, and coated with verglas! It was much too dangerous to make the move I have just described, and on this occasion I believed I had no choice but to abort the route. I climbed back down the Couloir, and finished my climb by the standard Keyhole Route up the Trough to the Narrows, and finally up the Homestretch. Here is a photo of the icicles and verglas. The ringed piton, critical to my earlier climb, shows up better in this closeup, in the crack just below and to the right of the lowest icicles.
From my stance, I could see it would be hard to move through the narrow cave with my backpack on. So I took the pack off, and pushed it into the cave ahead of me, then climbed into the darkness myself. Here is a photo taken from inside the cave, looking back down the Northwest Couloir. From the cave, you can see several possible lines of ascent on the shadowed slope of the ridge opposite. The Ledges are down below the beginning of this little ridge.
I crawled to the back of the cave, and made the U-turn onto the top of the pancake rock I had just crawled under. Then I emerged once again into the sunlight. The terrain above, as Rossiter says, is much easier.
I climbed up Class 2+ terrain to the ridgeline. At the ridgeline, the Northwest Couloir Route intersects the Keyhole Ridge Route (rated 5.5) . Here is a photo looking back down the Northwest Couloir. Chief's Head is on the left. Spearhead is in the center. McHenry's Peak to the right. It would be good to remember what the Couloir looks like in case you plan to descend this same route.
To show you where the Northwest Couloir route emerges, here is an autumn photo of Longs taken from the eastern edge of the Boulder Field. The Northwest Couloir Route joins the ridgeline at the top of the long shadow above the tiny snowfield that is all that remains of the "Dove" after a dry, hot summer. From the ridgeline, two alternative finishes present themselves-walking the skyline that is the northwest ridge to the summit, or descending a little to cross one of the rubbly ledges that traverse the North Face, then scrambling to the summit over blocky rocks just to climber‘s right of the apex of the Diamond.
Here is the dramatic exposure that turned me away from walking the northwest ridge. This is an interesting photo in that it actually looks DOWN at the Trough. Copeland Mountain can be seen in the distance to the left of the Keyboard of the Winds. I am sure that if the resolution were good enough, we would be able to make out a number of climbers making their way up the standard route.
Because of the exposure on the northwest ridgeline, I decided to cross the North Face. Chasm Lake and Peacock Pool are down below, Twin Sisters in the distance.
Crossing a ledge on the North Face. The idea here is to find a safe passage between the sets of slabby cliffs.
Here is a airy shot of Mount Lady Washington from midway across the North Face.
And here is a shot near the end of the North Face traverse. The summit is just a scramble up the blocky rocks near the skyline.
Looking back toward Storm Peak.
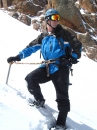
On the summit. I asked a stranger to take this shot of me. When I told my photographer I had come up through the Northwest Couloir, she had no idea what I was talking about.
The day had turned cloudy. I descended the same route I had come up. I wanted to beat the weather. And besides, it is a fine and seldom-climbed route.
********************************
Note of explanation: Sorry I am over six years late in filing this trip report! I am a Colorado native who would have been born in Estes Park if there had been a hospital in town back then. Instead, I was born in Boulder. My parents moved from Estes to Fort Collins when I was 5. In 1999, my wife and I got the chance to move back to the Park, and we stayed for several years. During that time I had no idea I was going to climb any 14ers other than Longs, let alone be participating in a website devoted to climbing 14ers. I was just happy to be climbing Longs, and RMNP's many 13ers. It was only when my wife and I reluctantly moved away from Estes Park again that I began climbing other 14ers.
I first climbed Longs when I was in college at CSU, in 1969. I know many of you hadn't even been born back then! I remember the first moon landing that year. And I remember climbing Longs by the old Cables route. The cables were still in place. Some friends and I climbed from Chasm View. There was a bottleneck of climbers at the lower cable's beginning. (There were two cables, I am told, though I don't remember the second one.) Most climbers were polite, and allowed plenty of space to develop between themselves and the climber above them before grabbing onto the cable themselves. Traffic on the mountain was one-way. We went up the Cables, then came back down the Homestretch and out the Keyhole route. It was safer that way, especially on the Homestretch. People ascending did not have to dodge people descending, and vice versa. And there just weren't that many people altogether. I climbed in blue jeans. Everybody wore cotton back then. I can remember the day I saw my first down jacket. They seemed so light and insubstantial. In 1969, who could tell what the future would bring?
Longs is a great mountain, a storied mountain, and I feel privileged to climb it every time I do. I can only hope to climb it many more times.
Thumbnails for uploaded photos (click to open slideshow):
Thanks for sharing. Your explanation seems like a winner.....; I think I could follow that. Always fun to read about new things..... Especially on such a heavily traveled peak.
Thanks for posting this excellent report! That route is on my (admittedly very loose...) winter ascent list, and these are the best photos I‘ve seen of the entire route. Thanks again.
-Tom
Thanks for the great description and pictures. As a Cheley Camp counselor, I climbed the NW Couloir in 1957 on a day-off (not with campers!). Since then I have climbed the route three more times (1984, 1996, 2004). This is a wonderful 4th Class climb. It should be noted that Cheley Camp counselors climbed (and maybe pioneered) this route in the 1940s and early ‘50s. Strange that, of the many guidebooks, only Rossiter had given a description of the NW Couloir. Thanks to ”flyingmagpie” for such a thorough update!
Kent Keller
I did this route on Aug. 5, 2012. The crux was wet even though the weather has been dry lately. I stepped on that ledge (wet) with my right foot and grabbed with my left hand a small rock fin (just to the lower left of the piton) and came right up to the piton. I could have clipped a sling into it, but did not see the need. I grabbed something with my right hand and stepped on the piton with my left foot and went straight on up toward the cave. This second move felt a little weird but worked nicely. The hardest part really was climbing up from the Ledges without so much as touching any of the loose rocks.
Really appreciated the thoroughness of this report. My son and I completed the Northwest Coulier on 7/11/2022 and frequently referenced the notes throughout our climb. I plan to do my own trip report, but for now thought I'd leave some notes here:
- The reference to the steel rods really through me off. I immediately started looking up for the gulley. My advice, ignore the rods, go well past the rods and just focus on the last gulley before the trough. It becomes very obvious when you get there.
- We really felt like there were plenty of class 4+ moves throughout the coulier, before and after the cave crux. We felt we made a few moves more difficult than the cave crux, before and after. I consider myself a pretty descent route finder and I don't believe we missed many, if any, easier routes. I guess my point is to convey to future adventurers that this is a challenging route that makes the Trough feel like a walk on the beach.
- Above the piton, and around the rock, is a great hand hold that one can reach with their feet placed in the crack/ledge below. The move into the cave is pretty smooth with that hold.
I am happy to share any photos or videos with anyone.
Caution: The information contained in this report may not be accurate and should not be the only resource used in preparation for your climb. Failure to have the necessary experience, physical conditioning, supplies or equipment can result in injury or death. 14ers.com and the author(s) of this report provide no warranties, either express or implied, that the information provided is accurate or reliable. By using the information provided, you agree to indemnify and hold harmless 14ers.com and the report author(s) with respect to any claims and demands against them, including any attorney fees and expenses. Please read the 14ers.com Safety and Disclaimer pages for more information.
Please respect private property: 14ers.com supports the rights of private landowners to determine how and by whom their land will be used. In Colorado, it is your responsibility to determine if land is private and to obtain the appropriate permission before entering the property.


")
")
")
")
")
")
")
")
")
")
")
")
")
")
")
")
")
")
")
")