| Peak(s): |
Mount Whitney - 14497 |
| Date Posted: | 05/06/2013 |
| Modified: | 07/11/2013 |
| Date Climbed: | 04/29/2013 |
| Author: | nyker |
| Peak(s): |
Mount Whitney - 14497 |
| Date Posted: | 05/06/2013 |
| Modified: | 07/11/2013 |
| Date Climbed: | 04/29/2013 |
| Author: | nyker |
| Mount Whitney: Mountaineers Route in Spring Snow |
|---|
|
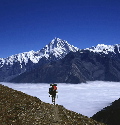
Peak: Mount Whitney Route: Mountaineers Route Date: April 29, 2013 Where: Eastern Sierra, Sierra Nevada Mountains, California Mileage: 11+ miles Vertical Gain: ~6300ft Years after climbing Mount Whitney, John Muir remarked: "For climbers there is a canyon which comes down from the north shoulder of the Whitney peak. Well-seasoned limbs will enjoy the climb of 9,000 feet required for this direct route, but soft, succulent people should go the mule way" (History of the Sierra Nevada," by Francis P. Farquhar) Note that his 9,000ft of ascent was starting from the town of Independence and was Mount Whitney's fifth known ascent, and first ascent up this cross country route, what is now known as the Mountaineers Route; the "Mule Way" is today's Main Trail. ****************** I've wanted to climb Mount Whitney via the Mountaineers Route as a snow climb for quite some time, but for various reasons, related to conditions or timing, it never worked out. I was here almost exactly a year ago this week, and climbed "the Mule Way" following the west "chute" up rather than the infamous switchbacks, which was a great climb. During the last week in April I was in a position to climb again and the route looked to be in good shape. As usual in late Spring in the Sierras, the snow is melting out fast even up high, but there was plenty of snow to make for a nice snow climb up the main couloir that in part defines the route. I had been contemplating whether to pack my tent for an overnighter and camp or just get an alpine start and do it in one day. Poring over weather forecasts which seemed solid and what conditions reports I could find, I decided that a one day climb might be doable and as such opted to go for it. I was hoping to be able to time my trip with the trip that Jason, Emily, Ryan, Shawn and Steve did two weeks back, but wasn't able to make it there that week. As I had no willing or available partners, I'd be heading up solo...and starting at the Portal trailhead (8,359ft), not the town of Independence, 27 miles away as Muir did. The awe inspiring view on the approach. Whitney (right) begs to be climbed.  The Planning My plan was to fly in from New York on Friday and drive up to Lone Pine, do an acclimatizing hike on Saturday morning, rest and acclimate on Sunday and go for it on Monday. As my warm-up hike, I figured I'd hike up the Mountaineers Route to about 12,000ft to do some recon in daylight so I'd know beforehand what kind of terrain I would be facing on Monday morning in the dark. Friday night, I got my self-issued wilderness permits for both hikes and was ready to go (note: there was a Ranger on the trail on Saturday afternoon checking permits). To clear up some current confusion, a permit is still needed for hikes into the "Whitney Zone" before May 1st; May 1st simply begins the "quota season" (which runs through Oct 31st) where you need to reserve a permit in advance either by the annual lottery or in person at the Eastern Sierra Interagency Visitor Center. On my acclimatizing hike up, I got to the plateau right before the remaining traverse and turn-off for the section towards Iceberg Lake and figured that was good enough for the day, sat and had lunch and leisurely hiked back to the car making mental notes of conditions along the way. On the hike up, I ran into Dave (from the WZB) and his group aiming for their summit bid the following morning. This short hike proved valuable as it enabled me to see what the snow conditions were like, snow coverage, highest unfrozen water sources and stream levels for crossing for Monday morning. Note: the photos of the first half of the route I took on the Saturday hike up; On the Monday climb, most of these areas were still dark as I climbed up. The Climb The Mountaineers Route differs from the Main Trail in many ways, which makes it more attractive to some and less attractive to others. The route is less well defined than the Main Trail and sees less people, generally. In some areas there is not much of a trail to follow and with the exception of those who've been up the route a few times, you move by following a rough climber's path and compass direction if you've not familiar where to go, rather than on a defined and well-traveled marked trail. The last section of the route also involve scrambling up a loose gulley (or moderately steep snow climb) and a final section of exposed Class 3 climbing. In short, this was a great climb! The route begins by following the Main Trail up for about a mile or so:  You depart from the Main trail just before the stream crossing where the North Fork sign is. On my climb up along this section, I saw a few pairs of eyes watching me as my headlamp revealed their eye shine signature in the predawn darkness. This always raises the hair on the back of my neck. These creatures of the night were all down low in the brush and eyes shining bright colored/bright yellow/pale green. I'd assign a higher probability of them being deer versus anything else, but who knows. I moved on, as I looked back every few steps to see if anything was following me... For the most part, however, the "route" is not that hard to follow if you're paying attention and have an understanding of the landmarks you need to watch out for. It climbs up the North Fork drainage and if you study the area with a topo map in hand, provided that the conditions are good and your routefinding skills are decent, there are really few ways to get lost due to its pretty direct nature. You can, however, get off route and damage the fragile plant life in the area adding to the erosion, so for the sake of the land, try to stay on the climbers trail where possible rather than bushwhack based on compass bearing or looking for shortcuts. Whereas the Main Trail continues its slow gradual ascent up, you'll notice that climbing up the North Fork route, you begin your ascent quite immediately. As the route is roughly half that in distance of the Main Trail but roughly the same elevation gain, it can be surmised that it is generally twice as steep with fewer flat portions in between. You'll pass a couple of streams and a waterfall to skirt around, which depending on higher snowpack and time of day could have you getting a bit wet. The rock hopping in the streams was fine this morning and proved no difficulties. Along this initial section, you'll pass alongside towering granite walls to the front and to your left as your hike in approaching the upper lakes. Note of caution: It was a bit disconcerting in the darkness when I was making my approach when I heard what sounded like glacial calving high above me. I then heard a crashing sound rifling through the brush beyond the reach of my headlamp. It was pitch black so I could only see as far as my headlamp illuminated. Seconds later, I heard "things" landing in the brush. I'd later see that they were blocks of ice from the size of a softball to a small coffee table which fell on and/or rolled across the trail. I paused for a few minutes to listen if anything else would break off, deemed it a good time to put my helmet on and moved up. I assume the recent warmer temps had caused the ice being held in the upper cliffs to let loose. This freaked me out a bit as this happened in otherwise "safe" flat forested terrain. Two climbers crossing under some granite slabs; while there is snow in spots lower down, it is a non-issue on the route for hiking in.  The route then becomes a bit vague around the E-ledges for the uninitiated and requires some scrambling up this section to stay on the route proper; Look for the weathered twisted Pine growing out of the granite that marks the turn-off right after the stream against a wall. Now look up, that's the route. The Ebersbacher Ledges (or "E-Ledges") are an interesting section over which to climb and traverse; Fairly easy scrambling will get you up them, but they are exposed to a long drop off if you're not paying attention, are unsteady due to carrying a heavy pack or if there is ice on the rock. There are some well-placed cairns here to point you in the right direction and a couple of ways to get up. No ice today thankfully. I was glad to have seen these in daylight on my warm-up hike. Heading up the E-Ledges ~ roughly 4:00AM  From just after the creek, once you climb up the boulders and up the fallen pine log jammed in the rock at the entrance marked by the Pine Tree, you'll move east initially on the first main ledge. The drop-off is on the right so stay close to the wall and slowly make your way up the ledge work before returning travel in the opposite direction on a west/southwest bearing up the drainage. The upper wall will be on your right now. Once over the ledges, the route then returns to a broken climbers trail here and there, traversing over streams and granite slabs and then making its way up to rocky talus and boulder fields passing three nice high altitude lakes before the base of the chute is reached for the final push to the top. There are arguably dozens of spots along the way where you are met with grand views in any direction, but one of the best is upon entering into the Lower Boyscout Lake basin (below), the first of the three lakes you'll pass along the way. In photo below, note the tent in the lower right of the pic.  Almost without warning after a short descent, a clearing appears and the Sierra Crest stands before you in a spectacular setting that no camera can capture. This is an amazing place and gives you a warm up of what is coming up. This is also a good first campsite for an ascent in winter. Sunrise from high above Lower Boyscout Lake (lower left)  A quick crossing of the outlet stream from Lower Boyscout Lake brings you to a small wooded pine forest, after which you start low and begin an ascending traverse of a boulder field up towards the Crest towards Upper Boyscout lake another thousand feet up to the west/southwest. Continuing to climb up this section out of the talus, you'll start walking up/across several granite slab formations, likely with some water running over them (or ice depending on the temps). I had a short breakfast break here in the morning light which transforms this area into a magical granite wonderworld bringing out colors you won't see later in the day. Try and time your climb so you can see this area just after sunrise. Take care walking across these slabs as these seemingly easy walkways might be very slippery due to ice or slime. Just before section this was the last unfrozen water source (as of 4/29) for those heading up soon.  In the photo below, to the right of the setting moon, is the snowfield you will climb to gain the ridge; Upper Boyscout lake is to the right, but not visible in this photo.  This is where some deeper snow starts in earnest. You'll posthole here in late afternoon a bit, but the snowpack was pretty manageable both ways this trip. If you have snowshoes, you might put them on here, but I'd recommend leaving them home and just deal with a little post holing for this short section. You'll likely have an option of ascending to the south ridge on snow or mixed rock/snow; either way gets you to the top and the time of day/conditions will dictate the best course to take. The shot below shows the snow slope (a closer view of the same snowfield as in Photo 8 above). Note the two sets of tracks in the top part of the image evidencing more than one way up.  The basin around Upper Boyscout Lake (which is below, to climber's right of the snowslope above); Upper Boyscout Lake was still frozen, though might have had accessible water at the edges if you have an axe with you to chop out a hole.  Once you gain the tiered ridge above Upper Boyscout lake, Keeler Needle and Whitney are soon visible in all their glory, abruptly jutting up to the west framing a visually awesome backdrop.  Continue in their direction; this section is pretty flat and while covered in snow today, was easily passable. The terrain gains some elevation as you move towards the base of Whitney; a campground is located a couple hundred feet to climbers left at this point, which is a nice flat area sheltered from the winds that this area is prone to. You will come to a large cairn atop a rock pile which means you're going the right way! A guided group (from April 27) is coming down from a successful ascent in the photo below.  From here, it seems there are several options, though there are really only two good options to gain the entrance to Iceberg Lake; There is a lower route and a higher route; the lower route was clearly visible with a boot track in the snow lower down in the ravine (see lower left in photo below), while the upper option was more vague, but more direct. Don't be tempted to leave the early part of the route too early and veer north aiming for Iceberg Lake as you will likely hit a vertical headwall that will stop you cold (ask me how I know this!).  Looking at the boot track far down below, I knew there was a better route higher up. Moving a bit down I picked up what appeared to be a route leading to the base of a boulder pile to pick up the ridge to Iceberg Lake. After a short traverse and with a bit of scrambling/climbing to this steep rock section you'll find the way which leads up to the basin around Iceberg Lake (which was still frozen on 4/29). Keeler Needle and Whitney stand tall framing your view west. This is a nice place to take in the moment; you can feel the enormous power here standing under the Sierra Crest and the east face of Mount Whitney. Along with Iceberg lake, it is also a good place to assess the weather and make a go/no go decision to continue on as bailing from here is relatively easy compared to higher up. Whitney in all its morning glory! Note the thin line of snow to the right in the photo, which gradually climbs up Whitney - this is the lower portion of the chute on the MR.  The basin around and above Iceberg lake is another stunning alpine setting. This is where I ran into fellow WZ/WPS MB members Bob and Carine, who were already starting to make their way up the lower chute when I arrived (below photo).  I stopped here to put on my gaiters, take my axe out and hydrate a bit before continuing on. The snow here was soft and post holing was unavoidable, though fortunately only lasted a few hundred feet to the base of the chute above the Lake to the right of the East Buttress where the snow firmed up a bit. Snowshoes would have helped, but again, honestly don't think they'd be worth lugging up here. Starting up the chute, the snow was pretty soft but in good shape to climb up. At this time of day, crampons were not needed, provided you kicked good steps out on the ascent. While I used my axe, Bob and Carine used their poles heading up. As it was mid-morning, I imagine if you're starting this earlier in the day (such as from high camp) that the snow would be more firm and require crampons. I'd recommend packing them and deciding at the last minute if you need them or not; it's a pound or two worth carrying.   The steepness of the chute increased fairly quickly, but the climbing was good, despite the occasional thigh-high posthole. The surrounding scenery was spectacular, impossibly blue skies with the towering north and east faces of Whitney to the south, Mount Russell ridgeline to the north and the steep run out leading to Iceberg Lake below. A view from midway up the couloir:  The top quarter of the chute had little to no snow remaining and became a scree fest with one step up and half step sliding back-type of movement. This brought back fond memories of the gulley on Mount Lindsey.  This sliding movement grew tiring, but slowly I made it up, trying to stick to either side of the gulley where more solid rock was located or on what little snow remained. Any solid rock or snow at this point was very welcome.  The "notch" soon became visible. Topping out at the notch (~14,000ft) you're met with stunning views of snow-capped Sierras, seemingly as far as the eye can see. Descending a bit to the west, the "Final 400" comes into view directly to the south.  The Final 400 The climbing on the infamous final 400 vertical feet begins immediately from the point below the notch. The rock is solid and the holds are bomber, but does require some thought as to the best line to take up. Some say the hardest moves are right at the bottom, but this depends on what line you take up, as there are potentially harder moves higher up. This is the last spot where you should take a good hard look at the weather before moving up. You don't want to be forced to hurry down this section, especially when wet or icy. Fleet-footed Bob and Carine are seen here moving up the rock like squirrels climbing up a Ponderosa Pine.  In dry conditions like today had, the best option appears to aim towards climbers left on the ascent and once past the mid-point, angle over to the right after some vertical rock/headwalls are reached higher up. This is one route, but not the only way up or down. Most of this section is a no-fall zone and has moderate to significant exposure along the entire way up from the notch. I can see how this section will put knots in the stomach of some folks if they attempt it. On the acclimatizing hike I did on Saturday I met three guided groups coming down, all of whom said that they used rope on this section and two of which roped up on the snow filled chute. Two other teams said they rappelled off the top, so I wasn't really sure what to expect or if there a lot of ice present, etc., and as such, my expectations were managed accordingly. As usual, you never really know conditions of a route until you're standing on it. Getting close to the top  Once you come up to the tall vertical slabs, if you've followed a line to climbers left, a somewhat exposed moderately ascending traverse to climber's right is needed to gain the summit plateau. Happily, the summit and Hut appear abruptly on this route, in comparison with the Main Route which follows a longer path to the Hut once the summit plateau is reached. My favorite view from the summit, looking east  Carine on the summit  The weather was just perfect though the wind was picking up. Carine and I stayed on the summit while Bob ran over and tagged Mt. Muir. I was happy with one summit for the day and didn't want to tempt fate with my barely acclimatized lungs. Faster than you can say "Lactate Threshold", he was back! If you look very closely, in this below shot taken from Whitney's summit you'll see Bob standing on Mt. Muir. You'll also see the upper switchbacks from the Main Trail leading to Trail Crest.  There was some discussion on the best way down, but we ultimately descended by the Mountaineers Route proper going down the Final 400, taking a somewhat different more direct line down. Coming back down the upper chute, in the afternoon shadow; Any snow in this section will firm up before anything lower down as it loses sun first.  Bob heading down, saying "Hey, what about Mt. Russell??" Bob would give a mountain goat a run for its money in these hills.  A parting shot later in the afternoon showing the lower chute coming out of Iceberg Lake area.  Many have asked what Class rating the final section is. Recognizing that there often is a discrepancy between such rankings in California and Colorado and that no two mountains are the same, it becomes a hard comparison to make. Relative to other Colorado Fourteeners, notwithstanding the elevation gain and distance on the routes, I would say that the Mountaineers Route (emphasizing the last section or two) is harder than the harder sections on the Wetterhorn, Longs and Crestone Peaks, and comparable to the Needle, Pyramid and the crux on Mount Wilson. As a fact that others have made reference to: it is a "low snow" year, not a "no snow" year, so bring your winter gear, even if you end up not using everything, since you really won't know if you need it until you are climbing. This mountain will punish those who don't respect it. Meeting up and finishing with and walking out with Bob and Carine made for an enjoyable day. Great company for a great mountain! Thumbnails for uploaded photos (click to open slideshow): ")
")
")
")
")
")
")
")
")
")
")
")
")
")
")
")
")
")
")
")
")
")
")
")
")
")
")
")
")
")
|
| Comments or Questions | ||||||||||||||||||||||||||||||
|---|---|---|---|---|---|---|---|---|---|---|---|---|---|---|---|---|---|---|---|---|---|---|---|---|---|---|---|---|---|---|
|
Caution: The information contained in this report may not be accurate and should not be the only resource used in preparation for your climb. Failure to have the necessary experience, physical conditioning, supplies or equipment can result in injury or death. 14ers.com and the author(s) of this report provide no warranties, either express or implied, that the information provided is accurate or reliable. By using the information provided, you agree to indemnify and hold harmless 14ers.com and the report author(s) with respect to any claims and demands against them, including any attorney fees and expenses. Please read the 14ers.com Safety and Disclaimer pages for more information.