Page 1 of 2
Panoramic Landscape Tutorial
Posted: Mon Mar 28, 2011 12:51 am
by mattpayne11
I wrote this tutorial and figured I would share it with you all since it seems to be something a lot of people are into.
http://bit.ly/i55EOP" onclick="window.open(this.href);return false;
Enjoy!
Re: Panoramic Landscape Tutorial
Posted: Mon Mar 28, 2011 1:19 am
by Doug Shaw
Did you really use a URL shortener to link to three
pages of instructions that can be expressed with sufficient clarity in just three
lines?
1. Download free
photo stitching software.
2. Install and run it.
3. Drag and drop the photos you want to stitch together.
Re: Panoramic Landscape Tutorial
Posted: Mon Mar 28, 2011 6:53 am
by climbing_rob
Thanks for sharing those tips Matt. Most folks (including, apparently, Doug) don't realize the importance of getting all of the shots in a pano exposed and focused identically for the best final result.
One lazy technique of mine to do this: visualize the total pano, and point at the center shot first. Push the shutter release 1/2 way to lock in exposure and focus, then pan left and take the left-most (or right-most) pic. then point at the center again, push half way to lock again (should be at the identical exposure) and pan left for the 2nd shot. Continue this way until all shots are done. This way all shots are at the same exposure/white balance/focus. Your way (Matt) is better, but my lazy way does work most of the time. I really like your tip of exposing a blank shot before and after the total series, it sure is hard to figure out which shots apply otherwise!!!! Nice tip.
With respect to filters, and with due respect Matt, I see no reason not to use them for Panos, except polarizers; polarizers don't work well if there is blue sky involved, because of the drastic uneven polarization over a large angle of sky. I use a warming filter often for all shots, including Panos.
Here's a pano along the John Muir trail last August, in the "Range of Light", P&S camera, no tripod:
Re: Panoramic Landscape Tutorial
Posted: Mon Mar 28, 2011 6:57 am
by mattpayne11
Thanks Rob, that is a great shot! Yes, It actually took me a year of shooting before I learned how to properly compose a pano, and I'm still learning new techniques everyday! I agree that shooting the center shot first is a great technique! I have to credit Terry Mathews on showing me a few settings on my camera back in 2009. We both had the same camera and were both into shooting panos, except he was (and still is) far better at it than me.
Re: Panoramic Landscape Tutorial
Posted: Mon Mar 28, 2011 8:00 am
by highpilgrim
Photoshop CS5 will photo merge any number of pictures and will adjust exposure automatically in Adobe Bridge. It pieces almost unlimited (only processor speed is a factor) frames together and seemlessly melds them. It provides a number of different options for the style of merge you want.
The program is not inexpensive but is well worth it if you do a lot of photo work or graphics.
Re: Panoramic Landscape Tutorial
Posted: Mon Mar 28, 2011 8:10 am
by Cruiser
Nice shot Rob! Thanks for posting that.
Re: Panoramic Landscape Tutorial
Posted: Mon Mar 28, 2011 9:29 am
by mattpayne11
Thanks Jason. I've used a filter before and it turned out with mixed results. I probably should have specified that a circular polarizer may detract from the pano since the clouds will look funky.
Re: Panoramic Landscape Tutorial
Posted: Mon Mar 28, 2011 9:42 am
by wboland
Polarizers are a useful tool for photographing landscapes, even with blue skies. You just have be aware of the fact that polarization changes as the camera's angle to the sun changes. So if you are rotating the camera, you may be changing the affect of polarization. If you are pointing straight away from the sun, you will get the strange affect on the sky mentioned ealier (for which a poloarizer is typically not used). If the scene is mostly side-lit, then a polarizer is a great tool. You just may need to adjust the rotation on each shot slightly to make the merge more natural.
Re: Panoramic Landscape Tutorial
Posted: Mon Mar 28, 2011 9:50 am
by CO Native
One point I'll add too is that a lot of people don't realize that panoramas don't just have to be horizontal and don't have to be just one row. You can shoot a whole grid of photographs and stitch them together.
Here's one I did like that on the Catwalk of Eolus using a grid of 15 photos.
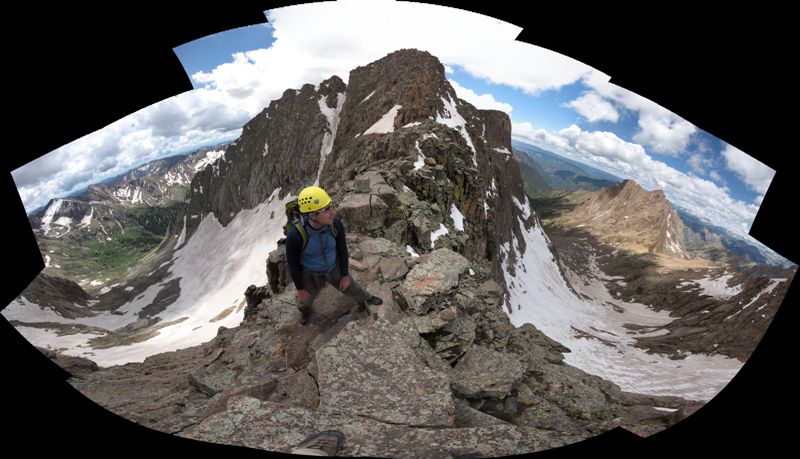
This one ended up just looking like a vertically oriented photo but it's actually 9 stitched photos that were able to catch a lot more in the photo than I could with one shot, really showing the dramatic summit of Uncompahgre..

Re: Panoramic Landscape Tutorial
Posted: Mon Mar 28, 2011 9:56 am
by Dave B
CO Native wrote:One point I'll add too is that a lot of people don't realize that panoramas don't just have to be horizontal and don't have to be just one row. You can shoot a whole grid of photographs and stitch them together.
Here's one I did like that on the Catwalk of Eolus using a grid of 15 photos.
Sick photo!
That's one thing I've noticed, is that having a person or something to scale the pano helps the picture dramatically, especially in a photo such as this with a fish-eye distortion.
Re: Panoramic Landscape Tutorial
Posted: Mon Mar 28, 2011 11:16 am
by mattpayne11
Cool shots man! Yes I agree you don't have to make them horizontal, it is my preference though. I've seen some creative looking ones with a fully round spherical look as well. That Uncompahgre photo is neat dude!
Re: Panoramic Landscape Tutorial
Posted: Mon Mar 28, 2011 3:42 pm
by MtHurd
Pano of Torrey's taken from near Sniktau a couple of weeks ago. I think I stitched 5 photos together. I use Arcsoft Panorama Maker 4.
Torrey's Pano
Taken a few years ago in May. Probably 5 photos stitched together.
La Sal's